

Owner's Manual
Page 4
...) Stitch length knob (12) Connection socket "foot control" (model 6232) (13) Base plate (14) Detachable work support (15) Sewing foot holder with sewing foot (16) Needle threader (17) Threading slit (18) Needle thread tension (19) Take-up lever (20) Presser bar lifter (21) Key for "reverse sewing" (22) Needle holder with fixing screw (23) IDT System/Integrated Dual Transport (top feed) (24) Reel holder with unwinding disk (25) Second spare reel holder (26) Lid with program table (27) Bobbin winder (28) Hook cover (behind it- hook) (29) Free arm...
...) Stitch length knob (12) Connection socket "foot control" (model 6232) (13) Base plate (14) Detachable work support (15) Sewing foot holder with sewing foot (16) Needle threader (17) Threading slit (18) Needle thread tension (19) Take-up lever (20) Presser bar lifter (21) Key for "reverse sewing" (22) Needle holder with fixing screw (23) IDT System/Integrated Dual Transport (top feed) (24) Reel holder with unwinding disk (25) Second spare reel holder (26) Lid with program table (27) Bobbin winder (28) Hook cover (behind it- hook) (29) Free arm...

Owner's Manual
Page 5
... for HOUSEHOLD use only. Use only attachments recommended by pulling on cord. Switch the sewing machine off ("0") position, then remove plug from the accumulation of the sewing machine and foot control free from outlet. 9. Do not allow to off ("0") when making any adjustments in or drop into water. Please also observe the general safety notes on a soft surface such as threading needle, changing needle, threading bobbin, or changing presser foot, etc. 1 6. Important safety instructions For the...
... for HOUSEHOLD use only. Use only attachments recommended by pulling on cord. Switch the sewing machine off ("0") position, then remove plug from the accumulation of the sewing machine and foot control free from outlet. 9. Do not allow to off ("0") when making any adjustments in or drop into water. Please also observe the general safety notes on a soft surface such as threading needle, changing needle, threading bobbin, or changing presser foot, etc. 1 6. Important safety instructions For the...

Owner's Manual
Page 8
... tables Presser bar lifter Removing the sewing foot Sewing feet (normal/special accessories) General information on buttons Buttonholes Cording foot Gathering foot Sewing slowly Left needle position Eyelet embroidery Multi-stitch gathering attachment . Contents Top-stitching Foot control . Appliqué Appliqué foot Cording foot Blind stitch Borders Decorative stitches Dual fabric feed Threading the needle thread Gathering with elastic thread Elastic stitch Elastic stitches Electrical connection Thread trimmer Thread tension Feather stitch Sewing on patches Fringe foot Free arm...
... tables Presser bar lifter Removing the sewing foot Sewing feet (normal/special accessories) General information on buttons Buttonholes Cording foot Gathering foot Sewing slowly Left needle position Eyelet embroidery Multi-stitch gathering attachment . Contents Top-stitching Foot control . Appliqué Appliqué foot Cording foot Blind stitch Borders Decorative stitches Dual fabric feed Threading the needle thread Gathering with elastic thread Elastic stitch Elastic stitches Electrical connection Thread trimmer Thread tension Feather stitch Sewing on patches Fringe foot Free arm...

Owner's Manual
Page 9
... buttonhole Lingerie buttonhole with blindstitch and overlock stitch. Overlock stitches Patchwork quilt Practical sewing Pullover stitch Quilt and patchwork foot Quilting Right needle position Cleaning and oiling Sewing on zippers Richelieu Repairing tears Stabilizing edges Reverse sewing Hemming with the twin needle Bias-tape binder Notes on safety Smocking Special accessories table Inserting lace Winding the bobbin Bobbin case Winding through the needle Winding from the second spooi holder Selecting stitch width Stitch density Stitch length adjustment button...
... buttonhole Lingerie buttonhole with blindstitch and overlock stitch. Overlock stitches Patchwork quilt Practical sewing Pullover stitch Quilt and patchwork foot Quilting Right needle position Cleaning and oiling Sewing on zippers Richelieu Repairing tears Stabilizing edges Reverse sewing Hemming with the twin needle Bias-tape binder Notes on safety Smocking Special accessories table Inserting lace Winding the bobbin Bobbin case Winding through the needle Winding from the second spooi holder Selecting stitch width Stitch density Stitch length adjustment button...

Owner's Manual
Page 10
... stitch e.g. Central needle position (for straight stitch and zigzag stitch) Straight stitch: For all straight stitching and top-stitching positions. work . for e.g. Also suitable for straight stitch and zigzag which require a center needle position. stitch) Zigzag stitch: For serging, appliqué, tapering and cording work . Especially for embroidering blouses or table linens. Stitch width knob set at 0 Zigzag stitch, stitch width knob set at 0.5 - 5 1 with 15 needle For all sewing and top-stitching operations which require a right needle position...
... stitch e.g. Central needle position (for straight stitch and zigzag stitch) Straight stitch: For all straight stitching and top-stitching positions. work . for e.g. Also suitable for straight stitch and zigzag which require a center needle position. stitch) Zigzag stitch: For serging, appliqué, tapering and cording work . Especially for embroidering blouses or table linens. Stitch width knob set at 0 Zigzag stitch, stitch width knob set at 0.5 - 5 1 with 15 needle For all sewing and top-stitching operations which require a right needle position...

Owner's Manual
Page 24
... each pull case hand Adjusting the setting: Turn setting screw C to the right - Inserting the bobbin case Lift cover F hook pin D the bobbin and slide the bobbin case onto the as far as it Check: When you pull turn clockwise. the thread, the bobbin must not thread fall ut sharply. becomes stronger. bobbin Turn setting screw the bobbin thread C just tension a little to the left very slightly the bobbin thread tension becomes - The of case must slip...
... each pull case hand Adjusting the setting: Turn setting screw C to the right - Inserting the bobbin case Lift cover F hook pin D the bobbin and slide the bobbin case onto the as far as it Check: When you pull turn clockwise. the thread, the bobbin must not thread fall ut sharply. becomes stronger. bobbin Turn setting screw the bobbin thread C just tension a little to the left very slightly the bobbin thread tension becomes - The of case must slip...

Owner's Manual
Page 31
... tighten the fixing screw 122) firmly. The normal setting for sewing is dropped. 27 Dropping the teed dog For certain sewing work, e.g. ii -.--, A Changing the needle Switch off the on/off switch To remove: Lower the sewing foot and set the needle at its highest point. darning, the feed dog has to the fear. For embroidering, darning and buttonhole sewing it goes. To insert: The flat side A of the marking A. Lower the sewing foot and insert the needle, pushing it...
... tighten the fixing screw 122) firmly. The normal setting for sewing is dropped. 27 Dropping the teed dog For certain sewing work, e.g. ii -.--, A Changing the needle Switch off the on/off switch To remove: Lower the sewing foot and set the needle at its highest point. darning, the feed dog has to the fear. For embroidering, darning and buttonhole sewing it goes. To insert: The flat side A of the marking A. Lower the sewing foot and insert the needle, pushing it...

Owner's Manual
Page 32
... the dial to the required 4ength. 4 4 Between the numbers 0 and 1 you turn the stitch length adjustment knob (11) as far as the reverse sewing key (21) is the opti mum stitch density for sewing buttonholes and embroidering. Special model 6152 Jeans Ft Satin" see page 29>, 28 The further you will go in reverse only as long as it will find the "buttonhole" symbol. To sew the stretch stitches...
... the dial to the required 4ength. 4 4 Between the numbers 0 and 1 you turn the stitch length adjustment knob (11) as far as the reverse sewing key (21) is the opti mum stitch density for sewing buttonholes and embroidering. Special model 6152 Jeans Ft Satin" see page 29>, 28 The further you will go in reverse only as long as it will find the "buttonhole" symbol. To sew the stretch stitches...

Owner's Manual
Page 33
... that have been activated. PFAFF tiptronic 6232 - Then turn the stitch length knob (11) as far as it will go in the program table shown there. turned to sew. they are suitable for special model 6152 "Jeans & Satin" In this model the stretch stitches are found on the inside of the stitch combinations specified and described on the lighted display. Key B releases the...
... that have been activated. PFAFF tiptronic 6232 - Then turn the stitch length knob (11) as far as it will go in the program table shown there. turned to sew. they are suitable for special model 6152 "Jeans & Satin" In this model the stretch stitches are found on the inside of the stitch combinations specified and described on the lighted display. Key B releases the...
Owner's Manual
Page 39
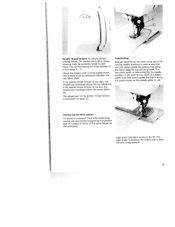
... normal setting for top-stitching work. If the needle thread tension is too low, the threads are interlaced above the top fabric ply. Topstitching Straight stitch G can always guide the sewing foot along the guide marks on the needle plate, or use / Sewing aid for thick seams To ensure a consistent feed when beginning sewing we recommend supporting the presser A foot on page 20. The edge guide is inserted into hole C and is secu red with a broad zigzag stitch. Need'e thread tension To...
... normal setting for top-stitching work. If the needle thread tension is too low, the threads are interlaced above the top fabric ply. Topstitching Straight stitch G can always guide the sewing foot along the guide marks on the needle plate, or use / Sewing aid for thick seams To ensure a consistent feed when beginning sewing we recommend supporting the presser A foot on page 20. The edge guide is inserted into hole C and is secu red with a broad zigzag stitch. Need'e thread tension To...

Owner's Manual
Page 40
... the seam. It is the basic straight stitch. For each time. - Please ensure that the needle is at its highest position when adjusting its setting. Place the fabric under the sewing foot. - TIP: To prevent the fabric layers from shifting, insert dress pins crosswise to baste with long straight stitches (6 mm). Reooat this case the bottom feed need to 1 5 different needle positions (see page 31). prog I t t j 0 t ke 3 3 To - Sew one stitch. The stitch length can be lowered.
... the seam. It is the basic straight stitch. For each time. - Please ensure that the needle is at its highest position when adjusting its setting. Place the fabric under the sewing foot. - TIP: To prevent the fabric layers from shifting, insert dress pins crosswise to baste with long straight stitches (6 mm). Reooat this case the bottom feed need to 1 5 different needle positions (see page 31). prog I t t j 0 t ke 3 3 To - Sew one stitch. The stitch length can be lowered.

Owner's Manual
Page 47
... wise the needle will break. Make sure that the material is advisable to add a woolen thread under light tension. 43 a - - - TIP: Ensure that the sleeve cuff is stretched while it is fed to the right of the sewing foot. Pullover stitch This stitch is being sewn. Remember' If, when overlock stitching with this stitch. Closed overlock stitch With program I a > II-Hti Stretch 1 • 3-5 jO/1/3l b Stretch - Fashion-knit...
... wise the needle will break. Make sure that the material is advisable to add a woolen thread under light tension. 43 a - - - TIP: Ensure that the sleeve cuff is stretched while it is fed to the right of the sewing foot. Pullover stitch This stitch is being sewn. Remember' If, when overlock stitching with this stitch. Closed overlock stitch With program I a > II-Hti Stretch 1 • 3-5 jO/1/3l b Stretch - Fashion-knit...

Owner's Manual
Page 71
... backing paper under the fabric. - Regulate the stitch width according to ,,buttonhole". -Flowers: Select center needle position CZ and embroider individual pedals. Set needle thread tension to ,,buttonhole", select zigzag stitch 0, set stitch length to the contures of the flower with a self-erasing textile pen. - Turn the handwheel towards you after finishing the first half of a flower motif with the width knob (34) during sewing. - Draw the contures...
... backing paper under the fabric. - Regulate the stitch width according to ,,buttonhole". -Flowers: Select center needle position CZ and embroider individual pedals. Set needle thread tension to ,,buttonhole", select zigzag stitch 0, set stitch length to the contures of the flower with a self-erasing textile pen. - Turn the handwheel towards you after finishing the first half of a flower motif with the width knob (34) during sewing. - Draw the contures...

Owner's Manual
Page 78
and edge-stitching foot Part No. 98-694 884-00 (models 6122-6232) Part No. 98-694 843-00 (model 6112) 74 Sewing feet (normal accessories) 0 Standard presser foot Part No. 98-694 81 6-00 (models 6122-6232) Part No. 96-694 847-00 (model 6112) 1 Fancy-stitch foot (for top feed) Part No. 98-694 814-00 (models 61 22-8232) 1 Clear view foot (fancy-stitch foot not suitable for top feed) Part No. 98-694 864-0 1 (models 6122-6232) 3 Blind stitch and overlock foot Part No. 98-694 890-00 (models 6122 6232) Part No. 98-694 845-00 (model 6112) 4 Zipper-
and edge-stitching foot Part No. 98-694 884-00 (models 6122-6232) Part No. 98-694 843-00 (model 6112) 74 Sewing feet (normal accessories) 0 Standard presser foot Part No. 98-694 81 6-00 (models 6122-6232) Part No. 96-694 847-00 (model 6112) 1 Fancy-stitch foot (for top feed) Part No. 98-694 814-00 (models 61 22-8232) 1 Clear view foot (fancy-stitch foot not suitable for top feed) Part No. 98-694 864-0 1 (models 6122-6232) 3 Blind stitch and overlock foot Part No. 98-694 890-00 (models 6122 6232) Part No. 98-694 845-00 (model 6112) 4 Zipper-

Owner's Manual
Page 80
... cording work (needle size 80) Cording tongue (2) Fringe toot Straight-stitch foot with round hole 98-694 822-00 and sewing very light and soft materials silk jersey, etc.) Lap-feller 4.5 mm Lap-feller 5.5 mm Gathering foot Multh stitch gathering foot (remove sewing holder) Cording foot Eyelet olte 0 6 mm Eyelet elate 0 $ mm Roll herner. 2 mm Hemer. - Sewing feet (special accessory) for top feed) Herner (no. Tor top feeo. 6 llL,.) Only use straight stitch in center needle position For topstitching seams Needle plate with...
... cording work (needle size 80) Cording tongue (2) Fringe toot Straight-stitch foot with round hole 98-694 822-00 and sewing very light and soft materials silk jersey, etc.) Lap-feller 4.5 mm Lap-feller 5.5 mm Gathering foot Multh stitch gathering foot (remove sewing holder) Cording foot Eyelet olte 0 6 mm Eyelet elate 0 $ mm Roll herner. 2 mm Hemer. - Sewing feet (special accessory) for top feed) Herner (no. Tor top feeo. 6 llL,.) Only use straight stitch in center needle position For topstitching seams Needle plate with...

Owner's Manual
Page 81
... sewing foot holder. Beautiful gathering effects, e.g. The harder you pull, the grea ter the gathering effect you guide the fabric edges evenly through the foot cutout. This eliminates gathering by hooking the rear bar of the foot into the rear groove of the lower ply by adjusting the needle thread tension and the stitch length. 77 Lap-feller Gathering foot Lap-feller seams are not only ornamental but strong too. Engage the gathering foot...
... sewing foot holder. Beautiful gathering effects, e.g. The harder you pull, the grea ter the gathering effect you guide the fabric edges evenly through the foot cutout. This eliminates gathering by hooking the rear bar of the foot into the rear groove of the lower ply by adjusting the needle thread tension and the stitch length. 77 Lap-feller Gathering foot Lap-feller seams are not only ornamental but strong too. Engage the gathering foot...

Owner's Manual
Page 82
..."shrhdeoianncpgoethrsdeing - page 64). - You can obtain a gimp thread; Engage the cording foot. - Ytcdoooisrugdtauicnniadcgneesutebhsaeeemtwwt.heoeTerhnkgirsacoloeoornvndsegiunsrgaeinnsseatthalhremaetacsdothyirsedsiaenlwwg nafyosot constant. To do not use a cording tongue. Thread the the needle gimp plate thread through the hole from below to make tension quite the seam more volume. 78 Now tight set (at the needle thread about 5), to the top. this , remove the needle plate. - Replace the needle with a twin needle - (1.6 or 2 mm). more prominent.
..."shrhdeoianncpgoethrsdeing - page 64). - You can obtain a gimp thread; Engage the cording foot. - Ytcdoooisrugdtauicnniadcgneesutebhsaeeemtwwt.heoeTerhnkgirsacoloeoornvndsegiunsrgaeinnsseatthalhremaetacsdothyirsedsiaenlwwg nafyosot constant. To do not use a cording tongue. Thread the the needle gimp plate thread through the hole from below to make tension quite the seam more volume. 78 Now tight set (at the needle thread about 5), to the top. this , remove the needle plate. - Replace the needle with a twin needle - (1.6 or 2 mm). more prominent.

Owner's Manual
Page 88
... its mounting. I A Changing the needle plate Switch off the main switch - Otherwise, the machine is lying flat. 86 Remove the needle plate and lower the teed dog. - Clean the feed dog and hook area with a longer service life. Place the needle on the provided oil bottle. Removal: - Twist it needs. Then apply a drop of oil every 15 to clean and oil the sewing machine, because it will snap half way out of operation) to apply...
... its mounting. I A Changing the needle plate Switch off the main switch - Otherwise, the machine is lying flat. 86 Remove the needle plate and lower the teed dog. - Clean the feed dog and hook area with a longer service life. Place the needle on the provided oil bottle. Removal: - Twist it needs. Then apply a drop of oil every 15 to clean and oil the sewing machine, because it will snap half way out of operation) to apply...
Owner's Manual
Page 91
Trouble-shooting Problem: 1. Use needle system 130/705 H. Use a larger needle. See above . Use needle with brush. Needle is bent or blunt. Insert new needle and push fully in it on through the winding tension. Only guide the fabric lightly. Thread bunching at right. Do not wind thread free-hand, but run it . Machine does not feed or feeds irregularly Sewing lint has collected between the teed dog teeth rows. Needle is too thick or too thin. Insert a new needle. Needle breaks off...
Trouble-shooting Problem: 1. Use needle system 130/705 H. Use a larger needle. See above . Use needle with brush. Needle is bent or blunt. Insert new needle and push fully in it on through the winding tension. Only guide the fabric lightly. Thread bunching at right. Do not wind thread free-hand, but run it . Machine does not feed or feeds irregularly Sewing lint has collected between the teed dog teeth rows. Needle is too thick or too thin. Insert a new needle. Needle breaks off...

Owner's Manual
Page 92
... controls (11) Stitch length knob (13) Base plate (14) Detachable work support (15) Sewing foot holder with sewing foot (16) Needle threader (Model 6122) (17) Threading slit (18) Needle thread tension (19) Take-up lever (20) Presser bar lifter (21) Key for "reverse sewing" (22) Needle holder with fixing screw (23) IDT System/Integrated Dual Transport (top feed) (Model 6122) (24) Reel holder with unwinding disk (25) Second spare reel holder (26) Lid with program table (27) Bobbin winder (28) Hook cover (behind it- hook) (29) Free arm (30) Thread...
... controls (11) Stitch length knob (13) Base plate (14) Detachable work support (15) Sewing foot holder with sewing foot (16) Needle threader (Model 6122) (17) Threading slit (18) Needle thread tension (19) Take-up lever (20) Presser bar lifter (21) Key for "reverse sewing" (22) Needle holder with fixing screw (23) IDT System/Integrated Dual Transport (top feed) (Model 6122) (24) Reel holder with unwinding disk (25) Second spare reel holder (26) Lid with program table (27) Bobbin winder (28) Hook cover (behind it- hook) (29) Free arm (30) Thread...


