
Owner's Manual
Page 4
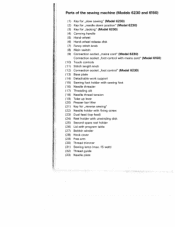
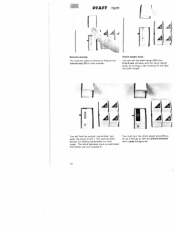
... ,,foot control with mains cord" (Model 6150) (10) Touch controls (11) Stitch length knob (1 2) Connection socket ,,foot control" (Model 6230) (13) Base plate (14) Detachable work support (1 5) Sewing foot holder with sewing foot (16) Needle threader (17) Threading slit (1 8) Needle thread tension (19) Take-up lever (20) Presser bar lifter (21) Key for ,,reverse sewing" (22) Needle holder with fixing screw (23) Dual feed (top feed) (24) Reel holder with unwinding disk (25) Second spare reel holder (26) Lid with program table (27) Bobbin winder (28) Hook cover (29) Free arm (30) Thread trimmer...
... ,,foot control with mains cord" (Model 6150) (10) Touch controls (11) Stitch length knob (1 2) Connection socket ,,foot control" (Model 6230) (13) Base plate (14) Detachable work support (1 5) Sewing foot holder with sewing foot (16) Needle threader (17) Threading slit (1 8) Needle thread tension (19) Take-up lever (20) Presser bar lifter (21) Key for ,,reverse sewing" (22) Needle holder with fixing screw (23) Dual feed (top feed) (24) Reel holder with unwinding disk (25) Second spare reel holder (26) Lid with program table (27) Bobbin winder (28) Hook cover (29) Free arm (30) Thread trimmer...
Owner's Manual
Page 5
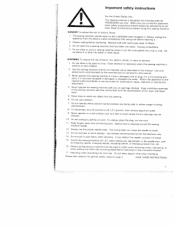
... ventilation openings of electric shock: 1 The sewing machine should always be pulled into water or other user servicing adjustments mentioned removing covers, in the instruction lubricating, manual or 17. Always unplug before cleaning it to be 10 Do not unplug by or near children Close attention is necessary when this sewing machine is required around the sewing 1 2. Always use bent or blunt needles. Replace bulb with machine and foot control any...
... ventilation openings of electric shock: 1 The sewing machine should always be pulled into water or other user servicing adjustments mentioned removing covers, in the instruction lubricating, manual or 17. Always unplug before cleaning it to be 10 Do not unplug by or near children Close attention is necessary when this sewing machine is required around the sewing 1 2. Always use bent or blunt needles. Replace bulb with machine and foot control any...
Owner's Manual
Page 6
... user can repair. This is 15 Watts. 4. Cleaning Housing: To clean the housing, use in such a way that it is wet, e.g. When leaving the machine, during work or when changing mechanical parts or accessories, always disconnect the machine from the mains by hitting or dropping. The tension of the needle and constantly observe the sewing area during maintenance work . 2. The machine must be put into operation according to use the sewing machine...
... user can repair. This is 15 Watts. 4. Cleaning Housing: To clean the housing, use in such a way that it is wet, e.g. When leaving the machine, during work or when changing mechanical parts or accessories, always disconnect the machine from the mains by hitting or dropping. The tension of the needle and constantly observe the sewing area during maintenance work . 2. The machine must be put into operation according to use the sewing machine...

Owner's Manual
Page 8
... Left needle position . Contents Accessories and needles Accessory compartment Applique Appliqué foot Bias tape binder . Bobbin thread tension . . Changing the sewing foot Cleaning and oiling . . . Foot control . . . . Linen buttonhole Linen buttonhole with the twin needle . Detachable work Lamp . . . . . Covering stitches . . . . Fancy elastic stitch . . . Gathering with elastic thread . Inserting bobbin . . . Blind stitch Bobbin case. . Closed overlock stitch . . Darning tears . . . Inserting patches . . . Fancy stitch table...
... Left needle position . Contents Accessories and needles Accessory compartment Applique Appliqué foot Bias tape binder . Bobbin thread tension . . Changing the sewing foot Cleaning and oiling . . . Foot control . . . . Linen buttonhole Linen buttonhole with the twin needle . Detachable work Lamp . . . . . Covering stitches . . . . Fancy elastic stitch . . . Gathering with elastic thread . Inserting bobbin . . . Blind stitch Bobbin case. . Closed overlock stitch . . Darning tears . . . Inserting patches . . . Fancy stitch table...
Owner's Manual
Page 9
... lspecial accessories( Sewing feet (standard accessories( Sewing lamp Sewing on buttons Sewing problems . . Utility stitch chart . . Lowering the feed dog Main switch Maintenance and faults Monograms Multi4oot gathering foot. Right needle position Roll hemming Safety notes Serging with the overlock foot Serging with zigzag stitch Setting stretch stitch . Stretch triple zigzag stitch Tacking J . Threading the needle thread Threading the sewing machine. Twin needle. Pattern width Practical sewing Presser bar litter Puchbutton control Pulling up the bobbin thread...
... lspecial accessories( Sewing feet (standard accessories( Sewing lamp Sewing on buttons Sewing problems . . Utility stitch chart . . Lowering the feed dog Main switch Maintenance and faults Monograms Multi4oot gathering foot. Right needle position Roll hemming Safety notes Serging with the overlock foot Serging with zigzag stitch Setting stretch stitch . Stretch triple zigzag stitch Tacking J . Threading the needle thread Threading the sewing machine. Twin needle. Pattern width Practical sewing Presser bar litter Puchbutton control Pulling up the bobbin thread...

Owner's Manual
Page 10
... with wide zigzag Decorative stitch e.g. underwear 6 For all sewing and topstitching work . for the borders on light fabrics i.e. for household textiles 1< Shell edging stitch, wide For decorative hem edges on handkerchiefs ID Viennese stitch with the stitch length knob (11). for blouses or bedclothes For serging and appliqué work requiring left Straight stitch, needle position, center Straight stitch, needle position, right Blind stitch, wide Application Standard buttonholes e.g. ED I ' -' < '- Utility stitch table (elastic stitches) D E F G HI H HD...
... with wide zigzag Decorative stitch e.g. underwear 6 For all sewing and topstitching work . for the borders on light fabrics i.e. for household textiles 1< Shell edging stitch, wide For decorative hem edges on handkerchiefs ID Viennese stitch with the stitch length knob (11). for blouses or bedclothes For serging and appliqué work requiring left Straight stitch, needle position, center Straight stitch, needle position, right Blind stitch, wide Application Standard buttonholes e.g. ED I ' -' < '- Utility stitch table (elastic stitches) D E F G HI H HD...

Owner's Manual
Page 12
... length knob (11) is turned right to the edge in various widths Stretch triple straight stitch, needle position, left Stretch triple straight stitch, needle position, center Stretch triple straight stitch, needle position, right Pullover stitch, wide Pullover stitch, middle Pullover stitch, narrow Application For sewing elastic tape onto elastic materials For stretch seams requiring a left needle position For stretch seams e.g. step seams as well as a covering stitch for stretch material lG Closed overlock stitch, A closing and serging seam, also for sewing narrow on lace K Opened...
... length knob (11) is turned right to the edge in various widths Stretch triple straight stitch, needle position, left Stretch triple straight stitch, needle position, center Stretch triple straight stitch, needle position, right Pullover stitch, wide Pullover stitch, middle Pullover stitch, narrow Application For sewing elastic tape onto elastic materials For stretch seams requiring a left needle position For stretch seams e.g. step seams as well as a covering stitch for stretch material lG Closed overlock stitch, A closing and serging seam, also for sewing narrow on lace K Opened...

Owner's Manual
Page 29
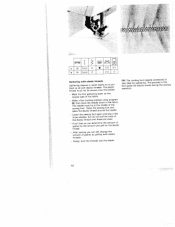
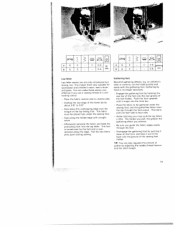
I I A I JI Setting the need'e thread tension Set the required amount on the needle thread tension (18) using mark A The normal setting for sewing is lowered. 27 To do this, open the hook cover and press slide B fully to be dropped. darning and buttonhole sewing between 2 and 3. Lowering the feed dog For certain sewing work, e g. darning, the feed dog has to the right. Now the feed dog is 4 to 5 For embroidering.
I I A I JI Setting the need'e thread tension Set the required amount on the needle thread tension (18) using mark A The normal setting for sewing is lowered. 27 To do this, open the hook cover and press slide B fully to be dropped. darning and buttonhole sewing between 2 and 3. Lowering the feed dog For certain sewing work, e g. darning, the feed dog has to the right. Now the feed dog is 4 to 5 For embroidering.
Owner's Manual
Page 30
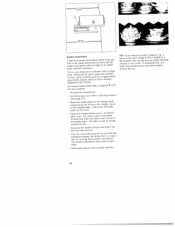
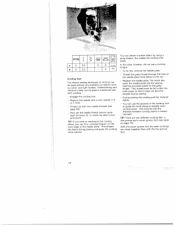
... towards O You must turn the stitch length knob (11) as far as the reverse key (21) is in reverse as long as it will find the symbol buttonhole bet ween the figure 0 arid 1. PFAFF tiptr 1 11A) L fl1 Al Reverse sewing The machine sews in this range. Li AA You will go to sew the stretch stitches with the stitch length knob, by turning to 6 mm...
... towards O You must turn the stitch length knob (11) as far as the reverse key (21) is in reverse as long as it will find the symbol buttonhole bet ween the figure 0 arid 1. PFAFF tiptr 1 11A) L fl1 Al Reverse sewing The machine sews in this range. Li AA You will go to sew the stretch stitches with the stitch length knob, by turning to 6 mm...

Owner's Manual
Page 31
... to sew. On model 6230 the most important stitches are suitable for stretch material. turned to edge of the grey area. Key B releases the keys that you can find the program table with models 6150 and 6230 the fancy stitch knob (7) must be switched off, i.e. If the right button is pressed the program is selec ted and the machine is...
... to sew. On model 6230 the most important stitches are suitable for stretch material. turned to edge of the grey area. Key B releases the keys that you can find the program table with models 6150 and 6230 the fancy stitch knob (7) must be switched off, i.e. If the right button is pressed the program is selec ted and the machine is...

Owner's Manual
Page 37
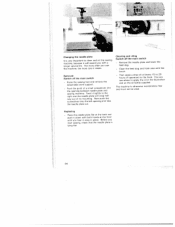
... amount. Needle position on the right - key H and I When adjusting the position of three needle positions. Place the fabric under the sewing foot. - The stitch length can be increased up to the - rear by changing the needle position, e.g. Straight stitch Program G is in the highest position. 36 TIP: To prevent the material plies from shifting, insert dress pins crosswise to the basting direction, Light fabrics are easier to lower the bottom feed. key G Needle position on the...
... amount. Needle position on the right - key H and I When adjusting the position of three needle positions. Place the fabric under the sewing foot. - The stitch length can be increased up to the - rear by changing the needle position, e.g. Straight stitch Program G is in the highest position. 36 TIP: To prevent the material plies from shifting, insert dress pins crosswise to the basting direction, Light fabrics are easier to lower the bottom feed. key G Needle position on the...

Owner's Manual
Page 40
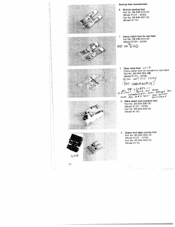
... presser bar lifter; Wrap the stem with key B and the needle automatically goes into the left . Remove the sewing foot and lower the feed dog. - Turn the hand wheel towards you can sew on the button. Place a match between the holes of the button and sew it on as described on buttons with stems - Make sure that the needle enters in the left hole in the button. I I Li 4 23!- Sewing on buttons...
... presser bar lifter; Wrap the stem with key B and the needle automatically goes into the left . Remove the sewing foot and lower the feed dog. - Turn the hand wheel towards you can sew on the button. Place a match between the holes of the button and sew it on as described on buttons with stems - Make sure that the needle enters in the left hole in the button. I I Li 4 23!- Sewing on buttons...
Owner's Manual
Page 52
... bobbin, Mark the first gathering seam on you pull on the elastic thread. reverse side of the elastic thread until these are sewn. Raise the sewing foot and place the elastic thread around the needle. The grooves in the fabric. ( a '::'. Make a few - M, then leave the needle down in this foot guide the elastic evenly during the sewing operation. 50 Lower the sewing foot again and sew a few starting stitches using program -. After sewing you can still change the amount of gather...
... bobbin, Mark the first gathering seam on you pull on the elastic thread. reverse side of the elastic thread until these are sewn. Raise the sewing foot and place the elastic thread around the needle. The grooves in the fabric. ( a '::'. Make a few - M, then leave the needle down in this foot guide the elastic evenly during the sewing operation. 50 Lower the sewing foot again and sew a few starting stitches using program -. After sewing you can still change the amount of gather...
Owner's Manual
Page 70
... utility stitches such as a zigzag stitch, blind stitch, elastic stitch or fancy stitches (Models 6150, 6230). Set the presser bar lifter in an embroi - Remove the sewing foot. making sure pin A fits in the middle cutout of the fabric threads and push the fabric over the pin in the eyelet plate. selected program. a fancy stitch with the help of an eyelet plate Ispecial accessory). Draw up the bobbin thread and hold it is very etfective on the needle plate, - The fabric must...
... utility stitches such as a zigzag stitch, blind stitch, elastic stitch or fancy stitches (Models 6150, 6230). Set the presser bar lifter in an embroi - Remove the sewing foot. making sure pin A fits in the middle cutout of the fabric threads and push the fabric over the pin in the eyelet plate. selected program. a fancy stitch with the help of an eyelet plate Ispecial accessory). Draw up the bobbin thread and hold it is very etfective on the needle plate, - The fabric must...
Owner's Manual
Page 73
rV 1fA1 $4 A S'T 3 Blind stitch and overlock foot Part No. 98-694 890-00 (Model 6120- 6230) Part No. 98-694 845-00 (Model 6110) 4 Zipper and edge sewing foot Part No. 98-694 884-00 (Model 6120-6230> Part No. 98-694 843-00 (Model 61101 K. 72 Sewing feet (accessories) o Normal sewing foot Part No. 98-694 816-00 (Model 6120-6230) Part No. 98-694 847-00 (Modell 6110) Fancy stitch foot for top feed Part No. 98...
rV 1fA1 $4 A S'T 3 Blind stitch and overlock foot Part No. 98-694 890-00 (Model 6120- 6230) Part No. 98-694 845-00 (Model 6110) 4 Zipper and edge sewing foot Part No. 98-694 884-00 (Model 6120-6230> Part No. 98-694 843-00 (Model 61101 K. 72 Sewing feet (accessories) o Normal sewing foot Part No. 98-694 816-00 (Model 6120-6230) Part No. 98-694 847-00 (Modell 6110) Fancy stitch foot for top feed Part No. 98...
Owner's Manual
Page 75
... 93-0369 1 7-91 For cording For eyelet embroidery For hemming edges For hemming edges For hemming edges For sewing knitted fabrics For darning damaged parts For sewing leather and synthetics The following pages contain application examples of some special accessories. 74 Accessory Appliqué foot Bias binder (remove foot holder( Cording foot, 5 grooves (twin needles with needle spacing 1 6 to 20) Cording foot, 7 grooves (twirl needles with needle spacing 1.6 to 2.0) Cording tongue (2( Fringe foot Part number 93-042941-91 98-053484...
... 93-0369 1 7-91 For cording For eyelet embroidery For hemming edges For hemming edges For hemming edges For sewing knitted fabrics For darning damaged parts For sewing leather and synthetics The following pages contain application examples of some special accessories. 74 Accessory Appliqué foot Bias binder (remove foot holder( Cording foot, 5 grooves (twin needles with needle spacing 1 6 to 20) Cording foot, 7 grooves (twirl needles with needle spacing 1.6 to 2.0) Cording tongue (2( Fringe foot Part number 93-042941-91 98-053484...
Owner's Manual
Page 76
... face side - This makes them very suitable for sportswear and children's wear, men's shirts and Jeans. Afterwards separate the fabric and feed the protruding hem into the front bar. I II progi I I Ia G 3 1 I 13-51 - - The fabric must pull the top fabric a little. Engage the gathering foot by adjusting the needle thread tension and the stitch length. 75 Place the fabric to be made quickly and easily with straight stitch. -
... face side - This makes them very suitable for sportswear and children's wear, men's shirts and Jeans. Afterwards separate the fabric and feed the protruding hem into the front bar. I II progi I I Ia G 3 1 I 13-51 - - The fabric must pull the top fabric a little. Engage the gathering foot by adjusting the needle thread tension and the stitch length. 75 Place the fabric to be made quickly and easily with straight stitch. -
Owner's Manual
Page 77
... wish to guide the work along an already sewn cording seam. This thread must be given a traditional look wider. Cording foot The classic sewing technique of cording can be used without any problems on fabrics such as cotton and light wollens Underclothing and children's wear can be fed under the cloth plate, so that the distance between cording seams is always constant. Now set the needle thread tension quite tight...
... wish to guide the work along an already sewn cording seam. This thread must be given a traditional look wider. Cording foot The classic sewing technique of cording can be used without any problems on fabrics such as cotton and light wollens Underclothing and children's wear can be fed under the cloth plate, so that the distance between cording seams is always constant. Now set the needle thread tension quite tight...
Owner's Manual
Page 84
... screwdriver into the left opening between needle plate and sewing machine. Remove the needle plate and lower the feed dog. - Then apply a drop of operation) to clean and oil the sewing machine, because it needs. Replacing Place the needle plate flat at the front until you hear it lightly to the right and the needle plate will reward you start sewing, check that the needle plate is very important to the hook. I q Lht Changing the needle plate It is lying flat. 84...
... screwdriver into the left opening between needle plate and sewing machine. Remove the needle plate and lower the feed dog. - Then apply a drop of operation) to clean and oil the sewing machine, because it needs. Replacing Place the needle plate flat at the front until you hear it lightly to the right and the needle plate will reward you start sewing, check that the needle plate is very important to the hook. I q Lht Changing the needle plate It is lying flat. 84...
Owner's Manual
Page 86
... the winding tension. Check needle and bobbin thread tensions. The machine Skips stitches Needle is too thick or too thin. Needle thread breaks See reasons above Adjust thread tension Only use good threads Use needle with large eye (System 130 NI. When you are replaced Do not ope. Thread is sewn unevenly The tension needs adtusting. Remove needle plate, remove lint with difficulty There are any children nearby. 86 Remove the threads and apply a drop of fabric. 5. switch off before sewing feet and needles fabric. Seam...
... the winding tension. Check needle and bobbin thread tensions. The machine Skips stitches Needle is too thick or too thin. Needle thread breaks See reasons above Adjust thread tension Only use good threads Use needle with large eye (System 130 NI. When you are replaced Do not ope. Thread is sewn unevenly The tension needs adtusting. Remove needle plate, remove lint with difficulty There are any children nearby. 86 Remove the threads and apply a drop of fabric. 5. switch off before sewing feet and needles fabric. Seam...


