
Owner's Manual
Page 5
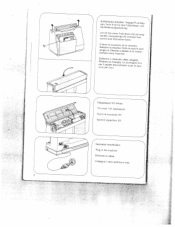
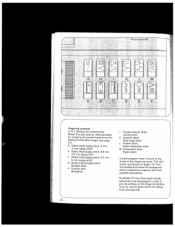
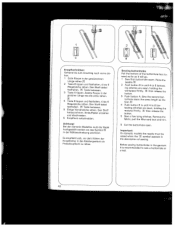
....inpdDeeea.dnIaaslevaaeltcisaeastetneo.Ntiscoent zpRSieooirbnllaiieilvptpaaeerrredelauailiescomod,a'panevirgvclihiaaim.o Lednoetloslaceovmpaelpirgalreettotais.Ntrue Klappdeckel 101 Tilt cover 101 backwards. ::: c::r:o Netzkabel anschlielen. Plug in the machine Brancher le cable. 2 Collegare il cavo elettrico a rete. control the cover. ( N 4 'V ( -.- 2 I dpKieeonf.BfeFeradhciaheunbNuenagstbsahfnüelrbeeditneu.nnTgFr.uaFgeagnnIaifsser und Lift off handle. Fold down the caring Compartment N contains foot and Instruction book.
....inpdDeeea.dnIaaslevaaeltcisaeastetneo.Ntiscoent zpRSieooirbnllaiieilvptpaaeerrredelauailiescomod,a'panevirgvclihiaaim.o Lednoetloslaceovmpaelpirgalreettotais.Ntrue Klappdeckel 101 Tilt cover 101 backwards. ::: c::r:o Netzkabel anschlielen. Plug in the machine Brancher le cable. 2 Collegare il cavo elettrico a rete. control the cover. ( N 4 'V ( -.- 2 I dpKieeonf.BfeFeradhciaheunbNuenagstbsahfnüelrbeeditneu.nnTgFr.uaFgeagnnIaifsser und Lift off handle. Fold down the caring Compartment N contains foot and Instruction book.
Owner's Manual
Page 7
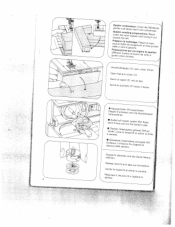
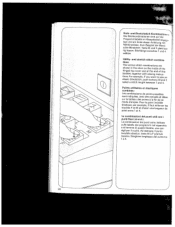
... spohina. Klappe N nehmen. the bobbm Raise case. 4 4 - 4tugBSonrwopedbiauefbreredinnnthtuhewvneodwinrloedbdfrieitke,nrsgeseuitppnerpaneco:phrUat rianannttkedisrosndswciseh:inwNRgeäenhatkcfolehdunct,he loquet N et retirer Ia canette. loslassen und die Spule heraus Release latch N and take out the bobbn Lãcher he csPeorluleesp-caairevbreorilseteIbadoegbariuancnahggeee.m: ePnatssaetrfaIairemapiinvoter gaPifrrfaeerprlroaarrvaeezriiisoopnieasninpoiesdtrriaa.lvavvoorlogedraesIoattsopeolina: 4 VerschluPklappe 121 nach unten Otfnen. Open free arm cover 121.
... spohina. Klappe N nehmen. the bobbm Raise case. 4 4 - 4tugBSonrwopedbiauefbreredinnnthtuhewvneodwinrloedbdfrieitke,nrsgeseuitppnerpaneco:phrUat rianannttkedisrosndswciseh:inwNRgeäenhatkcfolehdunct,he loquet N et retirer Ia canette. loslassen und die Spule heraus Release latch N and take out the bobbn Lãcher he csPeorluleesp-caairevbreorilseteIbadoegbariuancnahggeee.m: ePnatssaetrfaIairemapiinvoter gaPifrrfaeerprlroaarrvaeezriiisoopnieasninpoiesdtrriaa.lvavvoorlogedraesIoattsopeolina: 4 VerschluPklappe 121 nach unten Otfnen. Open free arm cover 121.
Owner's Manual
Page 17
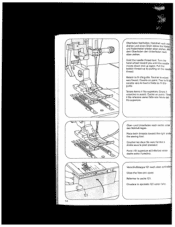
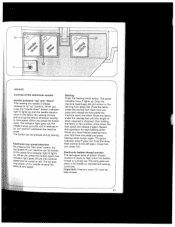
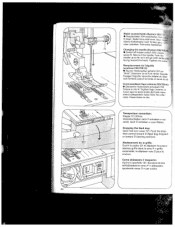
...un point. Chiudere bo sportelbo 121 verso 'alto. 2 I 4 Verschlu1.klappe 121 nach oben schlieBer Close the free arm cover. Handrad nach v 0 drehen und einen Stich ndhen bis Nadel und Fadenhebel wieder oben stehen. Tourner le volant vers l'avant. Tirar - Coucher les deux fils...Unterfaden nach rechts unter den Nähful legen. Hold the needle thread taut, Turn the hand wheel toward the right unde the sewing foot. r dem Oberfaden den Unterfaden nach oben ziehen. Tenere fermo II fib superiore. Pull the bobbin thread up again. lb fib inferiore verso l'alto con I'aiuto ...
...un point. Chiudere bo sportelbo 121 verso 'alto. 2 I 4 Verschlu1.klappe 121 nach oben schlieBer Close the free arm cover. Handrad nach v 0 drehen und einen Stich ndhen bis Nadel und Fadenhebel wieder oben stehen. Tourner le volant vers l'avant. Tirar - Coucher les deux fils...Unterfaden nach rechts unter den Nähful legen. Hold the needle thread taut, Turn the hand wheel toward the right unde the sewing foot. r dem Oberfaden den Unterfaden nach oben ziehen. Tenere fermo II fib superiore. Pull the bobbin thread up again. lb fib inferiore verso l'alto con I'aiuto ...
Owner's Manual
Page 18
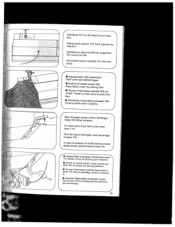
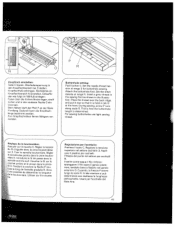
...)ten. Place fabric under the sewing foot. • Tournar I'interrupteur général 104 'Arrêt' Placer du tissu sous le pied pres seur. • Disinserire I Swing work support 107 back against the free arm. Porre (a ...bar • Tourner levier 114. on (N master switch. Remettre en place a bolte de rangement 107 contre le bras. N. /'interrupteurgénéraL Descendre le Pour a reprisage, utiliser a position ps•aerrIenrsaIaemrlmiarveeanld1in1o4t)e. (rNructotorrriesppornidneciaallIae.pAosbizbioanse I 15 Lower presser shows the darning position...
...)ten. Place fabric under the sewing foot. • Tournar I'interrupteur général 104 'Arrêt' Placer du tissu sous le pied pres seur. • Disinserire I Swing work support 107 back against the free arm. Porre (a ...bar • Tourner levier 114. on (N master switch. Remettre en place a bolte de rangement 107 contre le bras. N. /'interrupteurgénéraL Descendre le Pour a reprisage, utiliser a position ps•aerrIenrsaIaemrlmiarveeanld1in1o4t)e. (rNructotorrriesppornidneciaallIae.pAosbizbioanse I 15 Lower presser shows the darning position...
Owner's Manual
Page 25
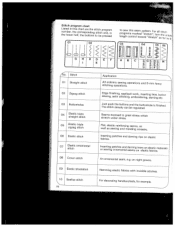
D Elastic triple zigzag stitch, 2 mm 2-mm zigzag stitch E Elastic triple zigzag stitch, 3.5 mm 3.5 mm zigzag stich F Elastic triple zigzag stitch, 5.0 mm 5-mm zigzag stitch G Elastic triple straight stitch Straight stitch H Pullover stich Blindstitch Closed overlock stitch Joining stitch K Overlock stitch Shell-edge stitch L Feather stitch Elastic decorative stitch M Honeycomb stitch Elastic stitch A stitch program chart is also reproduced on pages 76-79 of the hinged top cover. On Model 1171 the fancy-stitch thumb wheel has to be disengaged in order to sew the stitches on the inside of...
D Elastic triple zigzag stitch, 2 mm 2-mm zigzag stitch E Elastic triple zigzag stitch, 3.5 mm 3.5 mm zigzag stich F Elastic triple zigzag stitch, 5.0 mm 5-mm zigzag stitch G Elastic triple straight stitch Straight stitch H Pullover stich Blindstitch Closed overlock stitch Joining stitch K Overlock stitch Shell-edge stitch L Feather stitch Elastic decorative stitch M Honeycomb stitch Elastic stitch A stitch program chart is also reproduced on pages 76-79 of the hinged top cover. On Model 1171 the fancy-stitch thumb wheel has to be disengaged in order to sew the stitches on the inside of...
Owner's Manual
Page 29
... 4 Utihty- For example, if you want to sew an elastic blindstitch, push buttons M and F, select a stitch length between 1 and 4. Zum Beispiel der Elasti sche-Blindstich: Taste M und F gleichzej tig tippen. and stretch-stitch combina tions The various stitch combinations are shown in the chart on the inside of the hinged top cover and at the end of this booklet...
... 4 Utihty- For example, if you want to sew an elastic blindstitch, push buttons M and F, select a stitch length between 1 and 4. Zum Beispiel der Elasti sche-Blindstich: Taste M und F gleichzej tig tippen. and stretch-stitch combina tions The various stitch combinations are shown in the chart on the inside of the hinged top cover and at the end of this booklet...
Owner's Manual
Page 34
Drop the machine feed (page 44) and screw on the darning foot (page 39). When you press and release the foot pedal the machine sews one stitch. Close free arm cover 121. Important: Free arm cover 121 must be pressed during sewing. Electronic top speed selection By pressing the "sew slow" button, the SsAtcuIonpipatnpdme.gteihWecsdpepaahotecostweeaarnadnmenlriyyogbeoofhesutftyipvmtgopehauoerereeirdeesis.nmdnsedoaetafihcdtcfihalwsaeitnnioblrdelrue. Each time you have finished basting move your foot from the pedal and press basting stitch button again. The green indicator lamp P goes...
Drop the machine feed (page 44) and screw on the darning foot (page 39). When you press and release the foot pedal the machine sews one stitch. Close free arm cover 121. Important: Free arm cover 121 must be pressed during sewing. Electronic top speed selection By pressing the "sew slow" button, the SsAtcuIonpipatnpdme.gteihWecsdpepaahotecostweeaarnadnmenlriyyogbeoofhesutftyipvmtgopehauoerereeirdeesis.nmdnsedoaetafihcdtcfihalwsaeitnnioblrdelrue. Each time you have finished basting move your foot from the pedal and press basting stitch button again. The green indicator lamp P goes...
Owner's Manual
Page 44
...Buttonhole setting: Push button C. Inserire come segue it fib rinforzo: appoggiare it piedino per l'occhiello del filato fine. KnopflochfuI anbringen. Set the stitch density at range 3 for buttonhole sewing. For sewing buttonholes use light sewing thread. Cucendo, Ia freccia P scorre lungo Ia scala R. Beim Nähen läuft der Pfeil P an der Skala R entlang. Insert a gimp thread in the sewing foot...le long de l'échelle graduée R. Regolare Ia tensione superiore net settore occhiello 3. Usare per occhielli. Fixer a semelle boutonniere. J N Ré...
...Buttonhole setting: Push button C. Inserire come segue it fib rinforzo: appoggiare it piedino per l'occhiello del filato fine. KnopflochfuI anbringen. Set the stitch density at range 3 for buttonhole sewing. For sewing buttonholes use light sewing thread. Cucendo, Ia freccia P scorre lungo Ia scala R. Beim Nähen läuft der Pfeil P an der Skala R entlang. Insert a gimp thread in the sewing foot...le long de l'échelle graduée R. Regolare Ia tensione superiore net settore occhiello 3. Usare per occhielli. Fixer a semelle boutonniere. J N Ré...
Owner's Manual
Page 45
..., [1] then release the button. 3 Push button A. Erste Raupe in the description of the buttonhole foot for ward as far as a test. 42 Den Stoff dabel festhalten. Den Stoff dabei festhalten. Raise the needle. 1] 2 Push button B in until 4 to 6 bartacking stitches are sewn, holding the material firmly, [1] then release the button. 5 Sew a few tying stitches. Important: On tipmatic models the needle must be raised...
..., [1] then release the button. 3 Push button A. Erste Raupe in the description of the buttonhole foot for ward as far as a test. 42 Den Stoff dabel festhalten. Den Stoff dabei festhalten. Raise the needle. 1] 2 Push button B in until 4 to 6 bartacking stitches are sewn, holding the material firmly, [1] then release the button. 5 Sew a few tying stitches. Important: On tipmatic models the needle must be raised...
Owner's Manual
Page 47
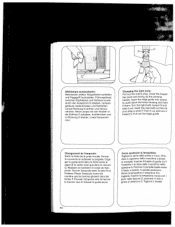
... will go (with its flat side facing toward 0 (sewing position). Engager I'aiguille neuve (le méplat du talon vers I 'alto fino all'ar resto. Dropping the feed dog: Open free arm cover 121. le déplacer vers 0 pour a couture. Schraube festdrehen Changing the needle (System 130/705 • Switch off master switch 104. Loosen screw N. Come cambiare l'ago (sistema 130/705 H): • Disinserire...
... will go (with its flat side facing toward 0 (sewing position). Engager I'aiguille neuve (le méplat du talon vers I 'alto fino all'ar resto. Dropping the feed dog: Open free arm cover 121. le déplacer vers 0 pour a couture. Schraube festdrehen Changing the needle (System 130/705 • Switch off master switch 104. Loosen screw N. Come cambiare l'ago (sistema 130/705 H): • Disinserire...
Owner's Manual
Page 48
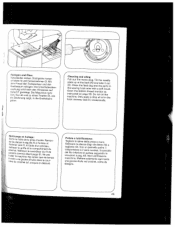
Do not oil the machine. Only apply a drop of oil in the sewing hook area with a soft brush. Mettere solamente ogni tanto una goccia d'olio net crochet, come da disegno. 45 Mit dam Pinsel den Transporteur und den wGarecihfuernrgauwmirrdeinnaigchend. Cleaning and oiling N Pull out the mains plug. Clean the bobbin thread monitor as instructed on page 59. Tilt the needle plate up at the back (N) and take...
Do not oil the machine. Only apply a drop of oil in the sewing hook area with a soft brush. Mettere solamente ogni tanto una goccia d'olio net crochet, come da disegno. 45 Mit dam Pinsel den Transporteur und den wGarecihfuernrgauwmirrdeinnaigchend. Cleaning and oiling N Pull out the mains plug. Clean the bobbin thread monitor as instructed on page 59. Tilt the needle plate up at the back (N) and take...
Owner's Manual
Page 49
...cover and swing up and turn it up the carrying handle. push down the lamp housing and hold it out. Pull out the edge guide...Insert the new bulb so that its pins slide in slots R Push it toward N and take it there. Enlever le guide-bord. Premere ii portalampade verso ii basso e tenerlo in direzione 0. U 46 Lampen gehäuse sowie durch den Ausschnitt Q stecken. Turn the light bulb...herausneh men. 4--Changing the light bulb: Pull out the mains plug. Klappdeckel schlief?,en und Tragegriff hochstellen. 4 Glühlampe auswechseln: Netzstecker ziehen. Come sostitUire Ia ...
...cover and swing up and turn it up the carrying handle. push down the lamp housing and hold it out. Pull out the edge guide...Insert the new bulb so that its pins slide in slots R Push it toward N and take it there. Enlever le guide-bord. Premere ii portalampade verso ii basso e tenerlo in direzione 0. U 46 Lampen gehäuse sowie durch den Ausschnitt Q stecken. Turn the light bulb...herausneh men. 4--Changing the light bulb: Pull out the mains plug. Klappdeckel schlief?,en und Tragegriff hochstellen. 4 Glühlampe auswechseln: Netzstecker ziehen. Come sostitUire Ia ...
Owner's Manual
Page 54
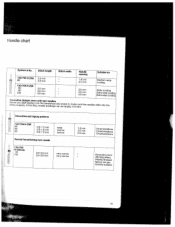
... & No. the needles stitch into the Decorative and zigzag patterns 130/705 H-ZWI 80 80 80 0.5-1.5mm 0.5-1.5 mm 0.5-1.5 mm Special hemstitching twin needle p 130/705 H-ZWI-I-fo 80 100 2.0-3.0 mm 2.0-3.0mm wide narrow narrow very narrow very narrow 1.6mm 2.0 mm 2.5 mm Ornamentations Ornamentations Ornamentations Decorative hem stitching effect Heavily dressed fabrics are par ticularly suitable. 51 Stitch length 1R 130/705...
... & No. the needles stitch into the Decorative and zigzag patterns 130/705 H-ZWI 80 80 80 0.5-1.5mm 0.5-1.5 mm 0.5-1.5 mm Special hemstitching twin needle p 130/705 H-ZWI-I-fo 80 100 2.0-3.0 mm 2.0-3.0mm wide narrow narrow very narrow very narrow 1.6mm 2.0 mm 2.5 mm Ornamentations Ornamentations Ornamentations Decorative hem stitching effect Heavily dressed fabrics are par ticularly suitable. 51 Stitch length 1R 130/705...
Owner's Manual
Page 61
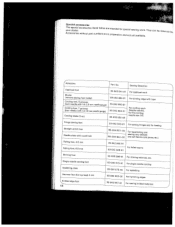
... reasons. During bobbin winding, do not hold thread in as for thread used. 2. Thread tension too strong. Machine threaded incorrectly. Needle thread breaks For any of adjustment. Bobbin case improperly inserted. 4. Insert system 130/705 H needle. Insert new needle. Machine skips stitches Needle not inserted correctly. Poor-quality or knotty thread used . Needle bent and strikes needle plate because work alone. Regulate thread tensions. Insert new needle and push it up as far as it will go . Check upper and lower tensions. Thread machine properly and...
... reasons. During bobbin winding, do not hold thread in as for thread used. 2. Thread tension too strong. Machine threaded incorrectly. Needle thread breaks For any of adjustment. Bobbin case improperly inserted. 4. Insert system 130/705 H needle. Insert new needle. Machine skips stitches Needle not inserted correctly. Poor-quality or knotty thread used . Needle bent and strikes needle plate because work alone. Regulate thread tensions. Insert new needle and push it up as far as it will go . Check upper and lower tensions. Thread machine properly and...
Owner's Manual
Page 62
Feed dog dropped. (Drop-feed control is faulty. Set drop-feed control at all Lint has accumulated between tooth rows of oil into hook raceway. 7. Electronic bobbin thread monitor does not work (tiptronic) Thread ends and dirt have collected in the free arm cover over the indicator lamp, in the hook raceway, in the bobbin case, behind the hook. Machine feeds irregularly or not at left. 6. The sewing lamp lights up, but the machine does not run. (tiptronic) Fuse...
Feed dog dropped. (Drop-feed control is faulty. Set drop-feed control at all Lint has accumulated between tooth rows of oil into hook raceway. 7. Electronic bobbin thread monitor does not work (tiptronic) Thread ends and dirt have collected in the free arm cover over the indicator lamp, in the hook raceway, in the bobbin case, behind the hook. Machine feeds irregularly or not at left. 6. The sewing lamp lights up, but the machine does not run. (tiptronic) Fuse...
Owner's Manual
Page 69
... with tape For cording work . For single-needle cording 93-036 975-45 For eyeletting 98-694 823-00 For hemming edges 93-042 957-91 For sewing knitted materials Special accessories The special accessories listed below are in intended for special preparation and not sewing work (Needle size 80, for fine cording needle size 70) Fringe sewing foot Straight-stitch foot Needle plate with 1.4-1.8 mm needle gauge) Cording blade (2 ea.) Part. Accessories without part numbers are your dealer...
... with tape For cording work . For single-needle cording 93-036 975-45 For eyeletting 98-694 823-00 For hemming edges 93-042 957-91 For sewing knitted materials Special accessories The special accessories listed below are in intended for special preparation and not sewing work (Needle size 80, for fine cording needle size 70) Fringe sewing foot Straight-stitch foot Needle plate with 1.4-1.8 mm needle gauge) Cording blade (2 ea.) Part. Accessories without part numbers are your dealer...
Owner's Manual
Page 79
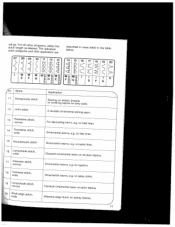
CD) C) - Inserting fabrics. patches and darning rips on night gowns. 09 Elastic blindstitch 10 Scallop stitch 76 Hemming elastic fabrics with invisible stitches. stress which Flat, well elastic reinforcing seams, as as sewing and mending corsetry. on elastic Inserting patches and or sewing ornamental dseaarnminsgotneaerlsasotniceflaabstriiccsm. For decorating handkerchiefs, for example. Seams stretch exposed to great under stress. Stitch program chart tnLhuiesmtelbodewrin,ertthhheiaslfcc,ohtrahrreetspaboruenttdtohinnesgsttositticbthcehppraronegdsrs,aemidn ...
CD) C) - Inserting fabrics. patches and darning rips on night gowns. 09 Elastic blindstitch 10 Scallop stitch 76 Hemming elastic fabrics with invisible stitches. stress which Flat, well elastic reinforcing seams, as as sewing and mending corsetry. on elastic Inserting patches and or sewing ornamental dseaarnminsgotneaerlsasotniceflaabstriiccsm. For decorating handkerchiefs, for example. Seams stretch exposed to great under stress. Stitch program chart tnLhuiesmtelbodewrin,ertthhheiaslfcc,ohtrahrreetspaboruenttdtohinnesgsttositticbthcehppraronegdsrs,aemidn ...
Owner's Manual
Page 80
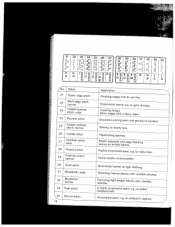
... stitch, wide Application Sewing on or covering elastic seams threads on bed linen. C) C) described below. on terry cloth. Ornamental seams, e.g. Classical ornamental seam on bed linen. 15 Houndstooth stitch 16 Lampshade stitch, wide 17 Viennese stitch, narrow 18 Viennese stitch, wide 19 Lampshade stitch, narrow Shelledge stitch, Wide Ornamental seams, e.g. Ornamental seams, e.g. A durable ornamental joining seam. For decorating hems, e.g. on plain fabrics. Effective edge finish on table linen. M. on dainty fabrics...
... stitch, wide Application Sewing on or covering elastic seams threads on bed linen. C) C) described below. on terry cloth. Ornamental seams, e.g. Classical ornamental seam on bed linen. 15 Houndstooth stitch 16 Lampshade stitch, wide 17 Viennese stitch, narrow 18 Viennese stitch, wide 19 Lampshade stitch, narrow Shelledge stitch, Wide Ornamental seams, e.g. Ornamental seams, e.g. A durable ornamental joining seam. For decorating hems, e.g. on plain fabrics. Effective edge finish on table linen. M. on dainty fabrics...
Owner's Manual
Page 81
21 22 23 24 25 26 27 ._ . .( .
21 22 23 24 25 26 27 ._ . .( .

Owner's Manual
Page 82
zC). K9. C) :,- C) CD r. G. 36 37 38 ll ll ll ll Jl -il II II 39 40 /11 ji \II /11 M \fl 41 \\\ /\\ Th li -JI ll /11 \ll M \' /\\ LH L°' I-IC,, I -. IL_C- ,, CD '-4. D. C:z) 42 'II 'It I U) L ,.+ 1 C) 43 N II N II N I_ lCD C) 44 XI I ,-4. C) 45 \) D.
zC). K9. C) :,- C) CD r. G. 36 37 38 ll ll ll ll Jl -il II II 39 40 /11 ji \II /11 M \fl 41 \\\ /\\ Th li -JI ll /11 \ll M \' /\\ LH L°' I-IC,, I -. IL_C- ,, CD '-4. D. C:z) 42 'II 'It I U) L ,.+ 1 C) 43 N II N II N I_ lCD C) 44 XI I ,-4. C) 45 \) D.


