

Owner's Manual
Page 2
... cover Carrying handle Cleaning Dual feed Electrical connection Foot control Foot control receptacle Light bulb Machine feed Master selector dial Needle Needle position Oiling Overlock seam Presser bar lifter Reverse sewing Sewing feet Sewing mechanism Slot-threading Special accessories Special sewing feet Stitch program chart Straight stitch Thread cutter Thread tensions Trouble shooting Upper threading...
... cover Carrying handle Cleaning Dual feed Electrical connection Foot control Foot control receptacle Light bulb Machine feed Master selector dial Needle Needle position Oiling Overlock seam Presser bar lifter Reverse sewing Sewing feet Sewing mechanism Slot-threading Special accessories Special sewing feet Stitch program chart Straight stitch Thread cutter Thread tensions Trouble shooting Upper threading...

Owner's Manual
Page 4
.... Please note: When a 13-ampere plug is coloured blue must be connected to use only a 15-watt light bulb in the sewing lamp. Some safety rules a> Be careful when sewing that your sewing machine 1 Take-up lever 2 Thread retainer stud 3 Eraser button 4 Utility-stitch buttons 5 Spool pins 6 Bobbin winder 7 Balance wheel 8 Stop motion knob...
.... Please note: When a 13-ampere plug is coloured blue must be connected to use only a 15-watt light bulb in the sewing lamp. Some safety rules a> Be careful when sewing that your sewing machine 1 Take-up lever 2 Thread retainer stud 3 Eraser button 4 Utility-stitch buttons 5 Spool pins 6 Bobbin winder 7 Balance wheel 8 Stop motion knob...
Owner's Manual
Page 5
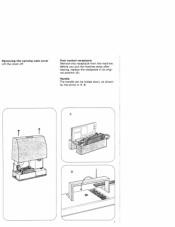
Handle The handle can be folded down, as shown by the arrow in its origi nal position (A). A II ) Removing the carrying case cover Lift the cover off. Foot control receptacle Remove this receptacle from the machine, Before you put the machine away after sewing, replace the receptacle in ill. B.
Handle The handle can be folded down, as shown by the arrow in its origi nal position (A). A II ) Removing the carrying case cover Lift the cover off. Foot control receptacle Remove this receptacle from the machine, Before you put the machine away after sewing, replace the receptacle in ill. B.
Owner's Manual
Page 7
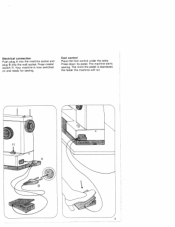
The machine starts sewing. The more the pedal is now switched on and ready for sewing. Press down its pedal. Electrical connection Push plug A into the machine socket and plug B into the wall socket. Foot control Place the foot contro[ under the table. Your machine is depressed, the faster the machine will run. 3 Press master switch 11.
The machine starts sewing. The more the pedal is now switched on and ready for sewing. Press down its pedal. Electrical connection Push plug A into the machine socket and plug B into the wall socket. Foot control Place the foot contro[ under the table. Your machine is depressed, the faster the machine will run. 3 Press master switch 11.

Owner's Manual
Page 13
... D = The feed dog is positioned below mark A. The machine sews permanently in the needle hole. C = Vertical position. ciD = Central (normal) needle position = Right needle position = Left needle position Reverse sewing and dropping the feed dog Reverse-feed control 20 has the following... positions: A = Normal position B = As long as the control is pressed, the machine sews backwards (for embroidering, darning, etc.). cp A 4 N 7 ...
... D = The feed dog is positioned below mark A. The machine sews permanently in the needle hole. C = Vertical position. ciD = Central (normal) needle position = Right needle position = Left needle position Reverse sewing and dropping the feed dog Reverse-feed control 20 has the following... positions: A = Normal position B = As long as the control is pressed, the machine sews backwards (for embroidering, darning, etc.). cp A 4 N 7 ...

Owner's Manual
Page 23
At the end of the two dots in range 8 the machine sews an edge-finishing seam with an edge-thread effect. Then press ejector lever F (bottom ill.) to one of the seam raise the sewing foot. at 3. E F 10 Remove the work by pulling it with an edge thread effect. Set the upper tension ...at top right) and trim the threads. Overlock seam The overlock stitch is used for sewing along edge guide E (top ill.). Edge-finishing seam When the overlock button is released and the master selector dial is illus trated below. Insert...
At the end of the two dots in range 8 the machine sews an edge-finishing seam with an edge-thread effect. Then press ejector lever F (bottom ill.) to one of the seam raise the sewing foot. at 3. E F 10 Remove the work by pulling it with an edge thread effect. Set the upper tension ...at top right) and trim the threads. Overlock seam The overlock stitch is used for sewing along edge guide E (top ill.). Edge-finishing seam When the overlock button is released and the master selector dial is illus trated below. Insert...

Owner's Manual
Page 27
Open cover 14. Remove the bobbin case. All you have to do is put a drop of needle plate 24 and remove it toward A and pull it is main tenance-free. Insert the new light bulb so that its pins move in the vicinity of the sewing hook and the feed dog with a soft brush. Changing the light bulb Push the light bulb up and turn it toward B. Do not oil the machine because it out. Cleaning and oiling Take out the screws of oil into the hook raceway now and then. 23 Push it up , turn it . Clean the parts in slots C.
Open cover 14. Remove the bobbin case. All you have to do is put a drop of needle plate 24 and remove it toward A and pull it is main tenance-free. Insert the new light bulb so that its pins move in the vicinity of the sewing hook and the feed dog with a soft brush. Changing the light bulb Push the light bulb up and turn it toward B. Do not oil the machine because it out. Cleaning and oiling Take out the screws of oil into the hook raceway now and then. 23 Push it up , turn it . Clean the parts in slots C.
Owner's Manual
Page 29
...dropped. Lever 20 it through thread retainer stud. Check thread tensions. 8. This the machine, is not uniform Tension out of adjustment. Kinks appear on top and bottom of fabric under the sewing foot. off the 25 Check upper and lower tensions. During bobbin winding, do not... hold thread in hook raceway. Bobbin thread wound unevenly. Machine skips stitches in position by tightening screw B securely (page 18...
...dropped. Lever 20 it through thread retainer stud. Check thread tensions. 8. This the machine, is not uniform Tension out of adjustment. Kinks appear on top and bottom of fabric under the sewing foot. off the 25 Check upper and lower tensions. During bobbin winding, do not... hold thread in hook raceway. Bobbin thread wound unevenly. Machine skips stitches in position by tightening screw B securely (page 18...


