

Owner's Manual
Page 3
... .......26 Utility stitches 26 Stretch stitches 26 Utility and stretch stitch combinations..26 Utility stitches and practical sewing Explanation of your Pfaff Select Lid 10 Connecting the foot control 10 Main switch 10 Accessory tray 11 Using the free arm 11 Bobbin winding 12-15 Changing the...foot 21 The IDT(Integrated Dual Feed 22 Setting the needle thread tension 23 Dropping the feed dog 23 Changing the needle 23 Stitch width dial 24 Needle position dial 24 Reverse sewing 25 Stitch length adjustment dial 25 Adjust stitch length 25 Buttonhole 25 Stretch stitches 25 Stitch...
... .......26 Utility stitches 26 Stretch stitches 26 Utility and stretch stitch combinations..26 Utility stitches and practical sewing Explanation of your Pfaff Select Lid 10 Connecting the foot control 10 Main switch 10 Accessory tray 11 Using the free arm 11 Bobbin winding 12-15 Changing the...foot 21 The IDT(Integrated Dual Feed 22 Setting the needle thread tension 23 Dropping the feed dog 23 Changing the needle 23 Stitch width dial 24 Needle position dial 24 Reverse sewing 25 Stitch length adjustment dial 25 Adjust stitch length 25 Buttonhole 25 Stretch stitches 25 Stitch...
Owner's Manual
Page 4
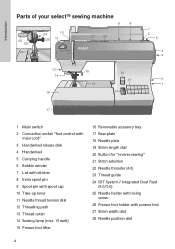
Introduction Parts of your select™ sewing machine 9 8 22 23 26 24 25 10 11 12 27 28 13 14 16 15 18 20 21 19 7 6 5 4 3 2 1 17 1 Main switch 2 Connection ...) 15 Presser foot lifter 16 Removable accessory tray 17 Base plate 18 Needle plate 19 Stitch length dial 20 Button for "reverse sewing" 21 Stitch selection 22 Needle threader (4.0) 23 Thread guide 24 IDT System / Integrated Dual Feed (4.0/3.0) 25 Needle holder with Àxing screw 26 Presser foot holder with presser...
Introduction Parts of your select™ sewing machine 9 8 22 23 26 24 25 10 11 12 27 28 13 14 16 15 18 20 21 19 7 6 5 4 3 2 1 17 1 Main switch 2 Connection ...) 15 Presser foot lifter 16 Removable accessory tray 17 Base plate 18 Needle plate 19 Stitch length dial 20 Button for "reverse sewing" 21 Stitch selection 22 Needle threader (4.0) 23 Thread guide 24 IDT System / Integrated Dual Feed (4.0/3.0) 25 Needle holder with Àxing screw 26 Presser foot holder with presser...

Owner's Manual
Page 24
...needle position to the symbol (maximum stitch width). Exception: Straight stitch is being changed, the needle must not be selected by turning the needle positioning dial (28) in the material. When the position of individual stitches. When selecting the width, the needle must not be achieved by...The furthest needle position to the left side of the stitch. Note: If you have selected the right needle position, you can also change the stitch width. Operate your Pfaff select Stitch width dial The stitch width can be achieved by turning the dial (27) as far as it will go ...
...needle position to the symbol (maximum stitch width). Exception: Straight stitch is being changed, the needle must not be selected by turning the needle positioning dial (28) in the material. When the position of individual stitches. When selecting the width, the needle must not be achieved by...The furthest needle position to the left side of the stitch. Note: If you have selected the right needle position, you can also change the stitch width. Operate your Pfaff select Stitch width dial The stitch width can be achieved by turning the dial (27) as far as it will go ...
Owner's Manual
Page 27
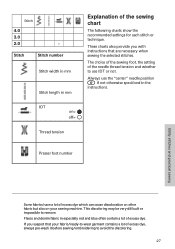
... to remove. Fleece and denim fabric in mm Explanation of excess dye. If you with instructions that your sewing machine. Stitch 4.0 3.0 2.0 - Stitch Stitch number Stitch width in mm Stitch length in especially red and blue often contain a lot of the sewing chart The following charts show the recommended settings for each...
... to remove. Fleece and denim fabric in mm Explanation of excess dye. If you with instructions that your sewing machine. Stitch 4.0 3.0 2.0 - Stitch Stitch number Stitch width in mm Stitch length in especially red and blue often contain a lot of the sewing chart The following charts show the recommended settings for each...
Owner's Manual
Page 29
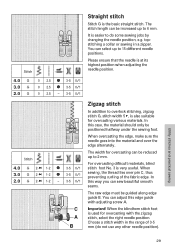
...0 2.5 - 3-5 0/1 Zigzag stitch In addition to overlock stitching, zigzag stitch G, stitch width 5 , is very useful. In 2.0 G 2- 1-2 - 3-5 0/1 this way you can select up to 2 mm. topstitching a collar or sewing in the range of the fabric edge. The width for overcasting can be guided along edge guide B. You can adjust this case, the... 1-2 3-5 0/1 sewing, the thread lies over the edge alternately. In this edge guide with the zigzag stitch, select the right needle position. Stitch Straight stitch Stitch G is easier to do not use any other needle position). It ...
...0 2.5 - 3-5 0/1 Zigzag stitch In addition to overlock stitching, zigzag stitch G, stitch width 5 , is very useful. In 2.0 G 2- 1-2 - 3-5 0/1 this way you can select up to 2 mm. topstitching a collar or sewing in the range of the fabric edge. The width for overcasting can be guided along edge guide B. You can adjust this case, the... 1-2 3-5 0/1 sewing, the thread lies over the edge alternately. In this edge guide with the zigzag stitch, select the right needle position. Stitch Straight stitch Stitch G is easier to do not use any other needle position). It ...
Owner's Manual
Page 30
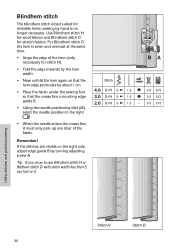
... the fabric under the sewing foot so that the hem edge protrudes by turning adjusting screw A. BA • Fold the edge inwards by the hem width. • Now unfold the hem again so that the crease line runs along edge guide B. • Using the needle positioning dial (28...), select the needle position to sew Blindhem stitch H or Blidhem stitch D with stitch width less than 5, use foot nr.0. Tip: If you chose to the right . Use Blindhem stitch H for wool fabrics and...
... the fabric under the sewing foot so that the hem edge protrudes by turning adjusting screw A. BA • Fold the edge inwards by the hem width. • Now unfold the hem again so that the crease line runs along edge guide B. • Using the needle positioning dial (28...), select the needle position to sew Blindhem stitch H or Blidhem stitch D with stitch width less than 5, use foot nr.0. Tip: If you chose to the right . Use Blindhem stitch H for wool fabrics and...

Owner's Manual
Page 31
.... Remember! They are well-sewn and long-lasting. Tip: Make sure that the sleeve cuff is stretched while it . Stitch 4.0 I 5- When overlocking, if you select stitch width other than normal seams, very durable and quickly sewn. stretch - 3-5 0/3 Open overlock stitch (K) With this stitch, thicker fabrics and fabrics which sew two fabric layers...
.... Remember! They are well-sewn and long-lasting. Tip: Make sure that the sleeve cuff is stretched while it . Stitch 4.0 I 5- When overlocking, if you select stitch width other than normal seams, very durable and quickly sewn. stretch - 3-5 0/3 Open overlock stitch (K) With this stitch, thicker fabrics and fabrics which sew two fabric layers...

Owner's Manual
Page 33
...fabric! Tip: On difÀcult fabrics such as T-shirts, knitted articles or cycling shorts both quickly and easily. The traditional width for the hem. • Then topstitch the hem from the right side. • Finally, cut the protruding hem edge ...the needle plate, you 4.0 G 0 3 3-5 0/1 must make beatiful topstitch seams. Using the twin needle you select the center 3.0 G 0 3 needle position . 3-5 0/1 2.0 G 0 3 - 3-5 0/1 • First fold and iron the width of fabric desired for Stitch topstitching is advisable to the seam. Twin needles are available in different...
...fabric! Tip: On difÀcult fabrics such as T-shirts, knitted articles or cycling shorts both quickly and easily. The traditional width for the hem. • Then topstitch the hem from the right side. • Finally, cut the protruding hem edge ...the needle plate, you 4.0 G 0 3 3-5 0/1 must make beatiful topstitch seams. Using the twin needle you select the center 3.0 G 0 3 needle position . 3-5 0/1 2.0 G 0 3 - 3-5 0/1 • First fold and iron the width of fabric desired for Stitch topstitching is advisable to the seam. Twin needles are available in different...
Owner's Manual
Page 35
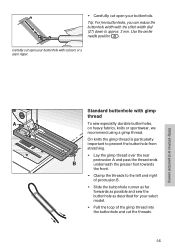
..., on heavy fabrics, knits or sportswear, we recommend using a gimp thread. Tip: For Àne buttonholes, you can reduce the buttonhole width with the stitch width dial (27) down to the left and right of protrusion B. • Slide the buttonhole runner as far forwards as possible and sew the... buttonhole as described for your select model. • Pull the loop of the gimp thread into the buttonhole and cut open your buttonhole. ...
..., on heavy fabrics, knits or sportswear, we recommend using a gimp thread. Tip: For Àne buttonholes, you can reduce the buttonhole width with the stitch width dial (27) down to the left and right of protrusion B. • Slide the buttonhole runner as far forwards as possible and sew the... buttonhole as described for your select model. • Pull the loop of the gimp thread into the buttonhole and cut open your buttonhole. ...
Owner's Manual
Page 36
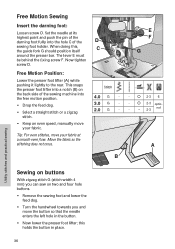
...- 2-3 optio- this , the guide fork G should position itself around the presser bar. nal - - 2-3 A Utility stitches and practical sewing Sewing on buttons With zigzag stitch G (stitch width 4 mm) you can sew on the back side of the sewing machine into the hole C of the darning foot fully into the free motion position.... • Drop the feed dog. • Select a straight stitch or a zigzag stitch. • Keep an even speed, manually move your fabric. Now tighten screw D. Tip: For even ...
...- 2-3 optio- this , the guide fork G should position itself around the presser bar. nal - - 2-3 A Utility stitches and practical sewing Sewing on buttons With zigzag stitch G (stitch width 4 mm) you can sew on the back side of the sewing machine into the hole C of the darning foot fully into the free motion position.... • Drop the feed dog. • Select a straight stitch or a zigzag stitch. • Keep an even speed, manually move your fabric. Now tighten screw D. Tip: For even ...
Owner's Manual
Page 37
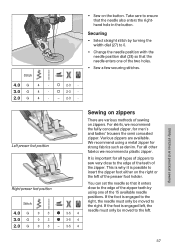
... the button. If the foot is important for all other fabrics we recommend the fully concealed zipper, for strong fabrics such as denim. Securing • Select straight stitch by using a metal zipper for men's and ladies' trousers the semi concealed zipper. For all types of zippers to sew very close to... the edge of the zipper teeth by turning the width dial (27) to the edge of the teeth of the zipper. Take care to the right. It is engaged left, the needle must only be...
... the button. If the foot is important for all other fabrics we recommend the fully concealed zipper, for strong fabrics such as denim. Securing • Select straight stitch by using a metal zipper for men's and ladies' trousers the semi concealed zipper. For all types of zippers to sew very close to... the edge of the zipper teeth by turning the width dial (27) to the edge of the teeth of the zipper. Take care to the right. It is engaged left, the needle must only be...


