

Owner's Manual
Page 2
..., turn all controls to the off ("0") when making any adjustment in the needle area, such as threading needle, changing needle, threading bobbin, or changing presser foot, etc. • Always unplug the sewing machine from the electrical outlet when removing covers, lubricating, or when making any other user servicing adjustments mentioned in the instruction manual. • Never drop or insert any object into water. IMPORTANT SAFETY INSTRUCTIONS When using and before cleaning. • Always unplug before using this sewing machine from the...
..., turn all controls to the off ("0") when making any adjustment in the needle area, such as threading needle, changing needle, threading bobbin, or changing presser foot, etc. • Always unplug the sewing machine from the electrical outlet when removing covers, lubricating, or when making any other user servicing adjustments mentioned in the instruction manual. • Never drop or insert any object into water. IMPORTANT SAFETY INSTRUCTIONS When using and before cleaning. • Always unplug before using this sewing machine from the...

Owner's Manual
Page 3
... Parts of the sewing chart 27 Needle thread tension 28 Topstitching 28 Straight stitch 29 Zigzag stitch 29 Blindhem stitch 30 Overlock stitch 31 Elastic stitch 32 Stabilizing edges 32 Hemming with the twin needle 33 Buttonholes 34-35 Free Motion Sewing 36 Sewing on buttons 36-37 Sewing on zippers 37 Maintenance and trouble-shooting Changing the needle plate 38 Cleaning 38 Changing the sewing bulb 39 Trouble-shooting 40-41 Non-elastic 6-7 Stitch table - Stretch stitches 8-9 Operate your select sewing machine .........4 Standard accessories 5 Stitch overview 6 Stitch...
... Parts of the sewing chart 27 Needle thread tension 28 Topstitching 28 Straight stitch 29 Zigzag stitch 29 Blindhem stitch 30 Overlock stitch 31 Elastic stitch 32 Stabilizing edges 32 Hemming with the twin needle 33 Buttonholes 34-35 Free Motion Sewing 36 Sewing on buttons 36-37 Sewing on zippers 37 Maintenance and trouble-shooting Changing the needle plate 38 Cleaning 38 Changing the sewing bulb 39 Trouble-shooting 40-41 Non-elastic 6-7 Stitch table - Stretch stitches 8-9 Operate your select sewing machine .........4 Standard accessories 5 Stitch overview 6 Stitch...
Owner's Manual
Page 4
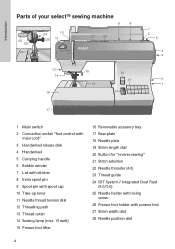
... disk 4 Handwheel 5 Carrying handle 6 Bobbin winder 7 Lid with stitches 8 Extra spool pin 9 Spool pin with spool cap 10 Take-up lever 11 Needle thread tension dial 12 Threading path 13 Thread cutter 14 Sewing lamp (max. 15 watt) 15 Presser foot lifter 16 Removable accessory tray 17 Base plate 18 Needle plate 19 Stitch length dial 20 Button for "reverse sewing" 21 Stitch selection 22 Needle threader (4.0) 23 Thread guide 24 IDT System / Integrated Dual Feed (4.0/3.0) 25 Needle holder with Àxing screw 26 Presser foot holder with presser foot 27 Stitch width dial 28 Needle position dial 4
... disk 4 Handwheel 5 Carrying handle 6 Bobbin winder 7 Lid with stitches 8 Extra spool pin 9 Spool pin with spool cap 10 Take-up lever 11 Needle thread tension dial 12 Threading path 13 Thread cutter 14 Sewing lamp (max. 15 watt) 15 Presser foot lifter 16 Removable accessory tray 17 Base plate 18 Needle plate 19 Stitch length dial 20 Button for "reverse sewing" 21 Stitch selection 22 Needle threader (4.0) 23 Thread guide 24 IDT System / Integrated Dual Feed (4.0/3.0) 25 Needle holder with Àxing screw 26 Presser foot holder with presser foot 27 Stitch width dial 28 Needle position dial 4

Owner's Manual
Page 7
...invisible hemming on elastic, darning tears and inserting patches. LG - 0/1 A dainty decorative stitch. MDF - 0/1 A traditional decorative stitch. 7 Introduction Stitch 4.0 G H Presser Foot 3.0/2.0 G 0/1 0/1 0/1 0/1 H 0/3 Application For all sewing and top-stitching operations which require a left needle position. Zigzag: for tapering, eyelet embroidery and cording work. I I K K 0/1 0/3 A traditional decorative stitch. For overcasting, sewing on woven materials. Zigzag stitch: For serging, appliqué and tapering. Straight stitch: For all straight stitching...
...invisible hemming on elastic, darning tears and inserting patches. LG - 0/1 A dainty decorative stitch. MDF - 0/1 A traditional decorative stitch. 7 Introduction Stitch 4.0 G H Presser Foot 3.0/2.0 G 0/1 0/1 0/1 0/1 H 0/3 Application For all sewing and top-stitching operations which require a left needle position. Zigzag: for tapering, eyelet embroidery and cording work. I I K K 0/1 0/3 A traditional decorative stitch. For overcasting, sewing on woven materials. Zigzag stitch: For serging, appliqué and tapering. Straight stitch: For all straight stitching...
Owner's Manual
Page 11
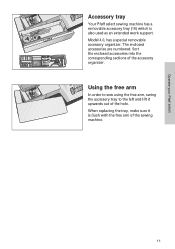
The enclosed accessories are numbered. Model 4.0, has a special removable accessory organizer. Sort the enclosed accessories into the corresponding sections of the hole. Using the free arm In order to sew using the free arm, swing the accessory tray to the left and lift it is also used as an extended work support. Operate your Pfaff select Accessory tray Your Pfaff select sewing machine has a removable accessory tray (16) which is Áush with the free arm of the sewing machine. 11 When replacing the tray, make sure it upwards out of the accessory organizer.
The enclosed accessories are numbered. Model 4.0, has a special removable accessory organizer. Sort the enclosed accessories into the corresponding sections of the hole. Using the free arm In order to sew using the free arm, swing the accessory tray to the left and lift it is also used as an extended work support. Operate your Pfaff select Accessory tray Your Pfaff select sewing machine has a removable accessory tray (16) which is Áush with the free arm of the sewing machine. 11 When replacing the tray, make sure it upwards out of the accessory organizer.

Owner's Manual
Page 13
Wind the thread clockwise a few times around in the bobbin. Hold the end of the thread spool. Operate your Pfaff select A B C Winding the bobbin from the spool pin Place the sewing thread on the main switch (1). To guarantee free movement of the thread and to give additional B hold to the thread spool, Àt a spool cap corresponding to the right under the hook C. The winding action will stop automatically as soon as the bobbin is full...
Wind the thread clockwise a few times around in the bobbin. Hold the end of the thread spool. Operate your Pfaff select A B C Winding the bobbin from the spool pin Place the sewing thread on the main switch (1). To guarantee free movement of the thread and to give additional B hold to the thread spool, Àt a spool cap corresponding to the right under the hook C. The winding action will stop automatically as soon as the bobbin is full...

Owner's Manual
Page 14
Winding Switch on the spool pin. Hold the end of thread Àrmly and press the the foot control. Threading Place the thread into guide A and pull it snaps into its hole. The winding action will stop automatically as soon as the bobbin is already threaded, you until it through opening B to the right under hook C. B A 14 TIP: If the machine is full. Don't forget: Turn the handwheel...
Winding Switch on the spool pin. Hold the end of thread Àrmly and press the the foot control. Threading Place the thread into guide A and pull it snaps into its hole. The winding action will stop automatically as soon as the bobbin is already threaded, you until it through opening B to the right under hook C. B A 14 TIP: If the machine is full. Don't forget: Turn the handwheel...

Owner's Manual
Page 15
... still wind the bobbin. The winding action will stop the needle from left and remove it snaps into the take -up lever from moving while winding the bobbin (see page 12). First make sure to the right under the hook C. Then wind the thread several times around the bobbin. The take -up lever must be positioned at its very top. Threading Raise the presser foot lifter (15). Operate your Pfaff select C Winding through...
... still wind the bobbin. The winding action will stop the needle from left and remove it snaps into the take -up lever from moving while winding the bobbin (see page 12). First make sure to the right under the hook C. Then wind the thread several times around the bobbin. The take -up lever must be positioned at its very top. Threading Raise the presser foot lifter (15). Operate your Pfaff select C Winding through...
Owner's Manual
Page 19
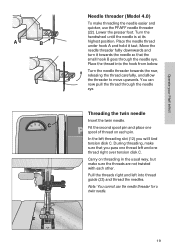
Lower the presser foot. Turn the handwheel until the needle is at its highest position. Fit the second spool pin and place one thread right over tension disk C. Move the needle threader fully downwards and turn it taut. Note: You cannot use the PFAFF needle threader (22). Place the thread into thread guide (23) and thread the needles. Place the needle thread under hook A and hold it towards the rear, releasing the thread carefully, and...
Lower the presser foot. Turn the handwheel until the needle is at its highest position. Fit the second spool pin and place one thread right over tension disk C. Move the needle threader fully downwards and turn it taut. Note: You cannot use the PFAFF needle threader (22). Place the thread into thread guide (23) and thread the needles. Place the needle thread under hook A and hold it towards the rear, releasing the thread carefully, and...
Owner's Manual
Page 20
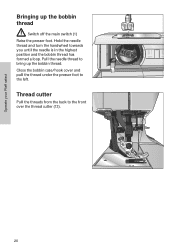
Close the bobbin case/hook cover and pull the thread under the presser foot to the front over the thread cutter (13). 20 Hold the needle thread and turn the handwheel towards you until the needle is in the highest position and the bobbin thread has formed a loop. Pull the needle thread to bring up the bobbin thread Switch off the main switch (1) Raise the presser foot. Thread cutter Pull the threads from the back to the left. Operate your Pfaff select Bringing up the bobbin thread.
Close the bobbin case/hook cover and pull the thread under the presser foot to the front over the thread cutter (13). 20 Hold the needle thread and turn the handwheel towards you until the needle is in the highest position and the bobbin thread has formed a loop. Pull the needle thread to bring up the bobbin thread Switch off the main switch (1) Raise the presser foot. Thread cutter Pull the threads from the back to the left. Operate your Pfaff select Bringing up the bobbin thread.

Owner's Manual
Page 23
... feed dog has to 5. C Now the feed dog is 4 to be dropped. Dropping the feed dog For certain sewing work, e.g. The normal setting for sewing is dropped. 23 For free-motion sewing, darning and buttonhole set the tension between 2 and 3. Now loosen the needle screw (25) and pull the needle down. To remove: Lower the presser foot and move slide C fully to the rear. Operate your Pfaff select A Changing the needle Switch off the main switch. B Setting the needle thread tension Set the required needle thread tension (11) with the help...
... feed dog has to 5. C Now the feed dog is 4 to be dropped. Dropping the feed dog For certain sewing work, e.g. The normal setting for sewing is dropped. 23 For free-motion sewing, darning and buttonhole set the tension between 2 and 3. Now loosen the needle screw (25) and pull the needle down. To remove: Lower the presser foot and move slide C fully to the rear. Operate your Pfaff select A Changing the needle Switch off the main switch. B Setting the needle thread tension Set the required needle thread tension (11) with the help...
Owner's Manual
Page 27
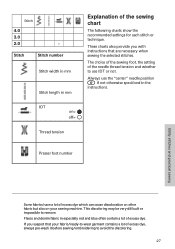
... sewing foot, the setting of the needle thread tension and whether to use the "center" needle position if not otherwise speciÀced in especially red and blue often contain a lot of excess dye. If you with instructions that your sewing machine. Always use IDT or not. These charts also provide you suspect that are necessary when sewing the selected stitches. Fleece and denim fabric in the instructions. Stitch Stitch number Stitch...
... sewing foot, the setting of the needle thread tension and whether to use the "center" needle position if not otherwise speciÀced in especially red and blue often contain a lot of excess dye. If you with instructions that your sewing machine. Always use IDT or not. These charts also provide you suspect that are necessary when sewing the selected stitches. Fleece and denim fabric in the instructions. Stitch Stitch number Stitch...

Owner's Manual
Page 28
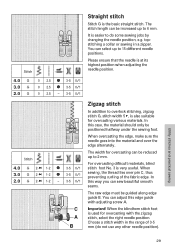
... the top fabric. The adjustment of 4-5. If you can be sewn using any of 15 various needle positions in the range of the needle thread tension is determined by the needle position dial. The top-stitch needle position is described on the needle plate or use the edge guide (standard accessory No.8). If the needle thread tension is too high the threads are interlaced below the lower fabric. Topstitching Straight stitch G can always guide the sewing foot along the guide marks...
... the top fabric. The adjustment of 4-5. If you can be sewn using any of 15 various needle positions in the range of the needle thread tension is determined by the needle position dial. The top-stitch needle position is described on the needle plate or use the edge guide (standard accessory No.8). If the needle thread tension is too high the threads are interlaced below the lower fabric. Topstitching Straight stitch G can always guide the sewing foot along the guide marks...
Owner's Manual
Page 29
... the edge, make sure the needle goes into the material and over pin C, thus preventing curling of 3-5 mm (do some sewing jobs by changing the needle position, e.g. It is easier to overlock stitching, zigzag stitch G, stitch width 5 , is at its highest position when adjusting the needle position. 4.0 G 3.0 G 2.0 G 0 2.5 3-5 0/1 0 2.5 3-5 0/1 0 2.5 - 3-5 0/1 Zigzag stitch In addition to do not use any other needle position). For overcasting difÀcult materials, blind 4.0 G 2- 1-2 3-5 0/1 stitch foot No. 3 is the basic straight stitch. Important! In...
... the edge, make sure the needle goes into the material and over pin C, thus preventing curling of 3-5 mm (do some sewing jobs by changing the needle position, e.g. It is easier to overlock stitching, zigzag stitch G, stitch width 5 , is at its highest position when adjusting the needle position. 4.0 G 3.0 G 2.0 G 0 2.5 3-5 0/1 0 2.5 3-5 0/1 0 2.5 - 3-5 0/1 Zigzag stitch In addition to do not use any other needle position). For overcasting difÀcult materials, blind 4.0 G 2- 1-2 3-5 0/1 stitch foot No. 3 is the basic straight stitch. Important! In...

Owner's Manual
Page 31
... more elastic than 5 , make sure the needle does not strike the bar of the fabric just over the edge and not in it is an overlock stitch? They are well-sewn and long-lasting. This to the right position. stretch 3.0 I 5- Tip: Ensure that the needle sews to the right of sewing foot 3. Utility stitches and practical sewing 31 Tip: We recommend using blindhem stitch foot No. 3 when sewing overlock seams. It guides...
... more elastic than 5 , make sure the needle does not strike the bar of the fabric just over the edge and not in it is an overlock stitch? They are well-sewn and long-lasting. This to the right position. stretch 3.0 I 5- Tip: Ensure that the needle sews to the right of sewing foot 3. Utility stitches and practical sewing 31 Tip: We recommend using blindhem stitch foot No. 3 when sewing overlock seams. It guides...

Owner's Manual
Page 34
...: Before starting point of the buttonhole foot fully to prevent the fabric from contracting while sewing. To produce beautiful seams, embroidering or darning threads are arranged at the Àrst red mark. Mark the starting any buttonhole, always push the guide of the buttonhole either with push button controls since the fabric does not have to secure your buttonhole. 34 5 5 - 5 Standard buttonhole • Insert the buttonhole foot and slide the foot forward...
...: Before starting point of the buttonhole foot fully to prevent the fabric from contracting while sewing. To produce beautiful seams, embroidering or darning threads are arranged at the Àrst red mark. Mark the starting any buttonhole, always push the guide of the buttonhole either with push button controls since the fabric does not have to secure your buttonhole. 34 5 5 - 5 Standard buttonhole • Insert the buttonhole foot and slide the foot forward...
Owner's Manual
Page 36
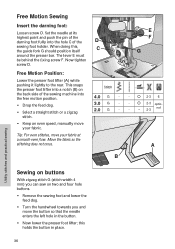
... its highest point and push the pin of the darning foot fully into the hole C of the sewing foot holder. nal - - 2-3 A Utility stitches and practical sewing Sewing on buttons With zigzag stitch G (stitch width 4 mm) you can sew on the back side of the sewing machine into the free motion position. • Drop the feed dog. • Select a straight stitch or a zigzag stitch. • Keep an even speed, manually move your fabric. D C Stitch 4.0 G 3.0 G 2.0 G - The lever E must be behind the Àxing screw F. Free Motion Sewing Insert the darning foot: Loosen screw D.
... its highest point and push the pin of the darning foot fully into the hole C of the sewing foot holder. nal - - 2-3 A Utility stitches and practical sewing Sewing on buttons With zigzag stitch G (stitch width 4 mm) you can sew on the back side of the sewing machine into the free motion position. • Drop the feed dog. • Select a straight stitch or a zigzag stitch. • Keep an even speed, manually move your fabric. D C Stitch 4.0 G 3.0 G 2.0 G - The lever E must be behind the Àxing screw F. Free Motion Sewing Insert the darning foot: Loosen screw D.

Owner's Manual
Page 38
... and push it needs. Changing the needle plate Switch off the main switch (1) • Remove the needle plate and lower the feed dog. • Clean the feed dog and hook area with the brush. • Apply a drop of oil (every 15 to 20 hours of its mounting. Cleaning and oiling Switch off the main switch (1) It is lying Áat the front until you use the machine, the more care...
... and push it needs. Changing the needle plate Switch off the main switch (1) • Remove the needle plate and lower the feed dog. • Clean the feed dog and hook area with the brush. • Apply a drop of oil (every 15 to 20 hours of its mounting. Cleaning and oiling Switch off the main switch (1) It is lying Áat the front until you use the machine, the more care...

Owner's Manual
Page 40
... stitches The needle is bent or blunt. The wrong needle is too small for thread. Needle thread breaks See reasons above . Thread is threaded. Insert new needle and push fully in. Needle is inserted. Needle is too thick or too thin. Only guide the fabric lightly. Do not wind thread free-hand, but run it fully into the stop. Use a needle system 130/705 H. Adjust thread tension. Check needle and bobbin thread tensions. 40 Insert new needle. Only use perfect threads. Thread up correctly. Let the machine feed...
... stitches The needle is bent or blunt. The wrong needle is too small for thread. Needle thread breaks See reasons above . Thread is threaded. Insert new needle and push fully in. Needle is inserted. Needle is too thick or too thin. Only guide the fabric lightly. Do not wind thread free-hand, but run it fully into the stop. Use a needle system 130/705 H. Adjust thread tension. Check needle and bobbin thread tensions. 40 Insert new needle. Only use perfect threads. Thread up correctly. Let the machine feed...

Owner's Manual
Page 41
... Feed dog is important if children are thread remnants in it. Before you replace sewing feet or needles, you leave the machine, even for a short time, do not forget to left. at right. Important note! Do not start the threaded machine without fabric in the hook race. If you must switch off the main switch. Machine does not feed or feeds irregularly Sewing lint has collected between the feed Remove needle plate, remove...
... Feed dog is important if children are thread remnants in it. Before you replace sewing feet or needles, you leave the machine, even for a short time, do not forget to left. at right. Important note! Do not start the threaded machine without fabric in the hook race. If you must switch off the main switch. Machine does not feed or feeds irregularly Sewing lint has collected between the feed Remove needle plate, remove...


