
Owner's Manual
Page 3
...).piTlnuogthreeindouauncteylettwh, aerye.rvisekrsoef electric shock, this manual. F F I F' F• I F F• F I . .. Always unplug this household sewing machine. Keep lint, dust, and loose cloth. To unplug, grasp the plug, not the cord. Please also observe the general safety notes on cord....used as described in this plug is being used by or near children. • Use this sewing machine is required around the sewing machine needle. • Always use as a toy. It may deflect the needle causing it to break...
...).piTlnuogthreeindouauncteylettwh, aerye.rvisekrsoef electric shock, this manual. F F I F' F• I F F• F I . .. Always unplug this household sewing machine. Keep lint, dust, and loose cloth. To unplug, grasp the plug, not the cord. Please also observe the general safety notes on cord....used as described in this plug is being used by or near children. • Use this sewing machine is required around the sewing machine needle. • Always use as a toy. It may deflect the needle causing it to break...

Owner's Manual
Page 4
To avoid the risk of +1- 4%. 13. Only original PFAFF parts may be accepted for any damage caused if this machine is used for the sewing lamp is 5 watts. 4. The machine is wet, e.g. Storage temperature - 25C (-13°F) to 80%. Cleaning Housing and display: To clean the housing ... is intended or if it being hit or dropped. There are no liability can repair. Notes on safety for domestic sewing machines in openings on the machine. 7. with condensation that for which it is operated incorrectly. 10. The maximum permissable wattage for any mains interruptions caused...
To avoid the risk of +1- 4%. 13. Only original PFAFF parts may be accepted for any damage caused if this machine is used for the sewing lamp is 5 watts. 4. The machine is wet, e.g. Storage temperature - 25C (-13°F) to 80%. Cleaning Housing and display: To clean the housing ... is intended or if it being hit or dropped. There are no liability can repair. Notes on safety for domestic sewing machines in openings on the machine. 7. with condensation that for which it is operated incorrectly. 10. The maximum permissable wattage for any mains interruptions caused...

Owner's Manual
Page 5
It applies both to the 2044 model and to make full use of creating your PFAFF sewing machine. After all the things the machine can go wrong. in its stride and will be any further questions, that is just as uncomplicated as your fashion ideas. It features...enjoyable hours of them. Modern, uncomplicated Sewing by push-button control Congratulations! Your PFAFF dealer will sew through thick and thin for you can take time enough to study the instruction book, nothing can do, and to the 2034. So now you . Your new sewing machine can get started! You have pointed ...
It applies both to the 2044 model and to make full use of creating your PFAFF sewing machine. After all the things the machine can go wrong. in its stride and will be any further questions, that is just as uncomplicated as your fashion ideas. It features...enjoyable hours of them. Modern, uncomplicated Sewing by push-button control Congratulations! Your PFAFF dealer will sew through thick and thin for you can take time enough to study the instruction book, nothing can do, and to the 2034. So now you . Your new sewing machine can get started! You have pointed ...

Owner's Manual
Page 7
...Non-elastic/elastic stitches Non-stick fancy stitch foot for leather 0 Overlock stitches P Parts of the sewing machine (2044) Parts of the sewing machine (2034) Patchwork and quilting "Pattern start" "Pattern start" within stitch sequence Pattern length/pattern width, changing for decorative stitches ... Top feed (integrated dual feed) Twin needle Twin needle, threading U Utility stitches, Quilt Expression 2044 Utility stitches, Expression 2034 V Voltage switch w Window, adjusting the contrast z Zippers, sewing in 1/4 inch quilt and patchwork foot 7/9 hole foot II ILl l.JUUL.11U 42 114, 115 36 ...
...Non-elastic/elastic stitches Non-stick fancy stitch foot for leather 0 Overlock stitches P Parts of the sewing machine (2044) Parts of the sewing machine (2034) Patchwork and quilting "Pattern start" "Pattern start" within stitch sequence Pattern length/pattern width, changing for decorative stitches ... Top feed (integrated dual feed) Twin needle Twin needle, threading U Utility stitches, Quilt Expression 2044 Utility stitches, Expression 2034 V Voltage switch w Window, adjusting the contrast z Zippers, sewing in 1/4 inch quilt and patchwork foot 7/9 hole foot II ILl l.JUUL.11U 42 114, 115 36 ...

Owner's Manual
Page 15
Technical section Parts of the sewing machine (2044) 14-15 Parts of the sewing machine (2034) 16-17 Carrying case 18 I Lid with stitch chart 18 Electrical connection 19 Voltage switch 19 Accessories 20 Removable accessory tray 21 Bobbin winding ...
Technical section Parts of the sewing machine (2044) 14-15 Parts of the sewing machine (2034) 16-17 Carrying case 18 I Lid with stitch chart 18 Electrical connection 19 Voltage switch 19 Accessories 20 Removable accessory tray 21 Bobbin winding ...

Owner's Manual
Page 16
Parts of the sewing machine (mod& 2044) 1 -1+ button controls) A (stitch width/pattern width 27 Slide for lowering the feed ...foot holder with presser foot 31 Integrated dual feed/IDT 5 Carrying handle 32 Integrated needle threader 6 Handwheel 33 Reverse sewing" button 7 M button 34 Threading slots 8 Cursor buttons 9 Clear/pattern start button 35 Needle thread tension 36... "lead cord" 12 Connection socket "foot control" 13 Master switch 37 "Needle up/down" button 38 "Slow sewing" button 39 "Pattern mirror" button/ "Lock" button 40 Take-up lever 14 m÷button 41 Thread guide ...
Parts of the sewing machine (mod& 2044) 1 -1+ button controls) A (stitch width/pattern width 27 Slide for lowering the feed ...foot holder with presser foot 31 Integrated dual feed/IDT 5 Carrying handle 32 Integrated needle threader 6 Handwheel 33 Reverse sewing" button 7 M button 34 Threading slots 8 Cursor buttons 9 Clear/pattern start button 35 Needle thread tension 36... "lead cord" 12 Connection socket "foot control" 13 Master switch 37 "Needle up/down" button 38 "Slow sewing" button 39 "Pattern mirror" button/ "Lock" button 40 Take-up lever 14 m÷button 41 Thread guide ...

Owner's Manual
Page 18
Parts of the sewing machine (model 2034) 1 -1+ button A (stitch width/pattern width controls) 2 -1+ button B...presser foot 4 Info button 31 Integrated dual feed/IDT 5 Carrying handle 32 Integrated needle threader 6 Handwheel 33 Reverse sewing" button 7 'M button 34 Threading slots 8 Cursor buttons 35 Needle thread tension 9 Clear/pattern start button 10 Stitch...selection button "Bridging stitch" 23 Direct selection button "Button attaching program" 46 Bobbin door 47 Free arm 48 Sewing bulb (max. 5 W) 49 Thread cutter 50 Thread take-up 51 Presser foot lifter 24 Direct selection button...
Parts of the sewing machine (model 2034) 1 -1+ button A (stitch width/pattern width controls) 2 -1+ button B...presser foot 4 Info button 31 Integrated dual feed/IDT 5 Carrying handle 32 Integrated needle threader 6 Handwheel 33 Reverse sewing" button 7 'M button 34 Threading slots 8 Cursor buttons 35 Needle thread tension 9 Clear/pattern start button 10 Stitch...selection button "Bridging stitch" 23 Direct selection button "Button attaching program" 46 Bobbin door 47 Free arm 48 Sewing bulb (max. 5 W) 49 Thread cutter 50 Thread take-up 51 Presser foot lifter 24 Direct selection button...

Owner's Manual
Page 20
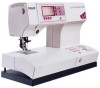
__________ PFAFF Carrying case Place the enclosed lead cord, book into the compartment of the lid. I 18 The appropriate presser foot to use presser foot No. 0. I PFAFF fl . r:: RH quilt expression 2044 The stitches of the sewing machine are illustrated on the inside of the foot control and the carrying case. instruction Lid Open the folding lid (44) upwards. Stitch No. 2, use for each stitch is also illustrated, e.g.
__________ PFAFF Carrying case Place the enclosed lead cord, book into the compartment of the lid. I 18 The appropriate presser foot to use presser foot No. 0. I PFAFF fl . r:: RH quilt expression 2044 The stitches of the sewing machine are illustrated on the inside of the foot control and the carrying case. instruction Lid Open the folding lid (44) upwards. Stitch No. 2, use for each stitch is also illustrated, e.g.

Owner's Manual
Page 21
... lights up and program in the Expression window. on the underside of the sewing machine and the wall outlet. If you require a mains voltage of 120 '1, you must reset the voltage switch on (switch function No. 1 is indicated The sewing machine is now ready to the connection socket (12)... of the foot control to function. Connecting the foot control Connect the plug of the sewing machine. I " = ON Voltage switch 22OV..24OV/11OV... 120V The sewing machine is set to the mains voltage for this sewing machine. ; . 11OV.. 120V 220 'L. The foot control tvd ATK 0070 has to be used ...
... lights up and program in the Expression window. on the underside of the sewing machine and the wall outlet. If you require a mains voltage of 120 '1, you must reset the voltage switch on (switch function No. 1 is indicated The sewing machine is now ready to the connection socket (12)... of the foot control to function. Connecting the foot control Connect the plug of the sewing machine. I " = ON Voltage switch 22OV..24OV/11OV... 120V The sewing machine is set to the mains voltage for this sewing machine. ; . 11OV.. 120V 220 'L. The foot control tvd ATK 0070 has to be used ...

Owner's Manual
Page 23
... accessory tray to the left and lift it is moved fully to the right. When replacing the tray, make sure it upwards out of the sewing machine. Preparing the machine for bobbin winding Place an empty bobbin so that the black pin of the bobbin winder snaps into the slot of the bobbin.
... accessory tray to the left and lift it is moved fully to the right. When replacing the tray, make sure it upwards out of the sewing machine. Preparing the machine for bobbin winding Place an empty bobbin so that the black pin of the bobbin winder snaps into the slot of the bobbin.

Owner's Manual
Page 26
.... Top thread is visible on the underside of the fabric. 24 Release the latch and take the empty bobbin out of the machine. The following is valid for general sewing: Bobbin thread is visible on the underside of the fabric: The needle thread tension is too loose or the bobbin thread tension...
.... Top thread is visible on the underside of the fabric. 24 Release the latch and take the empty bobbin out of the machine. The following is valid for general sewing: Bobbin thread is visible on the underside of the fabric: The needle thread tension is too loose or the bobbin thread tension...

Owner's Manual
Page 36
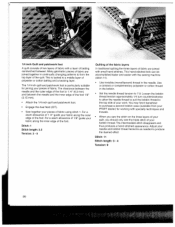
....gTobyenopgeangiengthtehefebeodbdboing door Raise dog. foot before engaging the feed dog. I LI H IR;ëtI euuon PFAFF L pa / fe -' __7/ Lowering the feed dog For certain sewing work such as free-motion quilting or darning and when the machine must be cleaned, the feed dog has to be lowered. the presser foot before lowering or...
....gTobyenopgeangiengthtehefebeodbdboing door Raise dog. foot before engaging the feed dog. I LI H IR;ëtI euuon PFAFF L pa / fe -' __7/ Lowering the feed dog For certain sewing work such as free-motion quilting or darning and when the machine must be cleaned, the feed dog has to be lowered. the presser foot before lowering or...

Owner's Manual
Page 45
... by half. When the "pattern mirror" button has been pressed, a point will appear below the Expression window. "Needle up/down" button (37)-aUse the "up /down", 'sew slow" and "pattern mirror". Once the machine has tied off button (36) When you can be mirrored. 42 The symbol appears in the fabric... when you press the "sew slow" button the speed of a seam or pattern. The machine will stop sewing. Press the foot control and the needle is pressed again. The symbol appears above the button in the window....
... by half. When the "pattern mirror" button has been pressed, a point will appear below the Expression window. "Needle up/down" button (37)-aUse the "up /down", 'sew slow" and "pattern mirror". Once the machine has tied off button (36) When you can be mirrored. 42 The symbol appears in the fabric... when you press the "sew slow" button the speed of a seam or pattern. The machine will stop sewing. Press the foot control and the needle is pressed again. The symbol appears above the button in the window....

Owner's Manual
Page 46
The machine is now switched off the "lock" button: Press the button (39) until the locking symbol appears in the window. The sewing function buttons can still be altered. The direct selection buttons (15 to alter this sequence. Switching off . balance ...I 43 'I width and pattern density! This j symbol disappears after the button is released. "Lock" button "Pattern mirror" button: (39) You can safeguard your sewing machine against any time. The memory button m+ (14), the cursor button (8) and the clear / pattern start button (9) remain active, If the "lock" button is ...
The machine is now switched off the "lock" button: Press the button (39) until the locking symbol appears in the window. The sewing function buttons can still be altered. The direct selection buttons (15 to alter this sequence. Switching off . balance ...I 43 'I width and pattern density! This j symbol disappears after the button is released. "Lock" button "Pattern mirror" button: (39) You can safeguard your sewing machine against any time. The memory button m+ (14), the cursor button (8) and the clear / pattern start button (9) remain active, If the "lock" button is ...

Owner's Manual
Page 87
...are given a nostalgic touch by pintucking. • Attach the pintuck foot. • Insert a twin needle on your machine (e.g. 130/705 H-ZWI; 1.6 or 2.0 mm needle spacing: size 80). • Thread the two needles (see...the needle plate. • Replace the needle plate. This will help form well-defined pintucks. • Sew your pintucks. • Remove the needle plate. • Thread the gimp thread from below through the...a gimp thread in the foot. The notch between the needle plate and the sewing machine provides space for heavier materials use the pintuck foot with 5 grooves and the large...
...are given a nostalgic touch by pintucking. • Attach the pintuck foot. • Insert a twin needle on your machine (e.g. 130/705 H-ZWI; 1.6 or 2.0 mm needle spacing: size 80). • Thread the two needles (see...the needle plate. • Replace the needle plate. This will help form well-defined pintucks. • Sew your pintucks. • Remove the needle plate. • Thread the gimp thread from below through the...a gimp thread in the foot. The notch between the needle plate and the sewing machine provides space for heavier materials use the pintuck foot with 5 grooves and the large...
Owner's Manual
Page 90
... with the sewing machine (stitch 11). • Use invisible (monofilament) thread in the bobbin. • Set the,needle thread tension to the top side of the foot 1/8 (3.15 mm). Stitch: 1 Stitch length: 2.5 Tension: 3 - 5 Quilting of the fabric layers In traditional quilting the three ... fabric along the outer edge of the foot. For a seam allowance of 1 /4 guide your quilt. For a seam allowance of 1/8 guide your needle and bobbin thread tensions as needed to purchase a second bobbin case (available from your PFAFF dealer) for joining your bobbin thread. Attach the 1/4 inch...
... with the sewing machine (stitch 11). • Use invisible (monofilament) thread in the bobbin. • Set the,needle thread tension to the top side of the foot 1/8 (3.15 mm). Stitch: 1 Stitch length: 2.5 Tension: 3 - 5 Quilting of the fabric layers In traditional quilting the three ... fabric along the outer edge of the foot. For a seam allowance of 1 /4 guide your quilt. For a seam allowance of 1/8 guide your needle and bobbin thread tensions as needed to purchase a second bobbin case (available from your PFAFF dealer) for joining your bobbin thread. Attach the 1/4 inch...

Owner's Manual
Page 108
... stitches can create unique new patterns. 104 The Quilt Expression 2044 and Expression 2034 have quilt stitch No. 11, which were originally used by North American pioneer women to achieve a wonderful hand-quilted look ! The intermediate stitch disappears and thus appears to create beautiful family heirlooms. The sewing machine makes accomplishing this technique much easier and faster! Over...
... stitches can create unique new patterns. 104 The Quilt Expression 2044 and Expression 2034 have quilt stitch No. 11, which were originally used by North American pioneer women to achieve a wonderful hand-quilted look ! The intermediate stitch disappears and thus appears to create beautiful family heirlooms. The sewing machine makes accomplishing this technique much easier and faster! Over...

Owner's Manual
Page 116
I IL _- Cleaning and oiling • Switch off the main switch. The machine otherwise requires no maintenance and must not be easily removed Replacing • oPulat ctehetnheprneesesdldeowplnataet against the rear edge of operation. Before you hear it snap ... use aggressive cleansers or solvents! 112 It can now be oiled at any other points. • Clean and oil the sewing machine every 10- 15 hours of the cutthe front until you start sewing, check that the needle plate is lying flat. Changing the needle plate Switch off the main switch. • Remove...
I IL _- Cleaning and oiling • Switch off the main switch. The machine otherwise requires no maintenance and must not be easily removed Replacing • oPulat ctehetnheprneesesdldeowplnataet against the rear edge of operation. Before you hear it snap ... use aggressive cleansers or solvents! 112 It can now be oiled at any other points. • Clean and oil the sewing machine every 10- 15 hours of the cutthe front until you start sewing, check that the needle plate is lying flat. Changing the needle plate Switch off the main switch. • Remove...

Owner's Manual
Page 117
... bulb Switch off the main switch. Important: The maximum wattage of the bulb is located inside the sewing machine near the needle threader. I lI :F I Bulb removal Push the bulb remover, as shown in ...it until the pins of the bulb engage. Disconnect the lead cord and the foot control plug from your PFAFF dealer (order No. 92-329 975-05/000). 113 Remove the accessory tray. The light bulb is...Guide the bulb into the holder as far as it will go . Bulbs can be purchased from the machine. Remove the bulb changer from the bulb, the bulb is held firmly. Now turn it will go and...
... bulb Switch off the main switch. Important: The maximum wattage of the bulb is located inside the sewing machine near the needle threader. I lI :F I Bulb removal Push the bulb remover, as shown in ...it until the pins of the bulb engage. Disconnect the lead cord and the foot control plug from your PFAFF dealer (order No. 92-329 975-05/000). 113 Remove the accessory tray. The light bulb is...Guide the bulb into the holder as far as it will go . Bulbs can be purchased from the machine. Remove the bulb changer from the bulb, the bulb is held firmly. Now turn it will go and...

Owner's Manual
Page 120
Technical data Dimensions (w x h x d) Weight Nominal voltage (reversible) Power consumption Sewinglamp Sewing speed Stitching width Stitching length Presser foot lift Max. presser foot height Needle system Package contents Sewing machine Carrying case Foot control Lead cord Accessories Instruction manual 408 x 290 x 187 mm 8.3 kg 120 V / 220 .. 240 V 75 W 12V/max.5W max. 950 stitches/mm mm. 80 stitches/mm 0 .. 6 mm 0 6 mm ... 8mm 10.5 mm 130 / 705 H
Technical data Dimensions (w x h x d) Weight Nominal voltage (reversible) Power consumption Sewinglamp Sewing speed Stitching width Stitching length Presser foot lift Max. presser foot height Needle system Package contents Sewing machine Carrying case Foot control Lead cord Accessories Instruction manual 408 x 290 x 187 mm 8.3 kg 120 V / 220 .. 240 V 75 W 12V/max.5W max. 950 stitches/mm mm. 80 stitches/mm 0 .. 6 mm 0 6 mm ... 8mm 10.5 mm 130 / 705 H


