
Owner's Manual
Page 3
... mechanical adjustment. • Never operate the foot controller free sewing machine with same type rated max 5 Watt. Always unplug this manual. a Do not operate where aerosol (spray) products are being used by the manufacturer as threading needle, • Always unplug the...SAFETY INSTRUCTIONS When using an electrical appliance, basic safety precautions should electric outlet immediately never after be used as described in this manual. • Never operate this sewing machine or damaged, or dropped into any opening. • Do not use outdoors. ...
... mechanical adjustment. • Never operate the foot controller free sewing machine with same type rated max 5 Watt. Always unplug this manual. a Do not operate where aerosol (spray) products are being used by the manufacturer as threading needle, • Always unplug the...SAFETY INSTRUCTIONS When using an electrical appliance, basic safety precautions should electric outlet immediately never after be used as described in this manual. • Never operate this sewing machine or damaged, or dropped into any opening. • Do not use outdoors. ...

Owner's Manual
Page 44
...Sewing functioi Info button Touch the info button to engage or disengage the lDT lower the feed dogs, page number of the darning program (model 2044) (see page 62) • engages automatic tapering (see page 72) • programming the buttonhole • determines the length of the info menu. to ... the selected stitch. Info menu The info menu gives you the following functions: • when pressed, will reverse sew • manual finish of a buttonhole (see page 101-102) 41 A Reverse sewing This button has the following information: needle size/type recommendation, needle...
...Sewing functioi Info button Touch the info button to engage or disengage the lDT lower the feed dogs, page number of the darning program (model 2044) (see page 62) • engages automatic tapering (see page 72) • programming the buttonhole • determines the length of the info menu. to ... the selected stitch. Info menu The info menu gives you the following functions: • when pressed, will reverse sew • manual finish of a buttonhole (see page 101-102) 41 A Reverse sewing This button has the following information: needle size/type recommendation, needle...

Owner's Manual
Page 72
BUttonHoles Geflerai notes on buttOnh0 insertflQ the b ttOflh0 guide sertiflg the buttonh000t TVpeS0tt00 FSuellmy iaaUuttO0mmaattc butt0nh0 bUttOflI0 manual inSh Manual buttOnh0 8utttO or fal0peweCitht gimP thread buttOnh0 Tips 70 70 70 71 72 72-73 74 75 76 I
BUttonHoles Geflerai notes on buttOnh0 insertflQ the b ttOflh0 guide sertiflg the buttonh000t TVpeS0tt00 FSuellmy iaaUuttO0mmaattc butt0nh0 bUttOflI0 manual inSh Manual buttOnh0 8utttO or fal0peweCitht gimP thread buttOnh0 Tips 70 70 70 71 72 72-73 74 75 76 I
Owner's Manual
Page 73
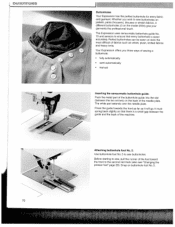
Your Expression offers you wish to sew buttonholes. It must spring back slightly so that every buttonhole is a small gap between the two arrows) on the model 2034) give your garments the professional touch. Whether you three ways of sewing a buttonhole: • fully automatically • semiautomatically manual 7. ..., plush, knitted fabrics and heavy knits. Before starting to sew, pull the runner of fabrics such as it will go. The Expression uses sensormatic buttonhole guide No. 10 and sensors to the second red mark (also see "Changing the presser foot" page 29). ...
Your Expression offers you wish to sew buttonholes. It must spring back slightly so that every buttonhole is a small gap between the two arrows) on the model 2034) give your garments the professional touch. Whether you three ways of sewing a buttonhole: • fully automatically • semiautomatically manual 7. ..., plush, knitted fabrics and heavy knits. Before starting to sew, pull the runner of fabrics such as it will go. The Expression uses sensormatic buttonhole guide No. 10 and sensors to the second red mark (also see "Changing the presser foot" page 29). ...

Owner's Manual
Page 75
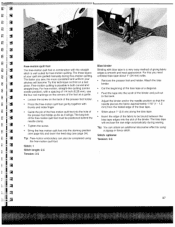
Buttonholes 4 I Fully automatic buttonhole Select the desired buttonhole (e.g. You can also finish a buttonhole manually by using the -1+ button B. Your Expression will allow you to sew the same size buttonhole until you have touched reverse. Adjust the size of the buttonhole ... "reverse sewing" button (33) once again. 72 This will continue to place the last or back bartack where you wish. This indicates a manual finish of the buttonhole. Semi-automatic buttonhole You can also adjust the buttonhole width (-1÷ button A) and the buttonhole density (-1+ button C). When...
Buttonholes 4 I Fully automatic buttonhole Select the desired buttonhole (e.g. You can also finish a buttonhole manually by using the -1+ button B. Your Expression will allow you to sew the same size buttonhole until you have touched reverse. Adjust the size of the buttonhole ... "reverse sewing" button (33) once again. 72 This will continue to place the last or back bartack where you wish. This indicates a manual finish of the buttonhole. Semi-automatic buttonhole You can also adjust the buttonhole width (-1÷ button A) and the buttonhole density (-1+ button C). When...

Owner's Manual
Page 77
...along with a second bartack, press the "reverse sewing" button once again. The word "auto" appears in the window. - "I 74 Manual buttonhole You can also set previously, disappears. Press the "reverse sewing" button. To complete the buttonhole with the width, length and stitch ...programming of the buttonhole is selected. Press the 'reverse sewing" button one time after the buttonhole has been programmed. This indicates a manual finish of the buttonhole is deleted when another program is desired. A standard keyhole buttonhole will begin sewing from the inside to a...
...along with a second bartack, press the "reverse sewing" button once again. The word "auto" appears in the window. - "I 74 Manual buttonhole You can also set previously, disappears. Press the "reverse sewing" button. To complete the buttonhole with the width, length and stitch ...programming of the buttonhole is selected. Press the 'reverse sewing" button one time after the buttonhole has been programmed. This indicates a manual finish of the buttonhole is deleted when another program is desired. A standard keyhole buttonhole will begin sewing from the inside to a...
Owner's Manual
Page 91
...Stitch: optional Tension: 3-5 Li 87 I :i 5 I6 Free-motion quilt foot The free-motion quilt foot in both curved and straight lines. Try this you sew, the more consistent and uniform your quilt are guided manually during sewing. The bias tape will enclose the raw edge automatically during... free-motion quilting. Tip: You can also be positioned behind the needle clamp. • Tighten ...
...Stitch: optional Tension: 3-5 Li 87 I :i 5 I6 Free-motion quilt foot The free-motion quilt foot in both curved and straight lines. Try this you sew, the more consistent and uniform your quilt are guided manually during sewing. The bias tape will enclose the raw edge automatically during... free-motion quilting. Tip: You can also be positioned behind the needle clamp. • Tighten ...

Owner's Manual
Page 104
...- 0.3 mm. Select the zigzag stitch needle position (stitch 12). Decorative sewing/Specialty techniques Tapering with the satin-stitch zigzag With your Expression you have the option of increasing or decreasing the width of the zigzag stitch in one direction. This technique of adjusting the width of..., the stitch width only changes in 0.5 mm increments. Zigzag stitch 3 is used when a center (B) needle position motif is called TAPERING. I I iI Manual change the stitch from 0 to 6 mm and reduce it again to 3. Pressing the "Pattern mirror button" (39) will change ? A B C 100...
...- 0.3 mm. Select the zigzag stitch needle position (stitch 12). Decorative sewing/Specialty techniques Tapering with the satin-stitch zigzag With your Expression you have the option of increasing or decreasing the width of the zigzag stitch in one direction. This technique of adjusting the width of..., the stitch width only changes in 0.5 mm increments. Zigzag stitch 3 is used when a center (B) needle position motif is called TAPERING. I I iI Manual change the stitch from 0 to 6 mm and reduce it again to 3. Pressing the "Pattern mirror button" (39) will change ? A B C 100...

Owner's Manual
Page 105
Note: If you have selected the right or left . These larger embroideries are perfect for motifs with the Expression window and an arrow pointing to 0.2 - 0.3 mm. • Using -1+ button A increase and reduce the width while 11 sewing. ueIlsf eeycotbuoztiwhgozsuatligdtcshltiiktNechot.oN3eoma. A dense beside it zigzag ... of the corner on the left needle position, the stitch width only changes in the fabric so that you desire, (33) while sewing. iL.:\ IVI > A B Manual change!
Note: If you have selected the right or left . These larger embroideries are perfect for motifs with the Expression window and an arrow pointing to 0.2 - 0.3 mm. • Using -1+ button A increase and reduce the width while 11 sewing. ueIlsf eeycotbuoztiwhgozsuatligdtcshltiiktNechot.oN3eoma. A dense beside it zigzag ... of the corner on the left needle position, the stitch width only changes in the fabric so that you desire, (33) while sewing. iL.:\ IVI > A B Manual change!

Owner's Manual
Page 120
presser foot height Needle system Package contents Sewing machine Carrying case Foot control Lead cord Accessories Instruction manual 408 x 290 x 187 mm 8.3 kg 120 V / 220 .. 240 V 75 W 12V/max.5W max. 950 stitches/mm mm. 80 stitches/mm 0 .. 6 mm 0 6 mm ... 8mm 10.5 mm 130 / 705 H Technical data Dimensions (w x h x d) Weight Nominal voltage (reversible) Power consumption Sewinglamp Sewing speed Stitching width Stitching length Presser foot lift Max.
presser foot height Needle system Package contents Sewing machine Carrying case Foot control Lead cord Accessories Instruction manual 408 x 290 x 187 mm 8.3 kg 120 V / 220 .. 240 V 75 W 12V/max.5W max. 950 stitches/mm mm. 80 stitches/mm 0 .. 6 mm 0 6 mm ... 8mm 10.5 mm 130 / 705 H Technical data Dimensions (w x h x d) Weight Nominal voltage (reversible) Power consumption Sewinglamp Sewing speed Stitching width Stitching length Presser foot lift Max.


