Owner's Manual
Page 4
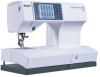
How to get it Electronic knee lift 3 Operating your performance 1:9 Operating your machine Integrated needle threader Bringing up the bobbin thread Thread cutter Changing the needle Threading the twin needle Correct thread tension - No 1 2:4 ... - No 74 and 75 Free motion darning - Table of content 1 Introduction Overview of your machine Standard presser feet and accessories Stitch chart Lid Carrying case Sewing with free arm Accessory tray 2 Preparations Voltage switch Electrical connection Connecting the foot control On/off switch Presser foot lift Changing the presser foot The...
How to get it Electronic knee lift 3 Operating your performance 1:9 Operating your machine Integrated needle threader Bringing up the bobbin thread Thread cutter Changing the needle Threading the twin needle Correct thread tension - No 1 2:4 ... - No 74 and 75 Free motion darning - Table of content 1 Introduction Overview of your machine Standard presser feet and accessories Stitch chart Lid Carrying case Sewing with free arm Accessory tray 2 Preparations Voltage switch Electrical connection Connecting the foot control On/off switch Presser foot lift Changing the presser foot The...

Owner's Manual
Page 9
.... Take-up /down button 4. Presser foot lifter 36. Selection by number button 8. Touch screen 12. Free arm 25. Needle plate 26. Thread cutter 27. Removable accessory tray 32. Integrated needle threader 35. Threading slots 37. Needle holder with spool cap 19. Main menu button 7. Thread cutter for lowering the feed dogs...
.... Take-up /down button 4. Presser foot lifter 36. Selection by number button 8. Touch screen 12. Free arm 25. Needle plate 26. Thread cutter 27. Removable accessory tray 32. Integrated needle threader 35. Threading slots 37. Needle holder with spool cap 19. Main menu button 7. Thread cutter for lowering the feed dogs...

Owner's Manual
Page 10
Standard presser feet and accessories Standard presser foot with IDT, No. 0A (attached on the machine upon delivery) Zipper foot with IDT, No. 4 Fancy stitch foot with IDT, No. 1A Buttonhole foot, No. 5A Fancy stitch foot, No. 2A Darning foot, No. 6 Blindhem and overlock foot with IDT, No. 3 Rolled hem foot 3 mm with IDT, No. 7 1:10
Standard presser feet and accessories Standard presser foot with IDT, No. 0A (attached on the machine upon delivery) Zipper foot with IDT, No. 4 Fancy stitch foot with IDT, No. 1A Buttonhole foot, No. 5A Fancy stitch foot, No. 2A Darning foot, No. 6 Blindhem and overlock foot with IDT, No. 3 Rolled hem foot 3 mm with IDT, No. 7 1:10

Owner's Manual
Page 17
Sewing with the free arm of the hole. When replacing the accessory tray, insert the pin into the hole and swing the tray to the right to close until it is a convenient storage compartment to protect your ... the lead cord, foot control and instruction book. There is flush with free arm In order to sew using the free arm, swing the accessory tray to open. All stitches are displayed on the inside of the case. Introduction Lid Lift the lid to the left and lift it .
Sewing with the free arm of the hole. When replacing the accessory tray, insert the pin into the hole and swing the tray to the right to close until it is a convenient storage compartment to protect your ... the lead cord, foot control and instruction book. There is flush with free arm In order to sew using the free arm, swing the accessory tray to open. All stitches are displayed on the inside of the case. Introduction Lid Lift the lid to the left and lift it .
Owner's Manual
Page 18
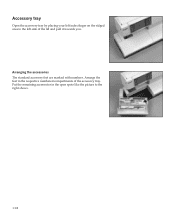
Arranging the accessories The standard accessory feet are marked with numbers. Arrange the feet in the open spots like the picture to the left side of the accessory tray. Put the remaining accessories in the respective numbered compartments of the lid and pull it towards you. Accessory tray Open the accessory tray by placing your left index finger on the ridged area to the right shows. 1:18
Arranging the accessories The standard accessory feet are marked with numbers. Arrange the feet in the open spots like the picture to the left side of the accessory tray. Put the remaining accessories in the respective numbered compartments of the lid and pull it towards you. Accessory tray Open the accessory tray by placing your left index finger on the ridged area to the right shows. 1:18

Owner's Manual
Page 27
... pin C of the bobbin case must face up. Open it by pulling it rests in the bobbin case. Check: Hold the bobbin case with the Pfaff logo facing towards you . Opening D of the sewing hook. Preparations Inserting the bobbin and bobbin case Turn off the on/off switch Swing away the... accessory tray to see arrow). Release the latch and take the empty bobbin out of the machine. When doing so, pull the thread through slot A, then ...
... pin C of the bobbin case must face up. Open it by pulling it rests in the bobbin case. Check: Hold the bobbin case with the Pfaff logo facing towards you . Opening D of the sewing hook. Preparations Inserting the bobbin and bobbin case Turn off the on/off switch Swing away the... accessory tray to see arrow). Release the latch and take the empty bobbin out of the machine. When doing so, pull the thread through slot A, then ...

Owner's Manual
Page 49
... the info system gives you using the sewing functions and recommendations regarding accessories and settings. Use the scroll buttons (4) to browse through multiple pages. Press the scroll buttons (4) to scroll through the pages. Info texts may extend over . Operating your performance 2058 Info system Your sewing machine has an info system function to...
... the info system gives you using the sewing functions and recommendations regarding accessories and settings. Use the scroll buttons (4) to browse through multiple pages. Press the scroll buttons (4) to scroll through the pages. Info texts may extend over . Operating your performance 2058 Info system Your sewing machine has an info system function to...

Owner's Manual
Page 60
... the presser foot and lower the feed dogs. (Make sure the IDT is disengaged). • Mark the button position on buttons - Sewing on your authorized Pfaff dealer as an optional accessory.
... the presser foot and lower the feed dogs. (Make sure the IDT is disengaged). • Mark the button position on buttons - Sewing on your authorized Pfaff dealer as an optional accessory.

Owner's Manual
Page 70
... about every 10 - 12 inches (25 - 30 cm). • Practice stippling on scraps of the quilt. When the feed dogs are extra accessories created to make your authorized Pfaff dealer to purchase. 5:8 See your stippling easier. The Quilting table and Open-toe Free-Motion foot are lowered, you move the fabric to...
... about every 10 - 12 inches (25 - 30 cm). • Practice stippling on scraps of the quilt. When the feed dogs are extra accessories created to make your authorized Pfaff dealer to purchase. 5:8 See your stippling easier. The Quilting table and Open-toe Free-Motion foot are lowered, you move the fabric to...
Owner's Manual
Page 89
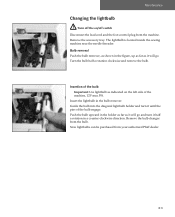
... the bulb half a rotation clockwise and remove the bulb. Insert the lightbulb in a counter-clockwise direction. Remove the bulb changer from your authorized Pfaff dealer. 8:3 Push the bulb upward in the holder as far as it will go and turn it until the pins of the machine, 12V...purchased from the bulb. Maintenance Changing the lightbulb Turn off switch Disconnect the lead cord and the foot control plug from the machine. Remove the accessory tray. Insertion of the bulb Important: Use lightbulb as it half a rotation in the bulb remover. Guide the bulb into the diagonal lightbulb ...
... the bulb half a rotation clockwise and remove the bulb. Insert the lightbulb in a counter-clockwise direction. Remove the bulb changer from your authorized Pfaff dealer. 8:3 Push the bulb upward in the holder as far as it will go and turn it until the pins of the machine, 12V...purchased from the bulb. Maintenance Changing the lightbulb Turn off switch Disconnect the lead cord and the foot control plug from the machine. Remove the accessory tray. Insertion of the bulb Important: Use lightbulb as it half a rotation in the bulb remover. Guide the bulb into the diagonal lightbulb ...

Owner's Manual
Page 91
The machine does not sew the selected stitch Select the desired stitch again. If problems remain, contact an authorized Pfaff dealer. Non-original Parts and Accessories The warranty does not cover any children nearby. Raise feed dogs. Switch off the machine on again after approx.... 10 seconds. Remove the threads. The contrast on again. Have your authorized Pfaff dealer. Feed dogs are thread remnants in the ...
The machine does not sew the selected stitch Select the desired stitch again. If problems remain, contact an authorized Pfaff dealer. Non-original Parts and Accessories The warranty does not cover any children nearby. Raise feed dogs. Switch off the machine on again after approx.... 10 seconds. Remove the threads. The contrast on again. Have your authorized Pfaff dealer. Feed dogs are thread remnants in the ...

Owner's Manual
Page 92
... Action field Arranging the accessories Alphabets Alphabet sequence Alphabet sequence menu Antique hand embroidery stitches Antique quilt stitches Appliqués Art stitches Audio signal Automatic darning 1:10 1:18 3:7 1:18 3:5, 6:6-6:7 6:7 6:6 1:15, 3:5 1:...
... Action field Arranging the accessories Alphabets Alphabet sequence Alphabet sequence menu Antique hand embroidery stitches Antique quilt stitches Appliqués Art stitches Audio signal Automatic darning 1:10 1:18 3:7 1:18 3:5, 6:6-6:7 6:7 6:6 1:15, 3:5 1:...
Owner's Manual
Page 95
... number button Selection menus Sensormatic buttonhole guide Inserting Sewing menu Sew slow Single stitch Spool cap Standard buttonhole Standard overlock stitch Standard presser feet and accessories Standard presser foot with IDT Status bar Stippling stitch Stitch balance Stitch chart Stitch Creator Add stitches Alter the settings Creating a new stitch Editing Saving...
... number button Selection menus Sensormatic buttonhole guide Inserting Sewing menu Sew slow Single stitch Spool cap Standard buttonhole Standard overlock stitch Standard presser feet and accessories Standard presser foot with IDT Status bar Stippling stitch Stitch balance Stitch chart Stitch Creator Add stitches Alter the settings Creating a new stitch Editing Saving...

Owner's Manual
Page 97
... 10.5mm 130/705 H Package contents Sewing machine Carrying case Foot control Lead cord Accessories Instruction manual Intellectual property PFAFF, PERFORMANCE and IDT (image) are registered trademarks or trademarks of accessories without prior notice, or make modifications to the performance or design. Technical data Dimensions (w x h x d) Weight Nominal voltage (reversible) Power consumption Sewing lamp...
... 10.5mm 130/705 H Package contents Sewing machine Carrying case Foot control Lead cord Accessories Instruction manual Intellectual property PFAFF, PERFORMANCE and IDT (image) are registered trademarks or trademarks of accessories without prior notice, or make modifications to the performance or design. Technical data Dimensions (w x h x d) Weight Nominal voltage (reversible) Power consumption Sewing lamp...


