Owner's Manual
Page 4
...2:14 Eyelets - No 59 2:15 Automatic darning - Table of content 1 Introduction Overview of your machine Standard presser feet and accessories Stitch chart Lid Carrying case Sewing with free arm Accessory tray 2 Preparations Voltage switch Electrical connection Connecting the...Straight stitch - No 4 2:5 Topstitching - No 1 2:10 Blindhem stitch - How to get it Electronic knee lift 3 Operating your performance 1:9 Operating your machine Integrated needle threader Bringing up the bobbin thread Thread cutter Changing the needle Threading the twin needle Correct thread tension ...
...2:14 Eyelets - No 59 2:15 Automatic darning - Table of content 1 Introduction Overview of your machine Standard presser feet and accessories Stitch chart Lid Carrying case Sewing with free arm Accessory tray 2 Preparations Voltage switch Electrical connection Connecting the...Straight stitch - No 4 2:5 Topstitching - No 1 2:10 Blindhem stitch - How to get it Electronic knee lift 3 Operating your performance 1:9 Operating your machine Integrated needle threader Bringing up the bobbin thread Thread cutter Changing the needle Threading the twin needle Correct thread tension ...

Owner's Manual
Page 10
Standard presser feet and accessories Standard presser foot with IDT, No. 0A (attached on the machine upon delivery) Zipper foot with IDT, No. 4 Fancy stitch foot with IDT, No. 1A Buttonhole foot, No. 5A Fancy stitch foot, No. 2A Darning foot, No. 6 Blindhem and overlock foot with IDT, No. 3 Rolled hem foot 3 mm with IDT, No. 7 1:10
Standard presser feet and accessories Standard presser foot with IDT, No. 0A (attached on the machine upon delivery) Zipper foot with IDT, No. 4 Fancy stitch foot with IDT, No. 1A Buttonhole foot, No. 5A Fancy stitch foot, No. 2A Darning foot, No. 6 Blindhem and overlock foot with IDT, No. 3 Rolled hem foot 3 mm with IDT, No. 7 1:10
Owner's Manual
Page 18
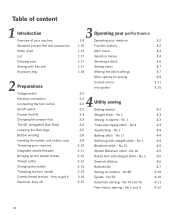
Arrange the feet in the open spots like the picture to the left side of the accessory tray. Accessory tray Open the accessory tray by placing your left index finger on the ridged area to the right shows. 1:18 Put the remaining accessories in the respective numbered compartments of the lid and pull it towards you. Arranging the accessories The standard accessory feet are marked with numbers.
Arrange the feet in the open spots like the picture to the left side of the accessory tray. Accessory tray Open the accessory tray by placing your left index finger on the ridged area to the right shows. 1:18 Put the remaining accessories in the respective numbered compartments of the lid and pull it towards you. Arranging the accessories The standard accessory feet are marked with numbers.
Owner's Manual
Page 22
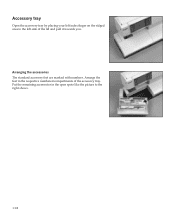
The fabric is fed precisely. The IDT keeps all work with the Integrated Dual Feed IDT, use presser feet with two fingers on industrial machines, the IDT feeds the fabric from you. 2:4 Press the IDT down , then release it slowly guiding it engages. ... such as silk or rayon the dual feed prevents puckering of the black ribbed elbow. The IDT (Integrated Dual Feed) For sewing any fabric precisely Pfaff provides the ideal solution: the Integrated Dual Feed, IDT system. As on either side of the seam.
The fabric is fed precisely. The IDT keeps all work with the Integrated Dual Feed IDT, use presser feet with two fingers on industrial machines, the IDT feeds the fabric from you. 2:4 Press the IDT down , then release it slowly guiding it engages. ... such as silk or rayon the dual feed prevents puckering of the black ribbed elbow. The IDT (Integrated Dual Feed) For sewing any fabric precisely Pfaff provides the ideal solution: the Integrated Dual Feed, IDT system. As on either side of the seam.
Owner's Manual
Page 94
... 8:1-8:5 3:4 3:3 3:7, 6:5, 7:5 3:9-3:10 3:3 1:11 8:2 3:7 3:2 5:10 2:2 1:13 3:11 Ornamental stitches Overlock stitches Overview of your machine 1:16, 3:5 1:13, 3:4, 4:6 1:9 P Package contents 8:10 Patchwork program 5:5 Pattern length 3:7 Pattern restart 3:2 Presser feet 1:10 Presser foot lift 2:3 Presser foot raise 3:2, 3:9, 3:12 Problems and solutions 8:4-8:5 Professional eyelet buttonhole 1:14 Programmable darning stitch 1:14 Programmable reinforced darning stitch 1:14 Programmable...
... 8:1-8:5 3:4 3:3 3:7, 6:5, 7:5 3:9-3:10 3:3 1:11 8:2 3:7 3:2 5:10 2:2 1:13 3:11 Ornamental stitches Overlock stitches Overview of your machine 1:16, 3:5 1:13, 3:4, 4:6 1:9 P Package contents 8:10 Patchwork program 5:5 Pattern length 3:7 Pattern restart 3:2 Presser feet 1:10 Presser foot lift 2:3 Presser foot raise 3:2, 3:9, 3:12 Problems and solutions 8:4-8:5 Professional eyelet buttonhole 1:14 Programmable darning stitch 1:14 Programmable reinforced darning stitch 1:14 Programmable...
Owner's Manual
Page 95
... Selection by number button Selection menus Sensormatic buttonhole guide Inserting Sewing menu Sew slow Single stitch Spool cap Standard buttonhole Standard overlock stitch Standard presser feet and accessories Standard presser foot with IDT Status bar Stippling stitch Stitch balance Stitch chart Stitch Creator Add stitches Alter the settings Creating a new stitch...
... Selection by number button Selection menus Sensormatic buttonhole guide Inserting Sewing menu Sew slow Single stitch Spool cap Standard buttonhole Standard overlock stitch Standard presser feet and accessories Standard presser foot with IDT Status bar Stippling stitch Stitch balance Stitch chart Stitch Creator Add stitches Alter the settings Creating a new stitch...

