
Owner's Manual
Page 2
...cover everything that is likely to help of the diagrams and names of the new KAYSER sewing machine with its sleek, modern lines and remarkable sewing capabilities. But it goes. Should you ever have any sewing problems, don't hesitate to contact your nearest dealer who will be glad to occur... may have given you this instruction book which holds the answers to see the many practical hints. Pfaff-Haushaltmaschinen GmbH Karlsruhe-Durlach Dear Customer, We congratulate you on your machine. The demonstrator has no doubt given you many useful and beautiful things you can make on your ...
...cover everything that is likely to help of the diagrams and names of the new KAYSER sewing machine with its sleek, modern lines and remarkable sewing capabilities. But it goes. Should you ever have any sewing problems, don't hesitate to contact your nearest dealer who will be glad to occur... may have given you this instruction book which holds the answers to see the many practical hints. Pfaff-Haushaltmaschinen GmbH Karlsruhe-Durlach Dear Customer, We congratulate you on your machine. The demonstrator has no doubt given you many useful and beautiful things you can make on your ...
Owner's Manual
Page 3
... Setting the stitch width for zigzag sewing 13 Changing the sewing foot . . 14 Dropping the machine feed . . 15 A few dos and donts 15 Sewing 16 Contents Sewing on buttons 16 17 Sewing buttonholes on zigzag sewing machines 18 19 Sewing buttonholes on zigzag and utility-stitch sewing machines . 20 21 Blindstitching on zigzag and utility-stitch sewing machines . . 25 Embroidering and darning . . . . 26...
... Setting the stitch width for zigzag sewing 13 Changing the sewing foot . . 14 Dropping the machine feed . . 15 A few dos and donts 15 Sewing 16 Contents Sewing on buttons 16 17 Sewing buttonholes on zigzag sewing machines 18 19 Sewing buttonholes on zigzag and utility-stitch sewing machines . 20 21 Blindstitching on zigzag and utility-stitch sewing machines . . 25 Embroidering and darning . . . . 26...
Owner's Manual
Page 7
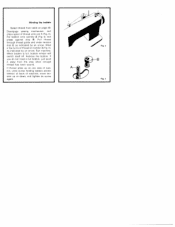
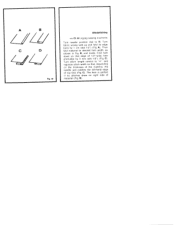
... tensicn at back of thread onto pin 1 (Fig. 3). If thread piles up on page 28. Disengage sewing mechanism, and place spool of machine, move ten sion up or down, and tighten its screw again, Fig. 4 Run machine. Remove the bobbin. Put bobbin onto spindle A (Fig. 4) and press against stop when enough thread has...
... tensicn at back of thread onto pin 1 (Fig. 3). If thread piles up on page 28. Disengage sewing mechanism, and place spool of machine, move ten sion up or down, and tighten its screw again, Fig. 4 Run machine. Remove the bobbin. Put bobbin onto spindle A (Fig. 4) and press against stop when enough thread has...
Owner's Manual
Page 14
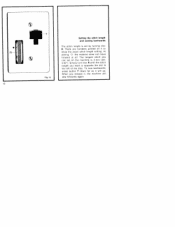
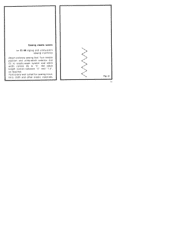
At setbng 0 the material does not move forward at all. When you release it, the machine will go. There are numbers printed on the machine is opposite the dot to show the exact stitch length setting. Simply turn disc R until the stitch length you can set by turning disc R. is Setting the stitch length and sewing backwards The stitch length is set on it will sew forwards again. To sew backwards, press button T down far as it to the left of the disc. The longest stitch you want is 4 mm (abt. 532"). -T Fig.
At setbng 0 the material does not move forward at all. When you release it, the machine will go. There are numbers printed on the machine is opposite the dot to show the exact stitch length setting. Simply turn disc R until the stitch length you can set by turning disc R. is Setting the stitch length and sewing backwards The stitch length is set on it will sew forwards again. To sew backwards, press button T down far as it to the left of the disc. The longest stitch you want is 4 mm (abt. 532"). -T Fig.
Owner's Manual
Page 17
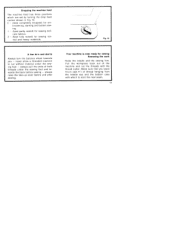
...start the next seam. always raise the take-up lever before sewing - ic Dropping the machine feed The machine feed has three positions which to run without material under the sewing foot and towards you leave 10cm (abt. 4") of the machine and cut the threads with which are set by turning the drop.... A few do's and donts Always turn the balance wheel towards the back before and after sewing. / Fig. 19 Your machine is now ready for sewing Removing the work Raise the needle and the sewing foot Pull the workpiece back out of thread hanging from the needle eye and the bobbin case ...
...start the next seam. always raise the take-up lever before sewing - ic Dropping the machine feed The machine feed has three positions which to run without material under the sewing foot and towards you leave 10cm (abt. 4") of the machine and cut the threads with which are set by turning the drop.... A few do's and donts Always turn the balance wheel towards the back before and after sewing. / Fig. 19 Your machine is now ready for sewing Removing the work Raise the needle and the sewing foot Pull the workpiece back out of thread hanging from the needle eye and the bobbin case ...
Owner's Manual
Page 18
... needle to its highest point. Straight-stitch sewing When the stitch width control (Fig. 17) is tight. Exchange the sewing toot with the but ton sewing foot shown in Fig. 20. the machine will sew zigzag stitches of the desired width Fig. 20 Sewing on the balance wheel is set stitch width... control C to any number between 0 and 5, the ma chine will sew straight stitches. Sewing Make sure the...
... needle to its highest point. Straight-stitch sewing When the stitch width control (Fig. 17) is tight. Exchange the sewing toot with the but ton sewing foot shown in Fig. 20. the machine will sew zigzag stitches of the desired width Fig. 20 Sewing on the balance wheel is set stitch width... control C to any number between 0 and 5, the ma chine will sew straight stitches. Sewing Make sure the...
Owner's Manual
Page 20
Fig. 23 Sewing buttonholes on material with tailors chalk. Place material with or without filler thread Attach niastic buttonhole foot (Fig. 23). Set stitch length so that stitches are close to 2 (see page 13). Turn needle position dial to "L" and stitch width control to each other. Mark position and length of buttonhole on CI. 44 zigzag sewing machines with mark ad buttonhole under sewing foot.
Fig. 23 Sewing buttonholes on material with tailors chalk. Place material with or without filler thread Attach niastic buttonhole foot (Fig. 23). Set stitch length so that stitches are close to 2 (see page 13). Turn needle position dial to "L" and stitch width control to each other. Mark position and length of buttonhole on CI. 44 zigzag sewing machines with mark ad buttonhole under sewing foot.
Owner's Manual
Page 22
... bol of left buttonhole seam is below both markings. Turn utilly-stitch selector dial back to the bartack symbol and sew about five barTacking stitches. Turn stitch width control to "0" and sew 3 to B in the desired length. Mark position and length of bartack is positioned below dot mark. Cut the ...-stitch selector dial to right buttonhole seam symbol. Raise needle out of material (E). Turn utility-stitch selector dial (5) until symbol of buttonhole on Cl. 46 zigzag and utility-stitch sewing machines with or without filler thread Attach clear-view buttonhole foot.
... bol of left buttonhole seam is below both markings. Turn utilly-stitch selector dial back to the bartack symbol and sew about five barTacking stitches. Turn stitch width control to "0" and sew 3 to B in the desired length. Mark position and length of bartack is positioned below dot mark. Cut the ...-stitch selector dial to right buttonhole seam symbol. Raise needle out of material (E). Turn utility-stitch selector dial (5) until symbol of buttonhole on Cl. 46 zigzag and utility-stitch sewing machines with or without filler thread Attach clear-view buttonhole foot.
Owner's Manual
Page 24
Blindstitching on CI. 46 zigzag and utility-stitch sewing machines with zig zag stitches before it is in line with left stitch exactly in folded edge, catching merely one grade. Re duce needle thread tension ... about one fabric yarn. Regulate stitch width so that folded edge is hemmed. Set stitch length control between '3' and '4'. Fold hem (2) and place fabric under sewing foot so that needle takes left groove of heavy woolens only once (3) and finish edge with clear-view foot Turn needle position and utility-stitch...
Blindstitching on CI. 46 zigzag and utility-stitch sewing machines with zig zag stitches before it is in line with left stitch exactly in folded edge, catching merely one grade. Re duce needle thread tension ... about one fabric yarn. Regulate stitch width so that folded edge is hemmed. Set stitch length control between '3' and '4'. Fold hem (2) and place fabric under sewing foot so that needle takes left groove of heavy woolens only once (3) and finish edge with clear-view foot Turn needle position and utility-stitch...
Owner's Manual
Page 26
... (abt. 1/2") (Fig. A B Blindstitching on right side of Fig. 3o material (Fig. A). B, and baste. C). C). The hem is perfect if no stitches show on CI. 44 zigzag sewing machines Turn needle position dial to desired hem width, as shown in Fig. Turn fabric wrong side up and fold its edge C D back by 3 mm (abt...
... (abt. 1/2") (Fig. A B Blindstitching on right side of Fig. 3o material (Fig. A). B, and baste. C). C). The hem is perfect if no stitches show on CI. 44 zigzag sewing machines Turn needle position dial to desired hem width, as shown in Fig. Turn fabric wrong side up and fold its edge C D back by 3 mm (abt...
Owner's Manual
Page 27
Particularly well suited for sewing tricot. Fig. 31 terry cloth and other elastic materials. Sewing elastic seams on Cl. 46 zigzag and utility-stitch sewing machines Attach ordinary sewing foot, Turn needle position and utility-stitch selector dial (5) to elastic-seam symbol and stitch width control (6) to 5 Set stitch length control between 0 and 1.5', as required.
Particularly well suited for sewing tricot. Fig. 31 terry cloth and other elastic materials. Sewing elastic seams on Cl. 46 zigzag and utility-stitch sewing machines Attach ordinary sewing foot, Turn needle position and utility-stitch selector dial (5) to elastic-seam symbol and stitch width control (6) to 5 Set stitch length control between 0 and 1.5', as required.
Owner's Manual
Page 28
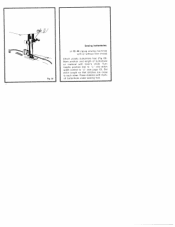
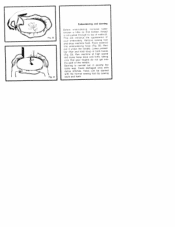
Cover damaged area with the normal sewing foot by sewing back and forth. Place material nto embrodering hooc (Fig. 32). then put it under the needle. increase ower tension a iftie so that your fingers do ... and hold hoop in both hands Fg. 33). Darning is carried out iii exactly the same way. Tears can be darned with dense stitches. Run machine at higri speed and move hoop back and forth, taking care that bobbin thread s not pulled through to top of ycur embroidery Remove...
Cover damaged area with the normal sewing foot by sewing back and forth. Place material nto embrodering hooc (Fig. 32). then put it under the needle. increase ower tension a iftie so that your fingers do ... and hold hoop in both hands Fg. 33). Darning is carried out iii exactly the same way. Tears can be darned with dense stitches. Run machine at higri speed and move hoop back and forth, taking care that bobbin thread s not pulled through to top of ycur embroidery Remove...
Owner's Manual
Page 31
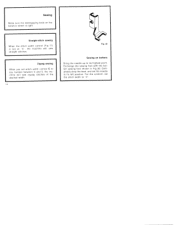
After oiling, run the machine for a short while sewing on a piece of waste material in order to get rid of moving parts behind the face cover and under the top cover and the bedplate have to time. Machine care Oiling All bearings of excess oil. The shuttle race must also be oiled from time to be oiled occasionally. Always use high-grade (resin-free) sew ing machine oil. To do this, re move the bobbin case.
After oiling, run the machine for a short while sewing on a piece of waste material in order to get rid of moving parts behind the face cover and under the top cover and the bedplate have to time. Machine care Oiling All bearings of excess oil. The shuttle race must also be oiled from time to be oiled occasionally. Always use high-grade (resin-free) sew ing machine oil. To do this, re move the bobbin case.
Owner's Manual
Page 38
Machine runs heavily and is noisy Remedy: Clean shuttle and shuttle race as instructed on page 29. Cause: 1 Dust and pieces of thread have accumulated in the shuttle race, 2. Machine has not been serviced for a longer time. 3. Machine clogged by nferior oil. Clean the machine thoroughly with cleaning fluid (kerosene) and oil it with highquality sewing machine oil. 36 Read instructions on page 30.
Machine runs heavily and is noisy Remedy: Clean shuttle and shuttle race as instructed on page 29. Cause: 1 Dust and pieces of thread have accumulated in the shuttle race, 2. Machine has not been serviced for a longer time. 3. Machine clogged by nferior oil. Clean the machine thoroughly with cleaning fluid (kerosene) and oil it with highquality sewing machine oil. 36 Read instructions on page 30.


