
Owner's Manual
Page 9
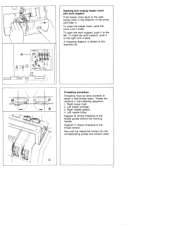
...done correctly to the machine (A). Left looper (orange) 3. Right needle (green) 4. Thread the machine in the direction of the arrow and lower it locks. Diagram C shows threading of the thread guides behind the carrying handle. Opening and closing looper cover and work support Push looper cover...) 2. To close the looper cover, push the cover until it to the right until it . Left needle (blue) Diagram B shows threading of the thread tension. To open the work support, push it to the left. A threading diagram is affixed to obtain a well-formed seam. Now pull the respective...
...done correctly to the machine (A). Left looper (orange) 3. Right needle (green) 4. Thread the machine in the direction of the arrow and lower it locks. Diagram C shows threading of the thread guides behind the carrying handle. Opening and closing looper cover and work support Push looper cover...) 2. To close the looper cover, push the cover until it to the right until it . Left needle (blue) Diagram B shows threading of the thread tension. To open the work support, push it to the left. A threading diagram is affixed to obtain a well-formed seam. Now pull the respective...
Owner's Manual
Page 12
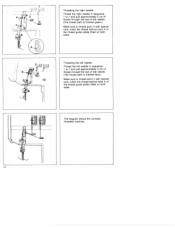
... the needle. (The thread path is marked green.) Make sure to thread point 4 with special care; Threading the right needle: Thread the right needle in sequence 1 to 7 and pull approximately 5 cm of thread through the eye of the needle. (The thread path is marked blue.) Make sure to thread point 4 with special care; The diagram shows the correctly...
... the needle. (The thread path is marked green.) Make sure to thread point 4 with special care; Threading the right needle: Thread the right needle in sequence 1 to 7 and pull approximately 5 cm of thread through the eye of the needle. (The thread path is marked blue.) Make sure to thread point 4 with special care; The diagram shows the correctly...


