
Owner's Manual
Page 4
...seam Threading the right looper Threading the left looper Threading the left and right needle Thread reel change on hobbylock 784 and 786 Adjusting the differential feed (hobbyfock 786) . . Disengaging the upper knife Adjusting the seam width Changing the sewing foot Changing the light bulb Cleaning... thread tensions Correcting the thread tensions 3-thread overedge seam Thread chart Adjusting the stitch length on threaded machine Inserting the lint box Seam allowance Sewing test Points to observe during sewing Securing the seam Axial blocking of the cardboard box 2. 3 4 4 5 6 7 7 8 8 9 10 10...
...seam Threading the right looper Threading the left looper Threading the left and right needle Thread reel change on hobbylock 784 and 786 Adjusting the differential feed (hobbyfock 786) . . Disengaging the upper knife Adjusting the seam width Changing the sewing foot Changing the light bulb Cleaning... thread tensions Correcting the thread tensions 3-thread overedge seam Thread chart Adjusting the stitch length on threaded machine Inserting the lint box Seam allowance Sewing test Points to observe during sewing Securing the seam Axial blocking of the cardboard box 2. 3 4 4 5 6 7 7 8 8 9 10 10...
Owner's Manual
Page 14
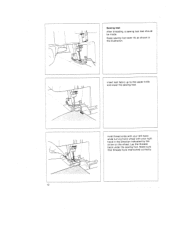
Sewing test After threading, a sewing test test should be made. Lay the threads back under the sewing foot. Insert test fabric up to the upper knife and lower the sewing foot. Make sure that threads have interlocked correctly. 12 I I 'N I I / / . / -- - . . Raise sewing foot lever 16, as shown in the direction indicated by the arrow on the wheel. - - 'I \\ Hold thread ends with your left hand while turning hand wheel with your right hand in the illustration.
Sewing test After threading, a sewing test test should be made. Lay the threads back under the sewing foot. Insert test fabric up to the upper knife and lower the sewing foot. Make sure that threads have interlocked correctly. 12 I I 'N I I / / . / -- - . . Raise sewing foot lever 16, as shown in the direction indicated by the arrow on the wheel. - - 'I \\ Hold thread ends with your left hand while turning hand wheel with your right hand in the illustration.
Owner's Manual
Page 22
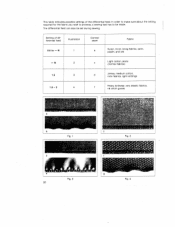
... Fig. 4 The differential feed can also be made. In order to make sure about the setting required for the fabric you wish to process, a sewing test has to - This table indicates possible settings of differential feed Illustration 0.5 to be set during sewing. Setting of the differential feed.
... Fig. 4 The differential feed can also be made. In order to make sure about the setting required for the fabric you wish to process, a sewing test has to - This table indicates possible settings of differential feed Illustration 0.5 to be set during sewing. Setting of the differential feed.

Owner's Manual
Page 23
If necessary, loosen screw 38 for blocking the upper knife, see page 14, Sew a test seam. Disengage the upper knife according to 5. Set the upper knife at its basic position again and close the looper cover. Now the upper knife ...
If necessary, loosen screw 38 for blocking the upper knife, see page 14, Sew a test seam. Disengage the upper knife according to 5. Set the upper knife at its basic position again and close the looper cover. Now the upper knife ...
