

Owner's Manual
Page 2
...lead of immedia tely. Your new hobbylock 756 can go amiss. We wish you many enjoyable hours creating your PFAFF dealer. Defective mains leads must be connected to the colour coding of the terminals in one ope ion. You have any material in its stride and will sew, trim and neaten up -to full... be connected to the safety-lead terminal I nor to follow. The plug must under no circumstances should be completetly replaced. If you in your machine can do and put it is happy to BS 1 362 and the fuse cover must be used without fuse covers. Please also observe the general...
...lead of immedia tely. Your new hobbylock 756 can go amiss. We wish you many enjoyable hours creating your PFAFF dealer. Defective mains leads must be connected to the colour coding of the terminals in one ope ion. You have any material in its stride and will sew, trim and neaten up -to full... be connected to the safety-lead terminal I nor to follow. The plug must under no circumstances should be completetly replaced. If you in your machine can do and put it is happy to BS 1 362 and the fuse cover must be used without fuse covers. Please also observe the general...

Owner's Manual
Page 3
... using and before relamping. Only use needles recommended by the manufacturer as a toy. Special care is required around the sewing machine needle. 12. Always unplug sewing machine from the electric outlet when removing covers, lubricating, or when making any other liquid. To unplug, hold the plug,... not the cord. 11. IMPORTANT SAFETY INSTRUCTIONS For the United States only This sewing machine is designed and manufactured for its intended purpose as a bed or couch where the air openings may deflect the needle, causing itto ...
... using and before relamping. Only use needles recommended by the manufacturer as a toy. Special care is required around the sewing machine needle. 12. Always unplug sewing machine from the electric outlet when removing covers, lubricating, or when making any other liquid. To unplug, hold the plug,... not the cord. 11. IMPORTANT SAFETY INSTRUCTIONS For the United States only This sewing machine is designed and manufactured for its intended purpose as a bed or couch where the air openings may deflect the needle, causing itto ...

Owner's Manual
Page 4
... is visible damage, - If this appliance is used on the specification plate. 6. Cleaning Housing and display: To clean the housing, use only original PFAFF parts. Never use the sewing machine if: - IEC 335-2-28. 1. Do not use insecticides or chemical products such as indicated on a firm be adjusted by a Ptaff mechanic. there is...
... is visible damage, - If this appliance is used on the specification plate. 6. Cleaning Housing and display: To clean the housing, use only original PFAFF parts. Never use the sewing machine if: - IEC 335-2-28. 1. Do not use insecticides or chemical products such as indicated on a firm be adjusted by a Ptaff mechanic. there is...

Owner's Manual
Page 5
... • Differential feed (with differential feed machine only) 36 22. Stitch variations and sewing techniques 29 • How to sew a flatlock decorative seam 29 • How to sew an overlock blind hem 31 • How to sew pin tucks 31 • Turning square corners...8226; Applying elastic 34 • How to sew a rolled hem 26 • Machine set up the thread guide holder 7 8. Relationship between cloth, thread and needle 39 25. Machine maintenance 40 • Cleaning the machine 40 • Oiling the machine 40 • How to replace the stationary knife...
... • Differential feed (with differential feed machine only) 36 22. Stitch variations and sewing techniques 29 • How to sew a flatlock decorative seam 29 • How to sew an overlock blind hem 31 • How to sew pin tucks 31 • Turning square corners...8226; Applying elastic 34 • How to sew a rolled hem 26 • Machine set up the thread guide holder 7 8. Relationship between cloth, thread and needle 39 25. Machine maintenance 40 • Cleaning the machine 40 • Oiling the machine 40 • How to replace the stationary knife...

Owner's Manual
Page 6
.... NEEDLE INFORMATION * This that overlock uses a eliminates the flat shank possibility industrial needle of inserting the needle backwards. * Do not attempt to use sewing machine needle of a standard any size or household type in this overlock. #2054 Overlock needle * ms(te2yaw0pce5ihns4ign-a0nere6.ewe)adoRvlveaeaerginel#ua2lbaal0freva5abi4pinrlioacssbisiinlzzeteesanfn11oe4d0er,dislsb1ee2faswu,llri(1nn#4igps2&ho0eik5ndn14t6i-...
.... NEEDLE INFORMATION * This that overlock uses a eliminates the flat shank possibility industrial needle of inserting the needle backwards. * Do not attempt to use sewing machine needle of a standard any size or household type in this overlock. #2054 Overlock needle * ms(te2yaw0pce5ihns4ign-a0nere6.ewe)adoRvlveaeaerginel#ua2lbaal0freva5abi4pinrlioacssbisiinlzzeteesanfn11oe4d0er,dislsb1ee2faswu,llri(1nn#4igps2&ho0eik5ndn14t6i-...

Owner's Manual
Page 8
... Upper looper () Movable upper knife ® Presser foot ® Stationary lower knife ® Lower looper 6. To reduce the risk of electric shock, this sewing machine has to be used also for light switch) to turn "ON" Push "0" mark side to turn "OFF" * To run the...Caution: Be sure looper cover is intended to install the proper outlet. If it will sew. * To stop the machine from sewing, remove your foot from the controller. * This appliance has a polarized plug (one way. PREPARATION PRIOR TO SEWING * Connect the controller/electric plug tD to "Warning" on foflowing page. Do not ...
... Upper looper () Movable upper knife ® Presser foot ® Stationary lower knife ® Lower looper 6. To reduce the risk of electric shock, this sewing machine has to be used also for light switch) to turn "ON" Push "0" mark side to turn "OFF" * To run the...Caution: Be sure looper cover is intended to install the proper outlet. If it will sew. * To stop the machine from sewing, remove your foot from the controller. * This appliance has a polarized plug (one way. PREPARATION PRIOR TO SEWING * Connect the controller/electric plug tD to "Warning" on foflowing page. Do not ...

Owner's Manual
Page 11
...AND REPLACE CLOTH PLATE * Remove cloth plate for easy threading and cleaning of the machine. * Cylinder cover can be removed together with the cloth plate by pulling the ... Warning: Do not hold the cylinder cover when lifting or •1 carrying the machine. Caution: Be sure cylinder coveris replaced when sewing. 9 4 HOWTO REMOVEAND REPLACE CYLINDER COVER * Removing the cylinder cover exposes the lower looper ...it will go . * To remove the cylinder cover when cloth plate is not fitted on the machine, it can be removed easily by lifting it upward while pulling to the left while pressing the ...
...AND REPLACE CLOTH PLATE * Remove cloth plate for easy threading and cleaning of the machine. * Cylinder cover can be removed together with the cloth plate by pulling the ... Warning: Do not hold the cylinder cover when lifting or •1 carrying the machine. Caution: Be sure cylinder coveris replaced when sewing. 9 4 HOWTO REMOVEAND REPLACE CYLINDER COVER * Removing the cylinder cover exposes the lower looper ...it will go . * To remove the cylinder cover when cloth plate is not fitted on the machine, it can be removed easily by lifting it upward while pulling to the left while pressing the ...

Owner's Manual
Page 20
...the presser foot down until the chain reaches 5 7.5 cm (2 3 inches) in length. * Clip the thread chain. CHAINING OFF AND TEST SEWING * When the machine is completely threaded, bring all of the threads over the throat plate and slightly to the left under the front of the sample, continue to.... * Place fabric under the presser foot. * Hold the threads and apply a slight tension. * Turn the hand wheel toward you have rethreaded the machine always chain off and sew a test sample to test tensions and make adjustments as this may deflect the needle, causing it to break. * At the end of the...
...the presser foot down until the chain reaches 5 7.5 cm (2 3 inches) in length. * Clip the thread chain. CHAINING OFF AND TEST SEWING * When the machine is completely threaded, bring all of the threads over the throat plate and slightly to the left under the front of the sample, continue to.... * Place fabric under the presser foot. * Hold the threads and apply a slight tension. * Turn the hand wheel toward you have rethreaded the machine always chain off and sew a test sample to test tensions and make adjustments as this may deflect the needle, causing it to break. * At the end of the...

Owner's Manual
Page 21
...a narrow 3.5mm (9/64 inch) wide three-thread stitch is 1'. Adjustment would be in no greater than half a number at a time. 2) Sew a test sample after each adjustment. .4 S Current Setting is sewn. Note: The stitch width can be to balance the tensions, it is correctly ... other wise proper thread tension cannot be in creased from 5.7mm (7/32inch) to 7.2mm (9/3 2inch), - I * As the number increases on this machine are a one- turn adjustment. 19 The right needle stitch width can be obtained. *1 * When making adjustments to 1 or 2 for Y2 turn system...
...a narrow 3.5mm (9/64 inch) wide three-thread stitch is 1'. Adjustment would be in no greater than half a number at a time. 2) Sew a test sample after each adjustment. .4 S Current Setting is sewn. Note: The stitch width can be to balance the tensions, it is correctly ... other wise proper thread tension cannot be in creased from 5.7mm (7/32inch) to 7.2mm (9/3 2inch), - I * As the number increases on this machine are a one- turn adjustment. 19 The right needle stitch width can be obtained. *1 * When making adjustments to 1 or 2 for Y2 turn system...

Owner's Manual
Page 25
... not pull easily, check for tangles or looping under thread stand. HOW TO DISENGAGE MOVABLE UPPER KNIFE 9 TNOONPLWAOCREKMINOGVPAOBSLIETIKONNIFE IN * Be sure the machine is in the up position * Turn the hand wheel toward you until the knife clears the top of the the needle, needle. STOP ...* Cut the thread, and insert it will go. on the 3mm most sewing conditions. * Adjust the stitch length to 4mm (5/32 inch) when sewing heavy weight fabrics. * Adjust sewing the stitch length to 2mm light weight fabrics to the horizontal position. 23 Note: If the ...
... not pull easily, check for tangles or looping under thread stand. HOW TO DISENGAGE MOVABLE UPPER KNIFE 9 TNOONPLWAOCREKMINOGVPAOBSLIETIKONNIFE IN * Be sure the machine is in the up position * Turn the hand wheel toward you until the knife clears the top of the the needle, needle. STOP ...* Cut the thread, and insert it will go. on the 3mm most sewing conditions. * Adjust the stitch length to 4mm (5/32 inch) when sewing heavy weight fabrics. * Adjust sewing the stitch length to 2mm light weight fabrics to the horizontal position. 23 Note: If the ...

Owner's Manual
Page 26
SEAM GUIDE LINES * When the left needle is inserted, the thick line on the left of the looper cover is 16.0mm (5/8 inch). * When sewing with the right needle, the thick line on the left of the looper cover is 14.0mm (35/64 inch). Caution: Always close looper cover before operating machine. 18. Note: All lines are 2.0mm (5/64 inch) apart. 24 • TO PLACE MOVABLE KNIFE IN WORKING POSITION * Open looper cover and push the movable knife [ holder to the right as far as it will go. * Turn the knob up and toward you until the knife clicks into the operating position.
SEAM GUIDE LINES * When the left needle is inserted, the thick line on the left of the looper cover is 16.0mm (5/8 inch). * When sewing with the right needle, the thick line on the left of the looper cover is 14.0mm (35/64 inch). Caution: Always close looper cover before operating machine. 18. Note: All lines are 2.0mm (5/64 inch) apart. 24 • TO PLACE MOVABLE KNIFE IN WORKING POSITION * Open looper cover and push the movable knife [ holder to the right as far as it will go. * Turn the knob up and toward you until the knife clicks into the operating position.

Owner's Manual
Page 27
Note: Do not set to the left sew the four-thread stitch needle position stitch at a width of 5.7mm (7/32 inch). * The machine is disconnected from the power source. * Open the looper cover (page 6). * Disengage the movable upper knife (page 23). * Remove the cylinder cover (page 9). * Loosen ...head wrench knife holder set screws provided in corn stitch (31 ' width. Right needle 25 HOW TO ADJUST THE OVEREDGE SEAM WIDTH * The and machine is set to three-thread left to right to decrease the stitch width. * Be sure to knife level align with the the cutting edge of...
Note: Do not set to the left sew the four-thread stitch needle position stitch at a width of 5.7mm (7/32 inch). * The machine is disconnected from the power source. * Open the looper cover (page 6). * Disengage the movable upper knife (page 23). * Remove the cylinder cover (page 9). * Loosen ...head wrench knife holder set screws provided in corn stitch (31 ' width. Right needle 25 HOW TO ADJUST THE OVEREDGE SEAM WIDTH * The and machine is set to three-thread left to right to decrease the stitch width. * Be sure to knife level align with the the cutting edge of...

Owner's Manual
Page 28
20. perform the best. * Rolled hemming is not suited for adjustment. HOW TO SEW A ROLLED HEM * Rolled hemming is not in the right needle position. * Turn the hand wheel toward you until the needle is at its highest position. * ...Unscrew the throat plate 3crew. 1F * Install careful the not rolled hemming throat plate being to catch the threads between the plate and the machine. * Replace throat plate screw. * Open looper cover (page 6). * Disengage upper knife (page 23). * Remove the cylinder cover (page 9). * Align the left edge of the knife...
20. perform the best. * Rolled hemming is not suited for adjustment. HOW TO SEW A ROLLED HEM * Rolled hemming is not in the right needle position. * Turn the hand wheel toward you until the needle is at its highest position. * ...Unscrew the throat plate 3crew. 1F * Install careful the not rolled hemming throat plate being to catch the threads between the plate and the machine. * Replace throat plate screw. * Open looper cover (page 6). * Disengage upper knife (page 23). * Remove the cylinder cover (page 9). * Align the left edge of the knife...

Owner's Manual
Page 29
... WRAPPED ROLLED HEM * When the upper looper thread is too loose Turn the upper looper thread tension dial - (orange) to roll. 1 Always sew a test sample, and if neccessary, adjust tension balance as for a narrow three-thread overlock stitch (page 21). Topside Blue Tension Dial Green Orange... * Set the stitch length dial to "2-F" and a fine seam will be sewn. * This machine can sew two types of rolled hems. • SUGGESTED TENSION SETTINGS FOR STANDARD ROLLED HEM * Always sew a test sample and adjust tension balance if neccessary. * Adjust tension balance the same as instructed...
... WRAPPED ROLLED HEM * When the upper looper thread is too loose Turn the upper looper thread tension dial - (orange) to roll. 1 Always sew a test sample, and if neccessary, adjust tension balance as for a narrow three-thread overlock stitch (page 21). Topside Blue Tension Dial Green Orange... * Set the stitch length dial to "2-F" and a fine seam will be sewn. * This machine can sew two types of rolled hems. • SUGGESTED TENSION SETTINGS FOR STANDARD ROLLED HEM * Always sew a test sample and adjust tension balance if neccessary. * Adjust tension balance the same as instructed...

Owner's Manual
Page 31
... tension of the three-thread overlock stitch, sewing the seam and pulling the fabric apart to flatten the seam. * The flatlock stitch can be used as a construction and decorative stitch or for ornamentation only. (1) MachineSetUp * Remove the left or right needle. * Begin with the machine threaded and tension balanced for the three...
... tension of the three-thread overlock stitch, sewing the seam and pulling the fabric apart to flatten the seam. * The flatlock stitch can be used as a construction and decorative stitch or for ornamentation only. (1) MachineSetUp * Remove the left or right needle. * Begin with the machine threaded and tension balanced for the three...

Owner's Manual
Page 33
...wrong side of the fabric, then back to barely catch the edge of pin g tucks using a water soluble fabric marker I Sew decorative pin tucks on the extended hem edge, allowing the machine needle to the right side with 6mm (1/4") beyond the fold. * Stitch on the fabric before cutting out the garment * ...Remove the left needle and adjust machine for sewing knit wear. The overlock blind hem is available (page 45) • HOW TO SEW PIN TUCKS I ii 31 • HOW TO SEW AN OVER LOCK BLIND HEM The excess fabric is trimmed and the hem is ...
...wrong side of the fabric, then back to barely catch the edge of pin g tucks using a water soluble fabric marker I Sew decorative pin tucks on the extended hem edge, allowing the machine needle to the right side with 6mm (1/4") beyond the fold. * Stitch on the fabric before cutting out the garment * ...Remove the left needle and adjust machine for sewing knit wear. The overlock blind hem is available (page 45) • HOW TO SEW PIN TUCKS I ii 31 • HOW TO SEW AN OVER LOCK BLIND HEM The excess fabric is trimmed and the hem is ...
Owner's Manual
Page 34
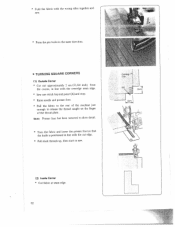
... same direction. • TURNING SQUARE CORNERS (1) Outside Corner * Cut out approximately 2 cm (51/64 inch) from the corner, in line with the overedge seam edge. * Sew one stitch beyond point (A) and stop. * Raise needle and presser foot. * Pull the fabric to the rear of the throat plate. Note: Presser foot has... knife is positioned in line with the cut edge. * Pull slack threads up, then start to release the thread caught on the finger of the machine just enough to sew. (2) Inside Corner * Cut fabric at seam edge. 32
... same direction. • TURNING SQUARE CORNERS (1) Outside Corner * Cut out approximately 2 cm (51/64 inch) from the corner, in line with the overedge seam edge. * Sew one stitch beyond point (A) and stop. * Raise needle and presser foot. * Pull the fabric to the rear of the throat plate. Note: Presser foot has... knife is positioned in line with the cut edge. * Pull slack threads up, then start to release the thread caught on the finger of the machine just enough to sew. (2) Inside Corner * Cut fabric at seam edge. 32

Owner's Manual
Page 36
... should be sewn using the three-thread overlock stitch or the four-thread overlock mock safety stitch. * After securing with 2 3 stitches, continue sewing, allowing the fabric to feed through the machine while gently stretching elastic (a quarter at a time) with the right hand.• * Use the left hand to keep the fabric even...
... should be sewn using the three-thread overlock stitch or the four-thread overlock mock safety stitch. * After securing with 2 3 stitches, continue sewing, allowing the fabric to feed through the machine while gently stretching elastic (a quarter at a time) with the right hand.• * Use the left hand to keep the fabric even...

Owner's Manual
Page 37
... the seam. * Insert the tape through the hole in the front of the foot. * Position the tape under the foot to the back of the machine and sew the garment seam. * The tape is attached as the seam is sewn. • BRAIDiNG BY CHAINING OFF * Place the movable upper knife in nonoperating...
... the seam. * Insert the tape through the hole in the front of the foot. * Position the tape under the foot to the back of the machine and sew the garment seam. * The tape is attached as the seam is sewn. • BRAIDiNG BY CHAINING OFF * Place the movable upper knife in nonoperating...

Owner's Manual
Page 42
Do not use any other oil or damage could result. 40 / Note: Use sewing machine oil. 25. MACHINE MAINTENANCE * An overlock requires more maintenance than a conventional machine mainly due to two reasons. 1) A lot of lint is produced due to the cutting action of the knives. 2) An overlock runs ... the wall receptacle. * Clean the lint from the looper and knife area often with a dry lint brush. • OILING THE MACHINE Danger: Before lubricating your machine, disconnect power line plug from the wall receptacle. * The oiling points shown in the diagram, should be oiled frequently to be oiled...
Do not use any other oil or damage could result. 40 / Note: Use sewing machine oil. 25. MACHINE MAINTENANCE * An overlock requires more maintenance than a conventional machine mainly due to two reasons. 1) A lot of lint is produced due to the cutting action of the knives. 2) An overlock runs ... the wall receptacle. * Clean the lint from the looper and knife area often with a dry lint brush. • OILING THE MACHINE Danger: Before lubricating your machine, disconnect power line plug from the wall receptacle. * The oiling points shown in the diagram, should be oiled frequently to be oiled...


