

Owner's Manual
Page 9
Looper cover 12 Lower knife . 79 Main switch 9 Maintenance and malfunction Material guide plate 77 - 83 33 Needle plates N and R 53 Needle threader 19 Normal accessories 66, 67 Oiling 81 Overedge needles 20, 21 Practical sewing...disc 67 Spool net. 67 Spool stands 11 Standard thread tension 42 Stitch length adjusting knob 26 Taping foot 69 Technical part 7 -3 Thread charts 54, 55 Thread cutter 24 Thread unreeling disc 67 Threading the looper 14 - 18 Threading the needles 20, 21 Threading the thread guides 13 Upper knife 78 Upper knife lock 34 Waste ...
Looper cover 12 Lower knife . 79 Main switch 9 Maintenance and malfunction Material guide plate 77 - 83 33 Needle plates N and R 53 Needle threader 19 Normal accessories 66, 67 Oiling 81 Overedge needles 20, 21 Practical sewing...disc 67 Spool net. 67 Spool stands 11 Standard thread tension 42 Stitch length adjusting knob 26 Taping foot 69 Technical part 7 -3 Thread charts 54, 55 Thread cutter 24 Thread unreeling disc 67 Threading the looper 14 - 18 Threading the needles 20, 21 Threading the thread guides 13 Upper knife 78 Upper knife lock 34 Waste ...
Owner's Manual
Page 11
Technical part Electrical connection Detachable work support Accessory box Spool stands Waste box / looper cover Threading the thread guides and the looper Threader Threading the needles Sewing foot lever Sewing test / thread cutter Seam width adjusting knob Stitch length adjusting knob Differential feed Changing the needle, sewing foot and needle plate Converting the machine for chainstitch...
Technical part Electrical connection Detachable work support Accessory box Spool stands Waste box / looper cover Threading the thread guides and the looper Threader Threading the needles Sewing foot lever Sewing test / thread cutter Seam width adjusting knob Stitch length adjusting knob Differential feed Changing the needle, sewing foot and needle plate Converting the machine for chainstitch...
Owner's Manual
Page 15
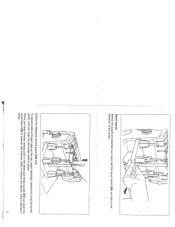
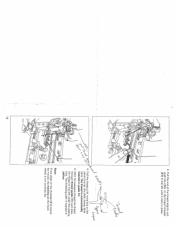
Extend the telescopic thread guide (24) fully. When you have finished sewing push in the telescopic thread guide (24) and push the spool stand (28) in towards the machine, with or without the spools, until you must be turned slowly until it catches in the direction of the arrow. -- -, Spool stands Before the spools are attached you hear the ball stops catch in place. To assure optimal thread take-up the two upper telescopic extensions must pull the spool stand (28) out fully in place. 11
Extend the telescopic thread guide (24) fully. When you have finished sewing push in the telescopic thread guide (24) and push the spool stand (28) in towards the machine, with or without the spools, until you must be turned slowly until it catches in the direction of the arrow. -- -, Spool stands Before the spools are attached you hear the ball stops catch in place. To assure optimal thread take-up the two upper telescopic extensions must pull the spool stand (28) out fully in place. 11
Owner's Manual
Page 17
... needle (blue) Note: To achieve top sewing results make sure that the thread is . - Threading thread guides Place thread spools on the back thread guide (36). dis ccc ccc 000 0 00 With both hands pull the thread through the thread guide (36) and the appropriate thread tension (1, 2, 4, 5 and 6). Set the thread tension to the bot accrding nd e off :ed n is pulled be...
... needle (blue) Note: To achieve top sewing results make sure that the thread is . - Threading thread guides Place thread spools on the back thread guide (36). dis ccc ccc 000 0 00 With both hands pull the thread through the thread guide (36) and the appropriate thread tension (1, 2, 4, 5 and 6). Set the thread tension to the bot accrding nd e off :ed n is pulled be...
Owner's Manual
Page 19
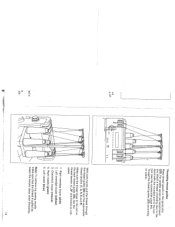
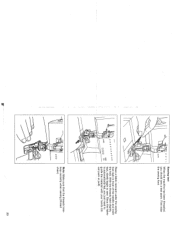
Pull the thread from thread guide 8 through the looper eye 9 and pull it a bit with the marking on the hou&ng. 12 C 2. Threading the left overedge looper (39) in line with your left hand. - 000 000 DOD D 15 The marking on the hand wheel must be in the order 1 to 8. Thread the left overedge looper 1.
Pull the thread from thread guide 8 through the looper eye 9 and pull it a bit with the marking on the hou&ng. 12 C 2. Threading the left overedge looper (39) in line with your left hand. - 000 000 DOD D 15 The marking on the hand wheel must be in the order 1 to 8. Thread the left overedge looper 1.
Owner's Manual
Page 20
The thread is marked in yellow. The threading path is automatically inserted in place. çgtL /Q 4. Note: If the slider on the threader (41) cannot be moved, the marking on the looper threader (41) to the left until it rests in guide 10. 5. Pull the end of the thread slightly and push the slider on the hand wheel is not correctly set. With the tweezers thread the thread through thread guide (1 1) and draw the thread to the left under the sewing foot. N , 11 7 0 16 3. Pull the thread a bit more nd at the same time let the slider slowly slide back.
The thread is marked in yellow. The threading path is automatically inserted in place. çgtL /Q 4. Note: If the slider on the threader (41) cannot be moved, the marking on the looper threader (41) to the left until it rests in guide 10. 5. Pull the end of the thread slightly and push the slider on the hand wheel is not correctly set. With the tweezers thread the thread through thread guide (1 1) and draw the thread to the left under the sewing foot. N , 11 7 0 16 3. Pull the thread a bit more nd at the same time let the slider slowly slide back.

Owner's Manual
Page 22
... 9 and place it easily. V / o 4 o / - , - to positioning lever (44) of the to its original position. The threading / / /1 Note: If you can thread it to thread guide 8. Return the looper to return the positioning 4870 does not sew chainstitch. Now pull the thread the left under the sewing foot. Push the positioning to the next position lever (44...
... 9 and place it easily. V / o 4 o / - , - to positioning lever (44) of the to its original position. The threading / / /1 Note: If you can thread it to thread guide 8. Return the looper to return the positioning 4870 does not sew chainstitch. Now pull the thread the left under the sewing foot. Push the positioning to the next position lever (44...

Owner's Manual
Page 23
... the needle's eye. D ! B 19 You can now pull the end of the thread through hook D and the thread automatically passes behind the needle until the needle is in its highest position. Place the threader from the accessories (see page 66) with the sewing ... threader and hold it a bit taut. ,B B 1 AB Slowly lower the threader behind hook C. Draw the threader back away from the bottom through the eye to thread the needle. A C '42) Needle threader (accessory) Lower the sewing foot with the needle between the two...
... the needle's eye. D ! B 19 You can now pull the end of the thread through hook D and the thread automatically passes behind the needle until the needle is in its highest position. Place the threader from the accessories (see page 66) with the sewing ... threader and hold it a bit taut. ,B B 1 AB Slowly lower the threader behind hook C. Draw the threader back away from the bottom through the eye to thread the needle. A C '42) Needle threader (accessory) Lower the sewing foot with the needle between the two...

Owner's Manual
Page 25
...is a lot easier to pull the looper threads if you turn to looper tensions (4,5 and 6) to 8 and draw the thread through the needle's eye 9 with one or two - o Caution: You can also draw the looper threads straight through the thread guide before the needles. Changing a spooi when the... machine is marked in blue (dots) for needle B is threaded Cut the threads off and thread the appropriate needles. Cut the knots off close to the left ...
...is a lot easier to pull the looper threads if you turn to looper tensions (4,5 and 6) to 8 and draw the thread through the needle's eye 9 with one or two - o Caution: You can also draw the looper threads straight through the thread guide before the needles. Changing a spooi when the... machine is marked in blue (dots) for needle B is threaded Cut the threads off and thread the appropriate needles. Cut the knots off close to the left ...
Owner's Manual
Page 27
Note: Make sure that the threads interloop correctly when sewing (thread chain). 000 23 Since the fabric 000 000 D 0 O is automatically fed, you should sew a test seam. First raise 000 the sewing foot. Place a fabric remnant under the sewing \ foot right in front of the needle and lower 00 the foot. With the threads held slightly taut, slowly begin to guide the material with your hands (do not push or pull). Sewing test - 00' When the machine has been threaded, you just need to sew.
Note: Make sure that the threads interloop correctly when sewing (thread chain). 000 23 Since the fabric 000 000 D 0 O is automatically fed, you should sew a test seam. First raise 000 the sewing foot. Place a fabric remnant under the sewing \ foot right in front of the needle and lower 00 the foot. With the threads held slightly taut, slowly begin to guide the material with your hands (do not push or pull). Sewing test - 00' When the machine has been threaded, you just need to sew.

Owner's Manual
Page 71
... place tape in relation to the needle with the slide 2. 4. Preparing the machine: Program: Stitch length: Stitch width: Differential setting: Sewing foot pressure: Needle plate: Thread tension: Sewing foot: Upper knife: 4 or 5 depending on width of tape N 3 - 5 (adjustable for sewing on the width of 4- 9 mm) N N normal needle plate N see display (press... seam. / 69 Set the needle at highest point. 2. Taping foot This special sewing foot is for a tape width of the tape, adjust its position in guides 1 from stretching.
... place tape in relation to the needle with the slide 2. 4. Preparing the machine: Program: Stitch length: Stitch width: Differential setting: Sewing foot pressure: Needle plate: Thread tension: Sewing foot: Upper knife: 4 or 5 depending on width of tape N 3 - 5 (adjustable for sewing on the width of 4- 9 mm) N N normal needle plate N see display (press... seam. / 69 Set the needle at highest point. 2. Taping foot This special sewing foot is for a tape width of the tape, adjust its position in guides 1 from stretching.

Owner's Manual
Page 72
...screw 1 and adjust the edge guide 2 so that the folded hem part 3 is ideal for skirt and trouser. Before sewing cut 2 cm off hem part 3. Place the prepared hem under the edge guide 2. The needle penetration in one thread of guide 2. 3. This prevents displacement of... the machine: Program: Stitch length: Stitch width: Differential setting: Sewing foot pressure: Needle plate: Thread tension: Sewing foot: Upper knife: 4 4 N N N normal ...
...screw 1 and adjust the edge guide 2 so that the folded hem part 3 is ideal for skirt and trouser. Before sewing cut 2 cm off hem part 3. Place the prepared hem under the edge guide 2. The needle penetration in one thread of guide 2. 3. This prevents displacement of... the machine: Program: Stitch length: Stitch width: Differential setting: Sewing foot pressure: Needle plate: Thread tension: Sewing foot: Upper knife: 4 4 N N N normal ...

Owner's Manual
Page 73
...length: Stitch width: Differential setting: Sewing foot pressure: Needle plate: Thread tension: Sewing foot: Upper knife: 1 3 (switch converter on wedding dresses and valance). Raise the sewing foot and set the needle in guide 2 of 1,0 mm. Thread gimp thread (cord) through the hole 1 and then place it in its ...highest position. 2. on ) or prog. 18 1,0 to 1,5 3 to a thickness of the sewing foot shoe. 4. Gimp thread sewing foot This special sewing foot is ...
...length: Stitch width: Differential setting: Sewing foot pressure: Needle plate: Thread tension: Sewing foot: Upper knife: 1 3 (switch converter on wedding dresses and valance). Raise the sewing foot and set the needle in guide 2 of 1,0 mm. Thread gimp thread (cord) through the hole 1 and then place it in its ...highest position. 2. on ) or prog. 18 1,0 to 1,5 3 to a thickness of the sewing foot shoe. 4. Gimp thread sewing foot This special sewing foot is ...
Owner's Manual
Page 76
... a cording tape between two fabric plies in its highest position. 2. Preparing the machine: Program: Stitch length: Stitch width: Differential setting: Sewing foot pressure: Needle plate: Thread tension: Sewing foot: Upper knife: 7.10cr 21 N' 3-5 N N or 3 normal needle plate N see display (press mod key) cording foot engaged Inserting the fabric plies: 1. Raise the...) under the cording foot up to the upper knife. Lower the sewing foot and sew a test seam. 74 The cording (piping) must be placed in guide 1. 3.
... a cording tape between two fabric plies in its highest position. 2. Preparing the machine: Program: Stitch length: Stitch width: Differential setting: Sewing foot pressure: Needle plate: Thread tension: Sewing foot: Upper knife: 7.10cr 21 N' 3-5 N N or 3 normal needle plate N see display (press mod key) cording foot engaged Inserting the fabric plies: 1. Raise the...) under the cording foot up to the upper knife. Lower the sewing foot and sew a test seam. 74 The cording (piping) must be placed in guide 1. 3.

Owner's Manual
Page 77
... foot (fig. 1). 2. Slide the bead tape through guide 1 and 2 to the back of the fabric (fig. 2). ned out with or without the upper knife in all the seam width settings. Preparing the machine: Program: Stitch length: Stitch width: Differential setting: Sewing foot pressure: Needle plate: Thread tension: Sewing foot: Upper knife: 4 (for...
... foot (fig. 1). 2. Slide the bead tape through guide 1 and 2 to the back of the fabric (fig. 2). ned out with or without the upper knife in all the seam width settings. Preparing the machine: Program: Stitch length: Stitch width: Differential setting: Sewing foot pressure: Needle plate: Thread tension: Sewing foot: Upper knife: 4 (for...

Owner's Manual
Page 78
...display (press mod key) lace sewing foot optionally disengaged or not Sewing on , both the lace and the fabric must simply be guided flush along edge guide 1 (engage upper knife). 4. Lace sewing toot This special sewing foot is sewn on lace: 1. When sewing the lace onto... the fabric it must be run through guide 2 along edge guide 1 (upper knife disengaged>. 5. Preparing the machine: Program: Stitch length: Stitch width: Differential setting: Sewing foot pressure: Needle plate: Thread tension: Sewing foot: Upper knife: 4 1,5 to be trimmed when the ...
...display (press mod key) lace sewing foot optionally disengaged or not Sewing on , both the lace and the fabric must simply be guided flush along edge guide 1 (engage upper knife). 4. Lace sewing toot This special sewing foot is sewn on lace: 1. When sewing the lace onto... the fabric it must be run through guide 2 along edge guide 1 (upper knife disengaged>. 5. Preparing the machine: Program: Stitch length: Stitch width: Differential setting: Sewing foot pressure: Needle plate: Thread tension: Sewing foot: Upper knife: 4 1,5 to be trimmed when the ...

Owner's Manual
Page 86
sewing foot height Needle system Needle size Number of the cardboard box Machine Foot control Mains cable Machine cover Waste box Workpiece guide plate Instruction manual Spedfications Maximum sewing speed Seam width Stitch length Differential feed Needle plate Lubrication Max. .li Contents of threads Dimensions Weight 84 1 500 stitches/mm 3 to 7,2 mm overlock stitch 7 to 9 mm chainstitch 1 to 4 mm 1: 0,5/1 : 2 exchangeable N or R manual 5 + 1,5 mm EL x 705 80 or 90 2, 3, 4, 5 310 x 330 x 320 10,5 kg
sewing foot height Needle system Needle size Number of the cardboard box Machine Foot control Mains cable Machine cover Waste box Workpiece guide plate Instruction manual Spedfications Maximum sewing speed Seam width Stitch length Differential feed Needle plate Lubrication Max. .li Contents of threads Dimensions Weight 84 1 500 stitches/mm 3 to 7,2 mm overlock stitch 7 to 9 mm chainstitch 1 to 4 mm 1: 0,5/1 : 2 exchangeable N or R manual 5 + 1,5 mm EL x 705 80 or 90 2, 3, 4, 5 310 x 330 x 320 10,5 kg

Owner's Manual
Page 87
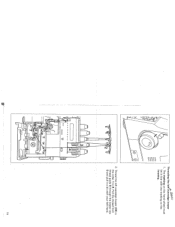
Parts of the hobbylock 4870 (23) Thread guide with coloured markings (24) TelescoPic thread guide (25) Spool pins (26) Thread cutter (27) Spool centering (28) Spool stands (29) Power socket (30) Main switch (31) Foot control socket (32) Hand wheel (33) Sewing foot lever (34) Stitch length adjusting knob (35) Adjusting ring for the differential feed (36) Reverse thread guide (50) Material guide plate (51) Waste box
Parts of the hobbylock 4870 (23) Thread guide with coloured markings (24) TelescoPic thread guide (25) Spool pins (26) Thread cutter (27) Spool centering (28) Spool stands (29) Power socket (30) Main switch (31) Foot control socket (32) Hand wheel (33) Sewing foot lever (34) Stitch length adjusting knob (35) Adjusting ring for the differential feed (36) Reverse thread guide (50) Material guide plate (51) Waste box


