
Owner's Manual
Page 5
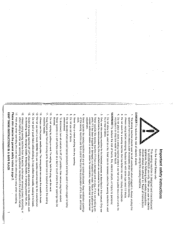
... operate on a soft surface such as contained in the instruction manual. 1 7. Only use the proper needle plate. Switch the sewing machine off (,,O") position, then remove plug from the electric outlet when removing covers, lubricating, or when making any opening. 6. Do not... when rewinding into water. Unplug immediately. 4. Do not use only. Important safety instructions For the United States only This sewing machine is required around the sewing machine needle. 12. Return the appliance to off (NO") when making any air openings blocked. 'A. Do not pull or ...
... operate on a soft surface such as contained in the instruction manual. 1 7. Only use the proper needle plate. Switch the sewing machine off (,,O") position, then remove plug from the electric outlet when removing covers, lubricating, or when making any opening. 6. Do not... when rewinding into water. Unplug immediately. 4. Do not use only. Important safety instructions For the United States only This sewing machine is required around the sewing machine needle. 12. Return the appliance to off (NO") when making any air openings blocked. 'A. Do not pull or ...
Owner's Manual
Page 6
... sunlight, static elec tricity, heat-producing objects, corro sive chemicals or liquids. Please Note! 9. iicated on Cleaning - Do not use the sewing machine if: To clean the housing, use only original PFAFF parts. 2 The user must be operated in openings on the specification plate. TI,? Environment The recommended environment is a high-quality elec...
... sunlight, static elec tricity, heat-producing objects, corro sive chemicals or liquids. Please Note! 9. iicated on Cleaning - Do not use the sewing machine if: To clean the housing, use only original PFAFF parts. 2 The user must be operated in openings on the specification plate. TI,? Environment The recommended environment is a high-quality elec...

Owner's Manual
Page 7
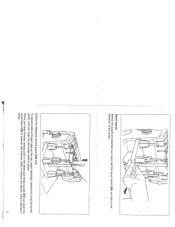
...amiss. You have any further questions just ask your machine can take a bit of service with any material in its stride and will sew, trim and neaten up -to find out just what your PFAFF dealer. So now let's get started! Your new hobbylock 4870 can do and put it to full use as this... instruction manual is the only way to -date sewing Congratulations! If you have bought a high...
...amiss. You have any further questions just ask your machine can take a bit of service with any material in its stride and will sew, trim and neaten up -to find out just what your PFAFF dealer. So now let's get started! Your new hobbylock 4870 can do and put it to full use as this... instruction manual is the only way to -date sewing Congratulations! If you have bought a high...
Owner's Manual
Page 8
... Electrical connection Electronics Entering new data Foot control Free arm Gathering foot Gimp thread stitching foot Knob to adjust seam width Lace sewing foot LED needle display (A, B, C) Left overedge looper 4 Page 44,53 44 52 43,48 43 53 44 65-76 10 15,16 ...40 8 9 73 71 25 76 38 15,16 Changin9 the needle Changing the needle plate Changing the sewing foot Changing the spool Cleaning the knife Cleaning the needle plate Converter Converting the machine (chainstitch) Correction of the thread tension Detachable work support Differential feed Disengaging the overedge looper. needle A Chainstitch...
... Electrical connection Electronics Entering new data Foot control Free arm Gathering foot Gimp thread stitching foot Knob to adjust seam width Lace sewing foot LED needle display (A, B, C) Left overedge looper 4 Page 44,53 44 52 43,48 43 53 44 65-76 10 15,16 ...40 8 9 73 71 25 76 38 15,16 Changin9 the needle Changing the needle plate Changing the sewing foot Changing the spool Cleaning the knife Cleaning the needle plate Converter Converting the machine (chainstitch) Correction of the thread tension Detachable work support Differential feed Disengaging the overedge looper. needle A Chainstitch...
Owner's Manual
Page 11
... / thread cutter Seam width adjusting knob Stitch length adjusting knob Differential feed Changing the needle, sewing foot and needle plate Converting the machine for chainstitch seam Fixing the upper knife /sewing foot pressure page 8, 9 page 9 page 10 page 11 page 12 page 13-18 page 19 page 20, 21 page 22 page 23...
... / thread cutter Seam width adjusting knob Stitch length adjusting knob Differential feed Changing the needle, sewing foot and needle plate Converting the machine for chainstitch seam Fixing the upper knife /sewing foot pressure page 8, 9 page 9 page 10 page 11 page 12 page 13-18 page 19 page 20, 21 page 22 page 23...

Owner's Manual
Page 12
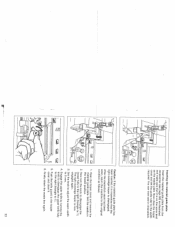
Connecting the foot control Connect the plug of the foot control with the connection socket (31) of the sewing machine and the wall socket. Electrical connection Connect the mains cord between socket (29) of the sewing machine. Caution: Do not put anything under the pedal. 8 The preset area of the sewing speed (see page 37) is regulated by pressing the pedal.
Connecting the foot control Connect the plug of the foot control with the connection socket (31) of the sewing machine and the wall socket. Electrical connection Connect the mains cord between socket (29) of the sewing machine. Caution: Do not put anything under the pedal. 8 The preset area of the sewing speed (see page 37) is regulated by pressing the pedal.

Owner's Manual
Page 13
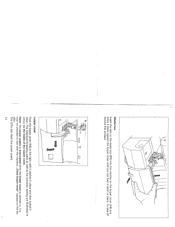
The machine is turned up. To remove detachab'e work support (18) to sew tubular goods without any difficulty. work support / free arm The free arm is particularly suited to the left. Insert the workpiece in the oppo 9 To do so pull the detachable site direction. I ri Main switch When the main switch (30) is turned on the sewing light is now operational.
The machine is turned up. To remove detachab'e work support (18) to sew tubular goods without any difficulty. work support / free arm The free arm is particularly suited to the left. Insert the workpiece in the oppo 9 To do so pull the detachable site direction. I ri Main switch When the main switch (30) is turned on the sewing light is now operational.
Owner's Manual
Page 15
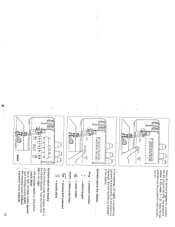
When you hear the ball stops catch in place. To assure optimal thread take-up the two upper telescopic extensions must pull the spool stand (28) out fully in the direction of the arrow. -- -, Spool stands Before the spools are attached you must be turned slowly until you have finished sewing push in the telescopic thread guide (24) and push the spool stand (28) in towards the machine, with or without the spools, until it catches in place. 11 Extend the telescopic thread guide (24) fully.
When you hear the ball stops catch in place. To assure optimal thread take-up the two upper telescopic extensions must pull the spool stand (28) out fully in the direction of the arrow. -- -, Spool stands Before the spools are attached you must be turned slowly until you have finished sewing push in the telescopic thread guide (24) and push the spool stand (28) in towards the machine, with or without the spools, until it catches in place. 11 Extend the telescopic thread guide (24) fully.
Owner's Manual
Page 16
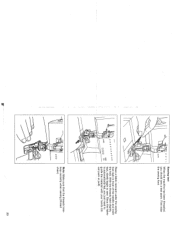
... right until it catches in colour on the looper cover (14) and press it down . ODD C 0 Looper cover Push the looper cover (14) to sew with the machine. ,,Close looper cover" appears in place. it catch in the dis play. To take off reverse this process. V I N Waste box Insert the tabs on...
... right until it catches in colour on the looper cover (14) and press it down . ODD C 0 Looper cover Push the looper cover (14) to sew with the machine. ,,Close looper cover" appears in place. it catch in the dis play. To take off reverse this process. V I N Waste box Insert the tabs on...

Owner's Manual
Page 25
Changing a spooi when the machine is threaded Cut the threads off and thread the appropriate needles. Lower the sewing feet. It is marked in blue (dots) for needle B is a...through until the knots are about six inches through the looper eye and to the left under the sewing foot. o Caution: You can also draw the looper threads straight through the thread guide before the... to 8 and draw the thread through the needle's eye 9 with one or two - You can only sew with the threader. Pull the needle threads out of the needles. The threading path for needle C in the order...
Changing a spooi when the machine is threaded Cut the threads off and thread the appropriate needles. Lower the sewing feet. It is marked in blue (dots) for needle B is a...through until the knots are about six inches through the looper eye and to the left under the sewing foot. o Caution: You can also draw the looper threads straight through the thread guide before the... to 8 and draw the thread through the needle's eye 9 with one or two - You can only sew with the threader. Pull the needle threads out of the needles. The threading path for needle C in the order...

Owner's Manual
Page 26
it is raised and lowered with the sewing foot lever (33). The LEDs on the speed selection also flash. .1 I 22 Sewing foot lever The sewing foot is now impossible to the machine is cut off if the looper cover is open i.e. Closing the looper cover When the machine has been threaded you must close the looper cover (14). Note The power to sew. ,,Close looper cover" appears in the display.
it is raised and lowered with the sewing foot lever (33). The LEDs on the speed selection also flash. .1 I 22 Sewing foot lever The sewing foot is now impossible to the machine is cut off if the looper cover is open i.e. Closing the looper cover When the machine has been threaded you must close the looper cover (14). Note The power to sew. ,,Close looper cover" appears in the display.
Owner's Manual
Page 27
First raise 000 the sewing foot. Since the fabric 000 000 D 0 O is automatically fed, you should sew a test seam. Note: Make sure that the threads interloop correctly when sewing (thread chain). 000 23 With the threads held slightly taut, slowly begin to guide the material with your hands (do not push or pull). Place a fabric remnant under the sewing \ foot right in front of the needle and lower 00 the foot. Sewing test - 00' When the machine has been threaded, you just need to sew.
First raise 000 the sewing foot. Since the fabric 000 000 D 0 O is automatically fed, you should sew a test seam. Note: Make sure that the threads interloop correctly when sewing (thread chain). 000 23 With the threads held slightly taut, slowly begin to guide the material with your hands (do not push or pull). Place a fabric remnant under the sewing \ foot right in front of the needle and lower 00 the foot. Sewing test - 00' When the machine has been threaded, you just need to sew.
Owner's Manual
Page 33
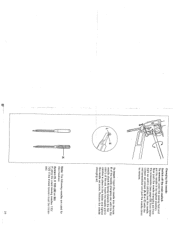
To remove: Lower the sewing foot and put the needle in the holder and tighten the needle set screws (A, B or C) with the flat needle shank K facing towards the flat side L ... accessories (see page 66) from below right up until it catches over the needle. Loosen set screw. K Note: The following needles are used for this machine: System EL X 705 (80 or 90) If using the usual sewing needles 130/ 705 H the thread tension must be increa sed. 29
To remove: Lower the sewing foot and put the needle in the holder and tighten the needle set screws (A, B or C) with the flat needle shank K facing towards the flat side L ... accessories (see page 66) from below right up until it catches over the needle. Loosen set screw. K Note: The following needles are used for this machine: System EL X 705 (80 or 90) If using the usual sewing needles 130/ 705 H the thread tension must be increa sed. 29
Owner's Manual
Page 37
... to disengage the looper fully to the right (triangle to 3 mm. 4. You can now sew in chainstitch. / z Caution: If the material guide plate has been inserted, it . 6. After the chainstitch seam has been sewn,, return the machine to the original condition as the needle plate. Open the looper cover and remove the...
... to disengage the looper fully to the right (triangle to 3 mm. 4. You can now sew in chainstitch. / z Caution: If the material guide plate has been inserted, it . 6. After the chainstitch seam has been sewn,, return the machine to the original condition as the needle plate. Open the looper cover and remove the...

Owner's Manual
Page 38
...fabric 34 For extremely thick fabrics you must be loo sened by the material. Position 1 = sewing foot pressure for very thin fabric Position N = sewing foot pressure for with medium thickness Position 3 = sewing foot pressure for the upper knife must tighten the axial lock screw on the thickness of its... pressure You can again move in an axial (side 0 ways) direction. Upper knife lock You can sew absolutely any type of fabric with this machine, regardless of the material with the large screwdriver from being displaced by about two turns, so that the knife can change ...
...fabric 34 For extremely thick fabrics you must be loo sened by the material. Position 1 = sewing foot pressure for very thin fabric Position N = sewing foot pressure for with medium thickness Position 3 = sewing foot pressure for the upper knife must tighten the axial lock screw on the thickness of its... pressure You can again move in an axial (side 0 ways) direction. Upper knife lock You can sew absolutely any type of fabric with this machine, regardless of the material with the large screwdriver from being displaced by about two turns, so that the knife can change ...
Owner's Manual
Page 43
...the display: Prog. = program number = stitch length = seam width = differential feed Lrit >. = sewing foot pressure = needle plate Symbols below the display: All the symbols under the display refer to the right... looper (mauve) 39 The programs appear in the display. left overedge looper (yellow) - Set the machine as indicated in the order 1 -21. right overedge looper (pink) - Keep the key pressed and...0 0 ID ID ID 0000000000 ID ID 1 ID "C 000 ooo Ill DDD 0 / PFAFF If the mod key (11 right) is pressed the standard characteristics of the stitch are from the left to...
...the display: Prog. = program number = stitch length = seam width = differential feed Lrit >. = sewing foot pressure = needle plate Symbols below the display: All the symbols under the display refer to the right... looper (mauve) 39 The programs appear in the display. left overedge looper (yellow) - Set the machine as indicated in the order 1 -21. right overedge looper (pink) - Keep the key pressed and...0 0 ID ID ID 0000000000 ID ID 1 ID "C 000 ooo Ill DDD 0 / PFAFF If the mod key (11 right) is pressed the standard characteristics of the stitch are from the left to...

Owner's Manual
Page 71
Preparing the machine: Program: Stitch length: Stitch width: Differential setting: Sewing foot pressure: Needle plate: Thread tension: Sewing foot: Upper knife: 4 or 5 depending on width of tape N 3 - 5 (adjustable for sewing on the width of 4- 9 mm) N N normal needle plate N see display (press mod key) taping ...to prevent stretch materials (knitwear) from the right. 3. Raise sewing foot and place tape in relation to right stop with adjusting screw 3. 5. Insert fabric and sew a test seam. / 69 Taping foot This special sewing foot is for a tape width of the tape, adjust its...
Preparing the machine: Program: Stitch length: Stitch width: Differential setting: Sewing foot pressure: Needle plate: Thread tension: Sewing foot: Upper knife: 4 or 5 depending on width of tape N 3 - 5 (adjustable for sewing on the width of 4- 9 mm) N N normal needle plate N see display (press mod key) taping ...to prevent stretch materials (knitwear) from the right. 3. Raise sewing foot and place tape in relation to right stop with adjusting screw 3. 5. Insert fabric and sew a test seam. / 69 Taping foot This special sewing foot is for a tape width of the tape, adjust its...

Owner's Manual
Page 72
... guide 2 so that the folded hem part 3 is caught by the needle. 70 Before sewing cut 2 cm off hem part 3. This prevents displacement of the machine: Program: Stitch length: Stitch width: Differential setting: Sewing foot pressure: Needle plate: Thread tension: Sewing foot: Upper knife: 4 4 N N N normal needle plate N see display (press mod key) blindstitch foot...
... guide 2 so that the folded hem part 3 is caught by the needle. 70 Before sewing cut 2 cm off hem part 3. This prevents displacement of the machine: Program: Stitch length: Stitch width: Differential setting: Sewing foot pressure: Needle plate: Thread tension: Sewing foot: Upper knife: 4 4 N N N normal needle plate N see display (press mod key) blindstitch foot...

Owner's Manual
Page 73
... ces an undulating or stiffer hem (e.g. Preparing the machine Program: Stitch length: Stitch width: Differential setting: Sewing foot pressure: Needle plate: Thread tension: Sewing foot: Upper knife: 1 3 (switch converter on wedding dresses and valance). Sew a test seam. 71 Gimp thread sewing foot This special sewing foot is used to sew in gimp threads (cords, synthetic threads) up...
... ces an undulating or stiffer hem (e.g. Preparing the machine Program: Stitch length: Stitch width: Differential setting: Sewing foot pressure: Needle plate: Thread tension: Sewing foot: Upper knife: 1 3 (switch converter on wedding dresses and valance). Sew a test seam. 71 Gimp thread sewing foot This special sewing foot is used to sew in gimp threads (cords, synthetic threads) up...

Owner's Manual
Page 83
Oiling the machine Before using your machine you should make a habit of a special material and do not need to be oiled. 81 One or two drops of PFAFF sewing machine oil are made of lightly oiling the marked points with the screwdriver supplied. 0 0 Cleaning the knife Switch the main switch off the upper and lower knife with the brush from the accessories (see page 66). / 0 -U N 6 I - All the other parts are enough. You can now remove the upper knife (49) and clean the lint off Take out the upper knife retaining screw (46) with the oil from the accessories (see page 66).
Oiling the machine Before using your machine you should make a habit of a special material and do not need to be oiled. 81 One or two drops of PFAFF sewing machine oil are made of lightly oiling the marked points with the screwdriver supplied. 0 0 Cleaning the knife Switch the main switch off the upper and lower knife with the brush from the accessories (see page 66). / 0 -U N 6 I - All the other parts are enough. You can now remove the upper knife (49) and clean the lint off Take out the upper knife retaining screw (46) with the oil from the accessories (see page 66).


