
Owner's Manual
Page 3
...dust, and loose cloth. • Keep fingers away from the electrical outlet when removing covers, lubricating, or when making any adjustment in this sewing machine if it has a damaged cord or plug, if it is used as threading needle, changing needle, threading bobbin, or changing presser foot, etc.... • Always unplug sewing machine from all instructions before relamping. To reduce the risk of burns, fire, electric shock, or injury to persons: • Do not allow to...
...dust, and loose cloth. • Keep fingers away from the electrical outlet when removing covers, lubricating, or when making any adjustment in this sewing machine if it has a damaged cord or plug, if it is used as threading needle, changing needle, threading bobbin, or changing presser foot, etc.... • Always unplug sewing machine from all instructions before relamping. To reduce the risk of burns, fire, electric shock, or injury to persons: • Do not allow to...
Owner's Manual
Page 5
... reality! Its ease of sewing fabrics, needles and machine settings 29 7Specifications 30 8Index 31 Congratulations! Give a free rein to use will soon discover how easy it is to your imagination and make your new Pfaff® hobbylock™ 4764! You will free your ideas... into reality will give you start, please spend some time reading these operating instructions. Your Pfaff hobbylock 4764 will be a joy. Before you professional sewing results! 5Sewing problems and their ...
... reality! Its ease of sewing fabrics, needles and machine settings 29 7Specifications 30 8Index 31 Congratulations! Give a free rein to use will soon discover how easy it is to your imagination and make your new Pfaff® hobbylock™ 4764! You will free your ideas... into reality will give you start, please spend some time reading these operating instructions. Your Pfaff hobbylock 4764 will be a joy. Before you professional sewing results! 5Sewing problems and their ...
Owner's Manual
Page 8
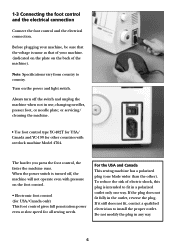
...not operate even with overlock machine Model 4764. When the power switch is turned off the switch and unplug the machine when not in a polarized outlet only one blade wider than the other countries with pressure on the power and light switch. For the USA and Canada This sewing machine has a polarized plug (one... way. Do not modify the plug in the outlet, reverse the plug. To reduce the risk of electric shock, this plug is same as that of your machine. (indicated on the plate on the back of the...
...not operate even with overlock machine Model 4764. When the power switch is turned off the switch and unplug the machine when not in a polarized outlet only one blade wider than the other countries with pressure on the power and light switch. For the USA and Canada This sewing machine has a polarized plug (one... way. Do not modify the plug in the outlet, reverse the plug. To reduce the risk of electric shock, this plug is same as that of your machine. (indicated on the plate on the back of the...
Owner's Manual
Page 9
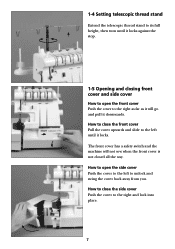
... swing the cover back away from you. How to open the front cover Push the cover to the right as far as it will not sew when the front cover is not closed all the way. 1-4 Setting telescopic thread stand Extend the telescopic thread stand to its full height, then turn... side cover How to open the side cover Push the cover to the left until it locks. The front cover has a safety switch and the machine will go and pull it downwards.
... swing the cover back away from you. How to open the front cover Push the cover to the right as far as it will not sew when the front cover is not closed all the way. 1-4 Setting telescopic thread stand Extend the telescopic thread stand to its full height, then turn... side cover How to open the side cover Push the cover to the left until it locks. The front cover has a safety switch and the machine will go and pull it downwards.
Owner's Manual
Page 10
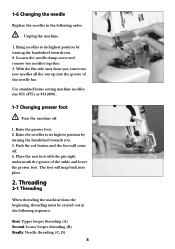
... you, insert two new needles all the way up into place. 2. Use standard home sewing machine needles size #11 (#75) or #14(#90). 1-7 Changing presser foot Turn the machine off . 4. Place the new foot with the pin right underneath the groove of the needle bar. Raise the presser... needles to its highest position by turning the handwheel towards you . 2. 1-6 Changing the needle Replace the needles in the following order: Unplug the machine. 1. With the flat side away from the beginning, threading must be carried out in the following sequence: First: Upper looper threading (A) Second:...
... you, insert two new needles all the way up into place. 2. Use standard home sewing machine needles size #11 (#75) or #14(#90). 1-7 Changing presser foot Turn the machine off . 4. Place the new foot with the pin right underneath the groove of the needle bar. Raise the presser... needles to its highest position by turning the handwheel towards you . 2. 1-6 Changing the needle Replace the needles in the following order: Unplug the machine. 1. With the flat side away from the beginning, threading must be carried out in the following sequence: First: Upper looper threading (A) Second:...
Owner's Manual
Page 12
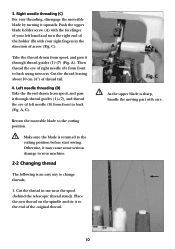
... holder (B) with care. 10 C). Take the thread drawn from spool, and pass it to the cutting position before start sewing. C As the upper blade is sharp, handle the moving part with your machine. 2-2 Changing thread The following is returned to the end of right needle (8) from spool, and pass it upwards. A). Then...
... holder (B) with care. 10 C). Take the thread drawn from spool, and pass it to the cutting position before start sewing. C As the upper blade is sharp, handle the moving part with your machine. 2-2 Changing thread The following is returned to the end of right needle (8) from spool, and pass it upwards. A). Then...
Owner's Manual
Page 15
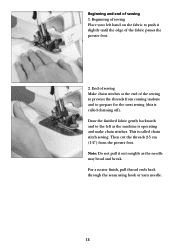
Draw the finished fabric gently backwards and to the left hand on the fabric to push it out roughly as the machine is called chaining off). For a neater finish, pull thread ends back through the seam using hook or yarn needle. 13 This is operating and make ... stitches. Note: Do not pull it slightly until the edge of the sewing to prepare for the next sewing (this is called chain stitch sewing. Beginning and end of sewing Place your left as the needle may bend and break. End of sewing Make chain stitches at the end of the fabric passes the presser...
Draw the finished fabric gently backwards and to the left hand on the fabric to push it out roughly as the machine is called chaining off). For a neater finish, pull thread ends back through the seam using hook or yarn needle. 13 This is operating and make ... stitches. Note: Do not pull it slightly until the edge of the sewing to prepare for the next sewing (this is called chain stitch sewing. Beginning and end of sewing Place your left as the needle may bend and break. End of sewing Make chain stitches at the end of the fabric passes the presser...
Owner's Manual
Page 20
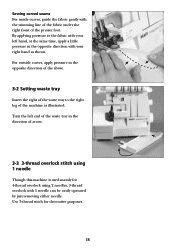
...the fabric with your right hand as illustrated. Turn the left hand, at the same time, apply a little pressure in the direction of the machine as shown. Use 3-thread stitch for 4-thread overlock using 2 needles, 3-thread overlock with your left end of the presser foot. By applying ...pressure to the right leg of arrow. 3-3 3-thread overlock stitch using 1 needle Though this machine is used mainly for decorative purposes. 18 Sewing curved seams For inside curves, guide the fabric gently with the trimming line of the fabric under the right front of ...
...the fabric with your right hand as illustrated. Turn the left hand, at the same time, apply a little pressure in the direction of the machine as shown. Use 3-thread stitch for 4-thread overlock using 2 needles, 3-thread overlock with your left end of the presser foot. By applying ...pressure to the right leg of arrow. 3-3 3-thread overlock stitch using 1 needle Though this machine is used mainly for decorative purposes. 18 Sewing curved seams For inside curves, guide the fabric gently with the trimming line of the fabric under the right front of ...
Owner's Manual
Page 30
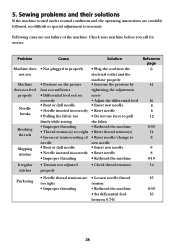
5. Problem Machine does not sew Machine does not feed properly Needle breaks Breaking threads Skipping stitches Irregular stitches Cause Solution • Not plugged in properly • Pressure on the presser foot ... set correctly • Bent or dull needle • Needle inserted incorrectly • Pulling the fabric too firmly while sewing • Improper threading • Thread tension(s) too tight • Incorrect tension setting of the machine. Following cases are not failure of needle • Bent or dull needle • Needle inserted incorrectly • Improper...
5. Problem Machine does not sew Machine does not feed properly Needle breaks Breaking threads Skipping stitches Irregular stitches Cause Solution • Not plugged in properly • Pressure on the presser foot ... set correctly • Bent or dull needle • Needle inserted incorrectly • Pulling the fabric too firmly while sewing • Improper threading • Thread tension(s) too tight • Incorrect tension setting of the machine. Following cases are not failure of needle • Bent or dull needle • Needle inserted incorrectly • Improper...
Owner's Manual
Page 31
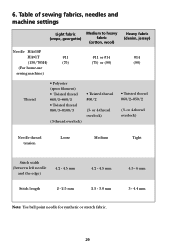
... Light fabric Medium to heavy (crepe, georgette) fabric (cotton, wool) Needle HAx1SP HAx1T #11 (130/705H) (75) (For home-use sewing machine) #11 or #14 (75) or (90) Heavy fabric (denim, jersey) #14 (90) Thread • Polyester (spun filament) • Twisted thread #60/2~#80/2 • Twisted thread #...
... Light fabric Medium to heavy (crepe, georgette) fabric (cotton, wool) Needle HAx1SP HAx1T #11 (130/705H) (75) (For home-use sewing machine) #11 or #14 (75) or (90) Heavy fabric (denim, jersey) #14 (90) Thread • Polyester (spun filament) • Twisted thread #60/2~#80/2 • Twisted thread #...
Owner's Manual
Page 32
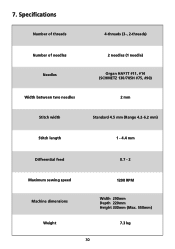
7. Specifications Number of threads 4-threads (3-, 2-threads) Number of needles Needles Width between two needles 2 needles (1 needle) Organ HAx1T #11, #14 (SCHMETZ 130/705H #75, #90) 2 mm Stitch width Standard 4.5 mm (Range 4.2-6.2 mm) Stitch length 1 - 4.4 mm Differential feed 0.7 - 2 Maximum sewing speed 1200 RPM Machine dimensions Weight Width 290mm Depth 220mm Height 330mm (Max. 550mm) 7.3 kg 30
7. Specifications Number of threads 4-threads (3-, 2-threads) Number of needles Needles Width between two needles 2 needles (1 needle) Organ HAx1T #11, #14 (SCHMETZ 130/705H #75, #90) 2 mm Stitch width Standard 4.5 mm (Range 4.2-6.2 mm) Stitch length 1 - 4.4 mm Differential feed 0.7 - 2 Maximum sewing speed 1200 RPM Machine dimensions Weight Width 290mm Depth 220mm Height 330mm (Max. 550mm) 7.3 kg 30


