
Owner's Manual
Page 4
...hobbylock 4764 4 1-2 Accessories ...5 1-3 Connecting the foot control and the electrical connection 6 1-4 Setting telescopic thread stand 7 1-5 Opening and closing front cover and side cover 7 1-6 Changing the needle 8 1-7 Changing the presser foot 8 2Threading 8 2-1 Threading ...8 2-2 Changing thread 10 2-3 Test sewing ...12 3Sewing 12 3-1 4-thread overlock... seams 18 3-2 Setting waste tray 18 3-3 3-thread overlock stitch using 1 needle 18 3-4 2-thread overlock stitch using 1 needle 19 Conversion to 2-thread overlock 20 Stitch selection table 20 Thread tension adjustment 21 3-5...
...hobbylock 4764 4 1-2 Accessories ...5 1-3 Connecting the foot control and the electrical connection 6 1-4 Setting telescopic thread stand 7 1-5 Opening and closing front cover and side cover 7 1-6 Changing the needle 8 1-7 Changing the presser foot 8 2Threading 8 2-1 Threading ...8 2-2 Changing thread 10 2-3 Test sewing ...12 3Sewing 12 3-1 4-thread overlock... seams 18 3-2 Setting waste tray 18 3-3 3-thread overlock stitch using 1 needle 18 3-4 2-thread overlock stitch using 1 needle 19 Conversion to 2-thread overlock 20 Stitch selection table 20 Thread tension adjustment 21 3-5...
Owner's Manual
Page 8
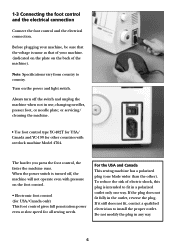
... fully in use; If it still does not fit, contact a qualified electrician to country. Always turn off , the machine will not operate even with overlock machine Model 4764. The harder you press the foot control, the faster the machine runs. To reduce the risk of the machine). 1-3 Connecting the foot control and...
... fully in use; If it still does not fit, contact a qualified electrician to country. Always turn off , the machine will not operate even with overlock machine Model 4764. The harder you press the foot control, the faster the machine runs. To reduce the risk of the machine). 1-3 Connecting the foot control and...
Owner's Manual
Page 14
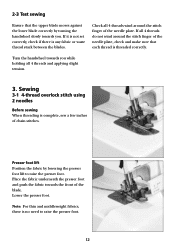
... sure that the upper blade moves against the lower blade correctly by lowering the presser foot lift to raise the presser foot. 12 Sewing 3-1 4-thread overlock stitch using 2 needles Before sewing When threading is no need to raise the presser foot. If all 4 threads do not wind around the stitch finger...
... sure that the upper blade moves against the lower blade correctly by lowering the presser foot lift to raise the presser foot. 12 Sewing 3-1 4-thread overlock stitch using 2 needles Before sewing When threading is no need to raise the presser foot. If all 4 threads do not wind around the stitch finger...
Owner's Manual
Page 19
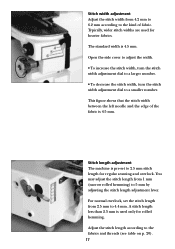
Adjust the stitch length according to a smaller number. A stitch length less than 2.5 mm is 4.5 mm. For normal overlock, set to 2.5 mm stitch length for regular seaming and overlock. Open the side cover to adjust the width. • To increase the stitch width, turn the stitch width adjustment dial to a larger number. • To...
Adjust the stitch length according to a smaller number. A stitch length less than 2.5 mm is 4.5 mm. For normal overlock, set to 2.5 mm stitch length for regular seaming and overlock. Open the side cover to adjust the width. • To increase the stitch width, turn the stitch width adjustment dial to a larger number. • To...
Owner's Manual
Page 20
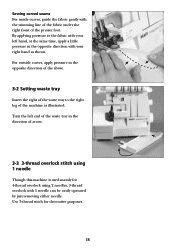
... curved seams For inside curves, guide the fabric gently with the trimming line of the fabric under the right front of arrow. 3-3 3-thread overlock stitch using 2 needles, 3-thread overlock with 1 needle can be easily operated by just removing either needle. For outside curves, apply pressure in the opposite direction of the above...
... curved seams For inside curves, guide the fabric gently with the trimming line of the fabric under the right front of arrow. 3-3 3-thread overlock stitch using 2 needles, 3-thread overlock with 1 needle can be easily operated by just removing either needle. For outside curves, apply pressure in the opposite direction of the above...
Owner's Manual
Page 21
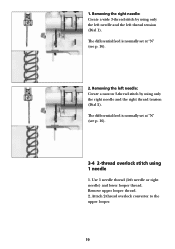
... needle or right needle) and lower looper thread. Use 1 needle thread (left thread tension (Dial 1). The differential feed is normally set at "N" (see p. 16). 3-4 2-thread overlock stitch using only the right needle and the right thread tension (Dial 2). Removing the right needle: Create a wide 3-thread stitch by using 1 needle 1. Attach 2-thread...
... needle or right needle) and lower looper thread. Use 1 needle thread (left thread tension (Dial 1). The differential feed is normally set at "N" (see p. 16). 3-4 2-thread overlock stitch using only the right needle and the right thread tension (Dial 2). Removing the right needle: Create a wide 3-thread stitch by using 1 needle 1. Attach 2-thread...

Owner's Manual
Page 22
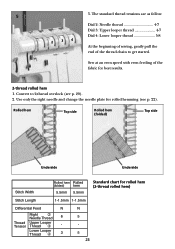
... Material (see p. 29) Left needle 4 5 6 Right needle 4 5 6 Upper looper 4 5 6 Lower looper 2 3 4 Stitch length dial Stitch width adjusting dial 2-Thread Light - 1-2 - 3-4 Overlock Medium - 1-2 - 3-4 (Narrow) Heavy - 2-3 - 4-5 2.5-3 4.5 2-Thread Light 1 - - 3-4 Overlock Medium 1 - - 3-4 (Wide) Heavy 2 - - 4-5 2.5-3 4.5 2-Thread Light - 4-6 - 4-6 Narrow edge Medium - 4-6 - 4-6 Heavy - - - - 1-1.5 5.5 2-Thread Light - 5-6 - 3-4 Rolled hem Medium - 5-6 - 3-4 Heavy - - - - 1-1.5 5.5 Since above settings are using...
... Material (see p. 29) Left needle 4 5 6 Right needle 4 5 6 Upper looper 4 5 6 Lower looper 2 3 4 Stitch length dial Stitch width adjusting dial 2-Thread Light - 1-2 - 3-4 Overlock Medium - 1-2 - 3-4 (Narrow) Heavy - 2-3 - 4-5 2.5-3 4.5 2-Thread Light 1 - - 3-4 Overlock Medium 1 - - 3-4 (Wide) Heavy 2 - - 4-5 2.5-3 4.5 2-Thread Light - 4-6 - 4-6 Narrow edge Medium - 4-6 - 4-6 Heavy - - - - 1-1.5 5.5 2-Thread Light - 5-6 - 3-4 Rolled hem Medium - 5-6 - 3-4 Heavy - - - - 1-1.5 5.5 Since above settings are using...
Owner's Manual
Page 24
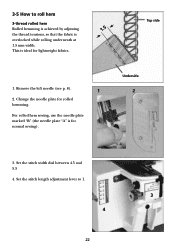
3-5 How to 1. 3 4 22 Remove the left needle (see p. 8). 1 2. Change the needle plate for lightweight fabrics. Set the stitch length adjustment lever to roll hem 3-thread rolled hem Rolled hemming is achieved by adjusting 1.5 the thread tensions, so that the fabric is for normal sewing). This is ideal for rolled hemming. Top side 1. Underside 2 3. Set the stitch width dial between 4.5 and 5.5 4. For rolled hem sewing, use the needle plate marked "B" (the needle plate "A" is overlocked while rolling underneath at 1.5 mm width.
3-5 How to 1. 3 4 22 Remove the left needle (see p. 8). 1 2. Change the needle plate for lightweight fabrics. Set the stitch length adjustment lever to roll hem 3-thread rolled hem Rolled hemming is achieved by adjusting 1.5 the thread tensions, so that the fabric is for normal sewing). This is ideal for rolled hemming. Top side 1. Underside 2 3. Set the stitch width dial between 4.5 and 5.5 4. For rolled hem sewing, use the needle plate marked "B" (the needle plate "A" is overlocked while rolling underneath at 1.5 mm width.
Owner's Manual
Page 25
Sew at an even speed with even feeding of the thread chain to 2-thread overlock (see p. 22). Use only the right needle and change the needle plate for rolled hemming (see p. 20). 2. Convert to get started. Rolled hem Top side ...
Sew at an even speed with even feeding of the thread chain to 2-thread overlock (see p. 22). Use only the right needle and change the needle plate for rolled hemming (see p. 20). 2. Convert to get started. Rolled hem Top side ...

Owner's Manual
Page 26
To sew a narrow cord, positioning it on the front of the fabric encased in stitching. 2. Taping a seam can be used to strengthen stitches when joining elastic fabrics such as knits. There are two ways to sew catching cord or tape in the overlock stitch. 3-6 Corded overlock Corded overlock can prevent knit fabrics from stretching and also stabilize the seams. 2 24 Thread cord through the hole on the edge of the foot. Place a slightly wide cord or tape (about 3 mm) under the right needle and 1 start to sew corded overlock. 1.
To sew a narrow cord, positioning it on the front of the fabric encased in stitching. 2. Taping a seam can be used to strengthen stitches when joining elastic fabrics such as knits. There are two ways to sew catching cord or tape in the overlock stitch. 3-6 Corded overlock Corded overlock can prevent knit fabrics from stretching and also stabilize the seams. 2 24 Thread cord through the hole on the edge of the foot. Place a slightly wide cord or tape (about 3 mm) under the right needle and 1 start to sew corded overlock. 1.
Owner's Manual
Page 31
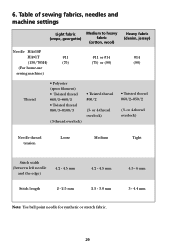
..., jersey) #14 (90) Thread • Polyester (spun filament) • Twisted thread #60/2~#80/2 • Twisted thread #80/3~#100/3 (3-thread overlock) • Twisted thread #60/2 (3- or 4-thread overlock) • Twisted thread #60/2~#50/2 (3- 6. or 4-thread overlock) Needle thread tension Loose Medium Tight Stitch width (between left needle and the edge) 4.2 - 4.5 mm Stitch length 2 - 2.5 mm...
..., jersey) #14 (90) Thread • Polyester (spun filament) • Twisted thread #60/2~#80/2 • Twisted thread #80/3~#100/3 (3-thread overlock) • Twisted thread #60/2 (3- or 4-thread overlock) • Twisted thread #60/2~#50/2 (3- 6. or 4-thread overlock) Needle thread tension Loose Medium Tight Stitch width (between left needle and the edge) 4.2 - 4.5 mm Stitch length 2 - 2.5 mm...
Owner's Manual
Page 33
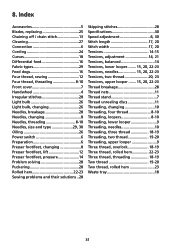
... 8-10 Threading, loopers 8-10 Threading, lower looper 9 Threading, needles 10 Threading, three thread 18-19 Threading, two thread 19-20 Threading, upper looper 9 Three thread, overlock 18-19 Three thread, rolled hem 22-23 Three thread, threading 18-19 Two thread 19-20 Two thread, rolled hem 23 Waste tray 18...
... 8-10 Threading, loopers 8-10 Threading, lower looper 9 Threading, needles 10 Threading, three thread 18-19 Threading, two thread 19-20 Threading, upper looper 9 Three thread, overlock 18-19 Three thread, rolled hem 22-23 Three thread, threading 18-19 Two thread 19-20 Two thread, rolled hem 23 Waste tray 18...


