

Owner's Manual
Page 4
...hobbylock 4760 (1) Thread spool stand (2) Carrying handle (3) Left needle thread tension dial (4) Right needle thread tension dial (5) Right looper thread tension dial (6) Left looper thread tension dial (7) Thread tension cover (10) Looper cover with recess (1 2) Swivel-type work support (13) Needle plate (14) Sewing foot (15) Needle holder (16) Sewing foot lifting lever (1 7) Thread... spooler holder (18) Color-coded thread guides (19) Telescopic thread guide bar (24) Accessory box (25) Stitch length adjustment knob (26)...
...hobbylock 4760 (1) Thread spool stand (2) Carrying handle (3) Left needle thread tension dial (4) Right needle thread tension dial (5) Right looper thread tension dial (6) Left looper thread tension dial (7) Thread tension cover (10) Looper cover with recess (1 2) Swivel-type work support (13) Needle plate (14) Sewing foot (15) Needle holder (16) Sewing foot lifting lever (1 7) Thread... spooler holder (18) Color-coded thread guides (19) Telescopic thread guide bar (24) Accessory box (25) Stitch length adjustment knob (26)...

Owner's Manual
Page 5
... the sewing machine needle. 12. Do not allow plug to off ("0") when making any object into water. Never operate on a soft surface such as threading needle, changing needle, threading bobbin, or changing presser foot, etc. 16. It may be blocked. 10. Use this sewing machine only for a sewing machine that has fallen...
... the sewing machine needle. 12. Do not allow plug to off ("0") when making any object into water. Never operate on a soft surface such as threading needle, changing needle, threading bobbin, or changing presser foot, etc. 16. It may be blocked. 10. Use this sewing machine only for a sewing machine that has fallen...

Owner's Manual
Page 8
... the swivel-type work support. Threading guide wires 18 and 22 Threading the right looper Threading the left looper / threading slide Threading the left and right needle Needle threader Thread reel change on safety How to observe during sewing Thread cutter Securing the seam Setting the standard thread tensions Possibilities requiring thread tension corrections. 3-thread overedge seam Engaging and disengaging...
... the swivel-type work support. Threading guide wires 18 and 22 Threading the right looper Threading the left looper / threading slide Threading the left and right needle Needle threader Thread reel change on safety How to observe during sewing Thread cutter Securing the seam Setting the standard thread tensions Possibilities requiring thread tension corrections. 3-thread overedge seam Engaging and disengaging...

Owner's Manual
Page 9
Rolled hem with 3 threads Rolled hem with 2 threads Changing the needles Changing the knives Changing the upper knife Changing the lower knife Upper knife arresting Cleaning the knives Oiling the machine Stitch selection table Sewing problems and their removal Accessories Thread spool net/thread unreeling disc Mounting of the Converter Special accessories Specifications / contents of the cardboard box 26 • • 27 28, 29 30 • • 31 31 • . 44 45 48 53 5 Changing the sewing foot Changing the light bulb Cleaning the thread tensions .
Rolled hem with 3 threads Rolled hem with 2 threads Changing the needles Changing the knives Changing the upper knife Changing the lower knife Upper knife arresting Cleaning the knives Oiling the machine Stitch selection table Sewing problems and their removal Accessories Thread spool net/thread unreeling disc Mounting of the Converter Special accessories Specifications / contents of the cardboard box 26 • • 27 28, 29 30 • • 31 31 • . 44 45 48 53 5 Changing the sewing foot Changing the light bulb Cleaning the thread tensions .

Owner's Manual
Page 12
How to handle the thread spool stand Pull thread spool stand 1 as far as it will go in place. After use fold up against the machine. 8 Push thread spool stand (with or without spools) up telescopic thread guide bar 19. Fully extend telescopic thread guide bar 19. Slowly turn the two upper tele scopic sections until you hear their de tent balls snap in the direction indkated by the arrow.
How to handle the thread spool stand Pull thread spool stand 1 as far as it will go in place. After use fold up against the machine. 8 Push thread spool stand (with or without spools) up telescopic thread guide bar 19. Fully extend telescopic thread guide bar 19. Slowly turn the two upper tele scopic sections until you hear their de tent balls snap in the direction indkated by the arrow.

Owner's Manual
Page 13
...right. left needle (blue) Push carrying handle 2 down . To close the work support 12, push it locks. First pull the threads through guides 18 according to the machine is illustrated with its slide settings for the respective stitch type. Opening and closing looper cover ...and work support is open work support, push it lightly until it in rear guides 22. Behind the looper cover converter 41 is interrupted. Threading of the looper cover the individual threa ding paths are illustrated in the following sequence: 1. right needle (green) 4. right looper (yellow)...
...right. left needle (blue) Push carrying handle 2 down . To close the work support 12, push it locks. First pull the threads through guides 18 according to the machine is illustrated with its slide settings for the respective stitch type. Opening and closing looper cover ...and work support is open work support, push it lightly until it in rear guides 22. Behind the looper cover converter 41 is interrupted. Threading of the looper cover the individual threa ding paths are illustrated in the following sequence: 1. right needle (green) 4. right looper (yellow)...

Owner's Manual
Page 14
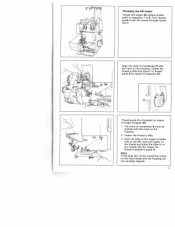
Thread right looper 31 in it: right position B. Please refer to 9 and pull approximately 10cm (4 of converter 41 must be in sequence 1 to page 20. Threading the right looper The slide of thread through the looper eye (the thread path is marked red). Important: In order to obtain perfect sewing re suits, the thread must be pulled bet ween the tension discs when threading the tensions. 10
Thread right looper 31 in it: right position B. Please refer to 9 and pull approximately 10cm (4 of converter 41 must be in sequence 1 to page 20. Threading the right looper The slide of thread through the looper eye (the thread path is marked red). Important: In order to obtain perfect sewing re suits, the thread must be pulled bet ween the tension discs when threading the tensions. 10
Owner's Manual
Page 15
... Align the mark on handwheel 9 with the mark on the housing. Tauten the thread a little. 3. By this means the thread is threaded by means of looper threader 40. 1. The mark on handwheel 9 must be moved the marks on the thread and allow the slide to re turn slowly. Push the slide of the looper... threader fully to 6. Threading the left looper Thread left , then pull lightly on the hand wheel and the housing are not correctly aligned...
... Align the mark on handwheel 9 with the mark on the housing. Tauten the thread a little. 3. By this means the thread is threaded by means of looper threader 40. 1. The mark on handwheel 9 must be moved the marks on the thread and allow the slide to re turn slowly. Push the slide of the looper... threader fully to 6. Threading the left looper Thread left , then pull lightly on the hand wheel and the housing are not correctly aligned...

Owner's Manual
Page 16
In the left-hand illustration the threa ding path is shown from the front. The use of needle threader 42 is described on the next page. 12 Thread the needle from green tension 1 up to right needle eye 6. The use of needle threader 42 is described on the next page. Threading the left needle Threading of guide wires 18 and 22 is shown on page 9. Thread the needle from blue tension 1 up to left needle eye 6. Threading the right needle Threading of guide wires 18 and 22 is shown on page 9, In the left-hand illustration the threa ding path is shown from the front.
In the left-hand illustration the threa ding path is shown from the front. The use of needle threader 42 is described on the next page. 12 Thread the needle from green tension 1 up to right needle eye 6. The use of needle threader 42 is described on the next page. Threading the left needle Threading of guide wires 18 and 22 is shown on page 9. Thread the needle from blue tension 1 up to left needle eye 6. Threading the right needle Threading of guide wires 18 and 22 is shown on page 9, In the left-hand illustration the threa ding path is shown from the front.

Owner's Manual
Page 17
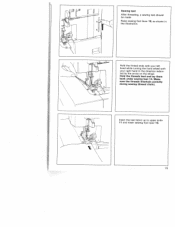
... of the needle (see top of thread through the eye. it a little, holding the needle threader a little turned to the thread spool. Place new thread spools on threaded machine Cut the threads close to the front. The looper threads can be placed in the needle eye. Thread spool change on spool holders 17. ...about 15 cm past the looper eyes without interruption. Turn the hand wheel until small hook C engages in hook C, too. Pull the needle threads out of lifting lever 16. Needle threader Lower the sewing foot by means of the needles. Pull the needle threader to -gether. Tie the...
... of the needle (see top of thread through the eye. it a little, holding the needle threader a little turned to the thread spool. Place new thread spools on threaded machine Cut the threads close to the front. The looper threads can be placed in the needle eye. Thread spool change on spool holders 17. ...about 15 cm past the looper eyes without interruption. Turn the hand wheel until small hook C engages in hook C, too. Pull the needle threads out of lifting lever 16. Needle threader Lower the sewing foot by means of the needles. Pull the needle threader to -gether. Tie the...

Owner's Manual
Page 18
For removal of 16 mm must be taken into consideration when cutting the fabric. 14 Seam allowance If the cutting is guided along below mark N on looper cover 10, a seam allowance of the lint box, use the reverse order. Then push the bottom of lint box 8 down , and close work support 12 and looper cover 10. After threading the machine, push handle 2 down wards in the recess of looper cover 10. Inserting the lint box: Insert the two tabs of the box against the machine.
For removal of 16 mm must be taken into consideration when cutting the fabric. 14 Seam allowance If the cutting is guided along below mark N on looper cover 10, a seam allowance of the lint box, use the reverse order. Then push the bottom of lint box 8 down , and close work support 12 and looper cover 10. After threading the machine, push handle 2 down wards in the recess of looper cover 10. Inserting the lint box: Insert the two tabs of the box against the machine.
Owner's Manual
Page 19
Hold the thread ends with your left hand while turning the hand wheel with your right hand in the illustration. Make sure the threads interlock correctly during sewing (thread chain). Insert the test fabric up to upper knife 11 and lower sewing foot lever 16. 15 Raise sewing foot lever 16, as shown in the direction indica ted by the arrow on the wheel. Hold the threads taut and lay them back under sewing foot 14. Sewing test After threading, a sewing test should be made.
Hold the thread ends with your left hand while turning the hand wheel with your right hand in the illustration. Make sure the threads interlock correctly during sewing (thread chain). Insert the test fabric up to upper knife 11 and lower sewing foot lever 16. 15 Raise sewing foot lever 16, as shown in the direction indica ted by the arrow on the wheel. Hold the threads taut and lay them back under sewing foot 14. Sewing test After threading, a sewing test should be made.
Owner's Manual
Page 20
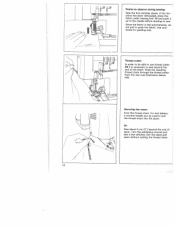
.... Or: Sew about 5 cm (2") beyond the end of seam. Turn the workpiece around and sew a few stitches over the seam just sewn without cutting the thread chain. 16 If the ma chine has been rethreaded, place the fabric under sewing foot 14 and push it is fed automatically, do not pull... or push the fabric. Use your hands for guiding only. Thread cutter In order to be used to sew. Draw the resulting thread chain through the thread cutter from the rear (see illustration below left). Points to sew beyond the end of the seam.
.... Or: Sew about 5 cm (2") beyond the end of seam. Turn the workpiece around and sew a few stitches over the seam just sewn without cutting the thread chain. 16 If the ma chine has been rethreaded, place the fabric under sewing foot 14 and push it is fed automatically, do not pull... or push the fabric. Use your hands for guiding only. Thread cutter In order to be used to sew. Draw the resulting thread chain through the thread cutter from the rear (see illustration below left). Points to sew beyond the end of the seam.

Owner's Manual
Page 21
... their respective looper- Allocation of the individual thread tensions. Face side Right looper thread Setting the standard thread tension N Optimum seam appearance depends on the type of fabric used, on the thread size, and on thread tension cover 7 (see illustration below). thread color = tension color). Set the N on the thread tension dials opposite the round colored mark...
... their respective looper- Allocation of the individual thread tensions. Face side Right looper thread Setting the standard thread tension N Optimum seam appearance depends on the type of fabric used, on the thread size, and on thread tension cover 7 (see illustration below). thread color = tension color). Set the N on the thread tension dials opposite the round colored mark...

Owner's Manual
Page 22
... be corrected. 1. A is too 3. The left needle thread (blue thread tension). is too loose The right needle thread (green thread tension>. The left looper thread 0 (yellow thread tension). is too loose 3. The (red right looper thread thread tension>. is too tight 2. The left (yellow looper thread thread D tension). The right loose (red looper thread C thread tension). Face side Reverse side Possibihties corrections...
... be corrected. 1. A is too 3. The left needle thread (blue thread tension). is too loose The right needle thread (green thread tension>. The left looper thread 0 (yellow thread tension). is too loose 3. The (red right looper thread thread tension>. is too tight 2. The left (yellow looper thread thread D tension). The right loose (red looper thread C thread tension). Face side Reverse side Possibihties corrections...

Owner's Manual
Page 23
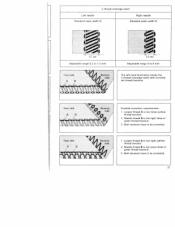
... 5 mm) only refer to 7.2 mm). When the left looper is described on pages 10 and 11. The 3-thread overedge seam is sewn with two looper threads and one needle thread. seam width 5 mm 19 seam width 7.2 mm Standard seam width N El 3,5 MM Max. Seam width adjustments ...at its right position B (see p. 20). Left needle 3-thread overedge seam Right needle Standard seam width N -1 I 5.7 MM Max. 3-thread overedge seam: Threading of converter 41 must be set value is increased by 2.2 mm (seam width 5.2 to the right needle.
... 5 mm) only refer to 7.2 mm). When the left looper is described on pages 10 and 11. The 3-thread overedge seam is sewn with two looper threads and one needle thread. seam width 5 mm 19 seam width 7.2 mm Standard seam width N El 3,5 MM Max. Seam width adjustments ...at its right position B (see p. 20). Left needle 3-thread overedge seam Right needle Standard seam width N -1 I 5.7 MM Max. 3-thread overedge seam: Threading of converter 41 must be set value is increased by 2.2 mm (seam width 5.2 to the right needle.

Owner's Manual
Page 24
... eye. Engaging the converter Turn the hand wheel until right looper 31 is positioned right of converter 41 to the left until the left looper thread placed over the point of the right looper in this position (position B). Push the slide of the needle. All seams sewn with converter 41... right looper 31 must be cut off and pulled out of the arrow, as shown in the eye of right looper 31. The left looper thread drops from the point of the looper, see p. 10. 20 A. Converter engaged = position A Converter disengages = position B Disengaging the converter Turn hand wheel 9 slowly until ...
... eye. Engaging the converter Turn the hand wheel until right looper 31 is positioned right of converter 41 to the left until the left looper thread placed over the point of the right looper in this position (position B). Push the slide of the needle. All seams sewn with converter 41... right looper 31 must be cut off and pulled out of the arrow, as shown in the eye of right looper 31. The left looper thread drops from the point of the looper, see p. 10. 20 A. Converter engaged = position A Converter disengages = position B Disengaging the converter Turn hand wheel 9 slowly until ...
Owner's Manual
Page 25
... have to be corrected. 1. Both tensions have to 5 mm The left-hand illustration shows the 2-thread overedge seam with correctly set thread tensions. Looper thread A is too loose (blue or green thread tension). 3. Needle thread B is too loose (yellow I thread tension>. 2. 2-thread overedge seam Left needle Standard seam width N Right needle Standard seam width N r L__ 5,7 MM Adjustable...
... have to be corrected. 1. Both tensions have to 5 mm The left-hand illustration shows the 2-thread overedge seam with correctly set thread tensions. Looper thread A is too loose (blue or green thread tension). 3. Needle thread B is too loose (yellow I thread tension>. 2. 2-thread overedge seam Left needle Standard seam width N Right needle Standard seam width N r L__ 5,7 MM Adjustable...

Owner's Manual
Page 26
... ! Standard setting N is 3 mm. 22 Light materials: Organdy, light-knit fabric, Taffeta, silk lining materials Thread Cotton No. 80 - 100 Silk No. 80 - 100 Synthetic thread No. 70 - 140 Stitch length 2,0 to 4,0 mm Medium-heavy materials: Cotton, tricot linen, dress materials Cotton... 60 Silk No. 40 - 60 Synthetic thread No. 70 - 140 2,0 to 4,0 mm Rolled hem with 2 or 3 threads (bulk thread) Polyester thread No. 1 20 - 140 Mercerized thread 1,0 to 2.0 mm Setting the stitch length Open work support 12. Thread chart for 2-, 3-, 4-thread- Hold hand wheel 9 fast and set ...
... ! Standard setting N is 3 mm. 22 Light materials: Organdy, light-knit fabric, Taffeta, silk lining materials Thread Cotton No. 80 - 100 Silk No. 80 - 100 Synthetic thread No. 70 - 140 Stitch length 2,0 to 4,0 mm Medium-heavy materials: Cotton, tricot linen, dress materials Cotton... 60 Silk No. 40 - 60 Synthetic thread No. 70 - 140 2,0 to 4,0 mm Rolled hem with 2 or 3 threads (bulk thread) Polyester thread No. 1 20 - 140 Mercerized thread 1,0 to 2.0 mm Setting the stitch length Open work support 12. Thread chart for 2-, 3-, 4-thread- Hold hand wheel 9 fast and set ...
Owner's Manual
Page 31
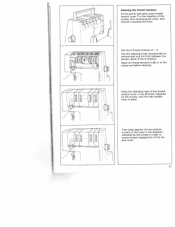
... of the 4 tensions. thus loosening the cover, then remove it towards the front. Cleaning the thread tensions: At the points indicated, press thread tension cover 7 in place. Set the 4 thread tensions at - 5. Press the individual tabs of the thread tension cover in the direction indicated by the arrows in order to ensure proper engagement...
... of the 4 tensions. thus loosening the cover, then remove it towards the front. Cleaning the thread tensions: At the points indicated, press thread tension cover 7 in place. Set the 4 thread tensions at - 5. Press the individual tabs of the thread tension cover in the direction indicated by the arrows in order to ensure proper engagement...


