
Owner's Manual
Page 2
... needle and blades. • Always use bent needles. • Do not pull or push fabric while stitching. Use only attachments recommended by the manufacturer as threading needle, changing needle, or changing presser foot, etc. • Always unplug sewing machine from the electrical outlet when removing covers, lubricating, or when making any...
... needle and blades. • Always use bent needles. • Do not pull or push fabric while stitching. Use only attachments recommended by the manufacturer as threading needle, changing needle, or changing presser foot, etc. • Always unplug sewing machine from the electrical outlet when removing covers, lubricating, or when making any...
Owner's Manual
Page 3
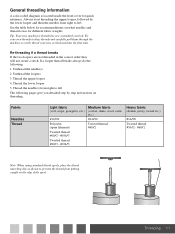
...5 Optional accessories from INSPIRA 6 Preparations Connecting the foot control and the power supply 7 Setting up the spool stand 7 Setting up the telescopic thread stand 7 Front cover 8 Open ...8 Close...8 Attaching the waste tray 8 Presser foot lift 8 Changing the presser foot 8 Needle information 9 Changing... length adjustment 24 Differential feed adjustment 25 Gathered overlock (stretch, knit fabrics 25 Stretch overlock (lightweight fabrics 25 Thread tension fine tuning 26 Maintenance Machine maintenance 28 Cleaning 28 Oiling ...28 Replacing the movable upper cutter 28...
...5 Optional accessories from INSPIRA 6 Preparations Connecting the foot control and the power supply 7 Setting up the spool stand 7 Setting up the telescopic thread stand 7 Front cover 8 Open ...8 Close...8 Attaching the waste tray 8 Presser foot lift 8 Changing the presser foot 8 Needle information 9 Changing... length adjustment 24 Differential feed adjustment 25 Gathered overlock (stretch, knit fabrics 25 Stretch overlock (lightweight fabrics 25 Thread tension fine tuning 26 Maintenance Machine maintenance 28 Cleaning 28 Oiling ...28 Replacing the movable upper cutter 28...

Owner's Manual
Page 4
... fine tuning lever (yellow) 7. Front cover 10.Power & light switch 11.Foot control/electric power cord socket 12. Telescopic thread stand 2. Handwheel 13.Stitch length dial 14.Spool stand 15.Cone holder 16.Auto tension dial (ATD) 17.Spool pin 18 19 20 21 22 ...25 23 24 18.Presser foot pressure adjusting dial 19.Thread cutter 20.Presser foot lift 21.Hole for extension table (optional accessory, part number 416384201) 22.Differential feed adjusting dial 23.Presser foot ankle 24...
... fine tuning lever (yellow) 7. Front cover 10.Power & light switch 11.Foot control/electric power cord socket 12. Telescopic thread stand 2. Handwheel 13.Stitch length dial 14.Spool stand 15.Cone holder 16.Auto tension dial (ATD) 17.Spool pin 18 19 20 21 22 ...25 23 24 18.Presser foot pressure adjusting dial 19.Thread cutter 20.Presser foot lift 21.Hole for extension table (optional accessory, part number 416384201) 22.Differential feed adjusting dial 23.Presser foot ankle 24...

Owner's Manual
Page 5
...discs (4) 5. 26.Moveable upper cutter 27.Stitch finger lever 28.Stationary lower cutter 29.Lower looper 30.Upper looper 31.2-thread converter 30 27 28 29 31 26 Accessories Accessories are in the accessory box. 1. Oiler 7. Two needles, size #14/...90, are contained in the machine on delivery. 1 23 4 9 12 5 6 7 8 11 10 13 Introduction 5 Allen key 8. Tweezers 9. Screwdriver 3. Thread spool nets (4) 6. Accessory box 2. Cone holders (4) 10.Dust cover 11.Lint brush 12.Waste tray 13.Needle threader 14.Needle pack (not pictured) system ELx705...
...discs (4) 5. 26.Moveable upper cutter 27.Stitch finger lever 28.Stationary lower cutter 29.Lower looper 30.Upper looper 31.2-thread converter 30 27 28 29 31 26 Accessories Accessories are in the accessory box. 1. Oiler 7. Two needles, size #14/...90, are contained in the machine on delivery. 1 23 4 9 12 5 6 7 8 11 10 13 Introduction 5 Allen key 8. Tweezers 9. Screwdriver 3. Thread spool nets (4) 6. Accessory box 2. Cone holders (4) 10.Dust cover 11.Lint brush 12.Waste tray 13.Needle threader 14.Needle pack (not pictured) system ELx705...
Owner's Manual
Page 7
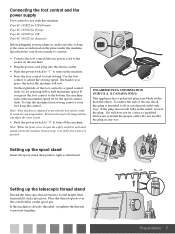
...for Australia Before plugging your foot from sewing, even if the foot control is intended to fit in , make sure the voltage is already threaded, straighten the threads to prevent tangling. Do not modify the plug in the outlet, reverse the plug. On the right side of electric shock, this machine: ... foot control/electric power cord to the socket on the machine. • Plug the power cord plug into place. Setting up the telescopic thread stand Extend the telescopic thread stand to adjust the sewing speed. Place the thread spools over the cone holders on the spool pin.
...for Australia Before plugging your foot from sewing, even if the foot control is intended to fit in , make sure the voltage is already threaded, straighten the threads to prevent tangling. Do not modify the plug in the outlet, reverse the plug. On the right side of electric shock, this machine: ... foot control/electric power cord to the socket on the machine. • Plug the power cord plug into place. Setting up the telescopic thread stand Extend the telescopic thread stand to adjust the sewing speed. Place the thread spools over the cone holders on the spool pin.
Owner's Manual
Page 10
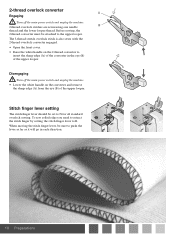
...be sure to push the lever as far as it will go in the eye (B) of the upper looper. The 3-thread stretch overlock stitch is also sewn with the 2-thread overlock converter engaged. • Open the front cover. • Raise the white handle on the converter and remove ...finger lever to the upper looper. Disengaging Turn off the main power switch and unplug the machine. 2-thread overlock stitches are sewn using one needle B thread and the lower looper thread. 2-thread overlock converter A Engaging Turn off the main power switch and unplug the machine. • Lower the white ...
...be sure to push the lever as far as it will go in the eye (B) of the upper looper. The 3-thread stretch overlock stitch is also sewn with the 2-thread overlock converter engaged. • Open the front cover. • Raise the white handle on the converter and remove ...finger lever to the upper looper. Disengaging Turn off the main power switch and unplug the machine. 2-thread overlock stitches are sewn using one needle B thread and the lower looper thread. 2-thread overlock converter A Engaging Turn off the main power switch and unplug the machine. • Lower the white ...
Owner's Manual
Page 11
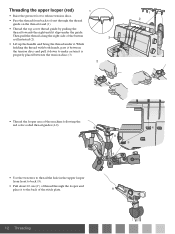
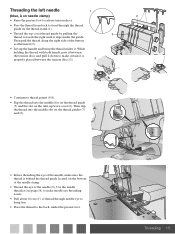
... the correct order they will not create a stitch. Tip: Your new machine is located inside the front cover for different fabric weights. Thread the upper looper 4. If a looper thread breaks always do the following pages give you detailed step by the lower looper and then the needles from getting caught on what...
... the correct order they will not create a stitch. Tip: Your new machine is located inside the front cover for different fabric weights. Thread the upper looper 4. If a looper thread breaks always do the following pages give you detailed step by the lower looper and then the needles from getting caught on what...
Owner's Manual
Page 12
...certain it is properly placed between the tension discs (3) 2 1 2 • Thread the looper area of the machine following the red color coded thread guides (4-9). 9 4 8 5 76 • Use the tweezers to thread the hole in the upper looper from back to the back of the stitch plate... presser foot to release tension discs. • Pass the thread from front to back (9). • Pull about 10 cm (4") of thread through the thread guide on the thread stand (1). • Thread the top cover thread guide by pulling the thread towards the right until it slips under it to front through...
...certain it is properly placed between the tension discs (3) 2 1 2 • Thread the looper area of the machine following the red color coded thread guides (4-9). 9 4 8 5 76 • Use the tweezers to thread the hole in the upper looper from back to the back of the stitch plate... presser foot to release tension discs. • Pass the thread from front to back (9). • Pull about 10 cm (4") of thread through the thread guide on the thread stand (1). • Thread the top cover thread guide by pulling the thread towards the right until it slips under it to front through...
Owner's Manual
Page 13
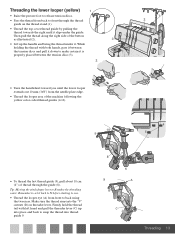
... looper eye (A) from back to front through the guide (8). Then pull the thread along the right side of thread through the thread guide on the thread stand (1). • Thread the top cover thread guide by pulling the thread towards the right until it slips under it is properly placed between the tension...lower looper extends out 10 mm (3/8") from the needle plate edge. • Thread the looper area of the machine following the yellow color coded thread guides (4-10). 10 9 4 5 • To thread the last thread guide (9), pull about 10 cm (4") of the button as illustrated (2). 3 &#...
... looper eye (A) from back to front through the guide (8). Then pull the thread along the right side of thread through the thread guide on the thread stand (1). • Thread the top cover thread guide by pulling the thread towards the right until it slips under it is properly placed between the tension...lower looper extends out 10 mm (3/8") from the needle plate edge. • Thread the looper area of the machine following the yellow color coded thread guides (4-10). 10 9 4 5 • To thread the last thread guide (9), pull about 10 cm (4") of the button as illustrated (2). 3 &#...
Owner's Manual
Page 14
... to front through needle eye to hang free. • Place the thread to the back, under the guide. 3 Then pull the thread along the right side of thread through the thread guide on the thread stand (1). • Thread the top cover thread guide by pulling the thread towards the right until it . Use the needle threader (see page...
... to front through needle eye to hang free. • Place the thread to the back, under the guide. 3 Then pull the thread along the right side of thread through the thread guide on the thread stand (1). • Thread the top cover thread guide by pulling the thread towards the right until it . Use the needle threader (see page...
Owner's Manual
Page 15
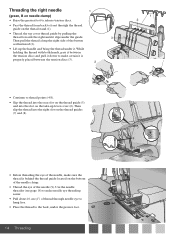
... foot to release tension discs. • Pass the thread from back to front through needle eye to hang free. • Place the thread to the back, under the presser foot. 6 4 5 7 8 9 9 Threading 15 While holding the thread with both hands, pass it between the tension discs and... pull it down to make sure the thread is properly placed between the tension discs (3). 2 1 2 • Continue to thread points (4-8). • Slip the thread into the middle slot on the thread guides (7) and (8). • Before threading the eye of the button as illustrated (2). •...
... foot to release tension discs. • Pass the thread from back to front through needle eye to hang free. • Place the thread to the back, under the presser foot. 6 4 5 7 8 9 9 Threading 15 While holding the thread with both hands, pass it between the tension discs and... pull it down to make sure the thread is properly placed between the tension discs (3). 2 1 2 • Continue to thread points (4-8). • Slip the thread into the middle slot on the thread guides (7) and (8). • Before threading the eye of the button as illustrated (2). •...
Owner's Manual
Page 16
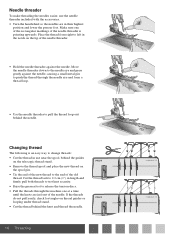
...of the new thread to pull the thread loop out behind the needle. Changing thread The following is pointing upwards. If the threads do not pull easily, check for tangles on thread guides or looping under thread stand. • Cut the thread behind the guides on the telescopic thread stand. • Remove the thread spool and place... tip of the needle threader. • Hold the needle threader against the needle, causing a small metal pin to push the thread through the machine one of the rectangular markings of the needle threader is an easy way to the needle eye and press gently against...
...of the new thread to pull the thread loop out behind the needle. Changing thread The following is pointing upwards. If the threads do not pull easily, check for tangles on thread guides or looping under thread stand. • Cut the thread behind the guides on the telescopic thread stand. • Remove the thread spool and place... tip of the needle threader. • Hold the needle threader against the needle, causing a small metal pin to push the thread through the machine one of the rectangular markings of the needle threader is an easy way to the needle eye and press gently against...

Owner's Manual
Page 17
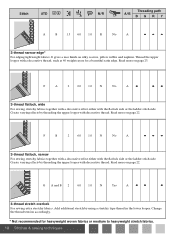
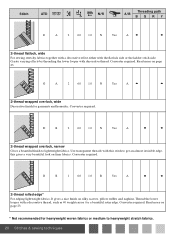
... lever setting A/B Setting for creating decorative tucks. Popular for upper cutter Stitch length Differential feed 2-thread converter Stitch ATD N/R Threading path A/B BGR Y A A and B 2.5 6.0 1.0 N No A 4-thread overlock For all seams where stretch or give is set automatically by combining the ATD with different needle...or overcasting a single layer of fabric and thread you sew, trying to medium fabric. Use decorative threads in the loopers and regular thread in this table are obtained by the use of the 2-thread converter. For best results make tension adjustments in...
... lever setting A/B Setting for creating decorative tucks. Popular for upper cutter Stitch length Differential feed 2-thread converter Stitch ATD N/R Threading path A/B BGR Y A A and B 2.5 6.0 1.0 N No A 4-thread overlock For all seams where stretch or give is set automatically by combining the ATD with different needle...or overcasting a single layer of fabric and thread you sew, trying to medium fabric. Use decorative threads in the loopers and regular thread in this table are obtained by the use of the 2-thread converter. For best results make tension adjustments in...
Owner's Manual
Page 18
...with the flatlock side or the ladder stitch side. Read more on page 22. Read more on page 23. Add additional stretch by threading the upper looper with the flatlock side or the ladder stitch side. It gives a nice finish on page 22. F ...B 2 6.0 1.0 N No A ••• 3-thread flatlock, narrow For sewing stretchy fabrics together with a decorative effect either with decorative thread. Create varying effects by using a stretchy type thread in the lower looper. Read more on silky scarves, pillow ruffles ...
...with the flatlock side or the ladder stitch side. Read more on page 22. Read more on page 23. Add additional stretch by threading the upper looper with the flatlock side or the ladder stitch side. It gives a nice finish on page 22. F ...B 2 6.0 1.0 N No A ••• 3-thread flatlock, narrow For sewing stretchy fabrics together with a decorative effect either with decorative thread. Create varying effects by using a stretchy type thread in the lower looper. Read more on silky scarves, pillow ruffles ...
Owner's Manual
Page 19
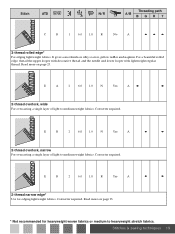
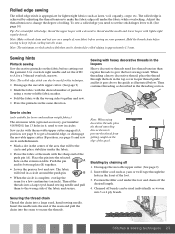
... lightweight fabrics. E A 2 6.0 1.0 N Yes A• • 2-thread overlock, wide For overcasting a single layer of light to medium weight fabrics. E B 2 6.0 1.0 R Yes A • • 2-thread narrow edge* Use for heavyweight woven fabrics or medium to heavyweight stretch fabrics. ...64258;es and napkins. For a beautiful rolled edge, thread the upper looper with decorative thread and the needle and lower looper with lightweight regular thread. E B 2 6.0 1.0 N Yes A • • 2-thread overlock, narrow For overcasting a single layer of light ...
... lightweight fabrics. E A 2 6.0 1.0 N Yes A• • 2-thread overlock, wide For overcasting a single layer of light to medium weight fabrics. E B 2 6.0 1.0 R Yes A • • 2-thread narrow edge* Use for heavyweight woven fabrics or medium to heavyweight stretch fabrics. ...64258;es and napkins. For a beautiful rolled edge, thread the upper looper with decorative thread and the needle and lower looper with lightweight regular thread. E B 2 6.0 1.0 N Yes A • • 2-thread overlock, narrow For overcasting a single layer of light ...
Owner's Manual
Page 20
... almost invisible edge, this gives a very beautiful look on page 23. Converter required. Use transparent threads with decorative thread. Converter required. Thread the lower looper with the flatlock side or the ladder stitch side. G A 2 6.0 1.0 N Yes A• • 2-thread wrapped overlock, wide Decorative finish for garments and homedec. Converter required. D B 2 6.0 1.0 N Yes A • •...
... almost invisible edge, this gives a very beautiful look on page 23. Converter required. Use transparent threads with decorative thread. Converter required. Thread the lower looper with the flatlock side or the ladder stitch side. G A 2 6.0 1.0 N Yes A• • 2-thread wrapped overlock, wide Decorative finish for garments and homedec. Converter required. D B 2 6.0 1.0 N Yes A • •...
Owner's Manual
Page 21
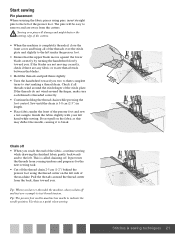
...When you reach the end of the cutters. • When the machine is called chaining off • When you have re-threaded the machine, always chain off the thread chain 2-5 cm (1-2") behind the presser foot using pins, insert straight pins to the left hand while sewing. Stitches & sewing... sewing while drawing the finished fabric gently backwards and to indicate the needle position. Sew until the chain is threaded correctly. • Continue holding the thread chain while pressing the foot control. Use this may deflect the needle, causing it to break. (25--38...
...When you reach the end of the cutters. • When the machine is called chaining off • When you have re-threaded the machine, always chain off the thread chain 2-5 cm (1-2") behind the presser foot using pins, insert straight pins to the left hand while sewing. Stitches & sewing... sewing while drawing the finished fabric gently backwards and to indicate the needle position. Sew until the chain is threaded correctly. • Continue holding the thread chain while pressing the foot control. Use this may deflect the needle, causing it to break. (25--38...
Owner's Manual
Page 22
...seam to create a decorative look, or with the wrong sides of the garment. • Sew the seam, trimming the excess fabric. The needle thread will form a V on opposite sides of the fabric. The flatlock stitch can be used both as a decorative construction stitch, sewing two ...pieces together (Standard flatlock stitch), or for 3-thread flatlock. • Place the wrong sides of the two pieces of fabric together to sew a decorative stitch on this stitch. • Follow...
...seam to create a decorative look, or with the wrong sides of the garment. • Sew the seam, trimming the excess fabric. The needle thread will form a V on opposite sides of the fabric. The flatlock stitch can be used both as a decorative construction stitch, sewing two ...pieces together (Standard flatlock stitch), or for 3-thread flatlock. • Place the wrong sides of the two pieces of fabric together to sew a decorative stitch on this stitch. • Follow...
Owner's Manual
Page 23
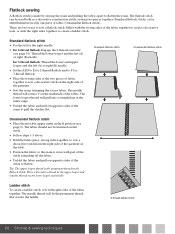
... medium weight fabrics) The extension table (optional accessory, part number 416384201) has 13 holes in circles. Hold the thread chain before cutting out the garment. Then continue threading as described in the front of the foot. 3. Sew in the same direction. The fabric will be obtained for... A for lightweight fabrics such as yarn or twill tape through the hole in a circle around the push pin. Braiding by adjusting the thread tension to change the degree of the area that can also be used for rolled edging is achieved by chaining off braids can be used...
... medium weight fabrics) The extension table (optional accessory, part number 416384201) has 13 holes in circles. Hold the thread chain before cutting out the garment. Then continue threading as described in the front of the foot. 3. Sew in the same direction. The fabric will be obtained for... A for lightweight fabrics such as yarn or twill tape through the hole in a circle around the push pin. Braiding by adjusting the thread tension to change the degree of the area that can also be used for rolled edging is achieved by chaining off braids can be used...
Owner's Manual
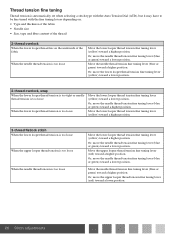
Page 26
... lever (blue or green) toward a higher position. Or, move the upper looper thread tension fine tuning lever (red) toward a lower position. 26 Stitch adjustments Thread tension fine tuning Thread tension is automatically set when selecting a stitch type with the Auto Tension Dial (ATD... size • Size, type and fibre content of the thread 2-thread overlock When the lower looper thread lies on the underside of the fabric When the needle thread tension is too loose Move the lower looper thread tension fine tuning lever (yellow) toward a higher position. Or...
... lever (blue or green) toward a higher position. Or, move the upper looper thread tension fine tuning lever (red) toward a lower position. 26 Stitch adjustments Thread tension fine tuning Thread tension is automatically set when selecting a stitch type with the Auto Tension Dial (ATD... size • Size, type and fibre content of the thread 2-thread overlock When the lower looper thread lies on the underside of the fabric When the needle thread tension is too loose Move the lower looper thread tension fine tuning lever (yellow) toward a higher position. Or...


