
Owner's Manual
Page 4
Please note: When a 13-ampere plug is used, a 3-ampere fuse has to the terminal marked with the letter L or coloured red. Safety rules valid for United Kingdom only The wires in the mains lead are coloured according to the following code: Blue: Neutral Brown: Live As the colours of the wires in the mains lead of this appliance may not corres pond with the colour coding of the terminals in your plug, proceed as follows: the wire coloured blue must be fitted. 2 The wire coloured brown must be connected to be con nected to the terminal marked with the letter N or coloured black.
Please note: When a 13-ampere plug is used, a 3-ampere fuse has to the terminal marked with the letter L or coloured red. Safety rules valid for United Kingdom only The wires in the mains lead are coloured according to the following code: Blue: Neutral Brown: Live As the colours of the wires in the mains lead of this appliance may not corres pond with the colour coding of the terminals in your plug, proceed as follows: the wire coloured blue must be fitted. 2 The wire coloured brown must be connected to be con nected to the terminal marked with the letter N or coloured black.
Owner's Manual
Page 5
... the sewing machine and foot controller free from the electric outlet immediately after using an electric appliance, basic safety precautions should never be blocked. 10. Special care is designed and manufactured for exami nation, repair, electrical or mechanical adjustment. 4. Use needles recommended by pulling on a soft surface such as threading needle, changing needle, threading bobbin, or changing presser foot, etc. 16. winding. Do not allow to whip when re Never drop or insert...
... the sewing machine and foot controller free from the electric outlet immediately after using an electric appliance, basic safety precautions should never be blocked. 10. Special care is designed and manufactured for exami nation, repair, electrical or mechanical adjustment. 4. Use needles recommended by pulling on a soft surface such as threading needle, changing needle, threading bobbin, or changing presser foot, etc. 16. winding. Do not allow to whip when re Never drop or insert...
Owner's Manual
Page 6
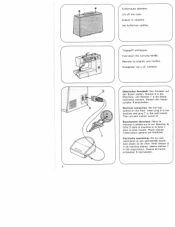
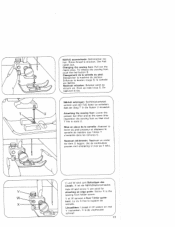
Insert plug S in the machine and plug T in hat stopcontact. Electrische aansluiting: Zet de voet weerstand op een gemakkelijk bereik bare plaats op de vloer. Electrical connection: Set the foot control on the floor. Brancher Ia fiche S dans Ia machine et Ia fiche T dans Ia prise murale. Daarna de hoofd...: Placer le rheostat a pedale sur Ia sol. Elektrischer Anschlul?: Den Anlasser auf den Boden stellen. Basculer Ia poignée vers l'arrière. Eerst stekker S in-de machine steken, daarna stekker T in the wall socket. Lift off the case. Fold down the carrying...
Insert plug S in the machine and plug T in hat stopcontact. Electrische aansluiting: Zet de voet weerstand op een gemakkelijk bereik bare plaats op de vloer. Electrical connection: Set the foot control on the floor. Brancher Ia fiche S dans Ia machine et Ia fiche T dans Ia prise murale. Daarna de hoofd...: Placer le rheostat a pedale sur Ia sol. Elektrischer Anschlul?: Den Anlasser auf den Boden stellen. Basculer Ia poignée vers l'arrière. Eerst stekker S in-de machine steken, daarna stekker T in the wall socket. Lift off the case. Fold down the carrying...
Owner's Manual
Page 13
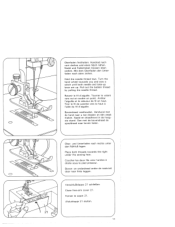
...- Pull out the bobbin thread by pulling the needle thread. Hold the needle thread taut. Turn the hand wheel towards the right under the sewing foot. Tjrer te fil de canette vers le haut a aide du fit d'aiguille. 7Oberfaden festhalten. Retenir le fit d'aiguille. Place both threads towards you and sew a stitch until both needle and take-up lever are up. Handrad riach...
...- Pull out the bobbin thread by pulling the needle thread. Hold the needle thread taut. Turn the hand wheel towards the right under the sewing foot. Tjrer te fil de canette vers le haut a aide du fit d'aiguille. 7Oberfaden festhalten. Retenir le fit d'aiguille. Place both threads towards you and sew a stitch until both needle and take-up lever are up. Handrad riach...
Owner's Manual
Page 25
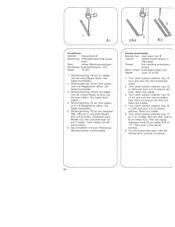
... the sewing foot, push the red button S. Enfoncer le bouton rouge S; Druk op rode knop S. Mise en place de Ia semelle: Abaisser le levier du pied presseur et deplacer Ia semelle de manière que létrier T sembolte dans les rainures U. Screw X .... Attaching the sewing foot: Lower the presser bar lifter and at W servent a fixer l'étrier guide bord. X is de voethouder schroef. 23 4 Nähful, auswechseln: Netzstecker zie hen. Changement de Ia semelle du pied: Débrancher Ia machine du secteur. La vis X fixe Ia support de semelle. Changing the sewing foot:...
... the sewing foot, push the red button S. Enfoncer le bouton rouge S; Druk op rode knop S. Mise en place de Ia semelle: Abaisser le levier du pied presseur et deplacer Ia semelle de manière que létrier T sembolte dans les rainures U. Screw X .... Attaching the sewing foot: Lower the presser bar lifter and at W servent a fixer l'étrier guide bord. X is de voethouder schroef. 23 4 Nähful, auswechseln: Netzstecker zie hen. Changement de Ia semelle du pied: Débrancher Ia machine du secteur. La vis X fixe Ia support de semelle. Changing the sewing foot:...

Owner's Manual
Page 26
...ReiRverschluBfu9, S Stick- Darunter ist Platz für Nähzubehär. und Stopfplatte Sewing feet (standard accessories) A Ordinary sewing foot B Clear-view foot G Blindstitch foot E Zipper foot S Embroidering/darning plate Pieds presseurs (accessoires standard) A Semelle normale B Semelle transparente G Semelle a point ...(aatje I Zubehörfach: Den Deckel der Nàh fläche 9 öffnen. Accessory box: To open the accessory compartment, open the lid of work support 9. La boite sert au rangement des accessoires de couture. In het bakje is plaats vbor de ...
...ReiRverschluBfu9, S Stick- Darunter ist Platz für Nähzubehär. und Stopfplatte Sewing feet (standard accessories) A Ordinary sewing foot B Clear-view foot G Blindstitch foot E Zipper foot S Embroidering/darning plate Pieds presseurs (accessoires standard) A Semelle normale B Semelle transparente G Semelle a point ...(aatje I Zubehörfach: Den Deckel der Nàh fläche 9 öffnen. Accessory box: To open the accessory compartment, open the lid of work support 9. La boite sert au rangement des accessoires de couture. In het bakje is plaats vbor de ...
Owner's Manual
Page 32
... the buttonhole open with the slitting knife lspecial accessoryl. 30 Turn stitch pattern selector ring 18 to 2A4 and sew 4 to 80 1. Stichmusterrring 18 auf A3 stellen und die zweite Raupe so lang wie die erste nähen. Zusãtzlich beim Modell 422 den Zickzackknopf 20 auf 0 stellen. Sewing buttonholes Sewing foot: clear-view foot B Tension: needle thread tension a little slack Thread: fine machine embroidery thread Stitch length: buttonhole range czz, Needle: sizes 70...
... the buttonhole open with the slitting knife lspecial accessoryl. 30 Turn stitch pattern selector ring 18 to 2A4 and sew 4 to 80 1. Stichmusterrring 18 auf A3 stellen und die zweite Raupe so lang wie die erste nähen. Zusãtzlich beim Modell 422 den Zickzackknopf 20 auf 0 stellen. Sewing buttonholes Sewing foot: clear-view foot B Tension: needle thread tension a little slack Thread: fine machine embroidery thread Stitch length: buttonhole range czz, Needle: sizes 70...
Owner's Manual
Page 48
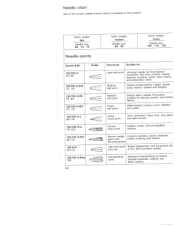
..., organdy, woolens, velvet, fancy seams and embroidery work. C Hemstitching point Attractive hemstitching on heavily dressed materials, organdy and glass cambric. 46 left-twist groove Light ball point Seams topstitched with Imitation leathers, plastic materials, plastic sheeting and oilcloth. Fabric weight: light Needle size: 60 7Ô 75 Fabric weight: medium Needle size: 80 90 Fabric weight: heavy Needle size: 100 110 '120 Needle points System & No. Narrow...
..., organdy, woolens, velvet, fancy seams and embroidery work. C Hemstitching point Attractive hemstitching on heavily dressed materials, organdy and glass cambric. 46 left-twist groove Light ball point Seams topstitched with Imitation leathers, plastic materials, plastic sheeting and oilcloth. Fabric weight: light Needle size: 60 7Ô 75 Fabric weight: medium Needle size: 80 90 Fabric weight: heavy Needle size: 100 110 '120 Needle points System & No. Narrow...
Owner's Manual
Page 56
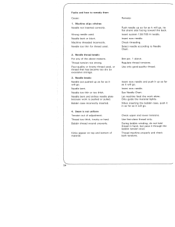
... the back. Machine skips stitches Needle not inserted correctly. Machine threaded incorrectly. See par. 1 above reasons. Use only good-quality thread. When inserting the bobbin case, push it in hand, but pass it through the bobbin tension stud. Bobbin case incorrectly inserted. 4. See Needle Chart. Only guide the material lightly. Use first-class thread only. Bobbin thread wound unevenly. Let machine feed the work is not uniform Tension out of adjustment. Thread machine properly and check both tensions. 54 Seam is pushed...
... the back. Machine skips stitches Needle not inserted correctly. Machine threaded incorrectly. See par. 1 above reasons. Use only good-quality thread. When inserting the bobbin case, push it in hand, but pass it through the bobbin tension stud. Bobbin case incorrectly inserted. 4. See Needle Chart. Only guide the material lightly. Use first-class thread only. Bobbin thread wound unevenly. Let machine feed the work is not uniform Tension out of adjustment. Thread machine properly and check both tensions. 54 Seam is pushed...
Owner's Manual
Page 57
If you have to leave the machine, even for a short while, be sure to pull out the mains plug. Remove thread ends and put a drop of feed dog. Machine runs with difficulty Thread ends in hook raceway. Important notes: Never run a threaded machine unless there is particularly important when children are around. 55 This is a piece of fabric under the sewing foot. Machine feeds irregularly or not at all Lint has accumulated between tooth rows of oil into hook raceway. 7. Remove needle plate and clean out lint. 6. Cause: Remedy: 5.
If you have to leave the machine, even for a short while, be sure to pull out the mains plug. Remove thread ends and put a drop of feed dog. Machine runs with difficulty Thread ends in hook raceway. Important notes: Never run a threaded machine unless there is particularly important when children are around. 55 This is a piece of fabric under the sewing foot. Machine feeds irregularly or not at all Lint has accumulated between tooth rows of oil into hook raceway. 7. Remove needle plate and clean out lint. 6. Cause: Remedy: 5.
Owner's Manual
Page 64
... 422-00 For top-stitching (wadding) 98-694 803-00 in preparation Important! Only for special sewing jobs. Needle plate with zigzag stitches Hemmer foot, 3mm 98-694401-00 For hemming edges Darning foot (remove sewing foot holderl --3-10t-1-&&St Darning fabric and wool Teflon foot 98-694801-00 For sewing plastic materials \ncy-5titch foot 98-694879-00 For sewing fancy patterns 62 Special accessories The special accessories listed below are intendend for straight stitches, needle position...
... 422-00 For top-stitching (wadding) 98-694 803-00 in preparation Important! Only for special sewing jobs. Needle plate with zigzag stitches Hemmer foot, 3mm 98-694401-00 For hemming edges Darning foot (remove sewing foot holderl --3-10t-1-&&St Darning fabric and wool Teflon foot 98-694801-00 For sewing plastic materials \ncy-5titch foot 98-694879-00 For sewing fancy patterns 62 Special accessories The special accessories listed below are intendend for straight stitches, needle position...
Owner's Manual
Page 65
... the needle thread tension Cleaning and oiling Covering the feed dog Darning Disengaging and engaging the sewing mechanism Drawing up to bobbin thread Elastic blindstitch Electrical connection Faults and how to remedy them Inserting the bobbin Inserting the bobbin case Inserting zippers Needle chart Operating the foot control Presser bar lifter Removing the carrying case Reverse sewing Seam-like zip fastener Setting the stitch length Sewing buttonholes Sewing feet Sewing on buttons Stitch pattern selector ring Straight stitching Stretch stitches Table of stretch-stitch patterns Table of...
... the needle thread tension Cleaning and oiling Covering the feed dog Darning Disengaging and engaging the sewing mechanism Drawing up to bobbin thread Elastic blindstitch Electrical connection Faults and how to remedy them Inserting the bobbin Inserting the bobbin case Inserting zippers Needle chart Operating the foot control Presser bar lifter Removing the carrying case Reverse sewing Seam-like zip fastener Setting the stitch length Sewing buttonholes Sewing feet Sewing on buttons Stitch pattern selector ring Straight stitching Stretch stitches Table of stretch-stitch patterns Table of...
Owner's Manual
Page 70
M. PFAFF Aktiengeselischaft Werk KarIsruheDuriach Gritznerstra5e 11 7500 Kadsruhe 41 Technische Arrderungen vorbehalten. Gedrskt in Deutschlancl. hr. 29829 998S8 000 P 0692 deutsch/englisch/frarrzbsisch/hollbndisch Gedruckt in Dunsland. Subject to alterations in Germany. Sous toute reserve be modifications techniques. Technische wijzingen voorbehouden. Imprimé en R.F.A. PFAFF G. Printed in design.
M. PFAFF Aktiengeselischaft Werk KarIsruheDuriach Gritznerstra5e 11 7500 Kadsruhe 41 Technische Arrderungen vorbehalten. Gedrskt in Deutschlancl. hr. 29829 998S8 000 P 0692 deutsch/englisch/frarrzbsisch/hollbndisch Gedruckt in Dunsland. Subject to alterations in Germany. Sous toute reserve be modifications techniques. Technische wijzingen voorbehouden. Imprimé en R.F.A. PFAFF G. Printed in design.


