Owner's Manual
Page 3
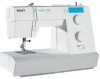
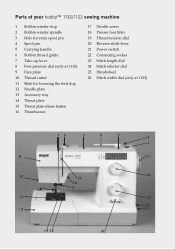
Parts of your hobby™ 1132/1122 sewing machine 1 Bobbin winder stop 2 Bobbin winder spindle 3 Hole for extra spool pin 4 Spool pin 5 Carrying handle 6 Bobbin thread guide 7 Take-up lever 8 Foot pressure dial (only ...
Parts of your hobby™ 1132/1122 sewing machine 1 Bobbin winder stop 2 Bobbin winder spindle 3 Hole for extra spool pin 4 Spool pin 5 Carrying handle 6 Bobbin thread guide 7 Take-up lever 8 Foot pressure dial (only ...

Owner's Manual
Page 4
Your hobby is a great way to learn the machine and also to make full use and offers a whole range of features and accessories for you suspect that your fabric/ready-to avoid the discoloring. ... wish you need. This discoloring may be at your service with any help or advice you many enjoyable hours of excess dye. Congratulations on your sewing machine. Your Pfaff dealer will be very difÀcult or impossible to explore. Fleece and denim fabric in especially red and blue often contain a lot of...
Your hobby is a great way to learn the machine and also to make full use and offers a whole range of features and accessories for you suspect that your fabric/ready-to avoid the discoloring. ... wish you need. This discoloring may be at your service with any help or advice you many enjoyable hours of excess dye. Congratulations on your sewing machine. Your Pfaff dealer will be very difÀcult or impossible to explore. Fleece and denim fabric in especially red and blue often contain a lot of...

Owner's Manual
Page 5
...for examination, repair, electrical or mechanical adjustment. • Never operate the sewing machine with the sewing machine. • Use this household sewing machine. Return the sewing machine to persons: • This sewing machine is required around the Sewing machine needle. • Always use bent needles. • Do not pull ...the electrical outlet when removing covers, lubricating, or when making any opening. • Do not use as contained in this sewing machine if it has a damaged cord or plug, if it is being administrated. • To disconnect, turn all instructions ...
...for examination, repair, electrical or mechanical adjustment. • Never operate the sewing machine with the sewing machine. • Use this household sewing machine. Return the sewing machine to persons: • This sewing machine is required around the Sewing machine needle. • Always use bent needles. • Do not pull ...the electrical outlet when removing covers, lubricating, or when making any opening. • Do not use as contained in this sewing machine if it has a damaged cord or plug, if it is being administrated. • To disconnect, turn all instructions ...

Owner's Manual
Page 6
... Buttonhole longer than 2.5 cm 2:14 Button sewing 2:15 Sewing on zippers 2:16 Sewing on patches 2:18 Darning with the elastic stitch 2:18 Repairing tears 2:18 Operate your hobby 1132/ 1122 Carrying handle, carrying case 1:2 Connecting the foot... control 1:2 Foot preassure dial 1:3 Dropping the feed dog 1:3 Presser foot lifter 1:4 Changing the presser foot 1:4 Removing and attaching the foot holder 1:5 Changing the needle 1:5 Bobbin winding 1:6 Inserting the bobbin 1:8 Threading the machine...
... Buttonhole longer than 2.5 cm 2:14 Button sewing 2:15 Sewing on zippers 2:16 Sewing on patches 2:18 Darning with the elastic stitch 2:18 Repairing tears 2:18 Operate your hobby 1132/ 1122 Carrying handle, carrying case 1:2 Connecting the foot... control 1:2 Foot preassure dial 1:3 Dropping the feed dog 1:3 Presser foot lifter 1:4 Changing the presser foot 1:4 Removing and attaching the foot holder 1:5 Changing the needle 1:5 Bobbin winding 1:6 Inserting the bobbin 1:8 Threading the machine...

Owner's Manual
Page 9
... guide Gathering foot 820 555-096 820 556-096 Pintuck foot deep groove with yarn guide Piping foot 820 557-096 820 558-096 Ribbon sewing foot 820 559-096 Roller foot 820 560-096 Makes it easier to put bias tape on your projects, prefabricated or hand made This foot... without cording The foot has grooves to make it easier to sew perfect piping Your ribbon is hold perfectly in place while you sew it onto your project For a better feed on material like vinyl plastic and leather Accessory tray Your sewing machine has a removable accessory tray which is also used as an extended...
... guide Gathering foot 820 555-096 820 556-096 Pintuck foot deep groove with yarn guide Piping foot 820 557-096 820 558-096 Ribbon sewing foot 820 559-096 Roller foot 820 560-096 Makes it easier to put bias tape on your projects, prefabricated or hand made This foot... without cording The foot has grooves to make it easier to sew perfect piping Your ribbon is hold perfectly in place while you sew it onto your project For a better feed on material like vinyl plastic and leather Accessory tray Your sewing machine has a removable accessory tray which is also used as an extended...

Owner's Manual
Page 12
... Operate your hobby 1132/1122 Carrying handle Lift up the carrying handle of the sewing machine and to the wall socket. YC-482J (not shown) For Europe, 230V - The sewing speed is now ready to the connecting socket (A) of the sewing machine from dust and damage while transporting. The sewing machine is regulated by...power supply, make sure the voltage shown on the carrying case, lift up . Connecting the foot control Before connecting to your sewing machine from behind. Make sure that you have the right type of electric shock, this plug is intended to install the proper ...
... Operate your hobby 1132/1122 Carrying handle Lift up the carrying handle of the sewing machine and to the wall socket. YC-482J (not shown) For Europe, 230V - The sewing speed is now ready to the connecting socket (A) of the sewing machine from dust and damage while transporting. The sewing machine is regulated by...power supply, make sure the voltage shown on the carrying case, lift up . Connecting the foot control Before connecting to your sewing machine from behind. Make sure that you have the right type of electric shock, this plug is intended to install the proper ...

Owner's Manual
Page 13
Operate your hobby 1132/1122 1:3 Foot pressure dial (only at 1132) C Turn the foot pressure dial to "II" for appliqué, cutwork, drawn work , e.g. To raise the feed dog, push the silde in the direction of the machine. Set the setting mark (C) at "III" for lowering the feed dog is ...in the picture (E), and turn the handwheel toward you. The foot pressure dial should be up for regular sewing. The slide for regular sewing. The feed dog must be set at "I" when sewing chiffon, lace, organdy and other Àne fabrics. Reduce the pressure to adjust the foot pressure. ...
Operate your hobby 1132/1122 1:3 Foot pressure dial (only at 1132) C Turn the foot pressure dial to "II" for appliqué, cutwork, drawn work , e.g. To raise the feed dog, push the silde in the direction of the machine. Set the setting mark (C) at "III" for lowering the feed dog is ...in the picture (E), and turn the handwheel toward you. The foot pressure dial should be up for regular sewing. The slide for regular sewing. The feed dog must be set at "I" when sewing chiffon, lace, organdy and other Àne fabrics. Reduce the pressure to adjust the foot pressure. ...

Owner's Manual
Page 24
1:14 Operate your hobby 1132/1122 Variable needle position (only at 1132) The needle drop position of the straight stitches can be moved between the center (5) and left (0) with the stitch width dial. The machine sews in reverse. Note: Do not turn the stitch width dial while the needle is in the fabric, otherwise the needle may bend or break Reverse sewing Push the reverse stitch lever down to sew in reverse only as long as the reverse sewing button is pressed.
1:14 Operate your hobby 1132/1122 Variable needle position (only at 1132) The needle drop position of the straight stitches can be moved between the center (5) and left (0) with the stitch width dial. The machine sews in reverse. Note: Do not turn the stitch width dial while the needle is in the fabric, otherwise the needle may bend or break Reverse sewing Push the reverse stitch lever down to sew in reverse only as long as the reverse sewing button is pressed.

Owner's Manual
Page 28
... the threads toward you to change sewing direction as desired. To lock the beginning of the seam, Àrst sew a few stitches forward, then sew a few stitches in the new direction. Changing the sewing direction Stop the machine and turn the handwheel toward the ...back. Lower the presser foot and continue sewing in reverse, then sew forward. 2:2 Utility stitches and practical sewing Basic sewing Starting to the left when sewing...
... the threads toward you to change sewing direction as desired. To lock the beginning of the seam, Àrst sew a few stitches forward, then sew a few stitches in the new direction. Changing the sewing direction Stop the machine and turn the handwheel toward the ...back. Lower the presser foot and continue sewing in reverse, then sew forward. 2:2 Utility stitches and practical sewing Basic sewing Starting to the left when sewing...

Owner's Manual
Page 38
... care not to cut the sewing thread. Stop sewing at a right stitch. Stop sewing at a left stitch (D). Sew until you to raise the needle to... right stitch. Carefully cut the opening. Lower the foot and sew forward until you so that the top mark (B) on stretch fabrics. Stop sewing at (A4/2). Turn the handwheel toward you reach the back ...marking of the buttonhole on the fabric. 2:12 Utility stitches and practical sewing A C B stitch A1-A4 4-5 0.5-1 1-5 B/J D E F G A1 A4/2 A3 A4/2 Buttonholes Note: ...
... care not to cut the sewing thread. Stop sewing at a right stitch. Stop sewing at a left stitch (D). Sew until you to raise the needle to... right stitch. Carefully cut the opening. Lower the foot and sew forward until you so that the top mark (B) on stretch fabrics. Stop sewing at (A4/2). Turn the handwheel toward you reach the back ...marking of the buttonhole on the fabric. 2:12 Utility stitches and practical sewing A C B stitch A1-A4 4-5 0.5-1 1-5 B/J D E F G A1 A4/2 A3 A4/2 Buttonholes Note: ...

Owner's Manual
Page 39
...buttonhole foot raised, hook the cord on the cord spur (H) at the back of the " " on the stitch length dial. Utility stitches and practical sewing 2:13 H I ) on the spur as the normal buttonhole. Hook the Àller cord into the garment where the buttonhole will start and lower ...you under the buttonhole foot until they clear the front end. Remove the fabric from the machine and cut . Hook the Àllar cord on the front of the fabric and cut the sewing threads. Note: To sew a corded buttonhole longer than 2.5 cm, use the buttonhole foot B. Adjusting buttonhole stitch density...
...buttonhole foot raised, hook the cord on the cord spur (H) at the back of the " " on the stitch length dial. Utility stitches and practical sewing 2:13 H I ) on the spur as the normal buttonhole. Hook the Àller cord into the garment where the buttonhole will start and lower ...you under the buttonhole foot until they clear the front end. Remove the fabric from the machine and cut . Hook the Àllar cord on the front of the fabric and cut the sewing threads. Note: To sew a corded buttonhole longer than 2.5 cm, use the buttonhole foot B. Adjusting buttonhole stitch density...

Owner's Manual
Page 40
... a left stitch (B). Set the stitch selector dial at (A4/2). Insert a pin inside the bartack. Lower the foot. Set the stitch selector dial at (A4/2). Sew a few bartacks (E) and raise the needle from the machine and cut through the bartracks. Set the stitch selector dial at a right stitch. Use a stabilizer on fabric. Stop...
... a left stitch (B). Set the stitch selector dial at (A4/2). Insert a pin inside the bartack. Lower the foot. Set the stitch selector dial at (A4/2). Sew a few bartacks (E) and raise the needle from the machine and cut through the bartracks. Set the stitch selector dial at a right stitch. Use a stabilizer on fabric. Stop...

Owner's Manual
Page 46
...bobbin holder. • Lift up the bobbin holder (B) and remove it needs. Note: Make sure the knob (C) of the machine with a longer service life. Do not dismantle the machine other than as explained in the needle plate. Removal • Remove the presser foot and needle. • Remove the screw ...bobbin holder into the holes (E) in this section. A Clean the outside of the bobbin holder Àts next to clean your sewing machine, because it will reward you use the machine, the more care it . • Clean the bobbin holder with the brush. Wipe the bobbin holder with a soft, dry ...
...bobbin holder. • Lift up the bobbin holder (B) and remove it needs. Note: Make sure the knob (C) of the machine with a longer service life. Do not dismantle the machine other than as explained in the needle plate. Removal • Remove the presser foot and needle. • Remove the screw ...bobbin holder into the holes (E) in this section. A Clean the outside of the bobbin holder Àts next to clean your sewing machine, because it will reward you use the machine, the more care it . • Clean the bobbin holder with the brush. Wipe the bobbin holder with a soft, dry ...

Owner's Manual
Page 48
... thread are not set under the presser foot when start sewing. The threads were not pulled to the rear after sewing. The needle is too tight. The threads were not pulled to the rear after sewing. The needle thread tension is incorrectly inserted. The needle ...thread tension is damaged and does not turn smoothly. Page 3:2 The bobbin is too tight. The needle is incorrectly inserted. Change the bobbin The needle breaks The needle is bent or blunt. Page 1:5 Page 1:5 Page 2:3 Page 1:5 The machine...
... thread are not set under the presser foot when start sewing. The threads were not pulled to the rear after sewing. The needle is too tight. The threads were not pulled to the rear after sewing. The needle thread tension is incorrectly inserted. The needle ...thread tension is damaged and does not turn smoothly. Page 3:2 The bobbin is too tight. The needle is incorrectly inserted. Change the bobbin The needle breaks The needle is bent or blunt. Page 1:5 Page 1:5 Page 2:3 Page 1:5 The machine...

Owner's Manual
Page 49
... 1:3 Page 1:15 The machine does not sew or run The machine is not suitable for the fabric being sewn The machine is packed with lint. The bobbin winder spindle is not returned to sew without fabric under the presser foot. Do not attempt to the left after "drop feed" sewing. The feed dog is ... Foot pressure is important if there are too Àne. The stitches are any children nearby. This is not adjusted properly. When leaving the machine, even for the fabric being sewn. Maintenance and trouble-shooting 3:5 The cloth is not fed smoothly The feed dog is noisy Thread has been ...
... 1:3 Page 1:15 The machine does not sew or run The machine is not suitable for the fabric being sewn The machine is packed with lint. The bobbin winder spindle is not returned to sew without fabric under the presser foot. Do not attempt to the left after "drop feed" sewing. The feed dog is ... Foot pressure is important if there are too Àne. The stitches are any children nearby. This is not adjusted properly. When leaving the machine, even for the fabric being sewn. Maintenance and trouble-shooting 3:5 The cloth is not fed smoothly The feed dog is noisy Thread has been ...

Owner's Manual
Page 51
adjust 1:13 Stretch triple straight stitch 2:8 Standard accessories IV Stitch length dial 1:12 Stitch selection 1:12 Stitch table VI Stitch width dial 1:13 T Thread tension 1:15 Threading for twin needle 1:10 Threading the machine 1:9 Tricot stitch (triple zigzag stitch) 2:9 Trouble-shooting 3:4 Turning a square corner 2:5 V Variable needle position 1:14 Z Zigzag stitch 2:8 Zippers 2:16 Maintenance and trouble-shooting 3:7 Sewing on patches 2:18 Sewing on zippers 2:16 Special accessories V Straight stitch 2:7 Stretch stitch balance -
adjust 1:13 Stretch triple straight stitch 2:8 Standard accessories IV Stitch length dial 1:12 Stitch selection 1:12 Stitch table VI Stitch width dial 1:13 T Thread tension 1:15 Threading for twin needle 1:10 Threading the machine 1:9 Tricot stitch (triple zigzag stitch) 2:9 Trouble-shooting 3:4 Turning a square corner 2:5 V Variable needle position 1:14 Z Zigzag stitch 2:8 Zippers 2:16 Maintenance and trouble-shooting 3:7 Sewing on patches 2:18 Sewing on zippers 2:16 Special accessories V Straight stitch 2:7 Stretch stitch balance -

Owner's Manual
Page 52
... height Needle system 385 x 280 x 170 8 kg 230 V 120 V 240 V 75 W 15 W Max 800 stitches/minute 0...5 mm 0...4 mm 6 mm 13 mm 103 / 705 H Package contents Sewing machine Carrying case Foot control Accessories Owner's manual Please note that on disposal, this product must be safely recycled in doubt please contact your retailer for...
... height Needle system 385 x 280 x 170 8 kg 230 V 120 V 240 V 75 W 15 W Max 800 stitches/minute 0...5 mm 0...4 mm 6 mm 13 mm 103 / 705 H Package contents Sewing machine Carrying case Foot control Accessories Owner's manual Please note that on disposal, this product must be safely recycled in doubt please contact your retailer for...


