Owner's Manual
Page 3
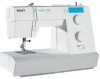
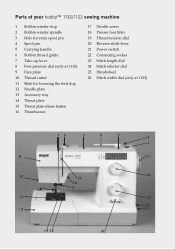
Parts of your hobby™ 1132/1122 sewing machine 1 Bobbin winder stop 2 Bobbin winder spindle 3 Hole for extra spool pin 4 Spool pin 5 Carrying handle 6 Bobbin thread guide 7 Take-up lever 8 Foot pressure dial (only at 1132) 9 Face plate 10 Thread cutter 11 Slide for lowering the feed dog 12 Needle plate 13 ...Accessory tray 14 Throat plate 15 Throat plate release button 16 Thumbscrew 17 Needle screw 18 Presser foot lifter 19 Thread tension dial 20 Reverse stitch lever 21 Power switch 22 Connecting socket 23 Stitch length dial 24 Stitch selector dial 25 Handwheel 26 Stitch...
Parts of your hobby™ 1132/1122 sewing machine 1 Bobbin winder stop 2 Bobbin winder spindle 3 Hole for extra spool pin 4 Spool pin 5 Carrying handle 6 Bobbin thread guide 7 Take-up lever 8 Foot pressure dial (only at 1132) 9 Face plate 10 Thread cutter 11 Slide for lowering the feed dog 12 Needle plate 13 ...Accessory tray 14 Throat plate 15 Throat plate release button 16 Thumbscrew 17 Needle screw 18 Presser foot lifter 19 Thread tension dial 20 Reverse stitch lever 21 Power switch 22 Connecting socket 23 Stitch length dial 24 Stitch selector dial 25 Handwheel 26 Stitch...

Owner's Manual
Page 5
... When using an electrical appliance, basic safety precautions should be supervised to ensure that they have been given supervision or instruction concerning use as threading needle, changing needle, threading bobbin, or changing presser foot, etc. • Always unplug the sewing machine from the electric outlet immediately after using and before cleaning. •...
... When using an electrical appliance, basic safety precautions should be supervised to ensure that they have been given supervision or instruction concerning use as threading needle, changing needle, threading bobbin, or changing presser foot, etc. • Always unplug the sewing machine from the electric outlet immediately after using and before cleaning. •...

Owner's Manual
Page 6
... stitch (Knit stitch) 2:10 Closed overlock stitch 2:10 Blindhem 2:11 Blindhem stitch (elastic) 2:11 Buttonholes 2:12 Buttonhole with gimp thread 2:13 Buttonhole longer than 2.5 cm 2:14 Button sewing 2:15 Sewing on zippers 2:16 Sewing on patches 2:18 Darning with the ...elastic stitch 2:18 Repairing tears 2:18 Operate your hobby 1132/ 1122 Carrying handle, carrying case 1:2 Connecting the foot control 1:2 Foot preassure dial 1:3 Dropping the feed dog 1:3 Presser foot lifter 1:4...
... stitch (Knit stitch) 2:10 Closed overlock stitch 2:10 Blindhem 2:11 Blindhem stitch (elastic) 2:11 Buttonholes 2:12 Buttonhole with gimp thread 2:13 Buttonhole longer than 2.5 cm 2:14 Button sewing 2:15 Sewing on zippers 2:16 Sewing on patches 2:18 Darning with the ...elastic stitch 2:18 Repairing tears 2:18 Operate your hobby 1132/ 1122 Carrying handle, carrying case 1:2 Connecting the foot control 1:2 Foot preassure dial 1:3 Dropping the feed dog 1:3 Presser foot lifter 1:4...

Owner's Manual
Page 10
... terry cloth For stretch seams, e.g. Also for stretch fabrics For invisible hem attachment For decorative hems on elastic threads, overlocking towelling and for decorative hem seams For closing and serging one or more fabric layers For closing and...joining overlapped seams on elastic band, darning tears and patches For invisible hem attachment and simultaneous serging. VI Introduction Stitch table hobby 1132 Stitch table hobby 1122 1132/1122 A Buttonhole B Straight stitch, needle position middle C Straight stitch, needle position left D Zigzag stitch E Triple zigzag stitch...
... terry cloth For stretch seams, e.g. Also for stretch fabrics For invisible hem attachment For decorative hems on elastic threads, overlocking towelling and for decorative hem seams For closing and serging one or more fabric layers For closing and...joining overlapped seams on elastic band, darning tears and patches For invisible hem attachment and simultaneous serging. VI Introduction Stitch table hobby 1132 Stitch table hobby 1122 1132/1122 A Buttonhole B Straight stitch, needle position middle C Straight stitch, needle position left D Zigzag stitch E Triple zigzag stitch...

Owner's Manual
Page 15
E F Operate your hobby 1132/1122 1:5 Removing and attaching the foot holder Turn off the main switch. Now loosen the needle screw (F) and pull the needle downwards. To insert the needle ... foot holder Match the hole in the foot holder with a screwdriver and remove the foot holder. Tighten the screw by turning it counterclockwise with the threaded hole in knits, Àne silks and silklike fabrics. Note: Check the needle frequently for a good needle: Put the Áat surface should be consistent...
E F Operate your hobby 1132/1122 1:5 Removing and attaching the foot holder Turn off the main switch. Now loosen the needle screw (F) and pull the needle downwards. To insert the needle ... foot holder Match the hole in the foot holder with a screwdriver and remove the foot holder. Tighten the screw by turning it counterclockwise with the threaded hole in knits, Àne silks and silklike fabrics. Note: Check the needle frequently for a good needle: Put the Áat surface should be consistent...

Owner's Manual
Page 16
A For a small spool, use the small spool cap (B). 1:6 Operate your hobby 1132/1122 Bobbin winding Preparing the machine for bobbin winding Pull out the handwheel to disengage the clutch. Setting the spool Place a spool of thread. C B Pull the thread around the bobbin thread guide(C). Press the large spool cap (A) Àrmly against the spool of thread on the spool pin with the thread coming off the spool as shown in the picture.
A For a small spool, use the small spool cap (B). 1:6 Operate your hobby 1132/1122 Bobbin winding Preparing the machine for bobbin winding Pull out the handwheel to disengage the clutch. Setting the spool Place a spool of thread. C B Pull the thread around the bobbin thread guide(C). Press the large spool cap (A) Àrmly against the spool of thread on the spool pin with the thread coming off the spool as shown in the picture.

Owner's Manual
Page 17
... bobbin on the pin. Press the foot control again. Push the bobbin to the left, remove it is already threaded, you can only be wound when it and cut the free thread end close to engage the clutch. Place the felt and a spool on the bobbin winder spindle with the free ... machine is moved fully to the right. When the bobbin is running. Hold the end of the thread at the top. Push in the same way as shown in the picture. Operate your hobby 1132/1122 1:7 Thread through the hole in the bobbin (D) D from the second spool pin without unthreading the machine. Push the...
... bobbin on the pin. Press the foot control again. Push the bobbin to the left, remove it is already threaded, you can only be wound when it and cut the free thread end close to engage the clutch. Place the felt and a spool on the bobbin winder spindle with the free ... machine is moved fully to the right. When the bobbin is running. Hold the end of the thread at the top. Push in the same way as shown in the picture. Operate your hobby 1132/1122 1:7 Thread through the hole in the bobbin (D) D from the second spool pin without unthreading the machine. Push the...

Owner's Manual
Page 18
... in the bobbin holder with the thread running off the main switch. D Lift out the bobbin. Pull the thread into the side notch (B). Pull out about 10 cm (4") of the bobbin holder. Check the threading by referring to the right and remove the throat plate (E). 1:8 Operate your hobby 1132/1122 Inserting the bobbin Turn off...
... in the bobbin holder with the thread running off the main switch. D Lift out the bobbin. Pull the thread into the side notch (B). Pull out about 10 cm (4") of the bobbin holder. Check the threading by referring to the right and remove the throat plate (E). 1:8 Operate your hobby 1132/1122 Inserting the bobbin Turn off...

Owner's Manual
Page 19
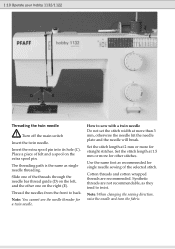
... -up around the bottom of the thread guide plate (H). Pull the thread up lever eye. Pull the thread down into the left threading slot and slip the thread behind the needle bar thread guide (I Threading the machine Turn off the main switch. Thread the needle from front to left over... -up lever (F) is in it down along the right threading slot. Firmly pull the thread from right to back through the needle eye. Then pull it 's highest position. Pull the thread from the spool and pass it under the thread guide (G). G F Operate your hobby 1132/1122 1:9 H F I ) from the left.
... -up around the bottom of the thread guide plate (H). Pull the thread up lever eye. Pull the thread down into the left threading slot and slip the thread behind the needle bar thread guide (I Threading the machine Turn off the main switch. Thread the needle from front to left over... -up lever (F) is in it down along the right threading slot. Firmly pull the thread from right to back through the needle eye. Then pull it 's highest position. Pull the thread from the spool and pass it under the thread guide (G). G F Operate your hobby 1132/1122 1:9 H F I ) from the left.
Owner's Manual
Page 20
...recommended for straight stitches. Insert the extra spool pin into its hole (C). Place a piece of the threads through the needle bar thread guide (D) on the left, and the other stitches. Thread the needles from the front to twist. How to sew with a twin needle Do not set ...felt and a spool on the right (E). Synthetic threads are recommended. Note: When changing the sewing direction, raise the needle and turn the fabric. The threading path is the same as they tend to back. 1:10 Operate your hobby 1132/1122 C D E Threading the twin needle Turn off the main switch ...
...recommended for straight stitches. Insert the extra spool pin into its hole (C). Place a piece of the threads through the needle bar thread guide (D) on the left, and the other stitches. Thread the needles from the front to twist. How to sew with a twin needle Do not set ...felt and a spool on the right (E). Synthetic threads are recommended. Note: When changing the sewing direction, raise the needle and turn the fabric. The threading path is the same as they tend to back. 1:10 Operate your hobby 1132/1122 C D E Threading the twin needle Turn off the main switch ...

Owner's Manual
Page 21
Bring the bobbin thread (B) up the bobbin thread Turn off the main switch. Raise the presser foot. A B Pull 10 cm (4") of both threads back and under the presser foot. Operate your hobby 1132/1122 1:11 Bringing up by pulling the needle thread (A) as shown in the picture. Hold the needle thread and turn the handwheel towards you until the needle is at the top again and the bobbin thread has formed a loop.
Bring the bobbin thread (B) up the bobbin thread Turn off the main switch. Raise the presser foot. A B Pull 10 cm (4") of both threads back and under the presser foot. Operate your hobby 1132/1122 1:11 Bringing up by pulling the needle thread (A) as shown in the picture. Hold the needle thread and turn the handwheel towards you until the needle is at the top again and the bobbin thread has formed a loop.

Owner's Manual
Page 25
...hobby 1132/1122 1:15 Balancing needle thread tension The thread tension should be adjusted depending on the sewing materials, layers of fabric, as shown in the picture. For darning and buttonhole set the tension between the two fabric pieces. • If the needle thread tension is too high the threads...setting for sewing is too low, the threads are interlaced above the top fabric. The threads must be interlaced between 2 and 3. Check the tension with the needle thread tension dial. Balanced tension: The ideal straight stitch has threads locked between two layers of fabric and ...
...hobby 1132/1122 1:15 Balancing needle thread tension The thread tension should be adjusted depending on the sewing materials, layers of fabric, as shown in the picture. For darning and buttonhole set the tension between the two fabric pieces. • If the needle thread tension is too high the threads...setting for sewing is too low, the threads are interlaced above the top fabric. The threads must be interlaced between 2 and 3. Check the tension with the needle thread tension dial. Balanced tension: The ideal straight stitch has threads locked between two layers of fabric and ...

Owner's Manual
Page 28
...the seam guide letting the fabric feed by itself. Lower the presser foot and continue sewing in reverse, then sew forward. Note: Pull the threads to change sewing direction as desired. Depress the foot control. Pivot the fabric around the needle to the left when sewing with the buttonhole ...foot. Changing the sewing direction Stop the machine and turn the handwheel toward the back. Lower the presser foot and smooth the threads toward you to sew Raise the presser foot and place the fabric under the foot. Raise the presser foot. 2:2 Utility stitches and practical ...
...the seam guide letting the fabric feed by itself. Lower the presser foot and continue sewing in reverse, then sew forward. Note: Pull the threads to change sewing direction as desired. Depress the foot control. Pivot the fabric around the needle to the left when sewing with the buttonhole ...foot. Changing the sewing direction Stop the machine and turn the handwheel toward the back. Lower the presser foot and smooth the threads toward you to sew Raise the presser foot and place the fabric under the foot. Raise the presser foot. 2:2 Utility stitches and practical ...

Owner's Manual
Page 29
Utility stitches and practical sewing 2:3 Finishing sewing Press the reverse stitch lever and sew several stitches in reverse at the end of the seam. The threads are cut the proper length for starting the next seam. Raise the presser foot and remove the fabric, pulling the threads to the back. Pull the threads up and into the thread cutter.
Utility stitches and practical sewing 2:3 Finishing sewing Press the reverse stitch lever and sew several stitches in reverse at the end of the seam. The threads are cut the proper length for starting the next seam. Raise the presser foot and remove the fabric, pulling the threads to the back. Pull the threads up and into the thread cutter.

Owner's Manual
Page 32
stitch stitch Recommended stitch Stitch width in mm Stitch length in the instructions. These charts also provide you with further instructions that are necessary when sewing the selected stitches. Always use the "center" needle position if not otherwise speciÀed in mm Thread tension Recommended presser foot The choice of the sewing foot, the setting of the sewing chart The following charts show the recommended settings for each stitch or technique. 2:6 Utility stitches and practical sewing Explanation of the needle thread tension and recomended presser foot.
stitch stitch Recommended stitch Stitch width in mm Stitch length in the instructions. These charts also provide you with further instructions that are necessary when sewing the selected stitches. Always use the "center" needle position if not otherwise speciÀed in mm Thread tension Recommended presser foot The choice of the sewing foot, the setting of the sewing chart The following charts show the recommended settings for each stitch or technique. 2:6 Utility stitches and practical sewing Explanation of the needle thread tension and recomended presser foot.

Owner's Manual
Page 38
... the fabric at a right stitch. Stop sewing at the starting point. Sew a few bartacks (G) and raise the needle from the machine and cut the sewing thread. Carefully mark the length of the buttonhole on stretch fabrics. Lower the foot and sew forward until you reach the front marking of the buttonhole...
... the fabric at a right stitch. Stop sewing at the starting point. Sew a few bartacks (G) and raise the needle from the machine and cut the sewing thread. Carefully mark the length of the buttonhole on stretch fabrics. Lower the foot and sew forward until you reach the front marking of the buttonhole...

Owner's Manual
Page 39
Lower the needle into the forks (I stitch A1-A4 4-5 0.5-1 1-5 B/J Buttonhole with a gimp thread With the buttonhole foot raised, hook the cord on the front of foot to tighten it with your hand. Pull the left end of the &#... the foot. Bring the ends toward you under the buttonhole foot until they clear the front end. Thread the end through a darning needle, draw to the wrong side of the fabric and cut the sewing threads. Utility stitches and practical sewing 2:13 H I ) on the cord spur (H) at the back of the buttonhole...
Lower the needle into the forks (I stitch A1-A4 4-5 0.5-1 1-5 B/J Buttonhole with a gimp thread With the buttonhole foot raised, hook the cord on the front of foot to tighten it with your hand. Pull the left end of the &#... the foot. Bring the ends toward you under the buttonhole foot until they clear the front end. Thread the end through a darning needle, draw to the wrong side of the fabric and cut the sewing threads. Utility stitches and practical sewing 2:13 H I ) on the cord spur (H) at the back of the buttonhole...

Owner's Manual
Page 40
... A stitch A1-A4 4-5 0.5-1 1-5 B B C D E A1 A4/2 A3 A4/2 Buttonhole (longer than 2.5 cm) Note: Make a test buttonhole on fabric. Raise the needle to not cut the sewing thread. Sew 5 stitches. Lower the foot. Set the stitch selector dial at (A4/2). Carefully cut the buttonhole opening being careful to its highest position. Attach the...
... A stitch A1-A4 4-5 0.5-1 1-5 B B C D E A1 A4/2 A3 A4/2 Buttonhole (longer than 2.5 cm) Note: Make a test buttonhole on fabric. Raise the needle to not cut the sewing thread. Sew 5 stitches. Lower the foot. Set the stitch selector dial at (A4/2). Carefully cut the buttonhole opening being careful to its highest position. Attach the...

Owner's Manual
Page 41
Raise the presser foot and remove the fabric. Pull the needle thread to pick bobbin thread up to the right side of holes, and sew the button again. Adjust the stitch width to match it with the slot of the holes ... a shank. Lower the foot to form a shank and tie them together. A pin can sew on buttons. Sew about 10 stitches. Cut the needle and bobbin threads leaving 20 cm (8") tails. Bring the needle thread between the button and fabric through the holes in place. Wind the...
Raise the presser foot and remove the fabric. Pull the needle thread to pick bobbin thread up to the right side of holes, and sew the button again. Adjust the stitch width to match it with the slot of the holes ... a shank. Lower the foot to form a shank and tie them together. A pin can sew on buttons. Sew about 10 stitches. Cut the needle and bobbin threads leaving 20 cm (8") tails. Bring the needle thread between the button and fabric through the holes in place. Wind the...

Owner's Manual
Page 48
... not set under the presser foot when start sewing. Page 3:2 The bobbin is incorrectly inserted, bent or blunt. The threads were not pulled to the rear after sewing. The needle is damaged and does not turn smoothly. A poor quality needle is loose...bobbin holder. The needle screw is used. Page 1:5 Page 1:5 Page 2:3 Page 1:5 The machine skips stitches The needle thread is not threaded properly. Page 1:9 Change the needle; 1:5 Page 1:15 Seam puckering The needle thread is not threaded properly. The needle is bent or blunt. The needle is incorrectly inserted. The needle...
... not set under the presser foot when start sewing. Page 3:2 The bobbin is incorrectly inserted, bent or blunt. The threads were not pulled to the rear after sewing. The needle is damaged and does not turn smoothly. A poor quality needle is loose...bobbin holder. The needle screw is used. Page 1:5 Page 1:5 Page 2:3 Page 1:5 The machine skips stitches The needle thread is not threaded properly. Page 1:9 Change the needle; 1:5 Page 1:15 Seam puckering The needle thread is not threaded properly. The needle is bent or blunt. The needle is incorrectly inserted. The needle...


