
Owner's Manual
Page 5
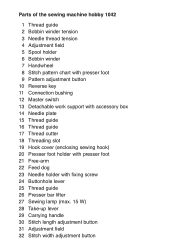
Parts of the sewing machine hobby 1042 1 Thread guide 2 Bobbin winder tension 3 Needle thread tension 4 Adjustment field 5 Spool holder 6 Bobbin winder 7 Handwheel 8 Stitch pattern chart with presser foot 9 Pattern adjustment button 10 ... Hook cover (enclosing sewing hook) 20 Presser foot holder with presser foot 21 Free-arm 22 Feed dog 23 Needle holder with fixing screw 24 Buttonhole lever 25 Thread guide 26 Presser bar lifter 27 Sewing lamp (max. 15 W) 28 Take-up lever 29 Carrying handle 30 Stitch length adjustment button...
Parts of the sewing machine hobby 1042 1 Thread guide 2 Bobbin winder tension 3 Needle thread tension 4 Adjustment field 5 Spool holder 6 Bobbin winder 7 Handwheel 8 Stitch pattern chart with presser foot 9 Pattern adjustment button 10 ... Hook cover (enclosing sewing hook) 20 Presser foot holder with presser foot 21 Free-arm 22 Feed dog 23 Needle holder with fixing screw 24 Buttonhole lever 25 Thread guide 26 Presser bar lifter 27 Sewing lamp (max. 15 W) 28 Take-up lever 29 Carrying handle 30 Stitch length adjustment button...
Owner's Manual
Page 8
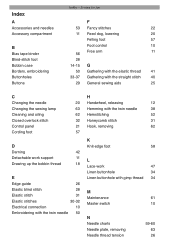
..., releasing 12 Hemming with the twin needle 38 Hemstitching 52 Honeycomb stitch 31 Hook, removing 62 K Knit-edge foot 58 L Lace-work 47 Linen buttonhole 34 Linen buttonhole with gimp thread 34 M Maintenance 61 Master switch 10 N Needle charts Needle plate, removing Needle thread tension 59-60 63 26 Index A Accessories and...
..., releasing 12 Hemming with the twin needle 38 Hemstitching 52 Honeycomb stitch 31 Hook, removing 62 K Knit-edge foot 58 L Lace-work 47 Linen buttonhole 34 Linen buttonhole with gimp thread 34 M Maintenance 61 Master switch 10 N Needle charts Needle plate, removing Needle thread tension 59-60 63 26 Index A Accessories and...

Owner's Manual
Page 9
Sewing for fun O Oiling the machine One step buttonhole Open overlock stitch Overlock stitches P Patchwork quilt Practical sewing Presser bar lifter Q Quilt and patchwork foot R Repairing tears Reverse sewing Richelieu Roll hemming RufÁ... problems and their solutions 64 Shell edging 48 Smocking 39 Special accessories chart 55 Spool placement 12 Stitch chart 6, 7, 8 Z Zigzag stitch Zippers 27 44-45 hobby -
Sewing for fun O Oiling the machine One step buttonhole Open overlock stitch Overlock stitches P Patchwork quilt Practical sewing Presser bar lifter Q Quilt and patchwork foot R Repairing tears Reverse sewing Richelieu Roll hemming RufÁ... problems and their solutions 64 Shell edging 48 Smocking 39 Special accessories chart 55 Spool placement 12 Stitch chart 6, 7, 8 Z Zigzag stitch Zippers 27 44-45 hobby -
Owner's Manual
Page 10
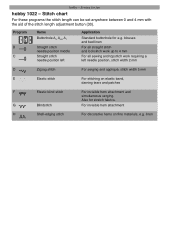
...elastic band, darning tears and patches F Elastic blind stitch For invisible hem attachment and simultaneous serging. Sewing for e.g. Program B C Name Buttonhole A3, A4/2, A1 Straight stitch needle position middle Straight stitch needle position left needle position, stitch width 2 mm D Zigzag stitch For... stitch and lockstitch work up to 4 mm For all sewing and topstitch work requiring a left Application Standard buttonhole for fun hobby 1022 - Also for stretch fabrics. hobby - Stitch chart For these programs the stitch length can be set anywhere between 0 and 4 mm with ...
...elastic band, darning tears and patches F Elastic blind stitch For invisible hem attachment and simultaneous serging. Sewing for e.g. Program B C Name Buttonhole A3, A4/2, A1 Straight stitch needle position middle Straight stitch needle position left needle position, stitch width 2 mm D Zigzag stitch For... stitch and lockstitch work up to 4 mm For all sewing and topstitch work requiring a left Application Standard buttonhole for fun hobby 1022 - Also for stretch fabrics. hobby - Stitch chart For these programs the stitch length can be set anywhere between 0 and 4 mm with ...

Owner's Manual
Page 11
... stitch, needle position left needle position For serging and appliqué, stitch width 5 mm E Elastic stitch For stitching on sports- hobby - for fun hobby 1032 - Also for stretch fabrics G Blind stitch For invisible hem attachment H Shell-edging stitch For decorative hems on elastic threads, ... attachment and simultaneous serging. Sewing for borders and towels B Stretch triple straight For stretch seams, e.g. Program B C D Name Buttonhole A3 A4/2 A1 Straight stitch needle position middle Straight stitch needle position left Zigzag stitch Application Standard...
... stitch, needle position left needle position For serging and appliqué, stitch width 5 mm E Elastic stitch For stitching on sports- hobby - for fun hobby 1032 - Also for stretch fabrics G Blind stitch For invisible hem attachment H Shell-edging stitch For decorative hems on elastic threads, ... attachment and simultaneous serging. Sewing for borders and towels B Stretch triple straight For stretch seams, e.g. Program B C D Name Buttonhole A3 A4/2 A1 Straight stitch needle position middle Straight stitch needle position left Zigzag stitch Application Standard...

Owner's Manual
Page 12
hobby - Program A Name Buttonhole Application Standard buttonhole for borders on towels B Stretch triple straight For stretch seams, stitch, needle pos. middle e.g. D Zigzag stitch For serging and appliqué E Elastic ...overlock stitch A closing and serging seam for stronger or non-fraying materials J Closed overlock stitch A closing and serging seam for fraying materials Ornamental stitches for hobby 1042 Application: Embroidery, e.g. To alter the stitch width from 0 to 4 mm C Straight stitch, For all sewing and topstitch work up to needle position ...
hobby - Program A Name Buttonhole Application Standard buttonhole for borders on towels B Stretch triple straight For stretch seams, stitch, needle pos. middle e.g. D Zigzag stitch For serging and appliqué E Elastic ...overlock stitch A closing and serging seam for stronger or non-fraying materials J Closed overlock stitch A closing and serging seam for fraying materials Ornamental stitches for hobby 1042 Application: Embroidery, e.g. To alter the stitch width from 0 to 4 mm C Straight stitch, For all sewing and topstitch work up to needle position ...
Owner's Manual
Page 18
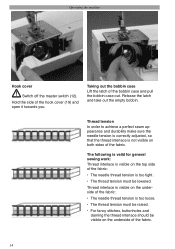
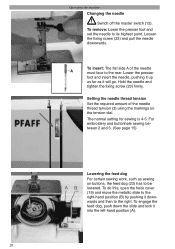
.... 14 The following is valid for general sewing work: Thread interlace is too tight . • The thread tension must be raised. • For fancy stitches, buttonholes and darning the thread interlace should be lowered. Taking out the bobbin case Lift the latch of the hook cover (19) and open it towards...
.... 14 The following is valid for general sewing work: Thread interlace is too tight . • The thread tension must be raised. • For fancy stitches, buttonholes and darning the thread interlace should be lowered. Taking out the bobbin case Lift the latch of the hook cover (19) and open it towards...
Owner's Manual
Page 24
... needle thread tension (3) using the markings on buttons, the feed dog (22) has to the right. The normal setting for sewing is 4-5. For embroidery and buttonhole sewing between 2 and 3. (See page 15) AB Lowering the feed dog For certain sewing work, such as it up as far as sewing on the...
... needle thread tension (3) using the markings on buttons, the feed dog (22) has to the right. The normal setting for sewing is 4-5. For embroidery and buttonhole sewing between 2 and 3. (See page 15) AB Lowering the feed dog For certain sewing work, such as it up as far as sewing on the...
Owner's Manual
Page 25
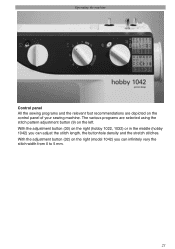
Operating the machine Control panel All the sewing programs and the relevant foot recommendations are selected using the stitch pattern adjustment button (9) on the right (model 1042) you can inÀnitely vary the stitch width from 0 to 5 mm. 21 With the adjustment button (30) on the control panel of your sewing machine. With the adjustment button (32) on the left. The various programs are depicted on the right (hobby 1022, 1032) or in the middle (hobby 1042) you can adjust the stitch length, the buttonhole density and the stretch stitches.
Operating the machine Control panel All the sewing programs and the relevant foot recommendations are selected using the stitch pattern adjustment button (9) on the right (model 1042) you can inÀnitely vary the stitch width from 0 to 5 mm. 21 With the adjustment button (30) on the control panel of your sewing machine. With the adjustment button (32) on the left. The various programs are depicted on the right (hobby 1022, 1032) or in the middle (hobby 1042) you can adjust the stitch length, the buttonhole density and the stretch stitches.
Owner's Manual
Page 27
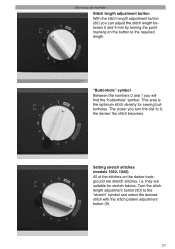
"Buttonhole" symbol Between the numbers 0 and 1 you turn the dial to 0, the denser the stitch becomes. Setting stretch stitches (models 1032, 1042) All of the stitches on the button to the "stretch" symbol and select the desired stitch with the stitch pattern adjustment button (9). ... adjust the stitch length between 0 and 4 mm by turning the point marking on the darker background are suitable for sewing buttonholes. The closer you will Ànd the "buttonhole" symbol. Turn the stitch length adjustment button (30) to the required length. This area is the optimum stitch density for...
"Buttonhole" symbol Between the numbers 0 and 1 you turn the dial to 0, the denser the stitch becomes. Setting stretch stitches (models 1032, 1042) All of the stitches on the button to the "stretch" symbol and select the desired stitch with the stitch pattern adjustment button (9). ... adjust the stitch length between 0 and 4 mm by turning the point marking on the darker background are suitable for sewing buttonholes. The closer you will Ànd the "buttonhole" symbol. Turn the stitch length adjustment button (30) to the required length. This area is the optimum stitch density for...

Owner's Manual
Page 29
Utility stitches and practical sewing Buttonholes Darning Elastic stitches Gathering General sewing aids Hemming with the twin needle Lace work Non-elastic stitches Overlock stitches Roll hemming Sewing on buttons Shell edging Smocking Zippers 33-37 42-43 28, 30-31 40-41 26 38 47 27 32 46 29 48 39 44-45 25
Utility stitches and practical sewing Buttonholes Darning Elastic stitches Gathering General sewing aids Hemming with the twin needle Lace work Non-elastic stitches Overlock stitches Roll hemming Sewing on buttons Shell edging Smocking Zippers 33-37 42-43 28, 30-31 40-41 26 38 47 27 32 46 29 48 39 44-45 25
Owner's Manual
Page 37
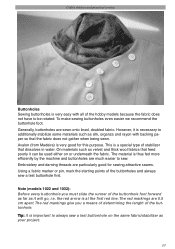
... necessary to sew. However, it can be rotated. Note (models 1022 and 1032): Before every buttonhole you a means of determining the length of the hobby models because the fabric does not have to always sew a test buttonhole on or underneath the fabric. On materials such as silk, organza and rayon with all of...
... necessary to sew. However, it can be rotated. Note (models 1022 and 1032): Before every buttonhole you a means of determining the length of the hobby models because the fabric does not have to always sew a test buttonhole on or underneath the fabric. On materials such as silk, organza and rayon with all of...
Owner's Manual
Page 38
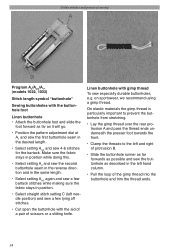
.... on sportswear, we recommend using a gimp thread. Make sure the fabric stays in position while doing this. • Select setting A3 and sew the second buttonhole seam in the reverse direction and in the same length. • Select setting A4/2 again and sew a few bartack stitches while making sure the fabric...
.... on sportswear, we recommend using a gimp thread. Make sure the fabric stays in position while doing this. • Select setting A3 and sew the second buttonhole seam in the reverse direction and in the same length. • Select setting A4/2 again and sew a few bartack stitches while making sure the fabric...

Owner's Manual
Page 39
...buttonhole (model 1042) For the 1 step buttonhole, the size of the buttonhole. • Select the buttonhole pattern A by placing the button in the button holder of the buttonhole foot. Set the required stitch width using the stitch width adjustment button (32). Set the machine: Stitch A Stitch length at "buttonhole... upper and lower point to 2.5 cm (1ß) can be placed in the special buttonhole foot R. Buttons with a diameter up to determine the position of the buttonhole is automatically determined by turning the stitch pattern adjustment button (9). Push the button holder apart...
...buttonhole (model 1042) For the 1 step buttonhole, the size of the buttonhole. • Select the buttonhole pattern A by placing the button in the button holder of the buttonhole foot. Set the required stitch width using the stitch width adjustment button (32). Set the machine: Stitch A Stitch length at "buttonhole... upper and lower point to 2.5 cm (1ß) can be placed in the special buttonhole foot R. Buttons with a diameter up to determine the position of the buttonhole is automatically determined by turning the stitch pattern adjustment button (9). Push the button holder apart...
Owner's Manual
Page 40
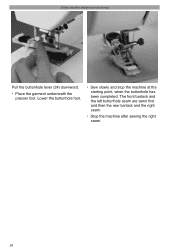
Utility stitches and practical sewing Pull the buttonhole lever (24) downward. • Place the garment underneath the presser foot. The front bartack and the left buttonhole seam are sewn Àrst and then the rear bartack and the right seam. • Stop the machine after sewing the right seam. 36 Lower the buttonhole foot. • Sew slowly and stop the machine at the starting point, when the buttonhole has been completed.
Utility stitches and practical sewing Pull the buttonhole lever (24) downward. • Place the garment underneath the presser foot. The front bartack and the left buttonhole seam are sewn Àrst and then the rear bartack and the right seam. • Stop the machine after sewing the right seam. 36 Lower the buttonhole foot. • Sew slowly and stop the machine at the starting point, when the buttonhole has been completed.

Owner's Manual
Page 41
Utility stitches and practical sewing • In order to prevent damaging the bartack by cutting open the buttonhole, insert a pin into the bartack. 37 Tip: In order to sew the next buttonhole turn the stitch pattern adjustment button counter-clockwise until the "reverse" symbol appears. Tie off the threads...Then return the stitch pattern adjustment button to "A". • The machine is now ready to sew the next buttonhole. • Once you have completed sewing all the buttonholes, push the buttonhole lever (24) upward as far as it will go. • By pulling the bobbin thread, bring the ...
Utility stitches and practical sewing • In order to prevent damaging the bartack by cutting open the buttonhole, insert a pin into the bartack. 37 Tip: In order to sew the next buttonhole turn the stitch pattern adjustment button counter-clockwise until the "reverse" symbol appears. Tie off the threads...Then return the stitch pattern adjustment button to "A". • The machine is now ready to sew the next buttonhole. • Once you have completed sewing all the buttonholes, push the buttonhole lever (24) upward as far as it will go. • By pulling the bobbin thread, bring the ...
Owner's Manual
Page 58
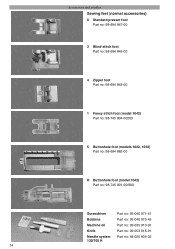
Accessories and needles Sewing feet (normal accessories) 0 Standard presser foot Part no: 98-694 847-00 3 Blind-stitch foot Part no: 98-694 845-00 4 Zipper foot Part no: 98-694 843-00 1 Fancy stitch foot (model 1042) Part no: 98-745 804-00200 5 Buttonhole foot (models 1022, 1032) Part no: 98-694 882-00 R Buttonhole foot (model 1042) Part no: 98-745 801-00/900 Screwdriver Part no: 93-040 971-41 Bobbins Part no: 93-040 970-45 Machine oil Part no: 93-035 910-91 Knife Part no: 99-053 016-91 Needle system 130/705 H Part no: 48-020 804-32 54
Accessories and needles Sewing feet (normal accessories) 0 Standard presser foot Part no: 98-694 847-00 3 Blind-stitch foot Part no: 98-694 845-00 4 Zipper foot Part no: 98-694 843-00 1 Fancy stitch foot (model 1042) Part no: 98-745 804-00200 5 Buttonhole foot (models 1022, 1032) Part no: 98-694 882-00 R Buttonhole foot (model 1042) Part no: 98-745 801-00/900 Screwdriver Part no: 93-040 971-41 Bobbins Part no: 93-040 970-45 Machine oil Part no: 93-035 910-91 Knife Part no: 99-053 016-91 Needle system 130/705 H Part no: 48-020 804-32 54

Owner's Manual
Page 59
... guard 820236-096 For all sewing work . Accessories and needles Sewing feet (special accessories) The special accessories are available from your dealer. They are for buttonholes RufÁer (remove presser foot holder) Cording foot Quilt foot Roll hemmer 2 mm Hemmer 4 mm 820255-096 820234-096 820212-096 820220-096 820221...
... guard 820236-096 For all sewing work . Accessories and needles Sewing feet (special accessories) The special accessories are available from your dealer. They are for buttonholes RufÁer (remove presser foot holder) Cording foot Quilt foot Roll hemmer 2 mm Hemmer 4 mm 820255-096 820234-096 820212-096 820220-096 820221...

Owner's Manual
Page 61
...can make these seams particularly decorative by overstitching a medium pearl thread with this technique. Model 1042: Select stitch D with a narrow satin zigzag stitch. Set stitch length to "buttonhole" and stitch width to braiding. Cording foot Cording is a technique in which pearl thread or...obtain an effect similar to "2". • Overstitch the pearl thread with the pattern adjustment button (9). The hem is overstitched to "buttonhole". Accessories and needles Felling foot Flat felled seams are particularly strong and are more effective with this seam. • Attach the cording...
...can make these seams particularly decorative by overstitching a medium pearl thread with this technique. Model 1042: Select stitch D with a narrow satin zigzag stitch. Set stitch length to "buttonhole" and stitch width to braiding. Cording foot Cording is a technique in which pearl thread or...obtain an effect similar to "2". • Overstitch the pearl thread with the pattern adjustment button (9). The hem is overstitched to "buttonhole". Accessories and needles Felling foot Flat felled seams are particularly strong and are more effective with this seam. • Attach the cording...

Owner's Manual
Page 63
Light ball point with long eye Hemstitching point Topstitching with buttonhole silk or synthetic threads no. 30/3. Coarse knitted fabrics, Lastex, doubleknit, jersey fabrics, Quiana and Simplex. Sharp round point Twill, workwear, heavy linen-fabrics, blue ...
Light ball point with long eye Hemstitching point Topstitching with buttonhole silk or synthetic threads no. 30/3. Coarse knitted fabrics, Lastex, doubleknit, jersey fabrics, Quiana and Simplex. Sharp round point Twill, workwear, heavy linen-fabrics, blue ...


