
Owner's Manual
Page 2
This household sewing machine is designed to comply with any air openings blocked. It may deÁect the needle causing it has been dropped or damaged, or dropped into any opening. • Do not use outdoors. • Do not operate where aerosol (spray) products are provided instead of the sewing machine by a person responsible for their safety. • Children should always be identical to the nearest authorized dealer or service center for examination, repair, electrical or mechanical adjustment. • Never operate the sewing machine with IEC/EN 60335-2-28 and UL1594. ...
This household sewing machine is designed to comply with any air openings blocked. It may deÁect the needle causing it has been dropped or damaged, or dropped into any opening. • Do not use outdoors. • Do not operate where aerosol (spray) products are provided instead of the sewing machine by a person responsible for their safety. • Children should always be identical to the nearest authorized dealer or service center for examination, repair, electrical or mechanical adjustment. • Never operate the sewing machine with IEC/EN 60335-2-28 and UL1594. ...

Owner's Manual
Page 3
...; dealer will of sewing! Your PFAFF® expression™ machine will soon discover how to transform all your creative ideas into reality. Congratulations on purchasing your machine. Before you to maximize the use of your new PFAFF® sewing machine. You will deÀnitely enable you to experience a totally new dimension of...
...; dealer will of sewing! Your PFAFF® expression™ machine will soon discover how to transform all your creative ideas into reality. Congratulations on purchasing your machine. Before you to maximize the use of your new PFAFF® sewing machine. You will deÀnitely enable you to experience a totally new dimension of...
Owner's Manual
Page 4
... winding 2:5 Inserting the bobbin 2:6 IDT (Integrated dual feed 2:6 Electronic knee-lift (4.0 2:7 Needles 2:7 Changing the needle 2:8 Lowering feed dogs 2:8 Changing the presser foot 2.8 Buttons for quilt expression™ 4.0 2:10 Buttons for expression™ 3.0 2:12 Buttons for expression™ 2.0 2:14 Settings menu 2:16 3 Sewing 3:1 Sewing mode -
... winding 2:5 Inserting the bobbin 2:6 IDT (Integrated dual feed 2:6 Electronic knee-lift (4.0 2:7 Needles 2:7 Changing the needle 2:8 Lowering feed dogs 2:8 Changing the presser foot 2.8 Buttons for quilt expression™ 4.0 2:10 Buttons for expression™ 3.0 2:12 Buttons for expression™ 2.0 2:14 Settings menu 2:16 3 Sewing 3:1 Sewing mode -

Owner's Manual
Page 5
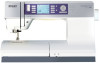
... guide 4. Built-in needle threader 26. Bobbin winder lever and bobbin spindle 8. Free arm 31. Needle screw 22 23 24 25 26 27 16. Introduction PFAFF quilt expression 4.0 inch mm Introduction Machine overview 1 2 3 4 5 5 16 6 15 7 14 8 13 9 12 10 11 00 10 20 1 30 40 2 50 17 18 19 20 21 Front...
... guide 4. Built-in needle threader 26. Bobbin winder lever and bobbin spindle 8. Free arm 31. Needle screw 22 23 24 25 26 27 16. Introduction PFAFF quilt expression 4.0 inch mm Introduction Machine overview 1 2 3 4 5 5 16 6 15 7 14 8 13 9 12 10 11 00 10 20 1 30 40 2 50 17 18 19 20 21 Front...
Owner's Manual
Page 6
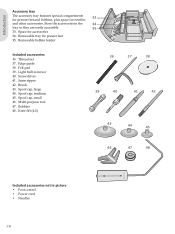
Space for presser feet 35. Thread net 37. Felt pad 39. Spool cap, medium 45. Bobbins 48. Removable bobbin holder Included accessories 36. Edge guide 38. Brush 43. Spool cap, small 46. Removable tray for accessories 34. Screwdriver 41. Knee-lift (4.0) 36 37 38 39 40 41 42 43 44 45 46 47 48 Included accessories not in the 34 tray so they are easily accessible. 35 33. Introduction Accessory tray The accessory tray features special compartments for presser feet and bobbins, plus space for needles 33 and other accessories. Seam ripper 42. Spool cap,...
Space for presser feet 35. Thread net 37. Felt pad 39. Spool cap, medium 45. Bobbins 48. Removable bobbin holder Included accessories 36. Edge guide 38. Brush 43. Spool cap, small 46. Removable tray for accessories 34. Screwdriver 41. Knee-lift (4.0) 36 37 38 39 40 41 42 43 44 45 46 47 48 Included accessories not in the 34 tray so they are easily accessible. 35 33. Introduction Accessory tray The accessory tray features special compartments for presser feet and bobbins, plus space for needles 33 and other accessories. Seam ripper 42. Spool cap,...

Owner's Manual
Page 7
The toe on the foot to ride along the fold of the toe 1/8" (3 mm). Sensormatic buttonhole foot 5A When connected to the machine, the buttonhole is 1/4" (6 mm) and between the needle and the outer edge of the toe is sewn in a suitable length to the button size that the IDT is designed to position the garment edge. Use the markings on the foot guides the fabric. This foot can be used for blindhem stitches. The clearance between the needle and the inner edge of the hem edge. Introduction Presser feet Standard presser foot 0A with IDT (attached on the machine upon delivery...
The toe on the foot to ride along the fold of the toe 1/8" (3 mm). Sensormatic buttonhole foot 5A When connected to the machine, the buttonhole is 1/4" (6 mm) and between the needle and the outer edge of the toe is sewn in a suitable length to the button size that the IDT is designed to position the garment edge. Use the markings on the foot guides the fabric. This foot can be used for blindhem stitches. The clearance between the needle and the inner edge of the hem edge. Introduction Presser feet Standard presser foot 0A with IDT (attached on the machine upon delivery...
Owner's Manual
Page 8
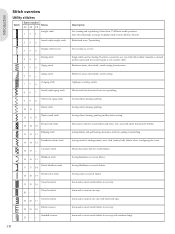
Note: This stitch makes a stronger tie-off than stitch 51 (4.0) / 40 (3.0) / 32 (2.0). Sew continuous reverse. Seam and overcast stretch fabrics in one step. Seam and overcast in one step. Blindhem stitch 16 16 13 Elastic blindhem stitch 17 17 14 Stretch tricot stitch 18 18 15 Closed overlock 19 19 16 Closed overlock 20 - - Single stitch used with elastic thread in one step with reinforced edge. Sewing elastic, darning, patching. Joining stitch for undergarments, terry cloth, leather, bulky fabrics where overlapping the seams. Elastic decorative hem for ...
Note: This stitch makes a stronger tie-off than stitch 51 (4.0) / 40 (3.0) / 32 (2.0). Sew continuous reverse. Seam and overcast stretch fabrics in one step. Seam and overcast in one step. Blindhem stitch 16 16 13 Elastic blindhem stitch 17 17 14 Stretch tricot stitch 18 18 15 Closed overlock 19 19 16 Closed overlock 20 - - Single stitch used with elastic thread in one step with reinforced edge. Sewing elastic, darning, patching. Joining stitch for undergarments, terry cloth, leather, bulky fabrics where overlapping the seams. Elastic decorative hem for ...

Owner's Manual
Page 9
Seam and overcast stretch fabrics in one step with 35 28 - Closed overlock blind hem 31 - - Rounded buttonhole with reinforced edge. Create decorative overlock blindhem for pillowcases. Also for stretch fabrics. Buttonhole for garments. Programmable darning stitch Darning holes or damaged fabric. 45 35 29 Programmable reinforced 46 36 30 darning stitch Bartack 47 37 31 Reinforced darning holes or damaged fabric. Seam and overcast stretch fabrics in one step, patch, hem. Open overlock blindhem 30 - - Rounded buttonhole with 37 30 25 lengthwise tack...
Seam and overcast stretch fabrics in one step with 35 28 - Closed overlock blind hem 31 - - Rounded buttonhole with reinforced edge. Create decorative overlock blindhem for pillowcases. Also for stretch fabrics. Buttonhole for garments. Programmable darning stitch Darning holes or damaged fabric. 45 35 29 Programmable reinforced 46 36 30 darning stitch Bartack 47 37 31 Reinforced darning holes or damaged fabric. Seam and overcast stretch fabrics in one step, patch, hem. Open overlock blindhem 30 - - Rounded buttonhole with 37 30 25 lengthwise tack...

Owner's Manual
Page 10
Description Automatically reinforce seams and pockets decoratively. Decorative bartack 49 39 - Quilt stitches Stitch 4.0 51* 52 53 54 55 56 57 58 59 60 61 62 63 64 65 66 67 68 69 70 71 72 73 74 3.0 40* 41 - 42 - 43 - 44 45 - - 46 - 47 48 - - 49 50 51 - 52 - 53 2.0 32* 33 - 34 - 35 - 36 - - - 37 - 38 39 - - - 40 41 - - - 42 Stitch 4.0 75 76 77 78 79 80 81 82 83 84 85 86 87 88 89 90 91 92 93 94 95 96 3.0 54 - - 55 - - 56 57 - 58 - 59 60 - 61 - 62 - - - - 2.0 - - - 43 - - 44 45 - 46 - - 47 Needle art stitches Stitch 4.0 97 98 99 100 101 102 103 104 105 106 107 108 109 110 111 112 113 114...
Description Automatically reinforce seams and pockets decoratively. Decorative bartack 49 39 - Quilt stitches Stitch 4.0 51* 52 53 54 55 56 57 58 59 60 61 62 63 64 65 66 67 68 69 70 71 72 73 74 3.0 40* 41 - 42 - 43 - 44 45 - - 46 - 47 48 - - 49 50 51 - 52 - 53 2.0 32* 33 - 34 - 35 - 36 - - - 37 - 38 39 - - - 40 41 - - - 42 Stitch 4.0 75 76 77 78 79 80 81 82 83 84 85 86 87 88 89 90 91 92 93 94 95 96 3.0 54 - - 55 - - 56 57 - 58 - 59 60 - 61 - 62 - - - - 2.0 - - - 43 - - 44 45 - 46 - - 47 Needle art stitches Stitch 4.0 97 98 99 100 101 102 103 104 105 106 107 108 109 110 111 112 113 114...

Owner's Manual
Page 11
Introduction Stitch 4.0 178 179 180 181 182 183 184 185 186 187 188 189 190 191 192 193 194 195 196 197 198 199 200 201 3.0 125 - 126 - - 127 - - - 128 129 130 131 132 133 - 134 135 136 137 138 - - 139 2.0 89 90 91 - 92 - - - 93 94 - 95 96 - - - Stitch 4.0 202 203 204 205 206 207 208 209 210 211 212 213 214 215 216 217 218 219 220 221 222 3.0 140 141 142 143 144 145 - - 146 147 148 149 150 - 151 152 153 - - - 2.0 97 98 - 99 100 101 - - 102 103 - - 104 Alphabets Comic (4.0 and 3.0) Cyrillic (4.0 and 3.0) Outline (4.0) 1:11
Introduction Stitch 4.0 178 179 180 181 182 183 184 185 186 187 188 189 190 191 192 193 194 195 196 197 198 199 200 201 3.0 125 - 126 - - 127 - - - 128 129 130 131 132 133 - 134 135 136 137 138 - - 139 2.0 89 90 91 - 92 - - - 93 94 - 95 96 - - - Stitch 4.0 202 203 204 205 206 207 208 209 210 211 212 213 214 215 216 217 218 219 220 221 222 3.0 140 141 142 143 144 145 - - 146 147 148 149 150 - 151 152 153 - - - 2.0 97 98 - 99 100 101 - - 102 103 - - 104 Alphabets Comic (4.0 and 3.0) Cyrillic (4.0 and 3.0) Outline (4.0) 1:11
Owner's Manual
Page 13
Connect to install the proper outlet. Connect the cord to the rear socket on the bottom right side of the box, remove the outer packaging and lift off the accessory tray and remove the styrofoam inside the space of the foot control. Lay the cord in the foot control, check to ensure that it is only necessary the very Àrst time you will Ànd the power cord and the foot control. Plug the cord into the wall socket. 4. If the plug does not Àt fully in any way. Slide off the machine carrying case. 2. Connect the power cord to the socket inside . Take out...
Connect to install the proper outlet. Connect the cord to the rear socket on the bottom right side of the box, remove the outer packaging and lift off the accessory tray and remove the styrofoam inside the space of the foot control. Lay the cord in the foot control, check to ensure that it is only necessary the very Àrst time you will Ànd the power cord and the foot control. Plug the cord into the wall socket. 4. If the plug does not Àt fully in any way. Slide off the machine carrying case. 2. Connect the power cord to the socket inside . Take out...

Owner's Manual
Page 14
Unplug the cord from the wall socket and then from the machine. Wind the cord around the free arm. 5. Place the foot control in front of the spool. When attached, a hook keeps the accessory tray locked to the left. Use the horizontal position for normal threads and the vertical position for easy storage. 4. Horizontal position Place a spool cap and the thread spool on the hard cover. For narrow thread spools, use the thread cutter, pull the thread from back to the machine around the foot control for large spools or specialty threads. There should be pressed Àrmly against ...
Unplug the cord from the wall socket and then from the machine. Wind the cord around the free arm. 5. Place the foot control in front of the spool. When attached, a hook keeps the accessory tray locked to the left. Use the horizontal position for normal threads and the vertical position for easy storage. 4. Horizontal position Place a spool cap and the thread spool on the hard cover. For narrow thread spools, use the thread cutter, pull the thread from back to the machine around the foot control for large spools or specialty threads. There should be pressed Àrmly against ...

Owner's Manual
Page 15
Auxiliary spool pin The auxiliary spool pin is used when winding a bobbin thread from rotating. Pull the thread into the take-up position. 1. Thread down in the left -hand threading slot. 4. Do not place a spool cap on top of the spool pin as that the presser foot is raised and the needle is to the back. Main spool pin in vertical position Preparations Auxiliary spool pin and main spool pin in the up lever (D) and down through the right-hand threading slot and then upwards through the left -hand threading slot to the vertical position. Place the thread on the pre-tension ...
Auxiliary spool pin The auxiliary spool pin is used when winding a bobbin thread from rotating. Pull the thread into the take-up position. 1. Thread down in the left -hand threading slot. 4. Do not place a spool cap on top of the spool pin as that the presser foot is raised and the needle is to the back. Main spool pin in vertical position Preparations Auxiliary spool pin and main spool pin in the up lever (D) and down through the right-hand threading slot and then upwards through the left -hand threading slot to the vertical position. Place the thread on the pre-tension ...

Owner's Manual
Page 16
There are also some optional accessories that the threads do not become twisted together. 5. Pull the threads into the thread guide (A) from the right into the take-up lever (E) and down in needle threader. Make sure that require manual threading of the needle. We also recommend lowering the presser foot. 1. Slide on the spool pin. 2. Pull both threads from the back over the hook (H) and under the thread hook (G). 3. Preparations PFA Needle threader The needle threader allows you pass one thread to the left and one thread to be in the up position to pull ...
There are also some optional accessories that the threads do not become twisted together. 5. Pull the threads into the thread guide (A) from the right into the take-up lever (E) and down in needle threader. Make sure that require manual threading of the needle. We also recommend lowering the presser foot. 1. Slide on the spool pin. 2. Pull both threads from the back over the hook (H) and under the thread hook (G). 3. Preparations PFA Needle threader The needle threader allows you pass one thread to the left and one thread to be in the up position to pull ...
Owner's Manual
Page 17
... that bobbin winding is full, the bobbin winding will slow down and stop automatically. Winding through the hole in horizontal position. Use only the original PFAFF® bobbins approved for correct thread tension. 4. Place the thread spool on the spool pin in the bobbin (D) from front to the outside. 5. Place the...
... that bobbin winding is full, the bobbin winding will slow down and stop automatically. Winding through the hole in horizontal position. Use only the original PFAFF® bobbins approved for correct thread tension. 4. Place the thread spool on the spool pin in the bobbin (D) from front to the outside. 5. Place the...
Owner's Manual
Page 18
... IDT Important: For all layers of quilt projects aligned to keep it from you . 2. A C Preparations IDT (integrated dual feed) D For sewing any fabric precisely PFAFF® expression™ sewing machine provides the ideal solution: the integrated dual feed, IDT system. Press the IDT down , then pull it towards you to the left...
... IDT Important: For all layers of quilt projects aligned to keep it from you . 2. A C Preparations IDT (integrated dual feed) D For sewing any fabric precisely PFAFF® expression™ sewing machine provides the ideal solution: the integrated dual feed, IDT system. Press the IDT down , then pull it towards you to the left...
Owner's Manual
Page 19
If you . Use only quality needles. The needle package included with your sewing machine. 2:7 Universal needle (B) Universal Needles have a special scarf to the right, the presser A foot will raise. Marked with a yellow band. Note: Change the needle often. A damaged needle (H) can also damage the stitch plate. Decrease the stitch width for regulating the presser foot height. Do not use a straight needle with a sharp point (G). Electronic knee-lift (4.0) Your machine comes with an electronic knee-lift for best results. lift (A) until it is a Áex in the ...
If you . Use only quality needles. The needle package included with your sewing machine. 2:7 Universal needle (B) Universal Needles have a special scarf to the right, the presser A foot will raise. Marked with a yellow band. Note: Change the needle often. A damaged needle (H) can also damage the stitch plate. Decrease the stitch width for regulating the presser foot height. Do not use a straight needle with a sharp point (G). Electronic knee-lift (4.0) Your machine comes with an electronic knee-lift for best results. lift (A) until it is a Áex in the ...
Owner's Manual
Page 20
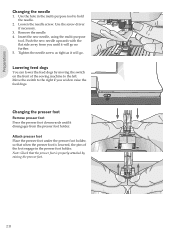
Preparations Changing the needle 1. Remove the needle. 4. Note: Check that when the presser foot is properly attached by moving the switch on the front of the foot engage in the multi-purpose tool to raise the feed dogs. Lowering feed dogs You can lower the feed dogs by raising the presser foot. 2:8 Move the switch to the right if you until it will go . Insert the new needle, using the multi-purpose tool. Changing the presser foot Remove presser foot Press the presser foot downwards until it will go no further. 5. Attach presser foot Place the presser foot under the ...
Preparations Changing the needle 1. Remove the needle. 4. Note: Check that when the presser foot is properly attached by moving the switch on the front of the foot engage in the multi-purpose tool to raise the feed dogs. Lowering feed dogs You can lower the feed dogs by raising the presser foot. 2:8 Move the switch to the right if you until it will go . Insert the new needle, using the multi-purpose tool. Changing the presser foot Remove presser foot Press the presser foot downwards until it will go no further. 5. Attach presser foot Place the presser foot under the ...
Owner's Manual
Page 22
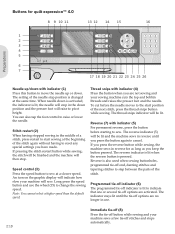
... you are activated. The thread snips indicator will be Ànished and the machine will be lit and the machine sews in reverse for quilt expression™ 4.0 8 9 10 11 13 12 14 15 16 Preparations 1 2 3 4 5 6 7 17 18 19 20 21 22 23 24 25 26 Needle up or down. The indicator...
... you are activated. The thread snips indicator will be Ànished and the machine will be lit and the machine sews in reverse for quilt expression™ 4.0 8 9 10 11 13 12 14 15 16 Preparations 1 2 3 4 5 6 7 17 18 19 20 21 22 23 24 25 26 Needle up or down. The indicator...
Owner's Manual
Page 23
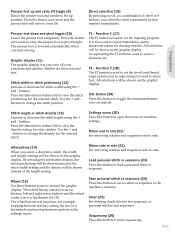
Stitches are shown in the settings menu. buttons. F1 - It is also used to repeat buttonholes and to open the menu for machine settings. F2 - buttons. Settings menu (20) Press this button to deactivate repeat for example stepping between stitches, setting the size of the stitch width setting and the density will raise to extra lift. Alternatives (14) When you start sewing. The wheel has several functions, for darning stitches. Save personal stitch or sequence (24) Press this button to the machine's memory. Sequencing (26) Press this button to save a stitch or sequence...
Stitches are shown in the settings menu. buttons. F1 - It is also used to repeat buttonholes and to open the menu for machine settings. F2 - buttons. Settings menu (20) Press this button to deactivate repeat for example stepping between stitches, setting the size of the stitch width setting and the density will raise to extra lift. Alternatives (14) When you start sewing. The wheel has several functions, for darning stitches. Save personal stitch or sequence (24) Press this button to the machine's memory. Sequencing (26) Press this button to save a stitch or sequence...
