
Owner's Manual
Page 4
...Accessories Applique foot Applique designs Automatic tapering B Balance Basting Bias binder Blind hem Bobbin case Bobbin thread monitor (model 2046) Bobbin thread tension Bobbin thread, drawing up Bobbin winding Bobbin winding through the needle Braiding foot Bridging Buttonhole, fully...114 85 85 102 65 92 D Darning, automatic darning (model 2046) 62 Darning, sewing on patches 59, 62-63 Decorative sewing, general notes 84 Decorative stitches, Quilt Expression 2046 10 Decorative stitches, Expression 2034 11 E Elastic utility stitches Electrical connection Eyelet embroidery Eyelets 56...
...Accessories Applique foot Applique designs Automatic tapering B Balance Basting Bias binder Blind hem Bobbin case Bobbin thread monitor (model 2046) Bobbin thread tension Bobbin thread, drawing up Bobbin winding Bobbin winding through the needle Braiding foot Bridging Buttonhole, fully...114 85 85 102 65 92 D Darning, automatic darning (model 2046) 62 Darning, sewing on patches 59, 62-63 Decorative sewing, general notes 84 Decorative stitches, Quilt Expression 2046 10 Decorative stitches, Expression 2034 11 E Elastic utility stitches Electrical connection Eyelet embroidery Eyelets 56...
Owner's Manual
Page 5
...bobbin thread tension Non-elastic/elastic stitches Non-stick fancy stitch foot for leather 0 Overlock stitches P Parts of the sewing machine (2046) Parts of the sewing machine (2034) Patchwork and quilting "Pattern start' 'Pattern start" within stitch sequence Pattern length/pattern width,... Tie-off Tips for a perfect buttonhole Top feed (integrated dual feed) Twin needle Twin needle, threading U Utility stitches, Quilt Expression 2046 Utility stitches, Expression 2034 V Voltage switch 29 Window, adjusting the contrast z 21 Zippers, sewing in 59 41 1/4 inch quilt and patchwork foot 66...
...bobbin thread tension Non-elastic/elastic stitches Non-stick fancy stitch foot for leather 0 Overlock stitches P Parts of the sewing machine (2046) Parts of the sewing machine (2034) Patchwork and quilting "Pattern start' 'Pattern start" within stitch sequence Pattern length/pattern width,... Tie-off Tips for a perfect buttonhole Top feed (integrated dual feed) Twin needle Twin needle, threading U Utility stitches, Quilt Expression 2046 Utility stitches, Expression 2034 V Voltage switch 29 Window, adjusting the contrast z 21 Zippers, sewing in 59 41 1/4 inch quilt and patchwork foot 66...
Owner's Manual
Page 6
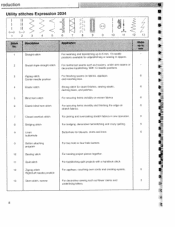
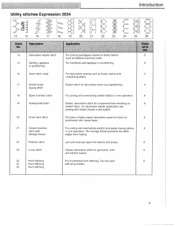
roduction Utility stitches Expression 2034 I Ei
roduction Utility stitches Expression 2034 I Ei
Owner's Manual
Page 7
... bobbin. 20 Cross hem stitch Provides a highly elastic decorative seam for garments, linen 6 and kitchen towels. 24 Hem stitching For ornamental hem stitching. I Utility stitches Expression 2034 Il . 4=31 II 14 15 16 17 18 20 21 22 23 24 ách t4o 14 Decorative elastic stitch 15 Quilting, applique or...
... bobbin. 20 Cross hem stitch Provides a highly elastic decorative seam for garments, linen 6 and kitchen towels. 24 Hem stitching For ornamental hem stitching. I Utility stitches Expression 2034 Il . 4=31 II 14 15 16 17 18 20 21 22 23 24 ách t4o 14 Decorative elastic stitch 15 Quilting, applique or...
Owner's Manual
Page 15
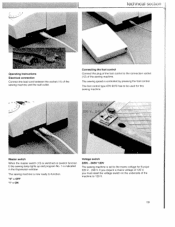
... Electrical connection Connect the lead cord between the socket (11) of the sewing machine and the wall outlet. The sewing speed is indicated in the Expression window.
... Electrical connection Connect the lead cord between the socket (11) of the sewing machine and the wall outlet. The sewing speed is indicated in the Expression window.
Owner's Manual
Page 31
Sewing functions Adjusting the contrast in the Expression window 36 Stitch selection 36 Bobbin thread monitor (model 2046) 37 Altering pattern sizes 37 Altering the stitch width/needle position 38 4ltering the pattern th/stitch length 38, 39 A1ring the pattern tenØVstitch density 39 Sa1ate 40 jnfobutton/reverse sewing button 41 Sewtrgfuction buttons 42 btton 43 :. 44 45
Sewing functions Adjusting the contrast in the Expression window 36 Stitch selection 36 Bobbin thread monitor (model 2046) 37 Altering pattern sizes 37 Altering the stitch width/needle position 38 4ltering the pattern th/stitch length 38, 39 A1ring the pattern tenØVstitch density 39 Sa1ate 40 jnfobutton/reverse sewing button 41 Sewtrgfuction buttons 42 btton 43 :. 44 45
Owner's Manual
Page 32
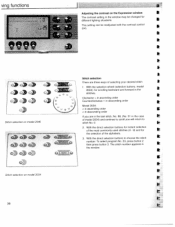
ving functions Adjusting the contrast on the Expression window The contrast setting in the p stitches. This setting can be readjusted with the contrast control (54). 1 I I Stitch selection There are three ways of selecting your desired stitch: p c) 1 With the selection wheel (selection buttons, model 2034): for scrolling backward and forward in the window may be changed for different lighting situations. Li) Clockwise in ascending order Counterclockwise = in descending order Model 2034: > in ascending order
ving functions Adjusting the contrast on the Expression window The contrast setting in the p stitches. This setting can be readjusted with the contrast control (54). 1 I I Stitch selection There are three ways of selecting your desired stitch: p c) 1 With the selection wheel (selection buttons, model 2034): for scrolling backward and forward in the window may be changed for different lighting situations. Li) Clockwise in ascending order Counterclockwise = in descending order Model 2034: > in ascending order

Owner's Manual
Page 36
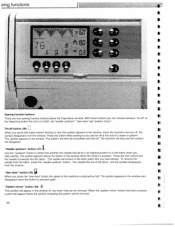
... sewn shorter, and thus the overall length will see the balance symbol with a '0 after it is sewn in the bottom right-hand corner of the Expression window. This symbol indicates that the balance can be sewn shorter. With -1+ button C you will be altered on different fabric types - t 40 The balance adjusts...
... sewn shorter, and thus the overall length will see the balance symbol with a '0 after it is sewn in the bottom right-hand corner of the Expression window. This symbol indicates that the balance can be sewn shorter. With -1+ button C you will be altered on different fabric types - t 40 The balance adjusts...
Owner's Manual
Page 38
...-off at the beginning and/or the end of a seam or pattern. When the 'pattern mirror" button has been pressed, a point will appear below the Expression window. The needle lifts out of the machine is pressed again. Once the machine has tied off . p 42 To remove the needle from the fabric...
...-off at the beginning and/or the end of a seam or pattern. When the 'pattern mirror" button has been pressed, a point will appear below the Expression window. The needle lifts out of the machine is pressed again. Once the machine has tied off . p 42 To remove the needle from the fabric...
Owner's Manual
Page 62
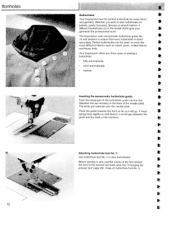
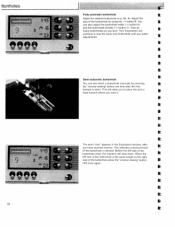
...mark (also see "Changing the presser foot" page 29). Snap on the model 2034) give your garments the professional touch. The Expression uses sensormatic buttonhole guide No. 10 and sensors to sew buttonholes. Perfect buttonholes can be sewn on the back of fabrics such ...of the machine. Press the guide towards the front as far as velvet, plush, knitted fabrics and heavy knits. ttonholes 70 Buttonholes Your Expression has the perfect buttonhole for every fabric and garment. Whether you three ways of sewing a buttonhole: fully automatically • semi-automatically ...
...mark (also see "Changing the presser foot" page 29). Snap on the model 2034) give your garments the professional touch. The Expression uses sensormatic buttonhole guide No. 10 and sensors to sew buttonholes. Perfect buttonholes can be sewn on the back of fabrics such ...of the machine. Press the guide towards the front as far as velvet, plush, knitted fabrics and heavy knits. ttonholes 70 Buttonholes Your Expression has the perfect buttonhole for every fabric and garment. Whether you three ways of sewing a buttonhole: fully automatically • semi-automatically ...
Owner's Manual
Page 64
No. 9). Your Expression will I continue to place the last or back bartack where you have touched reverse. This will slow down. I can also finish a buttonhole manually by using ... (33) once again. When the left side of the buttonhole is the same length as you make adjustments. You I The word "man' appears in the Expression window, after the first bartack is sewn. ttonholes "99 "'9 72 Fully automatic buttonhole I t Semi-automatic buttonhole You can also adjust the buttonhole width (-1÷ button...
No. 9). Your Expression will I continue to place the last or back bartack where you have touched reverse. This will slow down. I can also finish a buttonhole manually by using ... (33) once again. When the left side of the buttonhole is the same length as you make adjustments. You I The word "man' appears in the Expression window, after the first bartack is sewn. ttonholes "99 "'9 72 Fully automatic buttonhole I t Semi-automatic buttonhole You can also adjust the buttonhole width (-1÷ button...
Owner's Manual
Page 70
... or other smaller projects. 78 Today your creative ideas can be included in the bobbin. The seam allowance of fabric for your Pfaff Expression. Baste the completed quilt top to piece the quilt top. I your quilt top using monofilament thread on the optional ¼" .... A seam allowance of material are usually pressed towards the darker fabric side. Traditionally patchwork was sewn by hand with your Pfaft Expression, e.g. A quilt consists of three layers, two layers of batting sandwiched between. Iting Patchwork and quilting Patchwork and quilting are traditional...
... or other smaller projects. 78 Today your creative ideas can be included in the bobbin. The seam allowance of fabric for your Pfaff Expression. Baste the completed quilt top to piece the quilt top. I your quilt top using monofilament thread on the optional ¼" .... A seam allowance of material are usually pressed towards the darker fabric side. Traditionally patchwork was sewn by hand with your Pfaft Expression, e.g. A quilt consists of three layers, two layers of batting sandwiched between. Iting Patchwork and quilting Patchwork and quilting are traditional...

Owner's Manual
Page 71
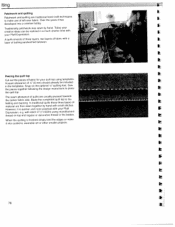
... quilting. Stitching in the Ditch means following the seams in -the-Ditch One way to the right and your quilt through thick quilts. Set your Expression with a straight stitch (1), stitch length 2.5, needle position 4 to hold the quilt together, it will form the top of 1/4" (6 mm). This stitching will... Change to include a seam allowance of the quilt. Test sew to keep layers in place. Begin by the block chosen. Set up your 2034/2046 for center needle straight stitch and engage the IDT Stitch-in the quilt blocks. Tip: Use the ¼ 'foot (820211-096) as required ...
... quilting. Stitching in the Ditch means following the seams in -the-Ditch One way to the right and your quilt through thick quilts. Set your Expression with a straight stitch (1), stitch length 2.5, needle position 4 to hold the quilt together, it will form the top of 1/4" (6 mm). This stitching will... Change to include a seam allowance of the quilt. Test sew to keep layers in place. Begin by the block chosen. Set up your 2034/2046 for center needle straight stitch and engage the IDT Stitch-in the quilt blocks. Tip: Use the ¼ 'foot (820211-096) as required ...
Owner's Manual
Page 73
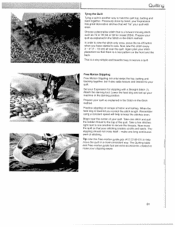
... to make one another way to secure a quilt. Lower the feed dog and set up your Expression for model 2034). Practice stippling on the front and the back. Remember using a constant speed will tie' your Expression has great decorative stitches that is a nice pattern on scraps of your stitching creates scrolls and...
... to make one another way to secure a quilt. Lower the feed dog and set up your Expression for model 2034). Practice stippling on the front and the back. Remember using a constant speed will tie' your Expression has great decorative stitches that is a nice pattern on scraps of your stitching creates scrolls and...

Owner's Manual
Page 74
... edge of the applique with the straight part of light weight iron on with the hand applique stitch 15 (2034) / 28 (2046). Trim around the I the position, iron it on interfacing. When you stop sewing. This makes turning easy with I applique leaving...the interlacing together. Use a straight stitch (1), stitch I There are satisfied with your quilt. Slash the interfacing so that special touch for your Expression. Follow around the applique with stitch 3, stitch length 0.5. I length 2.0, center needle position and sew the fabric and interfacing together using a...
... edge of the applique with the straight part of light weight iron on with the hand applique stitch 15 (2034) / 28 (2046). Trim around the I the position, iron it on interfacing. When you stop sewing. This makes turning easy with I applique leaving...the interlacing together. Use a straight stitch (1), stitch I There are satisfied with your quilt. Slash the interfacing so that special touch for your Expression. Follow around the applique with stitch 3, stitch length 0.5. I length 2.0, center needle position and sew the fabric and interfacing together using a...
Owner's Manual
Page 76
... stabilizers under fabric when sewing decorative stitches. Create a greater variety of your tension is properly adjusted. Your embroidery results will help eliminate distortion of your Expression offers you a wide variety of fancy and decorative stitches. No. 2 for decorative work.
... stabilizers under fabric when sewing decorative stitches. Create a greater variety of your tension is properly adjusted. Your embroidery results will help eliminate distortion of your Expression offers you a wide variety of fancy and decorative stitches. No. 2 for decorative work.

Owner's Manual
Page 79
Follow the instructions and tips for free-motion monograms. Draw the outline of the embroideries on fabric where you want to stitch your Expression. I 87 I [Decorative sewing/Specia[tytechniqu Free-motion embroidery These striking embroidery designs can easily be sewn with your embroideries. Set your Expression as for free-motion monograms to stitch them.
Follow the instructions and tips for free-motion monograms. Draw the outline of the embroideries on fabric where you want to stitch your Expression. I 87 I [Decorative sewing/Specia[tytechniqu Free-motion embroidery These striking embroidery designs can easily be sewn with your embroideries. Set your Expression as for free-motion monograms to stitch them.

Owner's Manual
Page 80
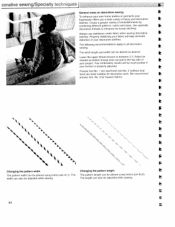
... called TAPERING. Begin sewing. • With -1+ button A increase the width from a right (C) to 3. A B C 88 Pressing the I Tapering with the satinstitch zigzag With your Expression you have the option of increasing or decreasing the width of the zigzag stitch in one direction. You can achieve great effects by adjusting the...only changes in 0.5 mm increments. This technique of adjusting the width of a wide zigzag stitch. Select the zigzag stitch needle position (stitch 11/2046, 12/2034). Manual change the stitch from 0 to 6 mm and reduce it again to 0.2 - 0.3 mm.
... called TAPERING. Begin sewing. • With -1+ button A increase the width from a right (C) to 3. A B C 88 Pressing the I Tapering with the satinstitch zigzag With your Expression you have the option of increasing or decreasing the width of the zigzag stitch in one direction. You can achieve great effects by adjusting the...only changes in 0.5 mm increments. This technique of adjusting the width of a wide zigzag stitch. Select the zigzag stitch needle position (stitch 11/2046, 12/2034). Manual change the stitch from 0 to 6 mm and reduce it again to 0.2 - 0.3 mm.

Owner's Manual
Page 81
... or zigzag stitch 3 for home decorating projects like to embroider the corners of a border, select z 9 zai g stitch No. 11/2046, 12/2034. Press the tie-off button (36) three times. The taper will be sewn automatically at the taper and the needle remains...so that you desire, then press the reverse sewing button (33) while sewing. I position. ,d Set stitch length to 3. A dense zigzag stitch appears in the Expression window and beside it the word 'tapering' with a center needle I • Using -1+ button A increase and reduce the width while 4) 1' sewing. (1 A ...
... or zigzag stitch 3 for home decorating projects like to embroider the corners of a border, select z 9 zai g stitch No. 11/2046, 12/2034. Press the tie-off button (36) three times. The taper will be sewn automatically at the taper and the needle remains...so that you desire, then press the reverse sewing button (33) while sewing. I position. ,d Set stitch length to 3. A dense zigzag stitch appears in the Expression window and beside it the word 'tapering' with a center needle I • Using -1+ button A increase and reduce the width while 4) 1' sewing. (1 A ...

Owner's Manual
Page 84
design your cross-stitch look as used to be sewn with the 2034 and 2046 with a great deal of effort can embroider on the count/size of your Expression can be altered depending on Aida cloth as if they were hand-embroidered and give a special touch to make your own cross...• You can now be stitched by hand with astonishing ease and speed. Tips for hand cross-stitching. t 92 With cross-stitch No. 22 (2046) or No 23 (2046/2034). corative sewing/SpecaIty techniqJ Cross-stitch Cross-stitch embroidery has always been a wonderful traditional, embroidery technique.
design your cross-stitch look as used to be sewn with the 2034 and 2046 with a great deal of effort can embroider on the count/size of your Expression can be altered depending on Aida cloth as if they were hand-embroidered and give a special touch to make your own cross...• You can now be stitched by hand with astonishing ease and speed. Tips for hand cross-stitching. t 92 With cross-stitch No. 22 (2046) or No 23 (2046/2034). corative sewing/SpecaIty techniqJ Cross-stitch Cross-stitch embroidery has always been a wonderful traditional, embroidery technique.


