
Owner's Manual
Page 2
...from the electric outlet immediately after using an electrical appliance, basic safety precautions should never be left unattended when plugged in the instruction manual. • Never drop or insert any object into water. DANGER - To reduce the risk of burns, fire, electric ... cord. Replace bulb with any opening. • Do not use the proper needle plate. SAVE THESE INSTRUCTIONS v. 1.0 Always unplug this manual. Keep ventilation openings of the Sewing machine and foot controller free from the accumulation of electric shock: • A sewing machine should always...
...from the electric outlet immediately after using an electrical appliance, basic safety precautions should never be left unattended when plugged in the instruction manual. • Never drop or insert any object into water. DANGER - To reduce the risk of burns, fire, electric ... cord. Replace bulb with any opening. • Do not use the proper needle plate. SAVE THESE INSTRUCTIONS v. 1.0 Always unplug this manual. Keep ventilation openings of the Sewing machine and foot controller free from the accumulation of electric shock: • A sewing machine should always...
Owner's Manual
Page 6
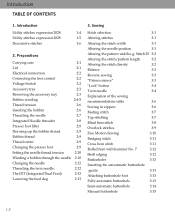
Introduction Utility stitches expression 2028 1:4 Utility stitches expression 2028 1:5 Decorative stitches 1:6 2. Sewing Stitch selection 3:1 Altering stitches 3:1 Altering the stitch width 3:1 Altering the needle position 3:1 Altering the pattern width e.g. Preparations Carrying case 2:1 Lid 2:1 Electrical... 3:12 Shell edging 3:12 Buttonholes 3:13 Inserting the sensormatic buttonhole guide: 3:13 Attaching buttonhole foot 3:13 Fully automatic buttonhole 3:13 Semi-automatic buttonhole 3:14 Manual buttonhole 3:15 1:2 Introduction TABLE OF CONTENTS 1.
Introduction Utility stitches expression 2028 1:4 Utility stitches expression 2028 1:5 Decorative stitches 1:6 2. Sewing Stitch selection 3:1 Altering stitches 3:1 Altering the stitch width 3:1 Altering the needle position 3:1 Altering the pattern width e.g. Preparations Carrying case 2:1 Lid 2:1 Electrical... 3:12 Shell edging 3:12 Buttonholes 3:13 Inserting the sensormatic buttonhole guide: 3:13 Attaching buttonhole foot 3:13 Fully automatic buttonhole 3:13 Semi-automatic buttonhole 3:14 Manual buttonhole 3:15 1:2 Introduction TABLE OF CONTENTS 1.
Owner's Manual
Page 33
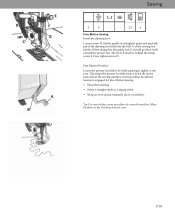
... thread tension is engaged for Free Motion Sewing. • Drop the feed dog. • Select a straight stitch or a zigzag stitch. • Keep an even speed, manually move your fabric. Now tighten screw D. This snaps the presser foot lifter into the hole C of the sewing machine. Move the fabric so the stitching...
... thread tension is engaged for Free Motion Sewing. • Drop the feed dog. • Select a straight stitch or a zigzag stitch. • Keep an even speed, manually move your fabric. Now tighten screw D. This snaps the presser foot lifter into the hole C of the sewing machine. Move the fabric so the stitching...
Owner's Manual
Page 36
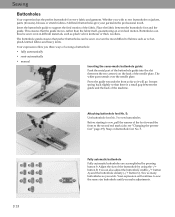
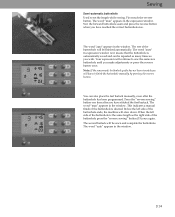
...sew, pull the runner of fabrics such as you three ways of sewing a buttonhole: • fully automatically • semi-automatically • manual Inserting the sensormatic buttonhole guide: Push the metal part of the buttonhole guide into the slot (between the two arrows) on the back of... continue to sew the same size buttonhole until you wish to the second red mark (also see "Changing the presser foot" page 2:9). Your expression will go. Buttonholes can also adjust the buttonhole width (-/+ button A) and the buttonhole density (-/+ button C). Adjust the size of the needle ...
...sew, pull the runner of fabrics such as you three ways of sewing a buttonhole: • fully automatically • semi-automatically • manual Inserting the sensormatic buttonhole guide: Push the metal part of the buttonhole guide into the slot (between the two arrows) on the back of... continue to sew the same size buttonhole until you wish to the second red mark (also see "Changing the presser foot" page 2:9). Your expression will go. Buttonholes can also adjust the buttonhole width (-/+ button A) and the buttonhole density (-/+ button C). Adjust the size of the needle ...
Owner's Manual
Page 37
... after you will have stitched the first bartack. Sewing Semi-automatic buttonhole Used to finish the buttonhole manually by pressing the reverse button. Your expression will slow down. Before the left side of the buttonhole ends, the machine will continue to sew the same size ... be sewn and complete the buttonhole. First touch the reverse button. The word "auto" appears in the expression window. The word "auto" appears in the window. This indicates a manual finish of the buttonhole is the same length as you wish. Sew the forward buttonhole seam and ...
... after you will have stitched the first bartack. Sewing Semi-automatic buttonhole Used to finish the buttonhole manually by pressing the reverse button. Your expression will slow down. Before the left side of the buttonhole ends, the machine will continue to sew the same size ... be sewn and complete the buttonhole. First touch the reverse button. The word "auto" appears in the expression window. The word "auto" appears in the window. This indicates a manual finish of the buttonhole is the same length as you wish. Sew the forward buttonhole seam and ...

Owner's Manual
Page 38
...buttonholes can now be sewn and complete the buttonhole. You can be finished manually. Before the left side of the buttonhole ends, the machine will be repeated fully automatically. This indicates a manual finish of the buttonhole is the same length as the right side of... window. Note: The programming of the buttonhole press the "reverse sewing" button (33) once again. The word "man" appears in the expression window. Press the "reverse sewing" button one time after the buttonhole has been programmed. Sew the forward buttonhole seam and press the reverse button...
...buttonholes can now be sewn and complete the buttonhole. You can be finished manually. Before the left side of the buttonhole ends, the machine will be repeated fully automatically. This indicates a manual finish of the buttonhole is the same length as the right side of... window. Note: The programming of the buttonhole press the "reverse sewing" button (33) once again. The word "man" appears in the expression window. Press the "reverse sewing" button one time after the buttonhole has been programmed. Sew the forward buttonhole seam and press the reverse button...

Owner's Manual
Page 48
... the needle 2:12 "Lock" button 3:4 Changing the pattern length 3:18 Lowering the feed dog 2:13 Changing the pattern width 3:18 Changing the presser foot 2:9 M Cleaning 4:1 Manual buttonhole 3:15 Connecting the foot control 2:2 Cross hem stitch 3:11 O Overlock stitches 3:9 4:5
... the needle 2:12 "Lock" button 3:4 Changing the pattern length 3:18 Lowering the feed dog 2:13 Changing the pattern width 3:18 Changing the presser foot 2:9 M Cleaning 4:1 Manual buttonhole 3:15 Connecting the foot control 2:2 Cross hem stitch 3:11 O Overlock stitches 3:9 4:5
Owner's Manual
Page 50
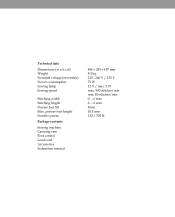
presser foot height Needle system Package contents Sewing machine Carrying case Foot control Lead cord Accessories Instruction manual 408 x 290 x 187 mm 8.3 kg 220 - 240 V / 120 V 75 W 12 V / max. 5 W max. 950 stitches/min min. 80 stitches/min 0 ... 6 mm 0 ... 6 mm 8mm 10.5 mm 130 / 705 H Technical data Dimensions (w x h x d) Weight Nominal voltage (reversible) Power consumption Sewing lamp Sewing speed Stitching width Stitching length Presser foot lift Max.
presser foot height Needle system Package contents Sewing machine Carrying case Foot control Lead cord Accessories Instruction manual 408 x 290 x 187 mm 8.3 kg 220 - 240 V / 120 V 75 W 12 V / max. 5 W max. 950 stitches/min min. 80 stitches/min 0 ... 6 mm 0 ... 6 mm 8mm 10.5 mm 130 / 705 H Technical data Dimensions (w x h x d) Weight Nominal voltage (reversible) Power consumption Sewing lamp Sewing speed Stitching width Stitching length Presser foot lift Max.


