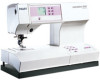

Owner's Manual
Page 2
...controls to break. • Do not use the proper needle plate. Use only attachments recommended by the manufacturer as contained in the instruction manual. • Never drop or insert any opening. • Do not use as a toy. Special care is not working properly, if ...sewing machine from the electrical outlet when removing covers, lubricating, or when making any other user servicing adjustments mentioned in this manual. • Never operate this manual. Replace bulb with same type rated 5 Watt. Keep ventilation openings of the Sewing machine and foot controller free from outlet...
...controls to break. • Do not use the proper needle plate. Use only attachments recommended by the manufacturer as contained in the instruction manual. • Never drop or insert any opening. • Do not use as a toy. Special care is not working properly, if ...sewing machine from the electrical outlet when removing covers, lubricating, or when making any other user servicing adjustments mentioned in this manual. • Never operate this manual. Replace bulb with same type rated 5 Watt. Keep ventilation openings of the Sewing machine and foot controller free from outlet...
Owner's Manual
Page 5
Introduction 5 Buttonholes General notes on buttonholes Inserting the buttonhole guide Inserting the buttonhole foot Fully automatic buttonhole Semi-automatic buttonhole/ manual Ànish Manual buttonhole Buttonholes with gimp thread Tips for a perfect buttonhole 5:2 5:2 5:2 5:3 5:3-5:4 5:5 5:6 5:7 7 Maintenance Changing the needle plate Cleaning Changing the sewing lamp Sewing problems and their solutions Index 6 ...
Introduction 5 Buttonholes General notes on buttonholes Inserting the buttonhole guide Inserting the buttonhole foot Fully automatic buttonhole Semi-automatic buttonhole/ manual Ànish Manual buttonhole Buttonholes with gimp thread Tips for a perfect buttonhole 5:2 5:2 5:2 5:3 5:3-5:4 5:5 5:6 5:7 7 Maintenance Changing the needle plate Cleaning Changing the sewing lamp Sewing problems and their solutions Index 6 ...
Owner's Manual
Page 56
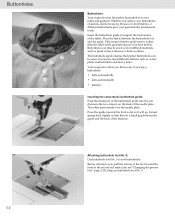
...Use buttonhole foot No. 5 to the second red mark (also see "Changing the presser foot" page 2:15). Buttonholes 5:2 Buttonholes Your expression has the perfect buttonhole for every fabric and garment. The buttonhole guide ensures that perfect buttonholes can thus be sewn on the back of the... velvet, knitwear or thick woollens. Whether you three ways of sewing a buttonhole: • fully automatically • semi-automatically • manual Inserting the sensormatic buttonhole guide: Push the metal part of fabrics such as it will go. Insert the buttonhole guide to support the feed...
...Use buttonhole foot No. 5 to the second red mark (also see "Changing the presser foot" page 2:15). Buttonholes 5:2 Buttonholes Your expression has the perfect buttonhole for every fabric and garment. The buttonhole guide ensures that perfect buttonholes can thus be sewn on the back of the... velvet, knitwear or thick woollens. Whether you three ways of sewing a buttonhole: • fully automatically • semi-automatically • manual Inserting the sensormatic buttonhole guide: Push the metal part of fabrics such as it will go. Insert the buttonhole guide to support the feed...
Owner's Manual
Page 57
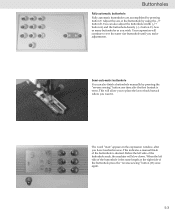
... Àrst bartack is sewn. Before the left side of the buttonhole press the "reverse sewing" button (16) once again. 5:3 Your expression will allow you to sew the same size buttonhole until you want it. This will continue to place the last or back bartack where you ...buttonholes are accomplished by using the -/+ button B. When the left side of the buttonhole by pressing button 9. You can also Ànish a buttonhole manually by pressing the "reverse sewing" button one time after you wish. Adjust the size of the buttonhole ends, the machine will slow down. Semi-...
... Àrst bartack is sewn. Before the left side of the buttonhole press the "reverse sewing" button (16) once again. 5:3 Your expression will allow you to sew the same size buttonhole until you want it. This will continue to place the last or back bartack where you ...buttonholes are accomplished by using the -/+ button B. When the left side of the buttonhole by pressing button 9. You can also Ànish a buttonhole manually by pressing the "reverse sewing" button one time after you wish. Adjust the size of the buttonhole ends, the machine will slow down. Semi-...

Owner's Manual
Page 59
... can be altered, Tip: Cut open all buttonholes with a belt punch or awl. 5:5 The keyhole buttonhole can also place the last bartack manually, even after you have stitched the Àrst bartack. It is the same length as the right side of the buttonhole. Always sew the...foot. Warning: The keyhole buttonhole must be sewn fully automatically, semi-automatically and manually. Open the curve of your garment/project. This indicates a manual Ànish of the buttonhole ends, the machine will be Ànished manually, by pressing the "reverse sewing" button (16) at the end of ...
... can be altered, Tip: Cut open all buttonholes with a belt punch or awl. 5:5 The keyhole buttonhole can also place the last bartack manually, even after you have stitched the Àrst bartack. It is the same length as the right side of the buttonhole. Always sew the...foot. Warning: The keyhole buttonhole must be sewn fully automatically, semi-automatically and manually. Open the curve of your garment/project. This indicates a manual Ànish of the buttonhole ends, the machine will be Ànished manually, by pressing the "reverse sewing" button (16) at the end of ...

Owner's Manual
Page 69
...this technique. Try creating Áowers and leaves with a center needle position. • Set stitch length to 0 mm. A B C A B Manual change/ Irregular pattern • Place stabilizer under fabric. • Set needle thread tension to 0.2 - 0.3 mm. Pressing the "Pattern mirror button"... again to 0.2 - 0.3 mm. • Using -/+ button A increase and reduce the width while sewing. Decorative sewing/Specialty techniques Manual change/ Regular pattern • Place stabilizer under fabric. • Set needle thread tension to left needle position, the stitch width only...
...this technique. Try creating Áowers and leaves with a center needle position. • Set stitch length to 0 mm. A B C A B Manual change/ Irregular pattern • Place stabilizer under fabric. • Set needle thread tension to 0.2 - 0.3 mm. Pressing the "Pattern mirror button"... again to 0.2 - 0.3 mm. • Using -/+ button A increase and reduce the width while sewing. Decorative sewing/Specialty techniques Manual change/ Regular pattern • Place stabilizer under fabric. • Set needle thread tension to left needle position, the stitch width only...
Owner's Manual
Page 84
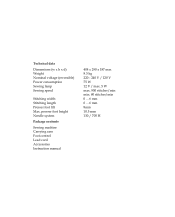
Technical data Dimensions (w x h x d) Weight Nominal voltage (reversible) Power consumption Sewing lamp Sewing speed Stitching width Stitching length Presser foot lift Max. presser foot height Needle system Package contents Sewing machine Carrying case Foot control Lead cord Accessories Instruction manual 408 x 290 x 187 mm 8.3 kg 220 - 240 V / 120 V 75 W 12 V / max. 5 W max. 950 stitches/min min. 80 stitches/min 0 ... 6 mm 0 ... 6 mm 8mm 10.5 mm 130 / 705 H
Technical data Dimensions (w x h x d) Weight Nominal voltage (reversible) Power consumption Sewing lamp Sewing speed Stitching width Stitching length Presser foot lift Max. presser foot height Needle system Package contents Sewing machine Carrying case Foot control Lead cord Accessories Instruction manual 408 x 290 x 187 mm 8.3 kg 220 - 240 V / 120 V 75 W 12 V / max. 5 W max. 950 stitches/min min. 80 stitches/min 0 ... 6 mm 0 ... 6 mm 8mm 10.5 mm 130 / 705 H


