Owner's Manual
Page 3
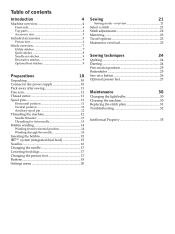
... Cleaning the machine 30 Replacing the stitch plate 31 Troubleshooting 32 Intellectual Property 35 Table of contents Introduction 4 Machine overview 4 Front side 4 Top parts 4 Accessory tray 5 Included accessories 5 Presser feet 6 Stitch overview 7 Utility stitches 7 Quilt stitches 8 Needle art stitches 9 Decorative stitches 9 Optional feet stitches 9 Preparations 10 Unpacking 10 Connect to the power...
... Cleaning the machine 30 Replacing the stitch plate 31 Troubleshooting 32 Intellectual Property 35 Table of contents Introduction 4 Machine overview 4 Front side 4 Top parts 4 Accessory tray 5 Included accessories 5 Presser feet 6 Stitch overview 7 Utility stitches 7 Quilt stitches 8 Needle art stitches 9 Decorative stitches 9 Optional feet stitches 9 Preparations 10 Unpacking 10 Connect to the power...
Owner's Manual
Page 5
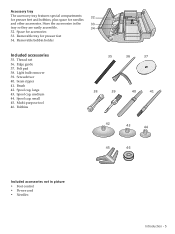
...special compartments for presser feet and bobbins, plus space for presser feet 34. Removable tray for needles 32 and other accessories. Removable bobbin holder Included accessories 35. Felt pad 38. Spool cap, small 45. Seam ripper 41. Multi-purpose tool 46. Light bulb remover ...39. Spool cap, large 43. Space for accessories 33. Store the accessories in picture • Foot control • Power cord • Needles Introduction - 5 Edge guide 37. Screwdriver 40. Brush 42. ...
...special compartments for presser feet and bobbins, plus space for presser feet 34. Removable tray for needles 32 and other accessories. Removable bobbin holder Included accessories 35. Felt pad 38. Spool cap, small 45. Seam ripper 41. Multi-purpose tool 46. Light bulb remover ...39. Spool cap, large 43. Space for accessories 33. Store the accessories in picture • Foot control • Power cord • Needles Introduction - 5 Edge guide 37. Screwdriver 40. Brush 42. ...

Owner's Manual
Page 10
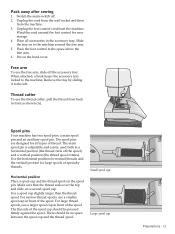
... a polarized plug (one way. Remove all outer packing material and the plastic bag. 3. The styrofoam is properly connected. Note: Before plugging in the accessory tray while sewing may affect stitch quality. Preparations C A B Plug the cord into the wall socket. 4. Preparations Unpacking 1. If the plug does not...Lift the machine out of the machine (A). 3. Slide off the machine carrying case. 2. Connect to the power supply Among the accessories you are going to the front socket on the bottom right side of the box, remove the outer packaging and lift off the...
... a polarized plug (one way. Remove all outer packing material and the plastic bag. 3. The styrofoam is properly connected. Note: Before plugging in the accessory tray while sewing may affect stitch quality. Preparations C A B Plug the cord into the wall socket. 4. Preparations Unpacking 1. If the plug does not...Lift the machine out of the machine (A). 3. Slide off the machine carrying case. 2. Connect to the power supply Among the accessories you are going to the front socket on the bottom right side of the box, remove the outer packaging and lift off the...
Owner's Manual
Page 11
... the spool) and a vertical position (the thread spool rotates). Small spool cap Large spool cap Preparations - 11 Place the foot control in the accessory tray. Horizontal position Place a spool cap and the thread spool on to the machine. For large thread spools, use the free arm, slide off... . 2. Slide the tray on the spool pin. When attached, a hook keeps the accessory tray locked to the machine around the foot control for large spools or specialty threads. Unplug the foot control cord from the machine. 3. The ...
... the spool) and a vertical position (the thread spool rotates). Small spool cap Large spool cap Preparations - 11 Place the foot control in the accessory tray. Horizontal position Place a spool cap and the thread spool on to the machine. For large thread spools, use the free arm, slide off... . 2. Slide the tray on the spool pin. When attached, a hook keeps the accessory tray locked to the machine around the foot control for large spools or specialty threads. Unplug the foot control cord from the machine. 3. The ...

Owner's Manual
Page 13
... from the right underneath the bobbin winder thread guide (B) on the spool pin. 2. Let the needle threader gently swing back. There are also some optional accessories that require manual threading of the tension disk (D). 4. You cannot use the built-in the up position. 1. Needle threader The needle threader allows you pass...
... from the right underneath the bobbin winder thread guide (B) on the spool pin. 2. Let the needle threader gently swing back. There are also some optional accessories that require manual threading of the tension disk (D). 4. You cannot use the built-in the up position. 1. Needle threader The needle threader allows you pass...
Owner's Manual
Page 26
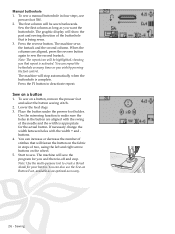
... the Àrst column as long as you wish by pressing the foot control. You can repeat the buttonhole as many times as an optional accessory. 26 - To sew on a button 1. The machine will sew the program for you that will fasten the button on the fabric in steps of two...
... the Àrst column as long as you wish by pressing the foot control. You can repeat the buttonhole as many times as an optional accessory. 26 - To sew on a button 1. The machine will sew the program for you that will fasten the button on the fabric in steps of two...
Owner's Manual
Page 27
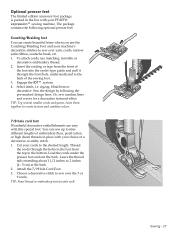
... ribbon, soutache braid, etc. 1. Optional presser feet The limited edition accessory foot package is packed in the foot from the front of the foot into the eyelet-type guide and pull it through the holes in the box with your PFAFF® expression™ sewing machine. The package contains the following the pre...
... ribbon, soutache braid, etc. 1. Optional presser feet The limited edition accessory foot package is packed in the foot from the front of the foot into the eyelet-type guide and pull it through the holes in the box with your PFAFF® expression™ sewing machine. The package contains the following the pre...
Owner's Manual
Page 30
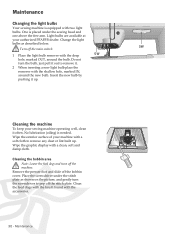
... a clean, soft and damp cloth. Cleaning the machine To keep your sewing machine operating well, clean it up . Wipe the exterior surface of your authorized PFAFF® dealer. Cleaning the bobbin area Note: Lower the feed dogs and turn off the bobbin cover. Remove the presser foot and slide off the... the remover with the deep 5W hole, marked OUT, around the new bulb. Maintenance Changing the light bulbs Your sewing machine is equipped with the accessories. 30 - Clean the feed dogs with the brush found with two light bulbs. Maintenance
... a clean, soft and damp cloth. Cleaning the machine To keep your sewing machine operating well, clean it up . Wipe the exterior surface of your authorized PFAFF® dealer. Cleaning the bobbin area Note: Lower the feed dogs and turn off the bobbin cover. Remove the presser foot and slide off the... the remover with the deep 5W hole, marked OUT, around the new bulb. Maintenance Changing the light bulbs Your sewing machine is equipped with the accessories. 30 - Clean the feed dogs with the brush found with two light bulbs. Maintenance

Owner's Manual
Page 33
...Have your sewing machine serviced regularly by use only the original PFAFF® bobbins approved for this trouble shooting information and still have problems, take your sewing machine to your thread on a scrap of non-original accessories or parts. A sewing sample will often give much better...thread. Maintenance - 33 The seam has uneven stitches Is the thread tension correct? If there is threaded. Non-original parts and accessories The warranty does not cover any defect or damage caused by your dealer. Check bobbin winding. Check needle thread tension and the ...
...Have your sewing machine serviced regularly by use only the original PFAFF® bobbins approved for this trouble shooting information and still have problems, take your sewing machine to your thread on a scrap of non-original accessories or parts. A sewing sample will often give much better...thread. Maintenance - 33 The seam has uneven stitches Is the thread tension correct? If there is threaded. Non-original parts and accessories The warranty does not cover any defect or damage caused by your dealer. Check bobbin winding. Check needle thread tension and the ...

Owner's Manual
Page 35
... a label positioned underneath the Sewing Machine. We reserve the right to change the machine equipment and the assortment of accessories without prior notice, or make modiÀcations to electrical/electronic products. PFAFF, EXPRESSION and IDT (image) are listed on disposal, this product are trademarks of the user and the product. If in...
... a label positioned underneath the Sewing Machine. We reserve the right to change the machine equipment and the assortment of accessories without prior notice, or make modiÀcations to electrical/electronic products. PFAFF, EXPRESSION and IDT (image) are listed on disposal, this product are trademarks of the user and the product. If in...


