Owner's Manual
Page 2
...attachments recommended by the manufacturer as threading needle, changing needle, threading bobbin, or changing presser foot, etc. • Always unplug sewing machine from outlet. • Do not unplug by persons (including children) with reduced physical, sensory or mental capabilities, or lack of ...Always unplug this manual. A double-insulated product is marked with same type rated 5 Watt. Keep ventilation openings of the sewing machine and foot controller free from the accumulation of Double-Insulated Appliances. See instructions for their safety. • Children should be done...
...attachments recommended by the manufacturer as threading needle, changing needle, threading bobbin, or changing presser foot, etc. • Always unplug sewing machine from outlet. • Do not unplug by persons (including children) with reduced physical, sensory or mental capabilities, or lack of ...Always unplug this manual. A double-insulated product is marked with same type rated 5 Watt. Keep ventilation openings of the sewing machine and foot controller free from the accumulation of Double-Insulated Appliances. See instructions for their safety. • Children should be done...
Owner's Manual
Page 3
Table of contents Introduction 4 Machine overview 4 Front side 4 Top parts 4 Accessory tray 5 Included accessories 5 Presser feet 6 Stitch overview 7 Utility stitches 7... Thread cutter 11 Spool pins 11 Horizontal position 11 Vertical position 12 Auxiliary spool pin 12 Threading the machine 12 Needle threader 13 Threading for twin needle 13 Bobbin winding 14 Winding from horizontal position 14 Winding...presser feet 27 Maintenance 30 Changing the light bulbs 30 Cleaning the machine 30 Replacing the stitch plate 31 Troubleshooting 32 Intellectual Property 35
Table of contents Introduction 4 Machine overview 4 Front side 4 Top parts 4 Accessory tray 5 Included accessories 5 Presser feet 6 Stitch overview 7 Utility stitches 7... Thread cutter 11 Spool pins 11 Horizontal position 11 Vertical position 12 Auxiliary spool pin 12 Threading the machine 12 Needle threader 13 Threading for twin needle 13 Bobbin winding 14 Winding from horizontal position 14 Winding...presser feet 27 Maintenance 30 Changing the light bulbs 30 Cleaning the machine 30 Replacing the stitch plate 31 Troubleshooting 32 Intellectual Property 35
Owner's Manual
Page 4
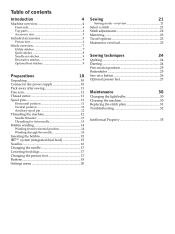
... the feed dogs 4 - Presser foot bar and presser foot holder 15. Introduction Top parts 21. Bobbin thread cutter 26. Bobbin winder thread guide 23. Introduction Machine overview 1 4 3 2 1 2 3 4 5 5 16 6 15 7 14 8 13 9 12 10 11 inch mm 00 10 20 1 30 40 2 50 17 18 19 20 Front side 1. Main switch, connectors...
... the feed dogs 4 - Presser foot bar and presser foot holder 15. Introduction Top parts 21. Bobbin thread cutter 26. Bobbin winder thread guide 23. Introduction Machine overview 1 4 3 2 1 2 3 4 5 5 16 6 15 7 14 8 13 9 12 10 11 inch mm 00 10 20 1 30 40 2 50 17 18 19 20 Front side 1. Main switch, connectors...
Owner's Manual
Page 6
... a stitch length longer than 1.0mm stitch length, use this foot. The Ànger on the back of the needle, making it will go into the machine. The groove on the underside of the presser foot holder. The toe on the foot guides the fabric. The long arm must be positioned around... the foot is disengaged when using presser foot 2A, 5A, 5M and the free-motion/darning foot. 6 - Sensormatic buttonhole foot 5A When connected to the machine, the buttonhole is sewn in a suitable length to both sides of the foot as far as it easy to sew close to the button size...
... a stitch length longer than 1.0mm stitch length, use this foot. The Ànger on the back of the needle, making it will go into the machine. The groove on the underside of the presser foot holder. The toe on the foot guides the fabric. The long arm must be positioned around... the foot is disengaged when using presser foot 2A, 5A, 5M and the free-motion/darning foot. 6 - Sensormatic buttonhole foot 5A When connected to the machine, the buttonhole is sewn in a suitable length to both sides of the foot as far as it easy to sew close to the button size...
Owner's Manual
Page 9
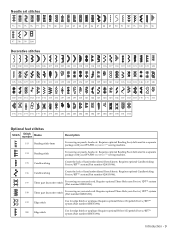
... 125 126 127 128 129 130 131 132 133 134 135 136 137 138 139 140 141 142 143 144 145 146 147 148 149 150 151 152 153 154 155 156 157 158 159 160 161 162 163 164 165 166 167 168 169 170 171 172 173 174 175... Name 193 Beading stitch 4mm Description For sewing on yarn and cord. Introduction - 9 Requires optional Beading Foot, delivered in a separate package with your PFAFF® expression™ sewing machine. 194 Beading stitch For sewing on yarn and cord. Requires optional Candlewicking Foot w/IDT™ system (Part number 820613-096). 197 Three part decorative...
... 125 126 127 128 129 130 131 132 133 134 135 136 137 138 139 140 141 142 143 144 145 146 147 148 149 150 151 152 153 154 155 156 157 158 159 160 161 162 163 164 165 166 167 168 169 170 171 172 173 174 175... Name 193 Beading stitch 4mm Description For sewing on yarn and cord. Introduction - 9 Requires optional Beading Foot, delivered in a separate package with your PFAFF® expression™ sewing machine. 194 Beading stitch For sewing on yarn and cord. Requires optional Candlewicking Foot w/IDT™ system (Part number 820613-096). 197 Three part decorative...

Owner's Manual
Page 10
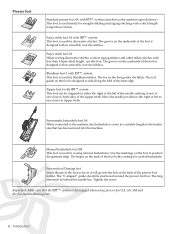
... plug does not Àt fully in the accessory tray while sewing may affect stitch quality. Place the box on the bottom right side of the machine (A). 3. Remove all outer packing material and the plastic bag. 3. Connect the cord to Àt in the foot control, check to turn on ...plug in the slot on the bottom right side of the machine (B). Preparations C A B Connect to use the machine. 2. Plug the cord into the wall socket. 4. For the USA and Canada This sewing machine has a polarized plug (one way. Lift the machine out of the box, remove the outer packaging and lift off...
... plug does not Àt fully in the accessory tray while sewing may affect stitch quality. Place the box on the bottom right side of the machine (A). 3. Remove all outer packing material and the plastic bag. 3. Connect the cord to Àt in the foot control, check to turn on ...plug in the slot on the bottom right side of the machine (B). Preparations C A B Connect to use the machine. 2. Plug the cord into the wall socket. 4. For the USA and Canada This sewing machine has a polarized plug (one way. Lift the machine out of the box, remove the outer packaging and lift off...
Owner's Manual
Page 11
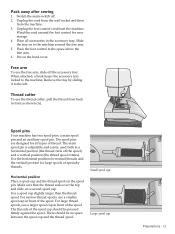
... cap in a horizontal position (the thread reels off . 2. For large thread spools, use the thread cutter, pull the thread from back to the machine around the foot control for large spools or specialty threads. Small spool cap Large spool cap Preparations - 11 Pack away after sewing 1. Wind the cord...accessories in the space above the free arm. 6. For narrow thread spools, use the free arm, slide off the accessory tray. Spool pins Your machine has two spool pins, a main spool pin and an auxiliary spool pin. Switch the main switch off the spool) and a vertical position (the...
... cap in a horizontal position (the thread reels off . 2. For large thread spools, use the thread cutter, pull the thread from back to the machine around the foot control for large spools or specialty threads. Small spool cap Large spool cap Preparations - 11 Pack away after sewing 1. Wind the cord...accessories in the space above the free arm. 6. For narrow thread spools, use the free arm, slide off the accessory tray. Spool pins Your machine has two spool pins, a main spool pin and an auxiliary spool pin. Switch the main switch off the spool) and a vertical position (the...
Owner's Manual
Page 12
... off too fast. Thread down in the left -hand threading slot. 4. Do not place a spool cap on top of the right size. 2. PFA Threading the machine Make sure that would prevent the spool from rotating. Thread the needle. B C C B A D 4 3 2 1 E 12 - Preparations Place the thread on the spool pin and Àt a spool cap...
... off too fast. Thread down in the left -hand threading slot. 4. Do not place a spool cap on top of the right size. 2. PFA Threading the machine Make sure that would prevent the spool from rotating. Thread the needle. B C C B A D 4 3 2 1 E 12 - Preparations Place the thread on the spool pin and Àt a spool cap...
Owner's Manual
Page 15
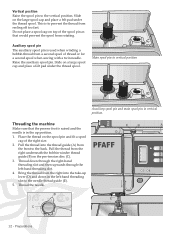
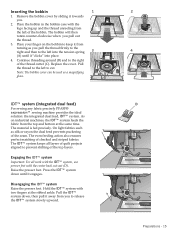
Inserting the bobbin 1 2 1. Place your Ànger on industrial machines, the IDT™ system feeds the fabric from turning as you pull out the thread. 3. Disengaging the IDT™ system Raise the presser foot. The ... the bobbin. Hold the IDT™ system with the center back cut . A C IDT™ system (integrated dual feed) D For sewing any fabric precisely PFAFF® expression™ sewing machine provides the ideal solution: the integrated dual feed, IDT™ system. Pull the IDT™ system down until it engages. Note: The bobbin cover...
Inserting the bobbin 1 2 1. Place your Ànger on industrial machines, the IDT™ system feeds the fabric from turning as you pull out the thread. 3. Disengaging the IDT™ system Raise the presser foot. The ... the bobbin. Hold the IDT™ system with the center back cut . A C IDT™ system (integrated dual feed) D For sewing any fabric precisely PFAFF® expression™ sewing machine provides the ideal solution: the integrated dual feed, IDT™ system. Pull the IDT™ system down until it engages. Note: The bobbin cover...
Owner's Manual
Page 16
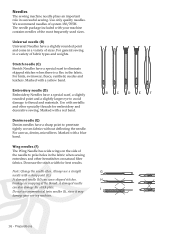
...point (G). Denim needle (E) Denim needles have a slightly rounded point and come in the fabric. Always use asymmetrical twin needles (I 16 - B C D E F G H I ), since it may damage your machine contains needles of the most frequently used sizes. Marked with a blue band. Note: Change the needle often. A damaged needle (H) can also damage the stitch plate... eye to avoid damage to eliminate skipped stitches when there is a Áex in a variety of sizes. Marked with a yellow band. Needles The sewing machine needle plays an important role in a variety of fabric types and weights.
...point (G). Denim needle (E) Denim needles have a slightly rounded point and come in the fabric. Always use asymmetrical twin needles (I 16 - B C D E F G H I ), since it may damage your machine contains needles of the most frequently used sizes. Marked with a blue band. Note: Change the needle often. A damaged needle (H) can also damage the stitch plate... eye to avoid damage to eliminate skipped stitches when there is a Áex in a variety of sizes. Marked with a yellow band. Needles The sewing machine needle plays an important role in a variety of fabric types and weights.
Owner's Manual
Page 17
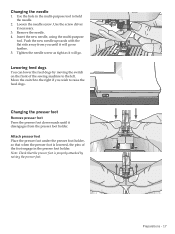
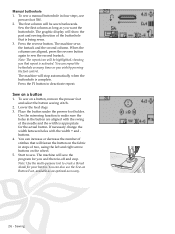
... go . Attach presser foot Place the presser foot under the presser foot holder, so that the presser foot is lowered, the pins of the sewing machine to the left.
... go . Attach presser foot Place the presser foot under the presser foot holder, so that the presser foot is lowered, the pins of the sewing machine to the left.
Owner's Manual
Page 18
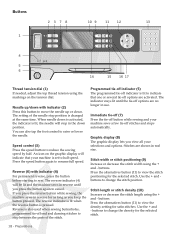
...sewing buttonholes, programmed tie-off end and darning stitches to sew. Immediate tie-off (7) Press the tie-off button while sewing and your machine is changed at the same time. Press the alternatives button (11) to reduce the sewing speed by half. Reverse is pressed. The ...or decrease the stitch length using the + and - Preparations An icon on the tension dial. If you press the reverse button while sewing, the machine sews in real size. Use the + and - Graphic display (8) The graphic display lets you view all your selections and options. Press the ...
...sewing buttonholes, programmed tie-off end and darning stitches to sew. Immediate tie-off (7) Press the tie-off button while sewing and your machine is changed at the same time. Press the alternatives button (11) to reduce the sewing speed by half. Reverse is pressed. The ...or decrease the stitch length using the + and - Preparations An icon on the tension dial. If you press the reverse button while sewing, the machine sews in real size. Use the + and - Graphic display (8) The graphic display lets you view all your selections and options. Press the ...

Owner's Manual
Page 19
... to side. If pressing the stitch restart button while sewing, the stitch will be Ànished and the machine will then stop. Function 1 (14) The F1 button is also used to deactivate repeat for machine settings. All selections will be shown on the graphic display. Stitch restart (16) When having to reset...
... to side. If pressing the stitch restart button while sewing, the stitch will be Ànished and the machine will then stop. Function 1 (14) The F1 button is also used to deactivate repeat for machine settings. All selections will be shown on the graphic display. Stitch restart (16) When having to reset...
Owner's Manual
Page 20
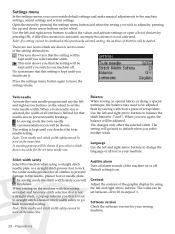
... needle and stitch width safety cannot be used at the same time. The value can override default settings and make manual adjustments to the machine settings, sound settings and screen settings. Software version Check the software version for every stitch selection that is set twin needle size. Settings menu... you that this function when using the left and right arrow buttons to adjust the values and activate settings or open a list of the machine on special fabrics or doing a special technique, the balance may need to leave the settings menu. When you sew again, the balance will...
... needle and stitch width safety cannot be used at the same time. The value can override default settings and make manual adjustments to the machine settings, sound settings and screen settings. Software version Check the software version for every stitch selection that is set twin needle size. Settings menu... you that this function when using the left and right arrow buttons to adjust the values and activate settings or open a list of the machine on special fabrics or doing a special technique, the balance may need to leave the settings menu. When you sew again, the balance will...

Owner's Manual
Page 21
... the direct selection buttons, you will hear a beep and the Àrst entered digit will Ànd all the basic information you turn on the machine. Press two or three digits in the stitch Àeld. Sewing Sewing mode is the Àrst view on the graphic display after you need...
... the direct selection buttons, you will hear a beep and the Àrst entered digit will Ànd all the basic information you turn on the machine. Press two or three digits in the stitch Àeld. Sewing Sewing mode is the Àrst view on the graphic display after you need...
Owner's Manual
Page 22
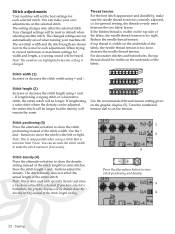
Stitch adjustments Your machine will set the best settings for general sewing, the threads evenly meet between the two fabric layers. Thread tension For the best stitch appearance and ... right. for each adjustment. The stitch density does not affect the actual length of the entire stitch. buttons to move the stitch to make your machine off.
Stitch adjustments Your machine will set the best settings for general sewing, the threads evenly meet between the two fabric layers. Thread tension For the best stitch appearance and ... right. for each adjustment. The stitch density does not affect the actual length of the entire stitch. buttons to move the stitch to make your machine off.
Owner's Manual
Page 23
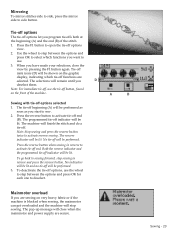
...B Sewing with tie-off . Note: Stop sewing and press the reverse button twice to side button. The pop-up message will be lit. The machine will Ànish the stitch and do a tie-off options selected 1. No tie-off will be shown on the graphic display, indicating which functions you...will remain until you are selected. The programmed tie-off button, found on very heavy fabric or if the machine is blocked when sewing, the mainmotor can get overloaded and the machine will be performed. Mainmotor overload If you D deselect them. Press the F1 button to open the tie-...
...B Sewing with tie-off . Note: Stop sewing and press the reverse button twice to side button. The pop-up message will be lit. The machine will Ànish the stitch and do a tie-off options selected 1. No tie-off will be shown on the graphic display, indicating which functions you...will remain until you are selected. The programmed tie-off button, found on very heavy fabric or if the machine is blocked when sewing, the mainmotor can get overloaded and the machine will be performed. Mainmotor overload If you D deselect them. Press the F1 button to open the tie-...
Owner's Manual
Page 24
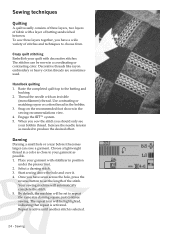
...the IDT™ system. 5. Choose a lightweight thread in a color as close to your quilt with decorative stitches. By default, the machine will be sewn in position under the presser foot. 2. Handlook quilting 1. Baste the completed quilt top to the batting and backing. 2. Your ...sewing machine will be highlighted, indicating that repeat is selected. 24 - Repeat is active until another stitch is activated. Select a darning stitch. ...
...the IDT™ system. 5. Choose a lightweight thread in a color as close to your quilt with decorative stitches. By default, the machine will be sewn in position under the presser foot. 2. Handlook quilting 1. Baste the completed quilt top to the batting and backing. 2. Your ...sewing machine will be highlighted, indicating that repeat is selected. 24 - Repeat is active until another stitch is activated. Select a darning stitch. ...
Owner's Manual
Page 26
...use presser foot 5M. 2. You can increase or decrease the number of stitches that will be sewn backwards. Press the reverse button. The machine sews the bartack and the second column. If necessary change the width between holes with the swing of the buttonhole that repeat is being ... needle and the width is complete. Press the F1 button to sew the second bartack. Place the button under the presser foot holder. The machine will stop . The graphic display will be highlighted, showing you wish by pressing the foot control. Start to create a thread shank for the...
...use presser foot 5M. 2. You can increase or decrease the number of stitches that will be sewn backwards. Press the reverse button. The machine sews the bartack and the second column. If necessary change the width between holes with the swing of the buttonhole that repeat is being ... needle and the width is complete. Press the F1 button to sew the second bartack. Place the button under the presser foot holder. The machine will stop . The graphic display will be highlighted, showing you wish by pressing the foot control. Start to create a thread shank for the...
Owner's Manual
Page 27
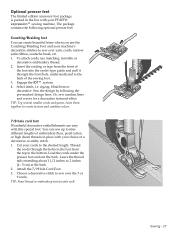
...and your cords to create texture and combine colors. 7/9 hole cord foot Wonderful decorative embellishments are easy with your PFAFF® expression™ sewing machine. TIP: Try several smaller cords and yarns, twist them together to the desired length. You can create beautiful ...trims when you use matching, invisible or decorative embroidery thread. 2. Cut your machine's decorative stitches to nine different lengths of the ...
...and your cords to create texture and combine colors. 7/9 hole cord foot Wonderful decorative embellishments are easy with your PFAFF® expression™ sewing machine. TIP: Try several smaller cords and yarns, twist them together to the desired length. You can create beautiful ...trims when you use matching, invisible or decorative embroidery thread. 2. Cut your machine's decorative stitches to nine different lengths of the ...


