Owner's Manual
Page 3
...stitches 9 Decorative stitches 9 Optional feet stitches 9 Preparations 10 Unpacking 10 Connect to the power supply 10 Pack away after sewing 11 Free arm 11 Thread cutter 11 Spool pins 11 Horizontal position 11 Vertical position 12 Auxiliary spool pin 12 Threading the machine 12 Needle ...system (integrated dual feed 15 Needles 16 Changing the needle 17 Lowering feed dogs 17 Changing the presser foot 17 Buttons 18 Settings menu 20 Sewing 21 Sewing mode - overview 21 Select a stitch 21 Stitch adjustments 22 Mirroring 23 Tie-off options 23 Mainmotor...
...stitches 9 Decorative stitches 9 Optional feet stitches 9 Preparations 10 Unpacking 10 Connect to the power supply 10 Pack away after sewing 11 Free arm 11 Thread cutter 11 Spool pins 11 Horizontal position 11 Vertical position 12 Auxiliary spool pin 12 Threading the machine 12 Needle ...system (integrated dual feed 15 Needles 16 Changing the needle 17 Lowering feed dogs 17 Changing the presser foot 17 Buttons 18 Settings menu 20 Sewing 21 Sewing mode - overview 21 Select a stitch 21 Stitch adjustments 22 Mirroring 23 Tie-off options 23 Mainmotor...
Owner's Manual
Page 25
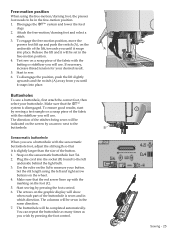
... lift, towards you sew a buttonhole with the marking on the wheel. 4. Plug the cord into place. Free-motion position When using the left underside behind the light bulb. 3. Disengage the IDT™ system and lower...ruler on the underside of the stitches being sewn will be in the free-motion position. 4. Set the slit length using the free-motion/darning foot, the presser foot needs to be sewn in which direction.... The columns will be set in the free-motion position. 1. Make sure that the red arrow lines up and push the...
... lift, towards you sew a buttonhole with the marking on the wheel. 4. Plug the cord into place. Free-motion position When using the left underside behind the light bulb. 3. Disengage the IDT™ system and lower...ruler on the underside of the stitches being sewn will be in the free-motion position. 4. Set the slit length using the free-motion/darning foot, the presser foot needs to be sewn in which direction.... The columns will be set in the free-motion position. 1. Make sure that the red arrow lines up and push the...


