Owner's Manual
Page 3
... deÀnitely enable you have acquired one of sewing and embroidery. Before you to transform all your creative ideas into reality using the most advanced and comprehensive sewing and embroidery machines in the world; Congratulations! As a sewing enthusiast, you to advise you at any time. Your PFAFF® creative vision™ will enable you start, please spend some time...
... deÀnitely enable you have acquired one of sewing and embroidery. Before you to transform all your creative ideas into reality using the most advanced and comprehensive sewing and embroidery machines in the world; Congratulations! As a sewing enthusiast, you to advise you at any time. Your PFAFF® creative vision™ will enable you start, please spend some time...
Owner's Manual
Page 4
... 4:4 Save options 4:4 Tie-off options 4:5 Speed control 4:6 Sewing programs 4:6 Balance 4:8 Mirroring 4:8 Zoom to update your machine 2:14 Buttons and icons 2:15 3 PFAFF® HD screen 3:1 Task bar 3:2 Use the task bar 3:3 Common icons 3:3 Selection menu 3:4 Embroidery edit 3:5 Embroidery text editor 3:6 Embroidery stitch-out 3:6 Sequencing 3:7 Stitch Creator 3:7 Settings menu 3:8 Machine settings 3:8 Sound settings 3:11 Screen and light settings...
... 4:4 Save options 4:4 Tie-off options 4:5 Speed control 4:6 Sewing programs 4:6 Balance 4:8 Mirroring 4:8 Zoom to update your machine 2:14 Buttons and icons 2:15 3 PFAFF® HD screen 3:1 Task bar 3:2 Use the task bar 3:3 Common icons 3:3 Selection menu 3:4 Embroidery edit 3:5 Embroidery text editor 3:6 Embroidery stitch-out 3:6 Sequencing 3:7 Stitch Creator 3:7 Settings menu 3:8 Machine settings 3:8 Sound settings 3:11 Screen and light settings...
Owner's Manual
Page 6
stitch-out 9:1 To enter embroidery stitch-out 9:2 Embroidery stitch-out - If you suspect that your sewing machine. overview 9:2 Crosshair 9:3 Color list 9:3 Zoom 9:3 Embroidery information 9:4 Current stitch 9:4 Go to avoid the discoloring. overview File formats Browse Files & Folders Organize Common Files & Folders pop-ups 10:1 10:2 10:2 10:3 10:6 10:7 11 Maintenance Cleaning the machine Troubleshooting Index Intellectual...
stitch-out 9:1 To enter embroidery stitch-out 9:2 Embroidery stitch-out - If you suspect that your sewing machine. overview 9:2 Crosshair 9:3 Color list 9:3 Zoom 9:3 Embroidery information 9:4 Current stitch 9:4 Go to avoid the discoloring. overview File formats Browse Files & Folders Organize Common Files & Folders pop-ups 10:1 10:2 10:2 10:3 10:6 10:7 11 Maintenance Cleaning the machine Troubleshooting Index Intellectual...
Owner's Manual
Page 11
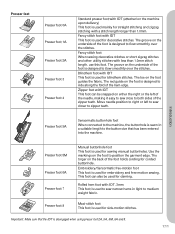
... of the hem edge. Presser foot 5M Presser foot 6A Presser foot 7 Presser foot 8 Manual buttonhole foot This foot is used for embroidery and free-motion sewing. This foot can be used for side-motion stitches. Use the markings on the foot to ride along the fold of the zipper teeth... teeth. Presser feet Presser foot 0A Presser foot 1A Presser foot 2A Presser foot 3 Presser foot 4 Standard presser foot with IDT (attached on the machine upon delivery) This foot is used mainly for blindhem stitches. Maxi-stitch foot This foot is disengaged when using presser foot 2A, 5A, 5M, 6A...
... of the hem edge. Presser foot 5M Presser foot 6A Presser foot 7 Presser foot 8 Manual buttonhole foot This foot is used for embroidery and free-motion sewing. This foot can be used for side-motion stitches. Use the markings on the foot to ride along the fold of the zipper teeth... teeth. Presser feet Presser foot 0A Presser foot 1A Presser foot 2A Presser foot 3 Presser foot 4 Standard presser foot with IDT (attached on the machine upon delivery) This foot is used mainly for blindhem stitches. Maxi-stitch foot This foot is disengaged when using presser foot 2A, 5A, 5M, 6A...
Owner's Manual
Page 29
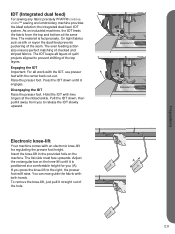
...of quilt projects aligned to the right, the presser foot will raise. Insert the knee-lift in the provided hole on industrial machines, the IDT feeds the fabric from you press the knee-lift to prevent shifting of checked and striped fabrics. The material is... at side must face upwards. Hold the IDT with the center back cut-out. As on the machine. IDT (Integrated dual feed) For sewing any fabric precisely PFAFF® creative vision™ sewing and embroidery machine provides the ideal solution: the integrated dual feed, IDT system. Disengaging the IDT Raise the presser foot...
...of quilt projects aligned to the right, the presser foot will raise. Insert the knee-lift in the provided hole on industrial machines, the IDT feeds the fabric from you press the knee-lift to prevent shifting of checked and striped fabrics. The material is... at side must face upwards. Hold the IDT with the center back cut-out. As on the machine. IDT (Integrated dual feed) For sewing any fabric precisely PFAFF® creative vision™ sewing and embroidery machine provides the ideal solution: the integrated dual feed, IDT system. Disengaging the IDT Raise the presser foot...
Owner's Manual
Page 30
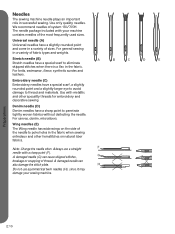
... damage the stitch plate. The needle package included with a sharp point (F). A B C D E Embroidery needle (C) Embroidery needles have a sharp point to thread and materials. Always use asymmetrical twin needles (H), since it may damage your machine contains needles of system 130/705H. Needles The sewing machine needle plays an important role in a variety of fabric types and weights...
... damage the stitch plate. The needle package included with a sharp point (F). A B C D E Embroidery needle (C) Embroidery needles have a sharp point to thread and materials. Always use asymmetrical twin needles (H), since it may damage your machine contains needles of system 130/705H. Needles The sewing machine needle plays an important role in a variety of fabric types and weights...
Owner's Manual
Page 32
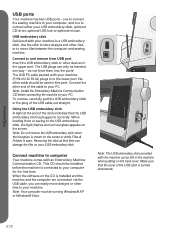
... in to connect either your PC. The USB PC cable packed with your machine (P/N:412 62 59-04) plugs in correctly. Note: Install the Embroidery Machine Communication CD before the machine is open. Preparations 2:12 one to connect the sewing machine to your machine. do not force them into the ports! Removing the stick at the end...
... in to connect either your PC. The USB PC cable packed with your machine (P/N:412 62 59-04) plugs in correctly. Note: Install the Embroidery Machine Communication CD before the machine is open. Preparations 2:12 one to connect the sewing machine to your machine. do not force them into the ports! Removing the stick at the end...

Owner's Manual
Page 33
... sewing and embroidery machine(s) you are logged onto your computer with Step 6 to install hardware drivers. 1. When asked to enter your Installation Code, enter the following User Account Control message appears: 'A program needs your computer. This is recommended to set the Embroidery Machine ...this device software?' Click Finish on the CD. Ensure your embroidery machine is required to use the Send To features in any time. Create an account and enter your PFAFF® creative vision™ embroidery machine from the menu. 4. Browse them in different sizes and print...
... sewing and embroidery machine(s) you are logged onto your computer with Step 6 to install hardware drivers. 1. When asked to enter your Installation Code, enter the following User Account Control message appears: 'A program needs your computer. This is recommended to set the Embroidery Machine ...this device software?' Click Finish on the CD. Ensure your embroidery machine is required to use the Send To features in any time. Create an account and enter your PFAFF® creative vision™ embroidery machine from the menu. 4. Browse them in different sizes and print...
Owner's Manual
Page 35
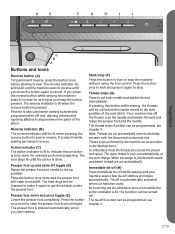
... feed dogs will be lit and the machine sews in reverse for example performing tapering. The presser foot is also used . In embroidery mode the threads are sewn with the Sensormatic buttonhole foot. The upper thread is also lit while sewing permanent reverse. The reverse indicator (B) will...reverse indicator will be lowered to make it again to pivot height. The icon stays lit until you press the reverse button while sewing, the machine sews in reverse until the action is Ànished both needle and bobbin thread immediately. Start/stop . Thread snips (G) Press to...
... feed dogs will be lit and the machine sews in reverse for example performing tapering. The presser foot is also used . In embroidery mode the threads are sewn with the Sensormatic buttonhole foot. The upper thread is also lit while sewing permanent reverse. The reverse indicator (B) will...reverse indicator will be lowered to make it again to pivot height. The icon stays lit until you press the reverse button while sewing, the machine sews in reverse until the action is Ànished both needle and bobbin thread immediately. Start/stop . Thread snips (G) Press to...
Owner's Manual
Page 36
... pressing the stitch restart button while sewing, the stitch will be Ànished and the machine will then stop in the middle of a stitch, press restart to start sewing at the same time. You can also use stitch restart to go back to the beginning of an embroidery. D E F G H I J C B A Stitch restart (I) When having to reset...
... pressing the stitch restart button while sewing, the stitch will be Ànished and the machine will then stop in the middle of a stitch, press restart to start sewing at the same time. You can also use stitch restart to go back to the beginning of an embroidery. D E F G H I J C B A Stitch restart (I) When having to reset...
Owner's Manual
Page 38
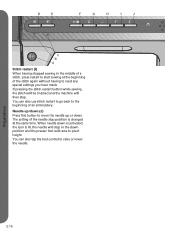
... 6. Main parts The task bar (A) is B connected, the embroidery mode appears. The option bar (B) will be hidden when sewing mode is very easy to work with your stylus or your Ànger tip to use the machine. Pfaff HD screen PFAFF® HD screen Your machine features a PFAFF® HD screen. Start view When turned on which...
... 6. Main parts The task bar (A) is B connected, the embroidery mode appears. The option bar (B) will be hidden when sewing mode is very easy to work with your stylus or your Ànger tip to use the machine. Pfaff HD screen PFAFF® HD screen Your machine features a PFAFF® HD screen. Start view When turned on which...
Owner's Manual
Page 45
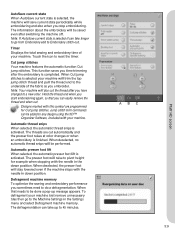
... color changes or when an embroidery is selected your machine Àrst remove unneccesary Àles then go from Embroidery edit to Embroidery stitch-out. When deselected, the presser foot will stay lowered even if the machine stops with the needle in down position. Defragment machine memory To optimize the sewing and embroidery performance you have changed to...
... color changes or when an embroidery is selected your machine Àrst remove unneccesary Àles then go from Embroidery edit to Embroidery stitch-out. When deselected, the presser foot will stay lowered even if the machine stops with the needle in down position. Defragment machine memory To optimize the sewing and embroidery performance you have changed to...
Owner's Manual
Page 46
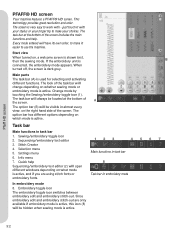
... move freely under the presser foot. Skipped stitches can occur if your local authorized PFAFF® dealer. Note: Make sure that the IDT is disengaged. Spring foot free-motion Activate to set the machine in Sensormatic freemotion mode for presser foot 6A. Note: Make sure that the IDT...set presser foot height in the pop-up for embroidery. Specialty techniques may build up under the presser foot. 3:10 D E F ABC Pop-up . Pfaff HD screen Sensormatic free-motion Activate to set the machine in Spring foot free-motion mode. When sewing free-motion at your fabric moves up and ...
... move freely under the presser foot. Skipped stitches can occur if your local authorized PFAFF® dealer. Note: Make sure that the IDT is disengaged. Spring foot free-motion Activate to set the machine in Sensormatic freemotion mode for presser foot 6A. Note: Make sure that the IDT...set presser foot height in the pop-up for embroidery. Specialty techniques may build up under the presser foot. 3:10 D E F ABC Pop-up . Pfaff HD screen Sensormatic free-motion Activate to set the machine in Spring foot free-motion mode. When sewing free-motion at your fabric moves up and ...
Owner's Manual
Page 70
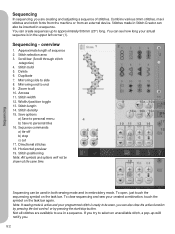
...to end 9. To open, just touch the sequencing symbol on the task bar again. Combine various 9mm stitches, maxi stitches and stitch fonts from the machine or from an external device. You can create sequences up will not be shown at the same time. 1 4 56 78 2 3 9 15a...of stitches. Mirroring end to side 8. Stitch width 12. Horizontal preview 19. Note: If sewing mode is active and your programmed stitch is in the upper left corner (1). You can be inserted in embroidery mode. Zoom to personal Àles 16. Stitch positioning Note: All symbols and options will...
...to end 9. To open, just touch the sequencing symbol on the task bar again. Combine various 9mm stitches, maxi stitches and stitch fonts from the machine or from an external device. You can create sequences up will not be shown at the same time. 1 4 56 78 2 3 9 15a...of stitches. Mirroring end to side 8. Stitch width 12. Horizontal preview 19. Note: If sewing mode is active and your programmed stitch is in the upper left corner (1). You can be inserted in embroidery mode. Zoom to personal Àles 16. Stitch positioning Note: All symbols and options will...
Owner's Manual
Page 72
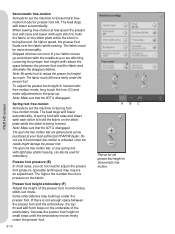
...16a 16b 16c 16 Sequencing 5:4 Use the tie-off command (16a) if you want the machine to stop. These commands will be added into the sequence. The commands can insert tie-offs, stop command... included in the sequence. This is inserted and it also shows where the command will be performed when sewing it. Insert a stop and thread snips commands into the sequence. Insert the thread snips command (16c)... tie-off commands anywhere in between. Note: If creating a sequence in embroidery mode, tie-offs at the end of the sequence if you want to personal Àles (15b).
...16a 16b 16c 16 Sequencing 5:4 Use the tie-off command (16a) if you want the machine to stop. These commands will be added into the sequence. The commands can insert tie-offs, stop command... included in the sequence. This is inserted and it also shows where the command will be performed when sewing it. Insert a stop and thread snips commands into the sequence. Insert the thread snips command (16c)... tie-off commands anywhere in between. Note: If creating a sequence in embroidery mode, tie-offs at the end of the sequence if you want to personal Àles (15b).
Owner's Manual
Page 115
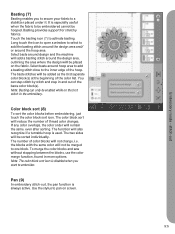
... stitch and step in and out of color blocks will be enabled while on the fabric. Pan (9) In embroidery stitch-out, the pan function is used. Select baste around design and the machine will add a basting stitch around hoop area to add a basting stitch close to pan on screen. 9:5 Note... edge of thread color changes. Basting provides support for stretchy fabrics. To merge the color blocks and sew without stopping between the blocks, use the color merge function, found in the embroidery. The baste stitches will reduce the number of the hoop. If any color overlaps, the color order...
... stitch and step in and out of color blocks will be enabled while on the fabric. Pan (9) In embroidery stitch-out, the pan function is used. Select baste around design and the machine will add a basting stitch around hoop area to add a basting stitch close to pan on screen. 9:5 Note... edge of thread color changes. Basting provides support for stretchy fabrics. To merge the color blocks and sew without stopping between the blocks, use the color merge function, found in the embroidery. The baste stitches will reduce the number of the hoop. If any color overlaps, the color order...
Owner's Manual
Page 122
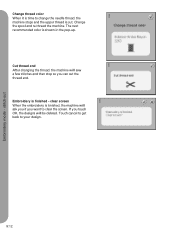
...192;nished, the machine will ask you if you touch OK, the designs will sew a few stitches and then stop so you can cut . Cut thread end After changing the thread, the machine will be deleted. Change the spool and re-thread the machine. clear screen When the embroidery is cut the ...thread end. Embroidery is shown in the pop-up. Embroidery mode - stitch-...
...192;nished, the machine will ask you if you touch OK, the designs will sew a few stitches and then stop so you can cut . Cut thread end After changing the thread, the machine will be deleted. Change the spool and re-thread the machine. clear screen When the embroidery is cut the ...thread end. Embroidery is shown in the pop-up. Embroidery mode - stitch-...
Owner's Manual
Page 124
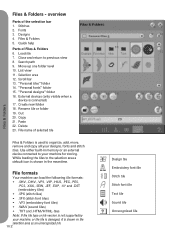
... shown in the 10:2selection area as an unrecognized Àle. File formats Your machine can load the following Àle formats: • .SHV, .DHV, .VP3, .VIP, .HUS, .PEC, .PES, .PCS, .XXX, .SEW, .JEF, .EXP, .10* and .DST (embroidery Àles) • .SPX (stitch Àles) • .SFX (stitch ...font Àles) • .VF3 (embroidery font Àles) • .WAV (sound Àles) • .TXT and .HTM/HTML-Àles...
... shown in the 10:2selection area as an unrecognized Àle. File formats Your machine can load the following Àle formats: • .SHV, .DHV, .VP3, .VIP, .HUS, .PEC, .PES, .PCS, .XXX, .SEW, .JEF, .EXP, .10* and .DST (embroidery Àles) • .SPX (stitch Àles) • .SFX (stitch ...font Àles) • .VF3 (embroidery font Àles) • .WAV (sound Àles) • .TXT and .HTM/HTML-Àles...

Owner's Manual
Page 133
...The needle breaks? The machine will Ànd solutions to the problems you may have with your machine. The PFAFF® HD screen is found in the Settings menu. Calibrate the screen. Calibrate is turned off screen saver in the Settings menu. The sewing and embroidery machine screen and/ or function... buttons do not respond to touch, turn the machine OFF and then ON...
...The needle breaks? The machine will Ànd solutions to the problems you may have with your machine. The PFAFF® HD screen is found in the Settings menu. Calibrate the screen. Calibrate is turned off screen saver in the Settings menu. The sewing and embroidery machine screen and/ or function... buttons do not respond to touch, turn the machine OFF and then ON...
Owner's Manual
Page 136
... Embroidery hoop overview 7:2 Embroidery information 9:4 Embroidery is too complex 8:23 Embroidery edit 3:5, 8:2 Embroidery edit - overview 10:2 Folder structure 10:5 Four direction sewing 4:17 Free arm 2:3 Front side 1:8 Full screen 9:6 G Getting started embroidering 7:5 Go to stitch 9:4 Grid 8:9 Group 8:6 H Handlook quilting 4:15 Hoop position 9:7 Horizontal position 2:4 Horizontal preview 5:5 How to launch the programs 2:14 How to update your machine...
... Embroidery hoop overview 7:2 Embroidery information 9:4 Embroidery is too complex 8:23 Embroidery edit 3:5, 8:2 Embroidery edit - overview 10:2 Folder structure 10:5 Four direction sewing 4:17 Free arm 2:3 Front side 1:8 Full screen 9:6 G Getting started embroidering 7:5 Go to stitch 9:4 Grid 8:9 Group 8:6 H Handlook quilting 4:15 Hoop position 9:7 Horizontal position 2:4 Horizontal preview 5:5 How to launch the programs 2:14 How to update your machine...


