Owner's Manual
Page 4
...Front side 1:8 Rear side 1:9 Top parts 1:9 Accessory tray 1:9 Parts of the embroidery unit 1:10 Included accessories 1:10 Presser feet 1:11 Stitch overview 1:12 Utility stitches 1:12 Decorative stitches 1:16 Alphabets 1:22 2 Preparations 2:1 Unpacking 2:2 Connect to the power...programs 2:14 Embroidery Machine Communication module.... 2:14 How to update your machine 2:14 Soft Touch Buttons and indicators 2:15 3 PFAFF® creative™ Color Touch Screen 3:1 Start view 3:2 Main parts 3:2 Task bar 3:2 Option bar 3:3 Common icons 3:3 Selection menu...
...Front side 1:8 Rear side 1:9 Top parts 1:9 Accessory tray 1:9 Parts of the embroidery unit 1:10 Included accessories 1:10 Presser feet 1:11 Stitch overview 1:12 Utility stitches 1:12 Decorative stitches 1:16 Alphabets 1:22 2 Preparations 2:1 Unpacking 2:2 Connect to the power...programs 2:14 Embroidery Machine Communication module.... 2:14 How to update your machine 2:14 Soft Touch Buttons and indicators 2:15 3 PFAFF® creative™ Color Touch Screen 3:1 Start view 3:2 Main parts 3:2 Task bar 3:2 Option bar 3:3 Common icons 3:3 Selection menu...
Owner's Manual
Page 9
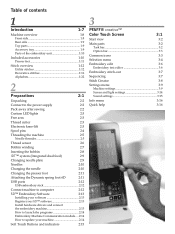
...pin 45. Level adjusting feet 51. Embroidery arm 49 50 Embroidery unit accessory tray 50 54 53 52 51 1:9 Bobbin spindle 41. Bobbin thread cutter 42. Spool caps 44. Take-up lever Accessory trays The accessory trays feature special compartments for presser feet and bobbins, plus space... for presser feet 48. Removable tray for needles and other accessories. Embroidery unit accesssory tray 52. Rear side 32 32. Bobbin ...
...pin 45. Level adjusting feet 51. Embroidery arm 49 50 Embroidery unit accessory tray 50 54 53 52 51 1:9 Bobbin spindle 41. Bobbin thread cutter 42. Spool caps 44. Take-up lever Accessory trays The accessory trays feature special compartments for presser feet and bobbins, plus space... for presser feet 48. Removable tray for needles and other accessories. Embroidery unit accesssory tray 52. Rear side 32 32. Bobbin ...
Owner's Manual
Page 10
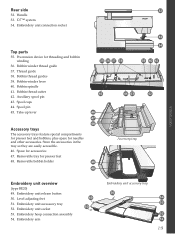
Included accessories Accessories 55. Screwdriver 61. Hoop clips 69. creative™ Master Hoop (240x150) 72. Fancy stitch foot with a stitch length longer than 1.0mm. 1:10 1A - Thread net (2) 57. USB Embroidery stick 60. ... cord (P/N:412 62 59-04) • Needles • MicroÀber cloth • 5D™ Embroidery Machine Communication CD • creative sensation™ Embroidery collection Presser feet 0A - Brush 63. creative™ 120 Square Hoop (120x120) 71. The groove on the machine upon delivery) This foot is used mainly for decorative stitches. Spool...
Included accessories Accessories 55. Screwdriver 61. Hoop clips 69. creative™ Master Hoop (240x150) 72. Fancy stitch foot with a stitch length longer than 1.0mm. 1:10 1A - Thread net (2) 57. USB Embroidery stick 60. ... cord (P/N:412 62 59-04) • Needles • MicroÀber cloth • 5D™ Embroidery Machine Communication CD • creative sensation™ Embroidery collection Presser feet 0A - Brush 63. creative™ 120 Square Hoop (120x120) 71. The groove on the machine upon delivery) This foot is used mainly for decorative stitches. Spool...
Owner's Manual
Page 21
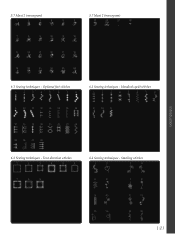
Optional feet stitches 6.2 Sewing techniques - Stacking stitches 1:21 Handlook quilt stitches Introduction 6.3 Sewing techniques - Four direction stitches 6.4 Sewing techniques - 5.7 Maxi 2 (monogram) 5.7 Maxi 2 (monogram) 6.1 Sewing techniques -
Optional feet stitches 6.2 Sewing techniques - Stacking stitches 1:21 Handlook quilt stitches Introduction 6.3 Sewing techniques - Four direction stitches 6.4 Sewing techniques - 5.7 Maxi 2 (monogram) 5.7 Maxi 2 (monogram) 6.1 Sewing techniques -
Owner's Manual
Page 31
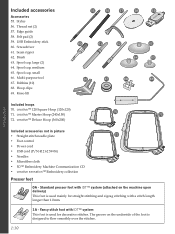
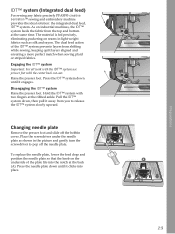
... the plate Àts into place. Engaging the IDT™ system Important: For all work with the IDT™ system use presser feet with two Àngers at the same time. Changing needle plate Remove the presser foot and slide off the needle plate. A 2:9 ...presser foot. Press the IDT™ system down until it engages. IDT™ system (Integrated dual feed) For sewing any fabric precisely PFAFF® creative sensation™ sewing and embroidery machine provides the ideal solution: the integrated dual feed, IDT™ system. The material is fed precisely, eliminating...
... the plate Àts into place. Engaging the IDT™ system Important: For all work with the IDT™ system use presser feet with two Àngers at the same time. Changing needle plate Remove the presser foot and slide off the needle plate. A 2:9 ...presser foot. Press the IDT™ system down until it engages. IDT™ system (Integrated dual feed) For sewing any fabric precisely PFAFF® creative sensation™ sewing and embroidery machine provides the ideal solution: the integrated dual feed, IDT™ system. The material is fed precisely, eliminating...

Owner's Manual
Page 62
.... Do not use with straight stitch. a b c d 16 30 Sewing mode 4:8 Free-motion options (16) A All stitches on your local authorized PFAFF® dealer. motion to set the machine in Machine settings. For all free-motion sewing the feed dogs will raise and lower with each stitch... be moved manually. Activate Stitch width safety in Spring foot freemotion mode for information about free-motion sewing on the symbol for optional spring feet. Spring foot free-motion (16b) Activate to open a window where you can be purchased at the top of the screen (A) indicates...
.... Do not use with straight stitch. a b c d 16 30 Sewing mode 4:8 Free-motion options (16) A All stitches on your local authorized PFAFF® dealer. motion to set the machine in Machine settings. For all free-motion sewing the feed dogs will raise and lower with each stitch... be moved manually. Activate Stitch width safety in Spring foot freemotion mode for information about free-motion sewing on the symbol for optional spring feet. Spring foot free-motion (16b) Activate to open a window where you can be purchased at the top of the screen (A) indicates...
Owner's Manual
Page 68
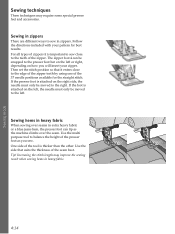
... sew. The zipper foot 4 can tip as you will insert your pattern for the straight stitch. Increasing the stitch length may require some special presser feet and accessories. Sewing hems in heavy fabric When sewing over the seam. Use the side that it is attached on the left, the needle must...
... sew. The zipper foot 4 can tip as you will insert your pattern for the straight stitch. Increasing the stitch length may require some special presser feet and accessories. Sewing hems in heavy fabric When sewing over the seam. Use the side that it is attached on the left, the needle must...

Owner's Manual
Page 75
... A technique stitches such as candlewicking, beading stitches, edge stitches, four direction sewing and stacking stitches. C Sewing mode 4:21 These techniques may require some special presser feet and accessories. To change the direction of the four direction icons (C). Note: Touch Quick help and then touch the selected stitch in the stitch selection...
... A technique stitches such as candlewicking, beading stitches, edge stitches, four direction sewing and stacking stitches. C Sewing mode 4:21 These techniques may require some special presser feet and accessories. To change the direction of the four direction icons (C). Note: Touch Quick help and then touch the selected stitch in the stitch selection...
Owner's Manual
Page 96
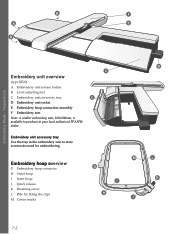
... Mode - Embroidery unit accessory tray Use the tray in the embroidery unit to purchase at your local authorized PFAFF® dealer. Preparations C Embroidery unit overview (type BE20) A Embroidery unit release button B Level adjusting feet C Embroidery unit accessory tray C D Embroidery unit socket E Embroidery hoop connection assembly F Embroidery arm Note: A smaller embroidery unit, 260x200mm...
... Mode - Embroidery unit accessory tray Use the tray in the embroidery unit to purchase at your local authorized PFAFF® dealer. Preparations C Embroidery unit overview (type BE20) A Embroidery unit release button B Level adjusting feet C Embroidery unit accessory tray C D Embroidery unit socket E Embroidery hoop connection assembly F Embroidery arm Note: A smaller embroidery unit, 260x200mm...
Owner's Manual
Page 97
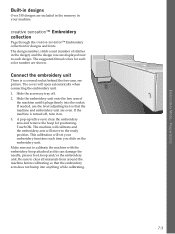
... collection Page through the creative sensation™ Embroidery collection for positioning. Slide the embroidery unit onto the free arm of stitches in the design) and the design size are displayed next ... with the embroidery hoop attached as this can damage the needle, presser foot, hoop and/or the embroidery unit. If needed, use the level adjusting feet so that the embroidery arm does not bump into the socket. Connect the embroidery unit There is turned off . 2. Preparations Built-in your embroidery functions...
... collection Page through the creative sensation™ Embroidery collection for positioning. Slide the embroidery unit onto the free arm of stitches in the design) and the design size are displayed next ... with the embroidery hoop attached as this can damage the needle, presser foot, hoop and/or the embroidery unit. If needed, use the level adjusting feet so that the embroidery arm does not bump into the socket. Connect the embroidery unit There is turned off . 2. Preparations Built-in your embroidery functions...
Owner's Manual
Page 159
... 3:16 Insert a new stitch point 6:4 Insert a stitch or letter 5:3 Inserting the bobbin 2:8 Installation code 2:13 K Knee-lift 1:10, 2:3 L Language 3:9 LED lights 1:8, 2:3 Adjust 3:14 Level adjusting feet 1:9, 7:2 Lid 1:8 Light settings 3:14 Line positioning, select 8:14 List view 10:3 Load a design 8:3 Load a Àle 10:5 Load a font 8:3 Load a font from another location 8:26...
... 3:16 Insert a new stitch point 6:4 Insert a stitch or letter 5:3 Inserting the bobbin 2:8 Installation code 2:13 K Knee-lift 1:10, 2:3 L Language 3:9 LED lights 1:8, 2:3 Adjust 3:14 Level adjusting feet 1:9, 7:2 Lid 1:8 Light settings 3:14 Line positioning, select 8:14 List view 10:3 Load a design 8:3 Load a Àle 10:5 Load a font 8:3 Load a font from another location 8:26...
Owner's Manual
Page 160
..., 9:7 Patchwork program 4:13, 4:19 PDF Guides 2:14 Personal designs 8:3, 10:4 Personal Àles 10:4 Personal fonts 10:4 Personal menu 3:5 PFAFF® creative™ Color Touch Screen 1:8 Piecing the quilt top 4:19 Pop-ups Embroidery edit 8:27 Embroidery stitch-out 9:12 Files & Folders 10:7 Sequencing...4:20 Straight stitch needle plate 4:19 R Raise and lower the presser foot 4:3 Redo 8:7 Removable bobbin holder 1:9 Removable tray for presser feet 1:9 Remove presser foot 2:11 Remove the embroidery unit 7:4 Remove the needle plate 2:9 Rename a Àle or folder 10:6 Replace...
..., 9:7 Patchwork program 4:13, 4:19 PDF Guides 2:14 Personal designs 8:3, 10:4 Personal Àles 10:4 Personal fonts 10:4 Personal menu 3:5 PFAFF® creative™ Color Touch Screen 1:8 Piecing the quilt top 4:19 Pop-ups Embroidery edit 8:27 Embroidery stitch-out 9:12 Files & Folders 10:7 Sequencing...4:20 Straight stitch needle plate 4:19 R Raise and lower the presser foot 4:3 Redo 8:7 Removable bobbin holder 1:9 Removable tray for presser feet 1:9 Remove presser foot 2:11 Remove the embroidery unit 7:4 Remove the needle plate 2:9 Rename a Àle or folder 10:6 Replace...

