Owner's Manual
Page 4
... Machine overview 1:8 Front side 1:8 Rear side 1:9 Top parts 1:9 Accessory tray 1:9 Parts of the embroidery unit 1:10 Included accessories 1:10 Presser feet 1:11 Stitch overview 1:12 Utility stitches 1:12 Decorative stitches 1:16...machine 2:14 Soft Touch Buttons and indicators 2:15 3 PFAFF® creative™ Color Touch Screen 3:1 Start view 3:2 Main parts 3:2 Task bar 3:2 Option bar 3:3 Common icons 3:3 Selection menu 3:4 Embroidery edit 3:6 Embroidery text editor 3:6 Embroidery stitch-out 3:7 Sequencing 3:7 Stitch Creator 3:8 Settings menu...
... Machine overview 1:8 Front side 1:8 Rear side 1:9 Top parts 1:9 Accessory tray 1:9 Parts of the embroidery unit 1:10 Included accessories 1:10 Presser feet 1:11 Stitch overview 1:12 Utility stitches 1:12 Decorative stitches 1:16...machine 2:14 Soft Touch Buttons and indicators 2:15 3 PFAFF® creative™ Color Touch Screen 3:1 Start view 3:2 Main parts 3:2 Task bar 3:2 Option bar 3:3 Common icons 3:3 Selection menu 3:4 Embroidery edit 3:6 Embroidery text editor 3:6 Embroidery stitch-out 3:7 Sequencing 3:7 Stitch Creator 3:8 Settings menu...
Owner's Manual
Page 6
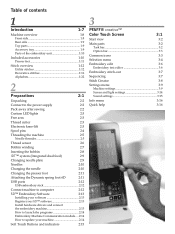
... bar 9:6 More options 9:6 Hoop position 9:7 Speed control 9:7 Precise positioning 9:8 Common Embroidery stitch-out pop-ups 9:12 10 Files & Folders Files & Folders - 7 Embroidery preparations 7:1 Embroidery unit overview 7:2 Embroidery hoop overview 7:2 Built-in designs 7:3 creative sensation™ Embroidery collection 7:3 Connect the embroidery unit 7:3 Remove the embroidery unit 7:4 Attaching the Dynamic spring foot for embroidery 7:4 To hoop the fabric 7:5 Slide on the hoop 7:5 Getting started embroidering...
... bar 9:6 More options 9:6 Hoop position 9:7 Speed control 9:7 Precise positioning 9:8 Common Embroidery stitch-out pop-ups 9:12 10 Files & Folders Files & Folders - 7 Embroidery preparations 7:1 Embroidery unit overview 7:2 Embroidery hoop overview 7:2 Built-in designs 7:3 creative sensation™ Embroidery collection 7:3 Connect the embroidery unit 7:3 Remove the embroidery unit 7:4 Attaching the Dynamic spring foot for embroidery 7:4 To hoop the fabric 7:5 Slide on the hoop 7:5 Getting started embroidering...
Owner's Manual
Page 9
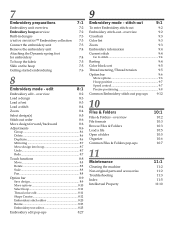
...easily accessible. 46. Bobbin winder thread guide 37. Removable tray for threading and bobbin winding 36. Level adjusting feet 51. Embroidery unit socket 53. Embroidery unit connection socket Top parts 35. Auxiliary spool pin 43. Spool caps 44. Take-up lever Accessory trays The accessory trays feature... compartments for presser feet and bobbins, plus space for accessories 47. Handle 33. Space for needles and other accessories. Embroidery arm 49 50 Embroidery unit accessory tray 50 54 53 52 51 1:9 Rear side 32 32. Removable bobbin holder 35 36 37 38 33 34...
...easily accessible. 46. Bobbin winder thread guide 37. Removable tray for threading and bobbin winding 36. Level adjusting feet 51. Embroidery unit socket 53. Embroidery unit connection socket Top parts 35. Auxiliary spool pin 43. Spool caps 44. Take-up lever Accessory trays The accessory trays feature... compartments for presser feet and bobbins, plus space for accessories 47. Handle 33. Space for needles and other accessories. Embroidery arm 49 50 Embroidery unit accessory tray 50 54 53 52 51 1:9 Rear side 32 32. Removable bobbin holder 35 36 37 38 33 34...
Owner's Manual
Page 40
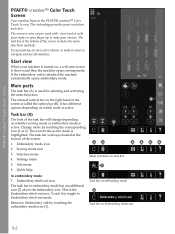
...menu Main functions in embroidery mode has an additional icon (7) above the embroidery icon. Embroidery stitch-out icon The task bar in task bar 5. Return to Embroidery stitch-out mode. PFAFF® creative™ Color Touch Screen PFAFF® creative™ Color Touch Screen Your machine features the PFAFF® creative™ Color Touch...2). The task bar at the bottom of the screen includes the main functions and help In embroidery mode 7. If the embroidery unit is the Embroidery stitch-out icon. Main parts The task bar (A) is used for the active mode is always...
...menu Main functions in embroidery mode has an additional icon (7) above the embroidery icon. Embroidery stitch-out icon The task bar in task bar 5. Return to Embroidery stitch-out mode. PFAFF® creative™ Color Touch Screen PFAFF® creative™ Color Touch Screen Your machine features the PFAFF® creative™ Color Touch...2). The task bar at the bottom of the screen includes the main functions and help In embroidery mode 7. If the embroidery unit is the Embroidery stitch-out icon. Main parts The task bar (A) is used for the active mode is always...
Owner's Manual
Page 44
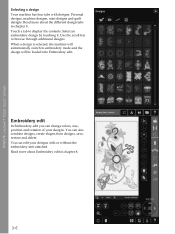
.... When a design is selected, the machine will be loaded into Embroidery edit. Read more about Embroidery edit in chapter 8. Touch a tab to display the contents. PFAFF® creative™ Color Touch Screen Selecting a design Your machine has four tabs with or without the embroidery unit attached. Read more about the different design tabs in chapter 8. 3:6 You...
.... When a design is selected, the machine will be loaded into Embroidery edit. Read more about Embroidery edit in chapter 8. Touch a tab to display the contents. PFAFF® creative™ Color Touch Screen Selecting a design Your machine has four tabs with or without the embroidery unit attached. Read more about the different design tabs in chapter 8. 3:6 You...
Owner's Manual
Page 96
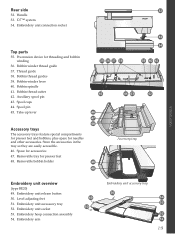
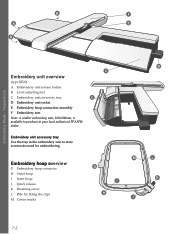
... C D Embroidery unit socket E Embroidery hoop connection assembly F Embroidery arm Note: A smaller embroidery unit, 260x200mm, is available to store accessories used for Àtting the clips M Center marks M G I Inner hoop J Quick release K Retaining screw L Ribs for embroidering. Embroidery hoop overview G Embroidery hoop connector H Outer hoop I H J D L K 7:2 B F A E B Embroidery Mode - Embroidery unit accessory tray Use the tray in the embroidery unit to purchase at your local authorized PFAFF...
... C D Embroidery unit socket E Embroidery hoop connection assembly F Embroidery arm Note: A smaller embroidery unit, 260x200mm, is available to store accessories used for Àtting the clips M Center marks M G I Inner hoop J Quick release K Retaining screw L Ribs for embroidering. Embroidery hoop overview G Embroidery hoop connector H Outer hoop I H J D L K 7:2 B F A E B Embroidery Mode - Embroidery unit accessory tray Use the tray in the embroidery unit to purchase at your local authorized PFAFF...
Owner's Manual
Page 97
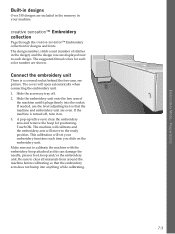
... design) and the design size are shown. Connect the embroidery unit There is turned off . 2. Be sure to the ready position. creative sensation™ Embroidery collection Page through the creative sensation™ Embroidery collection for positioning. The machine will calibrate and the embroidery arm will open automatically when connecting the embroidery unit. 1. The design number, stitch count (number of the machine...
... design) and the design size are shown. Connect the embroidery unit There is turned off . 2. Be sure to the ready position. creative sensation™ Embroidery collection Page through the creative sensation™ Embroidery collection for positioning. The machine will calibrate and the embroidery arm will open automatically when connecting the embroidery unit. 1. The design number, stitch count (number of the machine...
Owner's Manual
Page 98
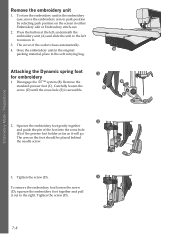
... into the cross-hole (E) of the socket closes automatically. 4. Press the button at the left, underneath the embroidery unit (A) and slide the unit to the left to remove it will go. Tighten the screw (D). 7:4 Remove the D standard presser foot (C).... (D) until the cross-hole (E) is accessible. Preparations 3. To store the embroidery unit in the embroidery case, move the embroidery arm to the right. Store the embroidery unit in the original A packing material, place in either Embroidery edit or Embroidery stitch-out. 2. The arm on the screen in the soft carrying bag....
... into the cross-hole (E) of the socket closes automatically. 4. Press the button at the left, underneath the embroidery unit (A) and slide the unit to the left to remove it will go. Tighten the screw (D). 7:4 Remove the D standard presser foot (C).... (D) until the cross-hole (E) is accessible. Preparations 3. To store the embroidery unit in the embroidery case, move the embroidery arm to the right. Store the embroidery unit in the original A packing material, place in either Embroidery edit or Embroidery stitch-out. 2. The arm on the screen in the soft carrying bag....
Owner's Manual
Page 99
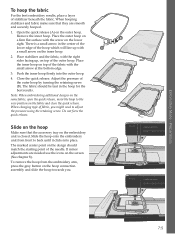
... the hoop towards you might need to adjust the pressure using the retaining screw. Close the quick release. Slide the hoop onto the embroidery unit from the embroidery arm, press the grey button on top of the outer hoop by turning the retaining screw (B). If minor adjustments are smooth and securely... fabric, open the quick release, move the hoop to back until it clicks into the outer hoop. 4. Note: When embroidering additional designs on the embroidery unit is a small arrow in the hoop for the best results. When changing type of fabric, you . 7:5 Slide on the hoop Make sure that ...
... the hoop towards you might need to adjust the pressure using the retaining screw. Close the quick release. Slide the hoop onto the embroidery unit from the embroidery arm, press the grey button on top of the outer hoop by turning the retaining screw (B). If minor adjustments are smooth and securely... fabric, open the quick release, move the hoop to back until it clicks into the outer hoop. 4. Note: When embroidering additional designs on the embroidery unit is a small arrow in the hoop for the best results. When changing type of fabric, you . 7:5 Slide on the hoop Make sure that ...
Owner's Manual
Page 100
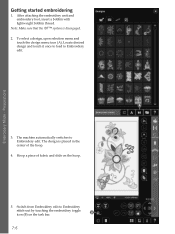
... attaching the embroidery unit and embroidery foot, insert a bobbin with lightweight bobbin thread. Note: Make sure that the IDT™ system is placed in the center of fabric and slide on the task bar. Preparations A 3. The machine automatically switches to Embroidery edit. Embroidery Mode - The... design is disengaged. 2. Hoop a piece of the hoop. 4. B 7:6 Locate desired design and touch it once to load to Embroidery edit. To select a design, open selection menu...
... attaching the embroidery unit and embroidery foot, insert a bobbin with lightweight bobbin thread. Note: Make sure that the IDT™ system is placed in the center of fabric and slide on the task bar. Preparations A 3. The machine automatically switches to Embroidery edit. Embroidery Mode - The... design is disengaged. 2. Hoop a piece of the hoop. 4. B 7:6 Locate desired design and touch it once to load to Embroidery edit. To select a design, open selection menu...
Owner's Manual
Page 104
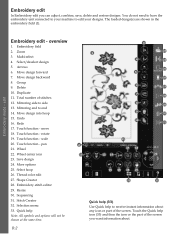
... to side 13. Wheel center icon 23. Thread color edit 27. Selection menu 33. Touch function - scale 20. The loaded design(s) are shown in the embroidery Àeld (1). Delete 10. Total number of the screen. pan 21. Wheel 22. Select/deselect design 5. Touch function - More options 25. Select hoop 26....your designs. Undo 16. Sequencing 31. Move design into hoop 15. Stitch Creator 32. Duplicate 11. Multi-select 4. You do not need to have the embroidery unit connected to your machine to receive instant information about . Arrows 6. Move design backward 8.
... to side 13. Wheel center icon 23. Thread color edit 27. Selection menu 33. Touch function - scale 20. The loaded design(s) are shown in the embroidery Àeld (1). Delete 10. Total number of the screen. pan 21. Wheel 22. Select/deselect design 5. Touch function - More options 25. Select hoop 26....your designs. Undo 16. Sequencing 31. Move design into hoop 15. Stitch Creator 32. Duplicate 11. Multi-select 4. You do not need to have the embroidery unit connected to your machine to receive instant information about . Arrows 6. Move design backward 8.
Owner's Manual
Page 112
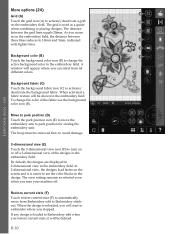
...you zoom C in the design. E Background color (B) F Touch the background color icon (B) to change the color of the designs in the embroidery Àeld. edit Move to park position (D) Touch the park position icon (E) to move from 64 different colors. The view setting remains ...If any design is reloaded, you will be deleted. 8:10 Background fabric (C) Touch the background fabric icon (C) to park position for storing the embroidery unit. A window will be removed Àrst, to avoid damage. 3-dimensional view (E) Touch the 3-dimensional view icon (D) to turn your machine ...
...you zoom C in the design. E Background color (B) F Touch the background color icon (B) to change the color of the designs in the embroidery Àeld. edit Move to park position (D) Touch the park position icon (E) to move from 64 different colors. The view setting remains ...If any design is reloaded, you will be deleted. 8:10 Background fabric (C) Touch the background fabric icon (C) to park position for storing the embroidery unit. A window will be removed Àrst, to avoid damage. 3-dimensional view (E) Touch the 3-dimensional view icon (D) to turn your machine ...
Owner's Manual
Page 113
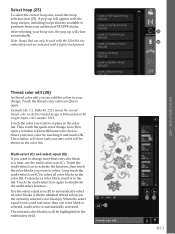
...change icon (B) to the currently selected color block(s). Use the select equal icon (D) to automatically select all color blocks in your authorized PFAFF® dealer. B The selected color block(s) will close and your new color will appear with a lighter background. Then touch the ...selected, multi-select is RobisonAnton 40 weight rayon, color number 2211. When the select equal icon is used with the 350x360 size 26 embroidery unit are available to select. Example (A): 1:2, RaRa 40, 2211 means the second thread color in the color list. Long touch the ...
...change icon (B) to the currently selected color block(s). Use the select equal icon (D) to automatically select all color blocks in your authorized PFAFF® dealer. B The selected color block(s) will close and your new color will appear with a lighter background. Then touch the ...selected, multi-select is RobisonAnton 40 weight rayon, color number 2211. When the select equal icon is used with the 350x360 size 26 embroidery unit are available to select. Example (A): 1:2, RaRa 40, 2211 means the second thread color in the color list. Long touch the ...
Owner's Manual
Page 129
...a design Àle that already exists, your machine will appear when a function has been chosen that forces the embroidery unit to move freely, remove the hoop and then touch OK. In order for the embroidery arm to purchase from your machine will ask you to conÀrm when you to delete all...If the design is available to move outside the limits for the attached hoop. Reduce the size and try to save again, your local authorized PFAFF® dealer. Delete all designs or when using delete long touch. Your machine will not start when you have selected to close the resize window...
...a design Àle that already exists, your machine will appear when a function has been chosen that forces the embroidery unit to move freely, remove the hoop and then touch OK. In order for the embroidery arm to purchase from your machine will ask you to conÀrm when you to delete all...If the design is available to move outside the limits for the attached hoop. Reduce the size and try to save again, your local authorized PFAFF® dealer. Delete all designs or when using delete long touch. Your machine will not start when you have selected to close the resize window...
Owner's Manual
Page 132
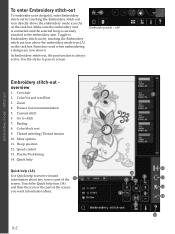
...12. Make sure the embroidery unit is connected and the selected hoop is always active. In Embroidery stitch-out, the pan function is securely attached to stitch 7. Go to the embroidery arm. More options 11. Speed control 13. Toggle to Embroidery stitch-out by touching the Embroidery stitch-out icon directly ...task bar. Use the stylus to receive instant information about . 9:2 2 1 10 4 9 11 5 7 12 6 13 8 14 A Embroidery mode - stitch-out Embroidery stitch-out overview 1. Quick help Quick help (14) Use Quick help icon (14) and then the icon or the part of the screen...
...12. Make sure the embroidery unit is connected and the selected hoop is always active. In Embroidery stitch-out, the pan function is securely attached to stitch 7. Go to the embroidery arm. More options 11. Speed control 13. Toggle to Embroidery stitch-out by touching the Embroidery stitch-out icon directly ...task bar. Use the stylus to receive instant information about . 9:2 2 1 10 4 9 11 5 7 12 6 13 8 14 A Embroidery mode - stitch-out Embroidery stitch-out overview 1. Quick help Quick help (14) Use Quick help icon (14) and then the icon or the part of the screen...
Owner's Manual
Page 142
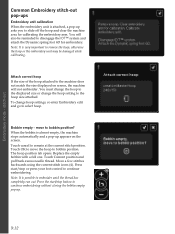
...has completely run out. The hoop position tab opens. Move a few stitches backwards using the current stitch icons (4). Embroidery mode - stitch-out Common Embroidery stitch-out pop-ups Embroidery unit calibration When the embroidery unit is possible to bobbin position? Attach correct hoop If the size of the hoop attached to select hoop. To ...change the hoop setting to remove the hoop, otherwise the hoop or the embroidery unit may be reminded to disengage the IDT™ system and attach the Dynamic spring foot 6D for calibrating the...
...has completely run out. The hoop position tab opens. Move a few stitches backwards using the current stitch icons (4). Embroidery mode - stitch-out Common Embroidery stitch-out pop-ups Embroidery unit calibration When the embroidery unit is possible to bobbin position? Attach correct hoop If the size of the hoop attached to select hoop. To ...change the hoop setting to remove the hoop, otherwise the hoop or the embroidery unit may be reminded to disengage the IDT™ system and attach the Dynamic spring foot 6D for calibrating the...
Owner's Manual
Page 156
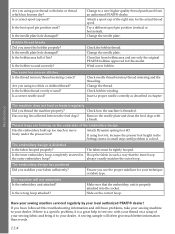
...Change the thread. Maintenance Have your sewing machine serviced regularly by your dealer. A sewing sample will not embroider Is the embroidery unit attached? Are you stabilize your fabric sufÀciently? Is the bobbin wound correctly? Check needle thread tension/thread metering and the... Insert a proper needle correctly as described in such a way that the embroidery unit is solved. Has sewing lint collected between the feed dogs? The machine will often give much to your local authorized PFAFF® dealer! Attach a spool cap of the right size for your ...
...Change the thread. Maintenance Have your sewing machine serviced regularly by your dealer. A sewing sample will not embroider Is the embroidery unit attached? Are you stabilize your fabric sufÀciently? Is the bobbin wound correctly? Check needle thread tension/thread metering and the... Insert a proper needle correctly as described in such a way that the embroidery unit is solved. Has sewing lint collected between the feed dogs? The machine will often give much to your local authorized PFAFF® dealer! Attach a spool cap of the right size for your ...
Owner's Manual
Page 157
...14 Allow lower needle position 9:10 Alphabets 1:22 Appliqué, create 8:15 Attaching the Dynamic spring foot 6D 2:11 Attaching the Dynamic spring foot for embroidery .... 7:4 Attaching the Sensormatic buttonhole foot 4:16 Attach presser foot 2:11 Audio preview application 10:7 Audio repeat 3:15 Automatic presser foot lift 3:11 Automatic... Touch Screen 1:8 Computer 10:4 Computer, connect to 2:12 Connect machine to computer 2:12 Connect to and remove from USB port 2:12 Connect the embroidery unit 7:3 Connect to the power supply 2:2 Control point, deÀnition 8:13 11:5 Index
...14 Allow lower needle position 9:10 Alphabets 1:22 Appliqué, create 8:15 Attaching the Dynamic spring foot 6D 2:11 Attaching the Dynamic spring foot for embroidery .... 7:4 Attaching the Sensormatic buttonhole foot 4:16 Attach presser foot 2:11 Audio preview application 10:7 Audio repeat 3:15 Automatic presser foot lift 3:11 Automatic... Touch Screen 1:8 Computer 10:4 Computer, connect to 2:12 Connect machine to computer 2:12 Connect to and remove from USB port 2:12 Connect the embroidery unit 7:3 Connect to the power supply 2:2 Control point, deÀnition 8:13 11:5 Index
Owner's Manual
Page 158
... assembly 1:9, 7:2 Embroidery hoop overview 7:2 Embroidery information 9:4 Embroidery Machine Communication CD ........ 1:10, 2:12 Embroidery Machine Communication module.......... 2:14 Embroidery needle 2:10 Embroidery stitch editor 8:20 Embroidery stitch-out 9:2-9:14 Embroidery stitch-out pop-ups 9:12 Embroidery text editor 8:25 Embroidery time 9:4 Embroidery unit accessory tray 7:2 Embroidery unit, connect 7:3 Embroidery unit connection socket 1:9 Embroidery unit overview 1:9, 7:2 Embroidery unit release button 1:9, 7:2 Embroidery unit, remove 7:4 Embroidery unit socket...
... assembly 1:9, 7:2 Embroidery hoop overview 7:2 Embroidery information 9:4 Embroidery Machine Communication CD ........ 1:10, 2:12 Embroidery Machine Communication module.......... 2:14 Embroidery needle 2:10 Embroidery stitch editor 8:20 Embroidery stitch-out 9:2-9:14 Embroidery stitch-out pop-ups 9:12 Embroidery text editor 8:25 Embroidery time 9:4 Embroidery unit accessory tray 7:2 Embroidery unit, connect 7:3 Embroidery unit connection socket 1:9 Embroidery unit overview 1:9, 7:2 Embroidery unit release button 1:9, 7:2 Embroidery unit, remove 7:4 Embroidery unit socket...
Owner's Manual
Page 160
... Embroidery edit 8:2 Embroidery hoop 7:2 Embroidery stitch-out 9:2 Embroidery unit 1:9, 7:2 Files & Folders 10:2 Machine 1:8 Precise positioning 9:8 Sequencing 5:2 Sewing mode 4:2 Shape Creator 8:12 Stitch Creator 6:2 Stitches 1:12 Owner's name 3:9 P Pack away after sewing 2:2 Pan 6:6, 8:8 Park position 7:4, 8:10, 9:7 Patchwork program 4:13, 4:19 PDF Guides 2:14 Personal designs 8:3, 10:4 Personal Àles 10:4 Personal fonts 10:4 Personal menu 3:5 PFAFF® creative...
... Embroidery edit 8:2 Embroidery hoop 7:2 Embroidery stitch-out 9:2 Embroidery unit 1:9, 7:2 Files & Folders 10:2 Machine 1:8 Precise positioning 9:8 Sequencing 5:2 Sewing mode 4:2 Shape Creator 8:12 Stitch Creator 6:2 Stitches 1:12 Owner's name 3:9 P Pack away after sewing 2:2 Pan 6:6, 8:8 Park position 7:4, 8:10, 9:7 Patchwork program 4:13, 4:19 PDF Guides 2:14 Personal designs 8:3, 10:4 Personal Àles 10:4 Personal fonts 10:4 Personal menu 3:5 PFAFF® creative...


