
Owner's Manual
Page 3
... cord or plug, if it is not working properly, if it has been dropped or damaged, or dropped into water. This houshold sewing machine is designed to comply with IEC/EN 60335-2-28 and UL1594 IMPORTANT SAFETY INSTRUCTIONS When using an electrical appliance, basic safety precautions should always...8226; Do not unplug by the manufacturer as described in the outlet, reverse the plug. SAVE THESE INSTRUCTIONS For the USA and Canada This sewing machine has a polarized plug (one way. Use only attachments recommended by pulling on cord. Do not allow plug to the nearest authorised dealer or...
... cord or plug, if it is not working properly, if it has been dropped or damaged, or dropped into water. This houshold sewing machine is designed to comply with IEC/EN 60335-2-28 and UL1594 IMPORTANT SAFETY INSTRUCTIONS When using an electrical appliance, basic safety precautions should always...8226; Do not unplug by the manufacturer as described in the outlet, reverse the plug. SAVE THESE INSTRUCTIONS For the USA and Canada This sewing machine has a polarized plug (one way. Use only attachments recommended by pulling on cord. Do not allow plug to the nearest authorised dealer or...

Owner's Manual
Page 4
...2-33 2-34 How to use this instruction manual 1-6 Parts of creative 4874 Summary of stitch programs for the creative 4874 3 1-10 1-13 Electronic functions Set language 3-2 2Technical section, general Machine cover LCD Display Button functions 2-2 Save 3-2 3-4 3-5 Electrical connection ...4-7 2-7 Important notes on sewing with the cover stitch 4-7 2-7 Sewing table 4-7 2-8 Starting to sew 4-8 2-9 Preparing the project 4-8 2-10 - 2-17 Stopping sewing 4-8 2-10 Ruler 4-9 2-18 - 2-19 Stitch formation 4-10 2-20 Changing spools with the machine threaded Needle threader Summary of...
...2-33 2-34 How to use this instruction manual 1-6 Parts of creative 4874 Summary of stitch programs for the creative 4874 3 1-10 1-13 Electronic functions Set language 3-2 2Technical section, general Machine cover LCD Display Button functions 2-2 Save 3-2 3-4 3-5 Electrical connection ...4-7 2-7 Important notes on sewing with the cover stitch 4-7 2-7 Sewing table 4-7 2-8 Starting to sew 4-8 2-9 Preparing the project 4-8 2-10 - 2-17 Stopping sewing 4-8 2-10 Ruler 4-9 2-18 - 2-19 Stitch formation 4-10 2-20 Changing spools with the machine threaded Needle threader Summary of...
Owner's Manual
Page 5
... plate 9-2 Summary of threading paths and their threading Placing the needle plate 9-2 sequences 5-11 Oiling the machine 9-2 Starting to sew 5-12 Cleaning of the machine 9-2 Important notes on sewing with the top cover stitch 5-12 Cleaning rubber feet 9-3 Sewing table 5-12 Replacing the upper knife 9-3 Preparing your project 5-12 Secure the upper knife for heavier...
... plate 9-2 Summary of threading paths and their threading Placing the needle plate 9-2 sequences 5-11 Oiling the machine 9-2 Starting to sew 5-12 Cleaning of the machine 9-2 Important notes on sewing with the top cover stitch 5-12 Cleaning rubber feet 9-3 Sewing table 5-12 Replacing the upper knife 9-3 Preparing your project 5-12 Secure the upper knife for heavier...
Owner's Manual
Page 6
... well spent, since it is happy to find out just what your machine can create with any fabric in design and technology, and it as easy as possible to use your creative 4874, using the coverstitch as this instruction manual a clear structure. He is the ...If you need for care and maintenance of your creative 4874. 9. Technical section, general - In this chapter, we are going to -date sewing Congratulations! You have given this instruction manual is just as easy to use as an example. 5. Your PFAFF® coverlock™ features the very latest in its features...
... well spent, since it is happy to find out just what your machine can create with any fabric in design and technology, and it as easy as possible to use your creative 4874, using the coverstitch as this instruction manual a clear structure. He is the ...If you need for care and maintenance of your creative 4874. 9. Technical section, general - In this chapter, we are going to -date sewing Congratulations! You have given this instruction manual is just as easy to use as an example. 5. Your PFAFF® coverlock™ features the very latest in its features...
Owner's Manual
Page 7
If you suspect that describe the individual parts of excess dye. Technnical Part Technical Part This chapter contains pages that your sewing machine. Fleece and denim fabric in especially red and blue often contain a lot of the machine and a program summary. Note: Some fabrics have a lot of excess dye which can cause discoloration on other fabric but also on your fabric/ready-to-wear garment contains a lot of excess dye, always pre-wash it before sewing/embroidering to remove. This discoloring may be very difficult or impossible to avoid the discoloring. 1-7
If you suspect that describe the individual parts of excess dye. Technnical Part Technical Part This chapter contains pages that your sewing machine. Fleece and denim fabric in especially red and blue often contain a lot of the machine and a program summary. Note: Some fabrics have a lot of excess dye which can cause discoloration on other fabric but also on your fabric/ready-to-wear garment contains a lot of excess dye, always pre-wash it before sewing/embroidering to remove. This discoloring may be very difficult or impossible to avoid the discoloring. 1-7
Owner's Manual
Page 16
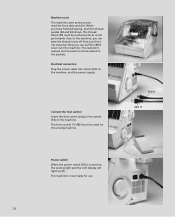
...power cable into socket (53) on the machine. Machine cover The machine cover protects your machine from dust and dirt. you can pull the 4874 cover over the machine. The thread stand (49) must be pushed as far as it will light up (9). Now you have finished sewing, push the thread guides (28 and 44...) down. The machine is not essential. Connect the foot control Insert the foot ...
...power cable into socket (53) on the machine. Machine cover The machine cover protects your machine from dust and dirt. you can pull the 4874 cover over the machine. The thread stand (49) must be pushed as far as it will light up (9). Now you have finished sewing, push the thread guides (28 and 44...) down. The machine is not essential. Connect the foot control Insert the foot ...

Owner's Manual
Page 17
... tweezers and the allen key are illustrated in the lower slots of the front cover. The top/deco cover sewing program sticker is cut off for safety reasons, so that you cannot continue sewing. Press the bottom part of the catcher until the lower catches engage in color on the inside of... the front cover. Trim catcher Insert the upper catches of the trim catcher in the upper slots in reverse order to the machine is behind the swivel table...
... tweezers and the allen key are illustrated in the lower slots of the front cover. The top/deco cover sewing program sticker is cut off for safety reasons, so that you cannot continue sewing. Press the bottom part of the catcher until the lower catches engage in color on the inside of... the front cover. Trim catcher Insert the upper catches of the trim catcher in the upper slots in reverse order to the machine is behind the swivel table...
Owner's Manual
Page 52
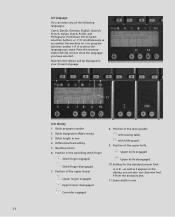
Press the memory button M (12) once to select the language you have selected. Differential feed setting 5. Position of the sewing table with sewing table with knife guard 9. Setting for the standard presser foot: A or B - Stitch designation (Main menu) 3. Stitch length in your chosen language.... Now the description will be displayed in mm 4. Stitch finger disengaged. 7. Seam width in the display, you switch the machine on. Position of the upper looper Upper looper engaged Upper looper disengaged Converter engaged 8. Hold down the program selection buttons +/- (11...
Press the memory button M (12) once to select the language you have selected. Differential feed setting 5. Position of the sewing table with sewing table with knife guard 9. Setting for the standard presser foot: A or B - Stitch designation (Main menu) 3. Stitch length in your chosen language.... Now the description will be displayed in mm 4. Stitch finger disengaged. 7. Seam width in the display, you switch the machine on. Position of the upper looper Upper looper engaged Upper looper disengaged Converter engaged 8. Hold down the program selection buttons +/- (11...

Owner's Manual
Page 57
... any setting with the corresponding +/- Error If a stepping motor for the blue needle thread tension is still displayed after you have switched the machine off and on again, you want to the main menu automatically. The program memory will not be returned to change the stitch length or ... corresponding +/- If the Error message is no changes are made within 10 seconds, the display switches back to save these values, press one of a sewing project, but don't want to the main menu, the changed setting will open. To change tension settings in the display: ERROR. buttons. buttons. ...
... any setting with the corresponding +/- Error If a stepping motor for the blue needle thread tension is still displayed after you have switched the machine off and on again, you want to the main menu automatically. The program memory will not be returned to change the stitch length or ... corresponding +/- If the Error message is no changes are made within 10 seconds, the display switches back to save these values, press one of a sewing project, but don't want to the main menu, the changed setting will open. To change tension settings in the display: ERROR. buttons. buttons. ...

Owner's Manual
Page 72
... the machine to use the detachable thread stand. Push the detachable thread stand to the left and pull upwards. Place the detachable thread guide from the accessories box on top of the stand against the cover. Row: Needle position 3. Detachable thread stand For top cover sewing you ...Detachable thread guide for top/deco cover Pull the thread guide up as far as it will go and twist it will go . Sewing program sticker 1 The top/deco sewing program sticker 2 (25) is located behind the front cover and 3 includes the following information: 4 1. Row: Stitch formation with ...
... the machine to use the detachable thread stand. Push the detachable thread stand to the left and pull upwards. Place the detachable thread guide from the accessories box on top of the stand against the cover. Row: Needle position 3. Detachable thread stand For top cover sewing you ...Detachable thread guide for top/deco cover Pull the thread guide up as far as it will go and twist it will go . Sewing program sticker 1 The top/deco sewing program sticker 2 (25) is located behind the front cover and 3 includes the following information: 4 1. Row: Stitch formation with ...
Owner's Manual
Page 73
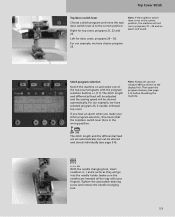
... set up your stitch program selection, this means that the top/deco switch lever (A) is not in the correct position, the machine will go into the needle holder (make your creative 4874 as shown in the display first. Then open the program memory (see page 3-4). 0 1L 2 1R 2 With the... cover, programs 24 - 30. For our example, we have chosen program 23. The stitch length and differential feed will be adjusted and the sewing speed will sound. 23. Tighten the associated retaining screw and remove the needle changing tool. 5-3 Top Cover Stitch Top/deco switch lever Note: ...
... set up your stitch program selection, this means that the top/deco switch lever (A) is not in the correct position, the machine will go into the needle holder (make your creative 4874 as shown in the display first. Then open the program memory (see page 3-4). 0 1L 2 1R 2 With the... cover, programs 24 - 30. For our example, we have chosen program 23. The stitch length and differential feed will be adjusted and the sewing speed will sound. 23. Tighten the associated retaining screw and remove the needle changing tool. 5-3 Top Cover Stitch Top/deco switch lever Note: ...

Owner's Manual
Page 88
... stand (27) into place. Row: Stitch formation with needle stitch line in blue and yellow, i.e. Deco Cover Switching the machine to deco cover operation (progs. 24 - 30) Detachable thread stand For deco cover sewing you need to this setting manually. 4. Row: Tension setting in grey. 6-2 Insert the top catches of the stand...
... stand (27) into place. Row: Stitch formation with needle stitch line in blue and yellow, i.e. Deco Cover Switching the machine to deco cover operation (progs. 24 - 30) Detachable thread stand For deco cover sewing you need to this setting manually. 4. Row: Tension setting in grey. 6-2 Insert the top catches of the stand...

Owner's Manual
Page 89
The decorative thread guides will be set up your creative 4874 as shown in the wrong position. The machine gives a warningsignal if the top/deco switch lever A is in the display. Note: Always set at their initial positions, and the sewing speed will sound. Then open the program memory (see page...;rst select the program, the 4874 is now set for deco cover, programs 24 - 30 For our example, we selected 3-needle, 6-thread deco cover stitch program 27. Left for use with thinner thread for each stitch. A Stitch program selection Switch the machine on and use with thicker thread...
The decorative thread guides will be set up your creative 4874 as shown in the wrong position. The machine gives a warningsignal if the top/deco switch lever A is in the display. Note: Always set at their initial positions, and the sewing speed will sound. Then open the program memory (see page...;rst select the program, the 4874 is now set for deco cover, programs 24 - 30 For our example, we selected 3-needle, 6-thread deco cover stitch program 27. Left for use with thinner thread for each stitch. A Stitch program selection Switch the machine on and use with thicker thread...
Owner's Manual
Page 129
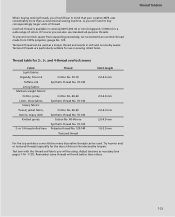
.... Textured threads are particularly suitable for use standard all-purpose threads. Thread Tension 7-23 When buying sewing threads, you should bear in mind that your creative 4874 uses considerably more than others. To prevent overlock seams from expanding excessively, we recommend an overlock thread...fabric, Denim, heavy cloth Knitted goods. 2- Remember some threads will work better than a conventional sewing machine, so you will be used as necessary (see pages 7-16 - 7-21). Test sew with the thread and fabric you can be using. Overlock thread is available in cones (2,000-5,000...
.... Textured threads are particularly suitable for use standard all-purpose threads. Thread Tension 7-23 When buying sewing threads, you should bear in mind that your creative 4874 uses considerably more than others. To prevent overlock seams from expanding excessively, we recommend an overlock thread...fabric, Denim, heavy cloth Knitted goods. 2- Remember some threads will work better than a conventional sewing machine, so you will be used as necessary (see pages 7-16 - 7-21). Test sew with the thread and fabric you can be using. Overlock thread is available in cones (2,000-5,000...

Owner's Manual
Page 133
... Part No.: 29 924 993-81/491 2. No.: 29 924 993-81/716 2. 3 2 1 1 2 3 2 3 1 The following accessories are included behind the swivelling table (21) in the machine: 1. Trim catcher Part No.: 29 924 993-81/111 3. Allen keys Part No.: 29 924 993-81/450 The following accessories are shipped with the... machine: 1. Sewing table Part No.: 29 924 993-81/120 1. 10 x Foam pad Part No.: 29 924 993-81/708 2. 10 x Cone holder (on the spool pins) ...
... Part No.: 29 924 993-81/491 2. No.: 29 924 993-81/716 2. 3 2 1 1 2 3 2 3 1 The following accessories are included behind the swivelling table (21) in the machine: 1. Trim catcher Part No.: 29 924 993-81/111 3. Allen keys Part No.: 29 924 993-81/450 The following accessories are shipped with the... machine: 1. Sewing table Part No.: 29 924 993-81/120 1. 10 x Foam pad Part No.: 29 924 993-81/708 2. 10 x Cone holder (on the spool pins) ...

Owner's Manual
Page 136
... up to 10 mm. For simultaneous gathering and sewing together two layers of fabrics. 8-6 For guiding and inserting piping and welting. For joining a rounded piece of the cut seam (use the machine's standard presser foot). For sewing on which the following accessories to 13 mm. ...Holder on elastic tape with a width up to a straight piece (use the machine's standard presser foot). For attaching the following accessories are attached...
... up to 10 mm. For simultaneous gathering and sewing together two layers of fabrics. 8-6 For guiding and inserting piping and welting. For joining a rounded piece of the cut seam (use the machine's standard presser foot). For sewing on which the following accessories to 13 mm. ...Holder on elastic tape with a width up to a straight piece (use the machine's standard presser foot). For attaching the following accessories are attached...
Owner's Manual
Page 137
For your safety when taking care of your machine, always turn off the power switch and unplug the sewing machine from the electrical outlet. 9-1 Care of the machine Care of the machine This chapter includes all the information you need for care and maintenance of your creative 4874 and suggestions for solving certain problems. WARNING!
For your safety when taking care of your machine, always turn off the power switch and unplug the sewing machine from the electrical outlet. 9-1 Care of the machine Care of the machine This chapter includes all the information you need for care and maintenance of your creative 4874 and suggestions for solving certain problems. WARNING!
Owner's Manual
Page 138
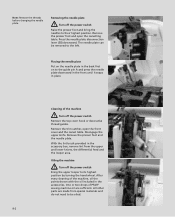
... the hand wheel. Press the needle plate disconnection lever (38) downward. With the lint brush provided in the accessories. After every cleaning of PFAFF sewing machine oil are made from the upper and lower knives, the differential feed and the looper area. Placing the needle plate Put on the needle plate... in place. Remove the presser foot and the needle plate. Oiling the machine Turn off the power switch Remove the top cover hook or decorative thread guides. Remove the presser foot and open the front cover and ...
... the hand wheel. Press the needle plate disconnection lever (38) downward. With the lint brush provided in the accessories. After every cleaning of PFAFF sewing machine oil are made from the upper and lower knives, the differential feed and the looper area. Placing the needle plate Put on the needle plate... in place. Remove the presser foot and the needle plate. Oiling the machine Turn off the power switch Remove the top cover hook or decorative thread guides. Remove the presser foot and open the front cover and ...
Owner's Manual
Page 141
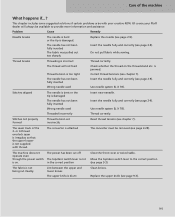
...4-thread overlock seam is irregular, so that the upper looper is not supplied with your Pfaff dealer will not feed Thread tension is damaged The needle has not been fully inserted Wrong ...and lower knives The upper knife is jammed. Check whether the thread on . The machine does not operate even though the power switch is damaged. The fabric is not being ... includes some suggested solutions if certain problems arise with thread. Of course your creative 4874. Do not pull fabric while sewing. Thread breaks Threading is not in the correct position Close the front cover or...
...4-thread overlock seam is irregular, so that the upper looper is not supplied with your Pfaff dealer will not feed Thread tension is damaged The needle has not been fully inserted Wrong ...and lower knives The upper knife is jammed. Check whether the thread on . The machine does not operate even though the power switch is damaged. The fabric is not being ... includes some suggested solutions if certain problems arise with thread. Of course your creative 4874. Do not pull fabric while sewing. Thread breaks Threading is not in the correct position Close the front cover or...
Owner's Manual
Page 143
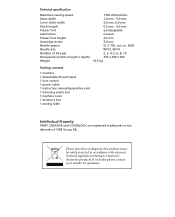
.... no. 2002 80/12, 90/14 2, 3, 4, 5, 6, 8, 10 355 x 290 x 300 10,5 kg Packing contents 1 machine 1 detachable thread stand 1 foot control 1 power cable 1 instruction manual/guarantee card 1 trimming waste box 1 machine cover 1 accessory box 1 sewing table Intellectual Property PFAFF, CREATIVE and COVERLOCK are registered trademarks or trademarks of threads Dimensions (width x height x depth) Weight 1500 stitches/min...
.... no. 2002 80/12, 90/14 2, 3, 4, 5, 6, 8, 10 355 x 290 x 300 10,5 kg Packing contents 1 machine 1 detachable thread stand 1 foot control 1 power cable 1 instruction manual/guarantee card 1 trimming waste box 1 machine cover 1 accessory box 1 sewing table Intellectual Property PFAFF, CREATIVE and COVERLOCK are registered trademarks or trademarks of threads Dimensions (width x height x depth) Weight 1500 stitches/min...


