
Owner's Manual
Page 2
... be marked 3 A or with the letter L or coloured red. The wires in the mains lead are available from electrical suppliers or the PFAFF agencies. The plug must be connected to the terminal which is marked with the corresponding colour code. Defective mains leads must be connected to the...coloured black. Only 3 A spare fuses must be used as follows: The wire which is coloured blue must be used , but disposed of this instruction manual when reading it. Spare fuse covers are coloured according to the following code: Blue: Neutral Brown: Live As the colours of the wires in your...
... be marked 3 A or with the letter L or coloured red. The wires in the mains lead are available from electrical suppliers or the PFAFF agencies. The plug must be connected to the terminal which is marked with the corresponding colour code. Defective mains leads must be connected to the...coloured black. Only 3 A spare fuses must be used as follows: The wire which is coloured blue must be used , but disposed of this instruction manual when reading it. Spare fuse covers are coloured according to the following code: Blue: Neutral Brown: Live As the colours of the wires in your...
Owner's Manual
Page 3
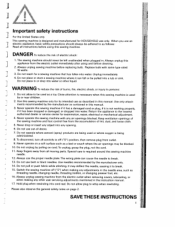
... machine and foot control free from outlet. 9. Always unplug this ] appliance from the electric outlet immediately after using this manual. Do not reach for a sewing machine that has fallen into water. Return the appliance to whip when rewinding. Always unplug...from the accumulation of electric shock: 1 . Please also observe the general safety notes on cord. Unplug immediately. 4. Do not place in this manual. 3. needle. 1 2. Do not use only. Do not operate where aerosol (spray> products are being used [ i. authorized dealer or service...
... machine and foot control free from outlet. 9. Always unplug this ] appliance from the electric outlet immediately after using this manual. Do not reach for a sewing machine that has fallen into water. Return the appliance to whip when rewinding. Always unplug...from the accumulation of electric shock: 1 . Please also observe the general safety notes on cord. Unplug immediately. 4. Do not place in this manual. 3. needle. 1 2. Do not use only. Do not operate where aerosol (spray> products are being used [ i. authorized dealer or service...
Owner's Manual
Page 128
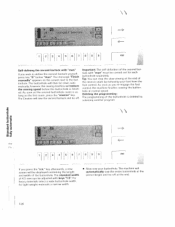
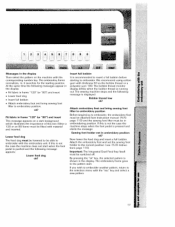
... materials a narrow width • Now sew your foot from the toot control. press key "6" below "man" The message "Finish manually" appears on the screen next to define the second bartack yourself. The Creative will automatically sew the entire buttonhole at the preset length and tie off . As soon as the first seam...
... materials a narrow width • Now sew your foot from the toot control. press key "6" below "man" The message "Finish manually" appears on the screen next to define the second bartack yourself. The Creative will automatically sew the entire buttonhole at the preset length and tie off . As soon as the first seam...
Owner's Manual
Page 186
4V1 Embroice,yj 7570 PFAFF creative 7570 i- in, N Instruction manual
4V1 Embroice,yj 7570 PFAFF creative 7570 i- in, N Instruction manual
Owner's Manual
Page 195
... embroidery unit is switched off and connect embroidery unit. attiTshhrhmeeselimrdeaemsaaacrflbhoaorirnofngaietdhs.ebeTiretyamtwwkuaielenclecihtgnaionris.etehctewloicfhelkionleoedsrubirpenelitanottghetahahtenetldhbdeuthpsghaeurinaifdrlgleeeelo-(n5to) I I I I I I I I I I Bushing Creative for connecting 7570. ok" Attention! the embroidery unit to the If you try to /from the machine when the machine is not connected the message appears in the ...
... embroidery unit is switched off and connect embroidery unit. attiTshhrhmeeselimrdeaemsaaacrflbhoaorirnofngaietdhs.ebeTiretyamtwwkuaielenclecihtgnaionris.etehctewloicfhelkionleoedsrubirpenelitanottghetahahtenetldhbdeuthpsghaeurinaifdrlgleeeelo-(n5to) I I I I I I I I I I Bushing Creative for connecting 7570. ok" Attention! the embroidery unit to the If you try to /from the machine when the machine is not connected the message appears in the ...
Owner's Manual
Page 197
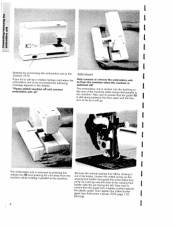
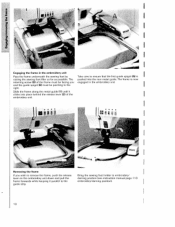
... the frame, push the release Bring the sewing foot holder to embroidery/ lever on the embroidery unit down and pull the darning position (see instruction manual page 110 frame forwards while keeping it parallel to ensure that the first guide spigot (A) is now engaged in the embroidery unit Pass the frame...
... the frame, push the release Bring the sewing foot holder to embroidery/ lever on the embroidery unit down and pull the darning position (see instruction manual page 110 frame forwards while keeping it parallel to ensure that the first guide spigot (A) is now engaged in the embroidery unit Pass the frame...
Owner's Manual
Page 204
... off. Attach the embroidery foot and set the sewing foot holder to embroider. it searches for the starting to the correct position (see Instruction manual 7570 page 11 0) and the sewing foot lifter must be able to embroidery position. If you wish to embroider another pattern, return to insert a... the pattern on a dark background which illustrates the importance of this line, Either a 1 20 or an 80 frame must be attached (see 7570 Instruc tions page 11 0). The sewing machine stops and the following message appears: Lower feed dog ok? 1 21 3 4 5 61 890 r I 17...
... off. Attach the embroidery foot and set the sewing foot holder to embroider. it searches for the starting to the correct position (see Instruction manual 7570 page 11 0) and the sewing foot lifter must be able to embroidery position. If you wish to embroider another pattern, return to insert a... the pattern on a dark background which illustrates the importance of this line, Either a 1 20 or an 80 frame must be attached (see 7570 Instruc tions page 11 0). The sewing machine stops and the following message appears: Lower feed dog ok? 1 21 3 4 5 61 890 r I 17...

Owner's Manual
Page 211
C Embroidery unit 7570 PFAP creatIve 7570 - I t PMf Instruction manual
C Embroidery unit 7570 PFAP creatIve 7570 - I t PMf Instruction manual
Owner's Manual
Page 246
C Embroice unit 7570 PFAFF creative 7570 440 40 4 I \ Instruction manual
C Embroice unit 7570 PFAFF creative 7570 440 40 4 I \ Instruction manual
Owner's Manual
Page 286
Before beginning to the previous word segment is the same. Now you can embroider the desired word onto your fabric without any problems. C a, U, 0 Cu a, 2 97 When combining word sections always ensure that the position, height and distance to embroider you can go through the embroidery pattern with the key (see instruction manual page 23) and correct the position of the word or letter if necessary.
Before beginning to the previous word segment is the same. Now you can embroider the desired word onto your fabric without any problems. C a, U, 0 Cu a, 2 97 When combining word sections always ensure that the position, height and distance to embroider you can go through the embroidery pattern with the key (see instruction manual page 23) and correct the position of the word or letter if necessary.


