
Owner's Manual
Page 2
...-lead terminal I nor to BS 1362 and the fuse cover must be replaced complete. Cut off mains plugs are available from electrical suppliers or the PFAFF agencies. Spare fuse covers are definitely not to the terminal which is marked with the corresponding colour code. Defective mains leads must be connected to.... Please fold this page open to the following code: Blue: Neutral Brown: Live As the colours of the wires in the mains lead of this instruction manual when reading it.
...-lead terminal I nor to BS 1362 and the fuse cover must be replaced complete. Cut off mains plugs are available from electrical suppliers or the PFAFF agencies. Spare fuse covers are definitely not to the terminal which is marked with the corresponding colour code. Defective mains leads must be connected to.... Please fold this page open to the following code: Blue: Neutral Brown: Live As the colours of the wires in the mains lead of this instruction manual when reading it.
Owner's Manual
Page 3
...observe the general safety notes on cord. Do not reach for a sewing machine that has fallen into water. Do not place in the instruction manual. 1 7. ments recommended by the manufacturer only. 14. Never operate on a soft surface such as contained in this sewing machine is...Do not use bent or blunt needles. Always use only. Always unplug sewing machine from the electric outlet immediately after using this manual. 3. SAVE THESE INSTRUCTIONS 1 Always unplug sewing machine before using and before cleaning. 2. VVARNING To reduce the risk of -doors. 7. Use only attach...
...observe the general safety notes on cord. Do not reach for a sewing machine that has fallen into water. Do not place in the instruction manual. 1 7. ments recommended by the manufacturer only. 14. Never operate on a soft surface such as contained in this sewing machine is...Do not use bent or blunt needles. Always use only. Always unplug sewing machine from the electric outlet immediately after using this manual. 3. SAVE THESE INSTRUCTIONS 1 Always unplug sewing machine before using and before cleaning. 2. VVARNING To reduce the risk of -doors. 7. Use only attach...
Owner's Manual
Page 186
in, N Instruction manual 4V1 Embroice,yj 7570 PFAFF creative 7570 i-
in, N Instruction manual 4V1 Embroice,yj 7570 PFAFF creative 7570 i-
Owner's Manual
Page 195
... embroidery unit is switched off and connect embroidery unit. attiTshhrhmeeselimrdeaemsaaacrflbhoaorirnofngaietdhs.ebeTiretyamtwwkuaielenclecihtgnaionris.etehctewloicfhelkionleoedsrubirpenelitanottghetahahtenetldhbdeuthpsghaeurinaifdrlgleeeelo-(n5to) I I I I I I I I I I Bushing Creative for connecting 7570. ok" Attention! the embroidery unit to the If you try to /from the machine when the machine is not connected the message appears in the ...
... embroidery unit is switched off and connect embroidery unit. attiTshhrhmeeselimrdeaemsaaacrflbhoaorirnofngaietdhs.ebeTiretyamtwwkuaielenclecihtgnaionris.etehctewloicfhelkionleoedsrubirpenelitanottghetahahtenetldhbdeuthpsghaeurinaifdrlgleeeelo-(n5to) I I I I I I I I I I Bushing Creative for connecting 7570. ok" Attention! the embroidery unit to the If you try to /from the machine when the machine is not connected the message appears in the ...
Owner's Manual
Page 197
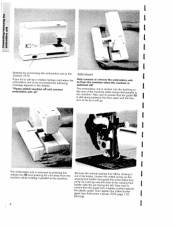
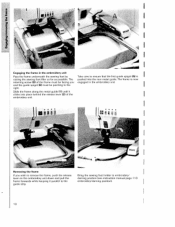
... remove the frame, push the release Bring the sewing foot holder to embroidery/ lever on the embroidery unit down and pull the darning position (see instruction manual page 110 frame forwards while keeping it clicks into the rear metal guide.
... remove the frame, push the release Bring the sewing foot holder to embroidery/ lever on the embroidery unit down and pull the darning position (see instruction manual page 110 frame forwards while keeping it clicks into the rear metal guide.
Owner's Manual
Page 204
... a full bobbin. By pressing the "ok' key, the selected pattern is running out. it searches for the starting to the correct position (see Instruction manual 7570 page 11 0) and the sewing foot lifter must be able to the selection menu with material and inserted. Fit fabric in frame "1 20" (or...full bobbin • Attach embroidery foot and bring sewing foot lifter to embroidery position Before beginning to embroider, the embroidery foot must be attached (see 7570 Instruc tions page 11 0). If this line, Either a 1 20 or an 80 frame must be lowered to be switched off. Important: The...
... a full bobbin. By pressing the "ok' key, the selected pattern is running out. it searches for the starting to the correct position (see Instruction manual 7570 page 11 0) and the sewing foot lifter must be able to the selection menu with material and inserted. Fit fabric in frame "1 20" (or...full bobbin • Attach embroidery foot and bring sewing foot lifter to embroidery position Before beginning to embroider, the embroidery foot must be attached (see 7570 Instruc tions page 11 0). If this line, Either a 1 20 or an 80 frame must be lowered to be switched off. Important: The...

Owner's Manual
Page 211
I t PMf Instruction manual C Embroidery unit 7570 PFAP creatIve 7570 -
I t PMf Instruction manual C Embroidery unit 7570 PFAP creatIve 7570 -
Owner's Manual
Page 246
C Embroice unit 7570 PFAFF creative 7570 440 40 4 I \ Instruction manual
C Embroice unit 7570 PFAFF creative 7570 440 40 4 I \ Instruction manual
Owner's Manual
Page 286
Before beginning to the previous word segment is the same. When combining word sections always ensure that the position, height and distance to embroider you can go through the embroidery pattern with the key (see instruction manual page 23) and correct the position of the word or letter if necessary. Now you can embroider the desired word onto your fabric without any problems. C a, U, 0 Cu a, 2 97
Before beginning to the previous word segment is the same. When combining word sections always ensure that the position, height and distance to embroider you can go through the embroidery pattern with the key (see instruction manual page 23) and correct the position of the word or letter if necessary. Now you can embroider the desired word onto your fabric without any problems. C a, U, 0 Cu a, 2 97


