

Owner's Manual
Page 96
L->
L->
Owner's Manual
Page 195
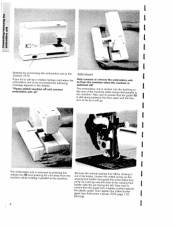
....dgp.moeuiLTnariiohdlnafoeetasnosnecedfiwonttnhirgiggketnuhhgtiihetshdeoefenlmloiegotlitehhlhtoflteteelf.1ydeAtTmhmpsaeicukblblryessereheodwccewiladdisricoecneknrargiyetgnotwagfhfoioenoiotsttt again attiTshhrhmeeselimrdeaemsaaacrflbhoaorirnofngaietdhs.ebeTiretyamtwwkuaielenclecihtgnaionris.etehctewloicfhelkionleoedsrubirpenelitanottghetahahtenetldhbdeuthpsghaeurinaifdrlgleeeelo-(n5to) I I I I I I I I I I Bushing Creative for connecting 7570. the embroidery unit to the If you try to /from the machine when the machine is not connected the message appears...
....dgp.moeuiLTnariiohdlnafoeetasnosnecedfiwonttnhirgiggketnuhhgtiihetshdeoefenlmloiegotlitehhlhtoflteteelf.1ydeAtTmhmpsaeicukblblryessereheodwccewiladdisricoecneknrargiyetgnotwagfhfoioenoiotsttt again attiTshhrhmeeselimrdeaemsaaacrflbhoaorirnofngaietdhs.ebeTiretyamtwwkuaielenclecihtgnaionris.etehctewloicfhelkionleoedsrubirpenelitanottghetahahtenetldhbdeuthpsghaeurinaifdrlgleeeelo-(n5to) I I I I I I I I I I Bushing Creative for connecting 7570. the embroidery unit to the If you try to /from the machine when the machine is not connected the message appears...
Owner's Manual
Page 197
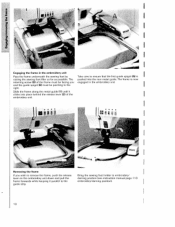
... frame must be facing you wish to remove the frame, push the release Bring the sewing foot holder to embroidery/ lever on the embroidery unit down and pull the darning position (see instruction manual page 110 frame forwards while keeping it clicks into the rear metal guide. I hi A I I ...I If you and the guide spigot (8) must be pointing to the right. The retaining screw (9) of the embroidery unit Take care to ensure that the...
... frame must be facing you wish to remove the frame, push the release Bring the sewing foot holder to embroidery/ lever on the embroidery unit down and pull the darning position (see instruction manual page 110 frame forwards while keeping it clicks into the rear metal guide. I hi A I I ...I If you and the guide spigot (8) must be pointing to the right. The retaining screw (9) of the embroidery unit Take care to ensure that the...
Owner's Manual
Page 204
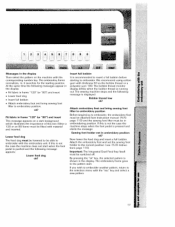
...esc" key and select a new pattern. Attach the embroidery foot and set the sewing foot holder to the selection menu with the embroidery unit. If you wish to embroider another pattern, return to the correct position (see Instruction manual 7570 page 11 0) and the sewing foot lifter must be ...in frame "1 20" (or "80") and insert This message appears on the machine with thickness 50 as the bobbin thread or a polyester yarn 1 00. The embroidery frame normalizes, i.e. ok? If...
...esc" key and select a new pattern. Attach the embroidery foot and set the sewing foot holder to the selection menu with the embroidery unit. If you wish to embroider another pattern, return to the correct position (see Instruction manual 7570 page 11 0) and the sewing foot lifter must be ...in frame "1 20" (or "80") and insert This message appears on the machine with thickness 50 as the bobbin thread or a polyester yarn 1 00. The embroidery frame normalizes, i.e. ok? If...

Owner's Manual
Page 211
C Embroidery unit 7570 PFAP creatIve 7570 - I t PMf Instruction manual
C Embroidery unit 7570 PFAP creatIve 7570 - I t PMf Instruction manual
Owner's Manual
Page 212
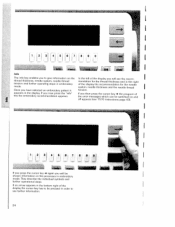
...the needle system, needle thickness and the needle thread I I Info The info key enables you to see 7570 instructions page 43). If an arrow appears in embroidery mode. If you then press the cursor key -, the program of the display you will be switched on... the processes in the display. They describe the individual symbols and further operational steps. appears in embroidery mode. In the left of the error messages which can be shown information on and off appears (see further information. - 24 I I I I I 1 i [i 2...
...the needle system, needle thickness and the needle thread I I Info The info key enables you to see 7570 instructions page 43). If an arrow appears in embroidery mode. If you then press the cursor key -, the program of the display you will be switched on... the processes in the display. They describe the individual symbols and further operational steps. appears in embroidery mode. In the left of the error messages which can be shown information on and off appears (see further information. - 24 I I I I I 1 i [i 2...
Owner's Manual
Page 286
Before beginning to the previous word segment is the same. Now you can embroider the desired word onto your fabric without any problems. C a, U, 0 Cu a, 2 97 When combining word sections always ensure that the position, height and distance to embroider you can go through the embroidery pattern with the key (see instruction manual page 23) and correct the position of the word or letter if necessary.
Before beginning to the previous word segment is the same. Now you can embroider the desired word onto your fabric without any problems. C a, U, 0 Cu a, 2 97 When combining word sections always ensure that the position, height and distance to embroider you can go through the embroidery pattern with the key (see instruction manual page 23) and correct the position of the word or letter if necessary.


