
Owner's Manual
Page 8
...Changing the needle plate Cleaning and oiling Clear key Code lock Combined borders Contrast (display) Cording foot Covering seams Creative card Cross stitch Cursor function Cursor keys Darning Deleting patterns Detachable work support Dual Feed Eight-way feed stitches Elastic...Automatic darning A-z key Balance Basting stitch Battery message Bias tape binder Blind stitch Bobbin case Bobbin thread Bobbin thread monitor Bobbin thread, raising the Bobbin thread tension Bobbin winding Buttonholes Buttonholes with gimp thread Card Carrying case Changing a sewing foot Changing stitch length and width.
...Changing the needle plate Cleaning and oiling Clear key Code lock Combined borders Contrast (display) Cording foot Covering seams Creative card Cross stitch Cursor function Cursor keys Darning Deleting patterns Detachable work support Dual Feed Eight-way feed stitches Elastic...Automatic darning A-z key Balance Basting stitch Battery message Bias tape binder Blind stitch Bobbin case Bobbin thread Bobbin thread monitor Bobbin thread, raising the Bobbin thread tension Bobbin winding Buttonholes Buttonholes with gimp thread Card Carrying case Changing a sewing foot Changing stitch length and width.
Owner's Manual
Page 25
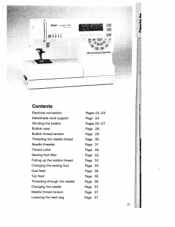
j PFAFF cratjve 7570 I , 1*v \ I Contents Electrical connection Detachable work support Winding the bobbin Bobbin case Bobbin thread tension Threading the needle thread Needle threader Thread cutter Sewing foot lifter Pulling up the bobbin thread Changing the sewing foot Dual feed Top feed Threading through the needle Changing the needle Needle thread tension Lowering the feed dog Pages 22-23 Page 24 Pages 25-27 Page 28 Page 29 Page 30 Page 31 Page 32 Page 32 Page 32 Page 33 Page 34 Page 35 Page 36 Page 37 Page 37 Page 37 I I 1 I 1' I I.21
j PFAFF cratjve 7570 I , 1*v \ I Contents Electrical connection Detachable work support Winding the bobbin Bobbin case Bobbin thread tension Threading the needle thread Needle threader Thread cutter Sewing foot lifter Pulling up the bobbin thread Changing the sewing foot Dual feed Top feed Threading through the needle Changing the needle Needle thread tension Lowering the feed dog Pages 22-23 Page 24 Pages 25-27 Page 28 Page 29 Page 30 Page 31 Page 32 Page 32 Page 32 Page 33 Page 34 Page 35 Page 36 Page 37 Page 37 Page 37 I I 1 I 1' I I.21
Owner's Manual
Page 32
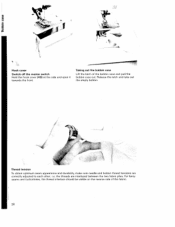
I Hook cover Switch off the master switch. For fancy seams and buttonholes, the thread interlace should be visible on the reverse side of the bobbin case and pull the bobbin case out. Hold the hook cover (49) at the side and open it towards the front. Taking out the bobbin case Lift the latch of the fabric. 28 the threads are correctly adjusted to each other; i.e. Release the latch and take out the empty bobbin. Thread tension To obtain optimum seam appearance and durability, make sure needle and bobbin thread tensions are interlaced between the two fabric plies.
I Hook cover Switch off the master switch. For fancy seams and buttonholes, the thread interlace should be visible on the reverse side of the bobbin case and pull the bobbin case out. Hold the hook cover (49) at the side and open it towards the front. Taking out the bobbin case Lift the latch of the fabric. 28 the threads are correctly adjusted to each other; i.e. Release the latch and take out the empty bobbin. Thread tension To obtain optimum seam appearance and durability, make sure needle and bobbin thread tensions are interlaced between the two fabric plies.
Owner's Manual
Page 33
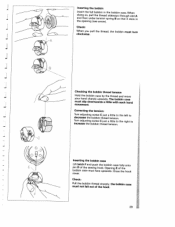
... thread sideways through slot under tension spring B so that it rests A in the bobbin case. the right to Inserting the bobbin case Lift latch F and push the bobbin case fully onto pin 0 of the hook. case must turn Checking the bobbin thread tension Hold the bobbin case by the thread and move mymoouuvsr tehmsalniepdndts.hoawrpnlwy aurpdwsaardlsi.ttTlehewbitohbbeainchcahsaend Correcting the tension...
... thread sideways through slot under tension spring B so that it rests A in the bobbin case. the right to Inserting the bobbin case Lift latch F and push the bobbin case fully onto pin 0 of the hook. case must turn Checking the bobbin thread tension Hold the bobbin case by the thread and move mymoouuvsr tehmsalniepdndts.hoawrpnlwy aurpdwsaardlsi.ttTlehewbitohbbeainchcahsaend Correcting the tension...
Owner's Manual
Page 48
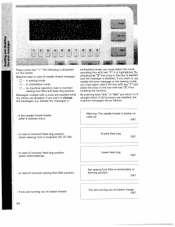
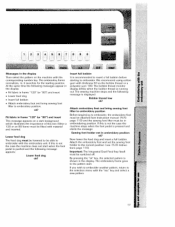
... message: LI - It is displayed on the screen: Machine stop in embroidery mode, you are disabled. In case of incorrect feed dog position (when embroidering): In case of bobbin thread OK? By pressing keys "o.k." or "esc" you return to incorrect sewing foot lifter and feed dog position...If all functions are enabled, the machine messages are running out of incorrect feed dog position - (when sewing) (not in sewing mode X - In case of bobbin thread: 44 Lower feed dog OK? I Li i1 Vi *H 8L ;8 7; b Press cursor key"-*The following is highlighted. If you must again...
... message: LI - It is displayed on the screen: Machine stop in embroidery mode, you are disabled. In case of incorrect feed dog position (when embroidering): In case of bobbin thread OK? By pressing keys "o.k." or "esc" you return to incorrect sewing foot lifter and feed dog position...If all functions are enabled, the machine messages are running out of incorrect feed dog position - (when sewing) (not in sewing mode X - In case of bobbin thread: 44 Lower feed dog OK? I Li i1 Vi *H 8L ;8 7; b Press cursor key"-*The following is highlighted. If you must again...
Owner's Manual
Page 118
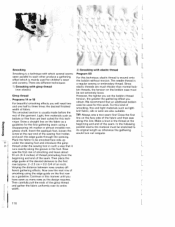
... such as the design requires. Make a knot in the thread at the guideline for the first gathering seam using the edge guide on the bobbin case must be smocked face side up under the sewing foot and introduce the gimp thread under the sewing foot in the foot. In the following...edge guide at the rear end of smocking, fine and light materials such as a along the groove in such a way that an additional bobbin case be set the bobbin-thread Programs 14 orlB tension, the greater the gathering effect you For beautiful smocking effects you set extremely loose. For this line. Then ...
... such as the design requires. Make a knot in the thread at the guideline for the first gathering seam using the edge guide on the bobbin case must be smocked face side up under the sewing foot and introduce the gimp thread under the sewing foot in the foot. In the following...edge guide at the rear end of smocking, fine and light materials such as a along the groove in such a way that an additional bobbin case be set the bobbin-thread Programs 14 orlB tension, the greater the gathering effect you For beautiful smocking effects you set extremely loose. For this line. Then ...
Owner's Manual
Page 151
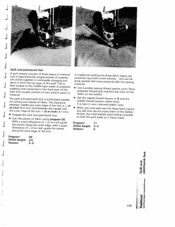
... connected to form the top layer of the quilt that thread (perlon yarn). thread, the intermediate stitch will only see the triple stitch of the bobbin • Engage the quilt and patchwork foot. • Join the pieces of fabric. Program: 11 Stitch length: 3-4 Tension: 9 Program: 00 Stitch length: 2,5 ...always consists of three layers of the foot. The clearance between needle and outer edge of the foot is best to use a second bobbin case. • When you will be done quicker and more practical with small stitches - Lots of geometrically shaped pieces of an inch (6,3 ...
... connected to form the top layer of the quilt that thread (perlon yarn). thread, the intermediate stitch will only see the triple stitch of the bobbin • Engage the quilt and patchwork foot. • Join the pieces of fabric. Program: 11 Stitch length: 3-4 Tension: 9 Program: 00 Stitch length: 2,5 ...always consists of three layers of the foot. The clearance between needle and outer edge of the foot is best to use a second bobbin case. • When you will be done quicker and more practical with small stitches - Lots of geometrically shaped pieces of an inch (6,3 ...

Owner's Manual
Page 161
... slubbed or hard. Insert new needle and push it has J become dry after about 10 seconds. See needle chart (Pages 152/153). Push the bobbin case in storage. Seam is too thick. Slide C (see page 37) to the hook. Thread is sewn unevenly The tension needs adjusting. j J ...new needle. Needle is too tight. J Thread tension is bent or blunt. If you are nearby. 159 Use perfect threads only. The bobbin case is lowered. Remove needle plate, remove lint with a larger eye (System 130 N). Check the threading paths. Feed dog is not properly ...
... slubbed or hard. Insert new needle and push it has J become dry after about 10 seconds. See needle chart (Pages 152/153). Push the bobbin case in storage. Seam is too thick. Slide C (see page 37) to the hook. Thread is sewn unevenly The tension needs adjusting. j J ...new needle. Needle is too tight. J Thread tension is bent or blunt. If you are nearby. 159 Use perfect threads only. The bobbin case is lowered. Remove needle plate, remove lint with a larger eye (System 130 N). Check the threading paths. Feed dog is not properly ...
Owner's Manual
Page 204
... select the pattern on a dark background which illustrates the importance of this is not the case the machine stops when the foot pedal is shown in embroidering position. If this is not the case the machine does not start . Attach embroidery foot and bring sewing foot lifter to embroider,.... Attach the embroidery foot and set the sewing foot holder to the correct position (see Instruction manual 7570 page 11 0) and the sewing foot lifter must be able to embroider. ok? Insert full bobbin It is running out. Fit fabric in frame "1 20" (or "80") and insert This message...
... select the pattern on a dark background which illustrates the importance of this is not the case the machine stops when the foot pedal is shown in embroidering position. If this is not the case the machine does not start . Attach embroidery foot and bring sewing foot lifter to embroider,.... Attach the embroidery foot and set the sewing foot holder to the correct position (see Instruction manual 7570 page 11 0) and the sewing foot lifter must be able to embroider. ok? Insert full bobbin It is running out. Fit fabric in frame "1 20" (or "80") and insert This message...


