
Owner's Manual
Page 2
... belt must be adjusted by pulling out the mains plug. 3. This is wet, e.g. When leaving the machine, during work or when changing mechanical parts or accessories, always disconnect the machine from the mains by a Pfaff mechanic. 5. The machine for ventilation must be used for another purpose than that intended or if it is solely...
... belt must be adjusted by pulling out the mains plug. 3. This is wet, e.g. When leaving the machine, during work or when changing mechanical parts or accessories, always disconnect the machine from the mains by a Pfaff mechanic. 5. The machine for ventilation must be used for another purpose than that intended or if it is solely...
Owner's Manual
Page 6
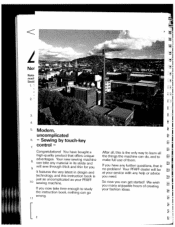
... to study the instruction book, nothing can get started! If you have bought a high-quality product that is 10 just as uncomplicated as your PFAFF sewing machine. Your PFAFF dealer will sew through thick and thin for you can go wrong. 11 E2 iK j I 3. 4. If you need. We wish you many enjoyable hours...
... to study the instruction book, nothing can get started! If you have bought a high-quality product that is 10 just as uncomplicated as your PFAFF sewing machine. Your PFAFF dealer will sew through thick and thin for you can go wrong. 11 E2 iK j I 3. 4. If you need. We wish you many enjoyable hours...
Owner's Manual
Page 9
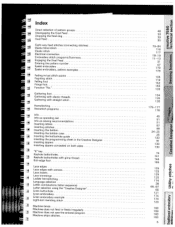
...programming sheet in /out stitch points Fagoting stitch Felling foot Fringe foot Function "No." Light-knit mending stitch Machine binds Machine does not feed or feeds irregularly Machine does not sew the entered program Machine skips stitches 48 to 0 33 ' 33 30 I C 79-84 1 11 7 1 8-1 9 11... stitch programs/Summary Engaging the Dual Feed Entering the pattern number Eyelet embroidery Eyelet embroidery, pattern examples Fading in the Creative Designer j Inserting zippers Inserting zippers concealed on both sides "K"key Keyhole buttonholes Keyhole buttonholes with gimp thread Knit-edge ...
...programming sheet in /out stitch points Fagoting stitch Felling foot Fringe foot Function "No." Light-knit mending stitch Machine binds Machine does not feed or feeds irregularly Machine does not sew the entered program Machine skips stitches 48 to 0 33 ' 33 30 I C 79-84 1 11 7 1 8-1 9 11... stitch programs/Summary Engaging the Dual Feed Entering the pattern number Eyelet embroidery Eyelet embroidery, pattern examples Fading in the Creative Designer j Inserting zippers Inserting zippers concealed on both sides "K"key Keyhole buttonholes Keyhole buttonholes with gimp thread Knit-edge ...
Owner's Manual
Page 10
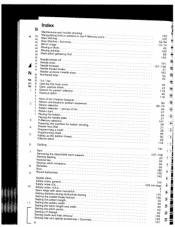
... start I Pattern selection - Richelieu Rom Round buttonhole Saddle stitch Safety notes, general 10. groups of the Creative Designer 2 F Pattern Pattern combinations selection (pattern sequence) I Placing the bobbin Placing the needle plate 3 P-Memory selection Preparing the machine Presser foot lifter for bobbin winding Programming a motif Programming sheet Pulling up /down Numbered keys (needle...
... start I Pattern selection - Richelieu Rom Round buttonhole Saddle stitch Safety notes, general 10. groups of the Creative Designer 2 F Pattern Pattern combinations selection (pattern sequence) I Placing the bobbin Placing the needle plate 3 P-Memory selection Preparing the machine Presser foot lifter for bobbin winding Programming a motif Programming sheet Pulling up /down Numbered keys (needle...
Owner's Manual
Page 22
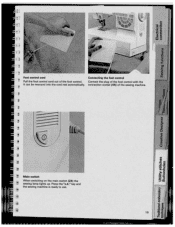
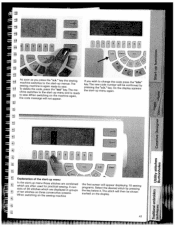
Press the 'ok key and the sewing machine is Main switch When switching on the main switch (24) the sewing lamp lights up. Connect the plug of the foot control with the It can be rewound into the cord reel automatically, connection socket (44) of the foot control. I I 19 I 1* 1$ is ready to use. Foot control cord Connecting the foot control Pull the foot control cord out of the sewing machine.
Press the 'ok key and the sewing machine is Main switch When switching on the main switch (24) the sewing lamp lights up. Connect the plug of the foot control with the It can be rewound into the cord reel automatically, connection socket (44) of the foot control. I I 19 I 1* 1$ is ready to use. Foot control cord Connecting the foot control Pull the foot control cord out of the sewing machine.
Owner's Manual
Page 24
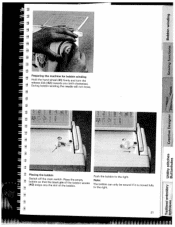
C C 0 0 C 0, L II!T I1L2 !i4I ri -3 / Wi Ii -3 Placing the bobbin (bS4ow0bi)btcishnnaospoffstthihnaettomtthhaeienbslslaowctkitocpfhit.nhPeolfabctoehbetbhibeno.ebmbipntywinder Push the bobbin to the right. Note: The bobbin can to the right. only be wound if it is moved fully 21 2 _cDQa,) CD During bobbin winding the needle will not move. . I TI' I,' Preparing the machine for bobbin winding Hold the hand wheel (41) release disk (42) towards firmly and turn the you (anti-clockwise).
C C 0 0 C 0, L II!T I1L2 !i4I ri -3 / Wi Ii -3 Placing the bobbin (bS4ow0bi)btcishnnaospoffstthihnaettomtthhaeienbslslaowctkitocpfhit.nhPeolfabctoehbetbhibeno.ebmbipntywinder Push the bobbin to the right. Note: The bobbin can to the right. only be wound if it is moved fully 21 2 _cDQa,) CD During bobbin winding the needle will not move. . I TI' I,' Preparing the machine for bobbin winding Hold the hand wheel (41) release disk (42) towards firmly and turn the you (anti-clockwise).
Owner's Manual
Page 41
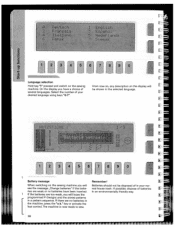
Select the number of batteries in the selected language. [ [ r Ffl[ff1 [ 1 Battery message Remember! key or activate the foot control.The machine is now ready to sew. If possible, dispose of your nor mal house trash. U, '4- If the batteries are too weak, you will loose the programmed P-... display will see the message ,,Change batteries" if the batte ries are no batteries have a choice of in a pattern sequence. When switching on the sewing machine. Batteries should not be shown in an environmentally friendly way. 38 If there are weak or no batteries in the...
Select the number of batteries in the selected language. [ [ r Ffl[ff1 [ 1 Battery message Remember! key or activate the foot control.The machine is now ready to sew. If possible, dispose of your nor mal house trash. U, '4- If the batteries are too weak, you will loose the programmed P-... display will see the message ,,Change batteries" if the batte ries are no batteries have a choice of in a pattern sequence. When switching on the sewing machine. Batteries should not be shown in an environmentally friendly way. 38 If there are weak or no batteries in the...
Owner's Manual
Page 43
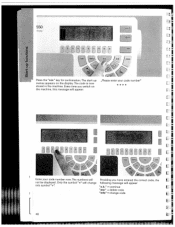
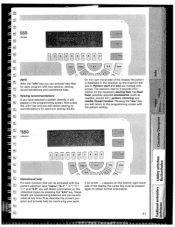
... message will change code LI - The numbers will appear: ,,Please enter your code number now. key for confirmation. The code is now stored in the machine. Only the symbol "*" will appear: "o.k." = continue "esc" = delete code "info"=change into symbol "+". I I • F Im ; ! I rI HrH L [a I Li i [E1[ L... Enter your code number" fl m "I ::I m i [ I 140 L s a anw a The start-up menue appears on the machine, this message will not be displayed. Providing you switch on the display. _____ 550 E1 [-H ii1[1W Press the "o.k."
... message will change code LI - The numbers will appear: ,,Please enter your code number now. key for confirmation. The code is now stored in the machine. Only the symbol "*" will appear: "o.k." = continue "esc" = delete code "info"=change into symbol "+". I I • F Im ; ! I rI HrH L [a I Li i [E1[ L... Enter your code number" fl m "I ::I m i [ I 140 L s a anw a The start-up menue appears on the machine, this message will not be displayed. Providing you switch on the display. _____ 550 E1 [-H ii1[1W Press the "o.k."
Owner's Manual
Page 44
.... LI a, 2 -Q E a, - Tcohidneelestweitthcheecsotdoe,thperesstsartth-uep"emsce"nukeayn. The pressing new code number the "o.k." When switching on the machine again, " the code message will the be confirmed by display appears the start -up menue. o\Jk. : / j As soon machine as you wish to the the "o.k." dThise ma ready If you press switches to change the...
.... LI a, 2 -Q E a, - Tcohidneelestweitthcheecsotdoe,thperesstsartth-uep"emsce"nukeayn. The pressing new code number the "o.k." When switching on the machine again, " the code message will the be confirmed by display appears the start -up menue. o\Jk. : / j As soon machine as you wish to the the "o.k." dThise ma ready If you press switches to change the...
Owner's Manual
Page 47
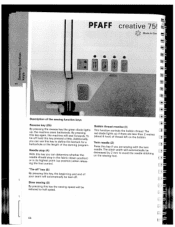
...needle should stop (4) With this key if you can use this key pressed a little. Bobbin thread monitor (1) This function controls the bobbin thread. PFAFF creative 75! 1 Mnda In G Description of the sewing function keys Reverse key (25) By pressing the reverse key the green diode lights up position...to avoid the needle stitching on less the than 2 bobbin. Needle stop in the fabric (down position) or in its highest point (up , the machine sews backwards. The stitch width will be decreased by 2 mm to half speed. 1 44 L metres Twin needle (2) Press this key you are (...
...needle should stop (4) With this key if you can use this key pressed a little. Bobbin thread monitor (1) This function controls the bobbin thread. PFAFF creative 75! 1 Mnda In G Description of the sewing function keys Reverse key (25) By pressing the reverse key the green diode lights up position...to avoid the needle stitching on less the than 2 bobbin. Needle stop in the fabric (down position) or in its highest point (up , the machine sews backwards. The stitch width will be decreased by 2 mm to half speed. 1 44 L metres Twin needle (2) Press this key you are (...
Owner's Manual
Page 54
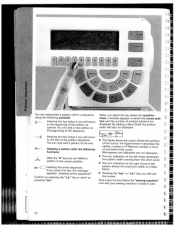
Now press the ,,info" key and you will obtain information on the necessary sewing feet, the Dual Feed, possible required accessories (such as the machine will sew it will appear in the direction as needles, stencil, etc.), pattern mirroring and needle thread tension. recommendations and operational help for continuing your ...
Now press the ,,info" key and you will obtain information on the necessary sewing feet, the Dual Feed, possible required accessories (such as the machine will sew it will appear in the direction as needles, stencil, etc.), pattern mirroring and needle thread tension. recommendations and operational help for continuing your ...
Owner's Manual
Page 58
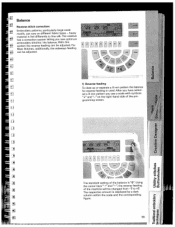
The creative has a correction system letting you see a scale with symbols "+" and "-" on different fabric types - For Maxi Stitches, additionally, the sideways feeding can be adjusted. After you have select ed a 9 mm pattern you sew optimum embroidery stitches: the balance. heavy material is used. I of the machine will be adjusted. [. EEi) -- .2- 20> < - > L a) C rf...
The creative has a correction system letting you see a scale with symbols "+" and "-" on different fabric types - For Maxi Stitches, additionally, the sideways feeding can be adjusted. After you have select ed a 9 mm pattern you sew optimum embroidery stitches: the balance. heavy material is used. I of the machine will be adjusted. [. EEi) -- .2- 20> < - > L a) C rf...
Owner's Manual
Page 67
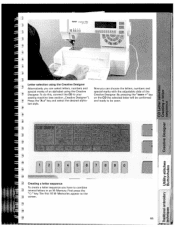
... the "" key. By pressing the "mem +" key sewing machine (see section ,,Creative Designer"). __ 'I Letter selection using the Creative Designer a Alternatively, you can choose the letters, numbers and special marks of an alphabet using the Creative special marks with the adjustable slide of the H' Designer. I Il I I I I PFAFF creatiSO i3iTi 5J! on the screen. (I) C.) 1-' a) 2 Ea) 65...
... the "" key. By pressing the "mem +" key sewing machine (see section ,,Creative Designer"). __ 'I Letter selection using the Creative Designer a Alternatively, you can choose the letters, numbers and special marks of an alphabet using the Creative special marks with the adjustable slide of the H' Designer. I Il I I I I PFAFF creatiSO i3iTi 5J! on the screen. (I) C.) 1-' a) 2 Ea) 65...
Owner's Manual
Page 74
... functions: With the "4" key you press this screen. V You can manipulate a pattern within a sequence When you select the key below the "sewing machine" IC L [ [ icon and your sewing machine is ready to the beginning of and behind the cursor. By adding a Maxi Stitch the pattern width will quit this key, the message...
... functions: With the "4" key you press this screen. V You can manipulate a pattern within a sequence When you select the key below the "sewing machine" IC L [ [ icon and your sewing machine is ready to the beginning of and behind the cursor. By adding a Maxi Stitch the pattern width will quit this key, the message...
Owner's Manual
Page 88
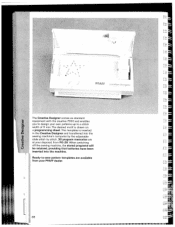
... 9 mm.The desired motif is inserted in the Creative Designer and transferred into the machine. I II 1/ i•1 I U F PFAF F The Creative Designer comes as standard equipment with the creative 7550 and enables you to design your own patterns up to -sew pattern templates are at your disposal, from your PFAFF dealer. This template is drawn on a programming...
... 9 mm.The desired motif is inserted in the Creative Designer and transferred into the machine. I II 1/ i•1 I U F PFAF F The Creative Designer comes as standard equipment with the creative 7550 and enables you to design your own patterns up to -sew pattern templates are at your disposal, from your PFAFF dealer. This template is drawn on a programming...
Owner's Manual
Page 90
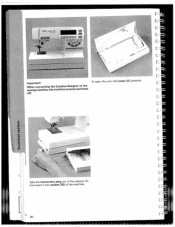
I .c . Take the connection plug out of the retainer (3) and insert it into socket (10) of the machine. PA rwavo me - :' Important! To open the unit, fold cover (2) upwards. • • Wsewheinngcomnancehcitnineg,ththeemCacrehaitnievemDuestsibgensewr tiotcthheed off!
I .c . Take the connection plug out of the retainer (3) and insert it into socket (10) of the machine. PA rwavo me - :' Important! To open the unit, fold cover (2) upwards. • • Wsewheinngcomnancehcitnineg,ththeemCacrehaitnievemDuestsibgensewr tiotcthheed off!
Owner's Manual
Page 92
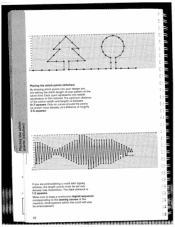
... The optimum distance of your pattern at a distance of roughly 2-5 squares. Make sure to keep a continuous logical sequence [ corresponding to the sewing course of the machine. (Interruptions within the motif will also be drawn more densely, at the same time. Each point represents one needle Ii penetration in the material. Only...
... The optimum distance of your pattern at a distance of roughly 2-5 squares. Make sure to keep a continuous logical sequence [ corresponding to the sewing course of the machine. (Interruptions within the motif will also be drawn more densely, at the same time. Each point represents one needle Ii penetration in the material. Only...
Owner's Manual
Page 95
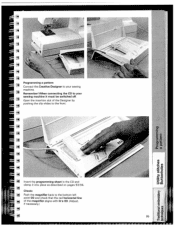
Remember! Insert the programming sheet in the CD and clamp it must be switched off. Open the insertion slot of the magnifier aligns with lire 00. (Adjust, if necessary.) C aco 0 oa()I - I ) t;.c LI 2 Ea) -Cl) C) 0O 95 CC3 i-if When connecting the CD to your sewing machine. Check: Push the magnifier back to the bottom left point 00 and check that the red horizontal line of the Designer by pushing the clip slides to your sewing machine it into place as described on pages 93/94. Programming a pattern Connect the Creative Designer to the front.
Remember! Insert the programming sheet in the CD and clamp it must be switched off. Open the insertion slot of the magnifier aligns with lire 00. (Adjust, if necessary.) C aco 0 oa()I - I ) t;.c LI 2 Ea) -Cl) C) 0O 95 CC3 i-if When connecting the CD to your sewing machine. Check: Push the magnifier back to the bottom left point 00 and check that the red horizontal line of the Designer by pushing the clip slides to your sewing machine it into place as described on pages 93/94. Programming a pattern Connect the Creative Designer to the front.
Owner's Manual
Page 96
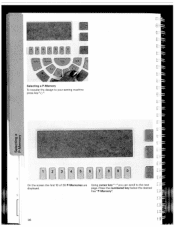
Press the numbered key below the desired free "P-Memory" I II 96 r Selecting a P-Memory To transfer the design to the next page. [ r 1 ' C- Using cursor key"*" you can scroll to your sewing machine press key"p)" E a) a)' 00.. 1 On the screen the first 10 of 30 P-Memories are displayed.
Press the numbered key below the desired free "P-Memory" I II 96 r Selecting a P-Memory To transfer the design to the next page. [ r 1 ' C- Using cursor key"*" you can scroll to your sewing machine press key"p)" E a) a)' 00.. 1 On the screen the first 10 of 30 P-Memories are displayed.
Owner's Manual
Page 97
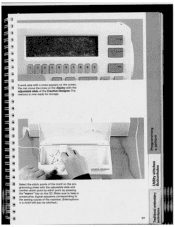
The memory is now ready for storage. I ,* creative designer Select the stitch points of the motif on the pro gramming sheet with the adjustable slide of the machine. (Interruptions in a motif will also be stitched,) 97 You can move the cross on the screen. If I £ A work area with a cross appears on the display with the adjustable slide and confirm stitch point by stitch point by pressing the "mem+" key on the CD, Make sure to keep a consecutive, logical sequence corresponding to the sewing course of the Creative Designer.
The memory is now ready for storage. I ,* creative designer Select the stitch points of the motif on the pro gramming sheet with the adjustable slide of the machine. (Interruptions in a motif will also be stitched,) 97 You can move the cross on the screen. If I £ A work area with a cross appears on the display with the adjustable slide and confirm stitch point by stitch point by pressing the "mem+" key on the CD, Make sure to keep a consecutive, logical sequence corresponding to the sewing course of the Creative Designer.


