

Owner's Manual
Page 8
... Changing the sewing foot or col Changing the sewing lamp The Cleaning and lubricating or col Clear key u must Cording foot The p Covering seams suppl Creative Designer Pleas Cross stitch Cross stitch buttonhole 18 32 1 72 29 1 73 172 L 42 41 49-51 38 165 166 106 61-91 142-145 11...
... Changing the sewing foot or col Changing the sewing lamp The Cleaning and lubricating or col Clear key u must Cording foot The p Covering seams suppl Creative Designer Pleas Cross stitch Cross stitch buttonhole 18 32 1 72 29 1 73 172 L 42 41 49-51 38 165 166 106 61-91 142-145 11...

Owner's Manual
Page 19
(DO q Cl' ,, ii j fikid I sewing creative designer Electronic Technical section
(DO q Cl' ,, ii j fikid I sewing creative designer Electronic Technical section

Owner's Manual
Page 22
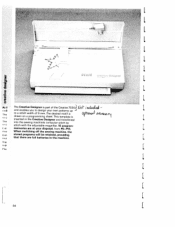
... or ct Cut I I L Caring case Top cover L Sa For t Place the enclosed mains cord, foot control, the Creative Designer, the instruction manual and the programming sheets in ía a I m us PFAFF creatve7o 0- -4 - Menu - decorative stitches [ Gr. 5 - L ii L PFAFF creative 7530 1 H in the compartment of the sewing machine (45) and the wall E groups. socket. alphabets 18 L flsusul1 1. Open...
... or ct Cut I I L Caring case Top cover L Sa For t Place the enclosed mains cord, foot control, the Creative Designer, the instruction manual and the programming sheets in ía a I m us PFAFF creatve7o 0- -4 - Menu - decorative stitches [ Gr. 5 - L ii L PFAFF creative 7530 1 H in the compartment of the sewing machine (45) and the wall E groups. socket. alphabets 18 L flsusul1 1. Open...

Owner's Manual
Page 58
I 1 q 2 3Jã 41 ã 5 6 á 7 t8 h 91 Ia I Creating a pattern sequence without the After pressing the "€" key, the message Creative Designer appears in an M-memory. I Tdeer1 I J L 0 tI flj 1 2 31 4 5 6 7 8 9110 Select the desired pattern sequence with stitch position center The message appears in each memory. Now ...
I 1 q 2 3Jã 41 ã 5 6 á 7 t8 h 91 Ia I Creating a pattern sequence without the After pressing the "€" key, the message Creative Designer appears in an M-memory. I Tdeer1 I J L 0 tI flj 1 2 31 4 5 6 7 8 9110 Select the desired pattern sequence with stitch position center The message appears in each memory. Now ...

Owner's Manual
Page 68
PFAFF creatwe1° - '- Contents Technical section The programming sheet Placing the stitch points Connecting creative designer Selecting a P-Memory Programming Combined patterns Changing a pattern Deleting a stitch, inserting a stitch Adding a stitch, Deleting a P-Memory Programming a P-Memory in M-Memory Alphabetic programming sheet Page 65 Pages 66,67,71,72 Page 68 Page 69 Page 70 Pages 73, 74 Pages 75-78 Pages 79-81 Page 83 Page 84 Page 85 Pages 86-9 1 11 Si/ ? ,9" C 4, -C [E Ii'63 -
PFAFF creatwe1° - '- Contents Technical section The programming sheet Placing the stitch points Connecting creative designer Selecting a P-Memory Programming Combined patterns Changing a pattern Deleting a stitch, inserting a stitch Adding a stitch, Deleting a P-Memory Programming a P-Memory in M-Memory Alphabetic programming sheet Page 65 Pages 66,67,71,72 Page 68 Page 69 Page 70 Pages 73, 74 Pages 75-78 Pages 79-81 Page 83 Page 84 Page 85 Pages 86-9 1 11 Si/ ? ,9" C 4, -C [E Ii'63 -
Owner's Manual
Page 69
... will be retained, providing C that there are at your own patterns up - to a stitch width of the Creative 7530} and enables you to design your disposal, from PO-P15. L I I I I memories are full batteries in the Creative Designer and transferred into the sewing machines computer stitch by stitch with the adjustable magnifier. 16 program- drawn on...
... will be retained, providing C that there are at your own patterns up - to a stitch width of the Creative 7530} and enables you to design your disposal, from PO-P15. L I I I I memories are full batteries in the Creative Designer and transferred into the sewing machines computer stitch by stitch with the adjustable magnifier. 16 program- drawn on...

Owner's Manual
Page 74
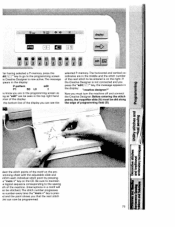
PFAF 7530 - "p S •. Lift cover 2 to recognize the Creative Designer. into socket (10) of the machine. The display shows straight stitch 00 with center needle position. Important The Creative Designer must be connected before the sewing machine is the only way for the sewing machine to open. I H •0 = JJ I ' ii69 ii H I Take connecting plug from retainer 3 and insert it Switch on at the on , this is switched on /off switch (25).
PFAF 7530 - "p S •. Lift cover 2 to recognize the Creative Designer. into socket (10) of the machine. The display shows straight stitch 00 with center needle position. Important The Creative Designer must be connected before the sewing machine is the only way for the sewing machine to open. I H •0 = JJ I ' ii69 ii H I Take connecting plug from retainer 3 and insert it Switch on at the on , this is switched on /off switch (25).

Owner's Manual
Page 76
Insert the pattern programming sheet in slot (8). Take care not to the left and the magnifier slide fully down and ad justable slide (4) left or right with the knob on both sides. Slide it upwards until the top edge of the paper slides under the the top cutout edge of the program ming area. Push the adjustable slide fully to fold the sheet. ii Ii ill Iii71 Inserting the programming sheet into the Creative Designer Slide the clip slides 7 and 12 forwards on the side. Adjusting the programming sheet Magnifier slide (5) is moved up or down .
Insert the pattern programming sheet in slot (8). Take care not to the left and the magnifier slide fully down and ad justable slide (4) left or right with the knob on both sides. Slide it upwards until the top edge of the paper slides under the the top cutout edge of the program ming area. Push the adjustable slide fully to fold the sheet. ii Ii ill Iii71 Inserting the programming sheet into the Creative Designer Slide the clip slides 7 and 12 forwards on the side. Adjusting the programming sheet Magnifier slide (5) is moved up or down .
Owner's Manual
Page 78
... next stitch to be entered is not connected and you P-pattern edit P1 BO 10 .1 press the "edit/1" key, the message appears in the display:,,creative designer? )U know you are in a motif will so be stitched.> The stitch number progresses ie number every time the "mem +" key is now active. ... elect the stitch points of the machine. (Interruptions in the middle and the stitch number ie Creative Designer is pres d and the point shows you that the next stitch )int can see the the Creative Designer. The horizontal and vertical co dit/" key to go to the sewing 3th of the motif on...
... next stitch to be entered is not connected and you P-pattern edit P1 BO 10 .1 press the "edit/1" key, the message appears in the display:,,creative designer? )U know you are in a motif will so be stitched.> The stitch number progresses ie number every time the "mem +" key is now active. ... elect the stitch points of the machine. (Interruptions in the middle and the stitch number ie Creative Designer is pres d and the point shows you that the next stitch )int can see the the Creative Designer. The horizontal and vertical co dit/" key to go to the sewing 3th of the motif on...

Owner's Manual
Page 83
"I I. Ensure that the needle enters the fabric at pattern L start point "A" of your embroidery ideas. lift pattern" key (16). Ihs 78 Sew the P-memories one after the other with the "single whatever you desire, the Creative Designer allows you to left. This ex Whether sewing a blouse, a shirt, bed linen or L "Li ample was sewn from right to realize all of the previously sewn pattern. L L 1 L L L L L L L And this is how it looks when finished. L tf ( >d 4-
"I I. Ensure that the needle enters the fabric at pattern L start point "A" of your embroidery ideas. lift pattern" key (16). Ihs 78 Sew the P-memories one after the other with the "single whatever you desire, the Creative Designer allows you to left. This ex Whether sewing a blouse, a shirt, bed linen or L "Li ample was sewn from right to realize all of the previously sewn pattern. L L 1 L L L L L L L And this is how it looks when finished. L tf ( >d 4-

Owner's Manual
Page 88
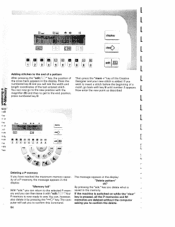
30 many = Idy i4 rr 0 BW ljJ £ L ,!J iJ W L1 Deleting a stitch In order to correct stitch points, the Creative Designer must first be connected and P-memory selected. If you wish to the previous stitch.The total number of stitches is reduced by 1. Then place the... is before the place which you wish to delete a stitch in the P-pattern. The "clear" key deletes the last stitch in the middle of the Creative Designer. r " key. Select the programming screen with numbered key 9, which is now entered and the stitches following it move up one stitch number. 1J tdt ...
30 many = Idy i4 rr 0 BW ljJ £ L ,!J iJ W L1 Deleting a stitch In order to correct stitch points, the Creative Designer must first be connected and P-memory selected. If you wish to the previous stitch.The total number of stitches is reduced by 1. Then place the... is before the place which you wish to delete a stitch in the P-pattern. The "clear" key deletes the last stitch in the middle of the Creative Designer. r " key. Select the programming screen with numbered key 9, which is now entered and the stitches following it move up one stitch number. 1J tdt ...
Owner's Manual
Page 89
... described magnifier (6) and then to get to confirm the delete. 84 "Memory full" By pressing the "o.k." ory and you to confirm this command. Press the Designer and your new stitch is now ready to sew. you have reached the maximum capac The message appears in the display: L ity of the... Creative the cross hairs appears in the "Delete pattern" display: ok? You can then leave it by pressing the "cIear'" key. asking you delete what is ...
... described magnifier (6) and then to get to confirm the delete. 84 "Memory full" By pressing the "o.k." ory and you to confirm this command. Press the Designer and your new stitch is now ready to sew. you have reached the maximum capac The message appears in the display: L ity of the... Creative the cross hairs appears in the "Delete pattern" display: ok? You can then leave it by pressing the "cIear'" key. asking you delete what is ...

Owner's Manual
Page 92
... the paper slides under the the of the slide the the PAFF creative PAF1 v JNIVJdJ f3V*f Position the adjustable and the magnifier slide as possible slide (4) as far to the right (5) as far to I - e II *, ' nserting the alphabet reative Designer program cards into the ee also page 71) ;ildoideres3.thIinnesseclrlotiptth(s8el)i.ddeessi7readndalp12hafboerwt...
... the paper slides under the the of the slide the the PAFF creative PAF1 v JNIVJdJ f3V*f Position the adjustable and the magnifier slide as possible slide (4) as far to the right (5) as far to I - e II *, ' nserting the alphabet reative Designer program cards into the ee also page 71) ;ildoideres3.thIinnesseclrlotiptth(s8el)i.ddeessi7readndalp12hafboerwt...

Owner's Manual
Page 93
... 7,0 0 As soon as you move the magnifier slide, the message appears in the program card. 1 1 a 1 H display cIear j r0 , 08I 1 2 3)4 5 6 7 8 9 fo [edit Connect the Creative Designer (see p. 53). Press "editI f" to go to the edge of the cutout of the programming field A is parallel to the programming screen. Then press key... machine on. J4 Slide the program card to the bottom right hand corner in such a way that the bottom border of the Creative Designer. Then slide the right clamp-slide 7 up to the back to clamp in the display: Select program card -CDPROG 88 Oq Vq 71!
... 7,0 0 As soon as you move the magnifier slide, the message appears in the program card. 1 1 a 1 H display cIear j r0 , 08I 1 2 3)4 5 6 7 8 9 fo [edit Connect the Creative Designer (see p. 53). Press "editI f" to go to the edge of the cutout of the programming field A is parallel to the programming screen. Then press key... machine on. J4 Slide the program card to the bottom right hand corner in such a way that the bottom border of the Creative Designer. Then slide the right clamp-slide 7 up to the back to clamp in the display: Select program card -CDPROG 88 Oq Vq 71!

Owner's Manual
Page 94
..., numbers and special characters of the programming field belonging to the right of programming field 9. Position the magnifier crosshairs 6 above the code number of the Creative Designer. he following message appears in the display: MO 1 CD PROG 1 Your selected M-memory appears in the top line of the display. .0 12 - 19 4 5 6 - - - 7 - 8 - 0 El! ii...
..., numbers and special characters of the programming field belonging to the right of programming field 9. Position the magnifier crosshairs 6 above the code number of the Creative Designer. he following message appears in the display: MO 1 CD PROG 1 Your selected M-memory appears in the top line of the display. .0 12 - 19 4 5 6 - - - 7 - 8 - 0 El! ii...

Owner's Manual
Page 95
The letter P is now saved and appears in the row and press the "mem +" key on the Designer. Repeat this example P) and press the "mem +" After having entered your text, press the "edit! Position the...those of the number. Enter the de sired text and program 177 as described above. Creating a pattern sequence with the Creative Designer d Example: Pfaff Position the magnifier cross-hairs over the first letter (in the pattern sequence. I 11 key on the left hand side... key. Now the programmed text can always be deleted with the vertical numbered row on the Creative Designer.
The letter P is now saved and appears in the row and press the "mem +" key on the Designer. Repeat this example P) and press the "mem +" After having entered your text, press the "edit! Position the...those of the number. Enter the de sired text and program 177 as described above. Creating a pattern sequence with the Creative Designer d Example: Pfaff Position the magnifier cross-hairs over the first letter (in the pattern sequence. I 11 key on the left hand side... key. Now the programmed text can always be deleted with the vertical numbered row on the Creative Designer.


