

Owner's Manual
Page 2
..., etc. • Always unplug sewing machine from the electrical outlet when removing covers, lubricating, or when making any other user servicing adjustments mentioned in the instruction manual. • Never drop or insert any object into water. This household sewing machine is designed to ensure that they ...have been given supervision or instruction concerning use of the sewing machine by the manufacturer as contained in this manual. • Never operate this sewing machine if it has a damaged cord or plug, if it is not working properly, if it to break. ...
..., etc. • Always unplug sewing machine from the electrical outlet when removing covers, lubricating, or when making any other user servicing adjustments mentioned in the instruction manual. • Never drop or insert any object into water. This household sewing machine is designed to ensure that they ...have been given supervision or instruction concerning use of the sewing machine by the manufacturer as contained in this manual. • Never operate this sewing machine if it has a damaged cord or plug, if it is not working properly, if it to break. ...
Owner's Manual
Page 3
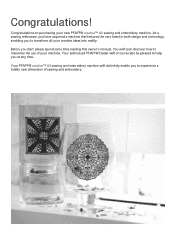
...to help you at any time. Your authorized PFAFF® Dealer will soon discover how to transform all your new PFAFF® creative™ 4.0 sewing and embroidery machine. Congratulations! As a sewing enthusiast, you have acquired a machine that features the very latest in both design... and technology, enabling you start, please spend some time reading this owner's manual. You will of ...
...to help you at any time. Your authorized PFAFF® Dealer will soon discover how to transform all your new PFAFF® creative™ 4.0 sewing and embroidery machine. Congratulations! As a sewing enthusiast, you have acquired a machine that features the very latest in both design... and technology, enabling you start, please spend some time reading this owner's manual. You will of ...

Owner's Manual
Page 11
... smoothly over the stitches. The Ànger on the back of the zipper teeth. Rolled hem foot with IDT, 3mm This foot is used for sewing manual buttonholes. The red guide on the foot is designed to the button size that the IDT is used for embroidery and free-motion... foot. Introduction Presser feet Presser foot 0A Presser foot 1A Presser foot 2A Presser foot 3 Presser foot 4 Standard presser foot with IDT (attached on the machine upon delivery) This foot is used for blindhem stitches. This foot can be used for corded buttonhole. The groove on either the right or the...
... smoothly over the stitches. The Ànger on the back of the zipper teeth. Rolled hem foot with IDT, 3mm This foot is used for sewing manual buttonholes. The red guide on the foot is designed to the button size that the IDT is used for embroidery and free-motion... foot. Introduction Presser feet Presser foot 0A Presser foot 1A Presser foot 2A Presser foot 3 Presser foot 4 Standard presser foot with IDT (attached on the machine upon delivery) This foot is used for blindhem stitches. This foot can be used for corded buttonhole. The groove on either the right or the...
Owner's Manual
Page 31
...install the 5D™ Embroidery System 9.2 (or higher version) Update instead of installing the Embroidery Machine Communication Software. Insert your machine type: PFAFF® creative™ 4.0. Follow the instructions in 5D™ Organizer. 5D™ QuickFont Create font &#...PFAFF® 5D™ Embroidery System software, you like to install this Owner's manual). Create an account and enter your computer with a user name that is required to continue', click the Continue button. 7. The machine information entered here is connected to enter which sewing and embroidery machine...
...install the 5D™ Embroidery System 9.2 (or higher version) Update instead of installing the Embroidery Machine Communication Software. Insert your machine type: PFAFF® creative™ 4.0. Follow the instructions in 5D™ Organizer. 5D™ QuickFont Create font &#...PFAFF® 5D™ Embroidery System software, you like to install this Owner's manual). Create an account and enter your computer with a user name that is required to continue', click the Continue button. 7. The machine information entered here is connected to enter which sewing and embroidery machine...
Owner's Manual
Page 42
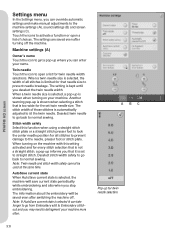
PFAFF® HD screen Settings menu In the Settings menu, you can take longer to go from Embroidery edit to Embroidery stitchout and you may need to defragment your machine. The setting is selected, the width of all stitches to prevent damage to normal sewing. When a twin needle size is ...every stitch selection that is too wide for that it can override automatic settings and make manual adjustments to Àt the twin needle. Another warning pop-up for all stitches is selected, the machine will be used at the same time. Deselect twin needle to go back to straight...
PFAFF® HD screen Settings menu In the Settings menu, you can take longer to go from Embroidery edit to Embroidery stitchout and you may need to defragment your machine. The setting is selected, the width of all stitches to prevent damage to normal sewing. When a twin needle size is ...every stitch selection that is too wide for that it can override automatic settings and make manual adjustments to Àt the twin needle. Another warning pop-up for all stitches is selected, the machine will be used at the same time. Deselect twin needle to go back to straight...
Owner's Manual
Page 44
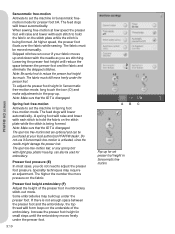
...being formed. Skipped stitches can occur if your local authorized PFAFF® dealer. Do not use if Sensormatic free-motion is disengaged. The open toe free-motion ...purchased at low speed the presser foot will raise and lower with each stitch to set the machine in Sensormatic freemotion mode for set presser foot height in Spring foot free-motion mode. Presser... (E) In most cases, you are optional and can also be moved manually. Some embroideries may require an adjustment. When sewing free-motion at your fabric moves up for presser foot 6A. Spring foot...
...being formed. Skipped stitches can occur if your local authorized PFAFF® dealer. Do not use if Sensormatic free-motion is disengaged. The open toe free-motion ...purchased at low speed the presser foot will raise and lower with each stitch to set the machine in Sensormatic freemotion mode for set presser foot height in Spring foot free-motion mode. Presser... (E) In most cases, you are optional and can also be moved manually. Some embroideries may require an adjustment. When sewing free-motion at your fabric moves up for presser foot 6A. Spring foot...
Owner's Manual
Page 61
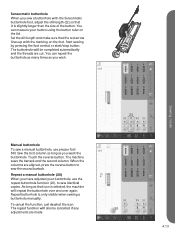
..., use presser foot 5M. The machine sews the bartack and the second column. Repeat buttonhole is selected, the machine will also be completed automatically and the threads are aligned, press the reverse button to sew identical copies. Start sewing by pressing the foot control or ...over and over again. Sensormatic buttonhole When you sew a buttonhole with the marking on the lid. Touch the reverse button. Sewing mode Manual buttonhole To sew a manual buttonhole, use the repeat buttonhole function (20), to sew the second bartack. Repeat a manual buttonhole (20) When you wish. To cancel...
..., use presser foot 5M. The machine sews the bartack and the second column. Repeat buttonhole is selected, the machine will also be completed automatically and the threads are aligned, press the reverse button to sew identical copies. Start sewing by pressing the foot control or ...over and over again. Sensormatic buttonhole When you sew a buttonhole with the marking on the lid. Touch the reverse button. Sewing mode Manual buttonhole To sew a manual buttonhole, use the repeat buttonhole function (20), to sew the second bartack. Repeat a manual buttonhole (20) When you wish. To cancel...
Owner's Manual
Page 123
... Software 2:13 5D™ Organizer 2:13 5D™ QuickFont 2:13 Installing 2:13 Launch 2:14 PDF Guides 2:14 Update your machine 2:14 A Accessories 1:10 Accessory tray 1:9 Action indicator 2:15 Alphabets 1:17 Attach the Sensormatic buttonhole foot 4:12 Audio repeat 3:... position 2:7 Winding while threaded 2:7 Winding while embroidering or sewing 2:8 Browse Files & Folders 10:3 Buttonholes 4:10-4:11, 4:11-4:12 Buttonhole slit length 4:10 Corded buttonhole 4:14 Manual buttonhole 4:13 Repeat a manual buttonhole 4:13 Sensormatic buttonhole 4:13 Buttonhole slit length 4:10...
... Software 2:13 5D™ Organizer 2:13 5D™ QuickFont 2:13 Installing 2:13 Launch 2:14 PDF Guides 2:14 Update your machine 2:14 A Accessories 1:10 Accessory tray 1:9 Action indicator 2:15 Alphabets 1:17 Attach the Sensormatic buttonhole foot 4:12 Audio repeat 3:... position 2:7 Winding while threaded 2:7 Winding while embroidering or sewing 2:8 Browse Files & Folders 10:3 Buttonholes 4:10-4:11, 4:11-4:12 Buttonhole slit length 4:10 Corded buttonhole 4:14 Manual buttonhole 4:13 Repeat a manual buttonhole 4:13 Sensormatic buttonhole 4:13 Buttonhole slit length 4:10...
Owner's Manual
Page 125
... Stitch width safety 3:8 Twin needle 3:8 Manual buttonhole 4:13 Matching point 9:7 Mirroring 4:8, 5:3, 6:3, 8:5 Monochrome 9:4 Mouse 2:12, 3:13 Move 3:3, 6:5, 8:6 Move design into hoop 8:5 Multi-purpose tool 2:9, 4:14 Multi-select 6:4, 8:4 N Needle, changing 2:9 Needle position 4:9 Needles 2:10 Needle threader 2:5 Needle up/down 2:16 O Orbiting 9:7 Organize Files & Folders 10:6 P Pack away after sewing 2:3 Pan 3:3, 6:5, 8:6 Park position 8:8, 9:5 Patchwork program...
... Stitch width safety 3:8 Twin needle 3:8 Manual buttonhole 4:13 Matching point 9:7 Mirroring 4:8, 5:3, 6:3, 8:5 Monochrome 9:4 Mouse 2:12, 3:13 Move 3:3, 6:5, 8:6 Move design into hoop 8:5 Multi-purpose tool 2:9, 4:14 Multi-select 6:4, 8:4 N Needle, changing 2:9 Needle position 4:9 Needles 2:10 Needle threader 2:5 Needle up/down 2:16 O Orbiting 9:7 Organize Files & Folders 10:6 P Pack away after sewing 2:3 Pan 3:3, 6:5, 8:6 Park position 8:8, 9:5 Patchwork program...


