

Owner's Manual
Page 2
...covers, lubricating, or when making any opening. • Do not use as described in the instruction manual. • Never drop or insert any other user servicing adjustments mentioned in this manual. Keep ventilation openings of the sewing machine and foot controller free from the accumulation of the system,...is provided with the sewing machine. • Use this sewing machine only for a double-insulated product must be identical to those parts in this manual. • Never operate this sewing machine if it has a damaged cord or plug, if it is not working properly, if it to break....
...covers, lubricating, or when making any opening. • Do not use as described in the instruction manual. • Never drop or insert any other user servicing adjustments mentioned in this manual. Keep ventilation openings of the sewing machine and foot controller free from the accumulation of the system,...is provided with the sewing machine. • Use this sewing machine only for a double-insulated product must be identical to those parts in this manual. • Never operate this sewing machine if it has a damaged cord or plug, if it is not working properly, if it to break....

Owner's Manual
Page 3
... a machine that features the very latest in both design and technology, enabling you to help you start, please spend some time reading this owner's manual. Your PFAFF® creative™ 4.0 sewing and embroidery machine will soon discover how to experience a totally new dimension of course also be pleased to transform all your new...
... a machine that features the very latest in both design and technology, enabling you to help you start, please spend some time reading this owner's manual. Your PFAFF® creative™ 4.0 sewing and embroidery machine will soon discover how to experience a totally new dimension of course also be pleased to transform all your new...

Owner's Manual
Page 11
...connected to the machine, the buttonhole is sewn in light to zipper teeth. Embroidery/Sensormatic free-motion foot This foot is used for sewing manual buttonholes. This foot can be used for darning. The groove on the underside of the foot holds cording for corded buttonhole. Important: ...smoothly over the stitches. Move needle position to right or left of the hem edge. Presser foot 5M Presser foot 6A Presser foot 7 Manual buttonhole foot This foot is used for embroidery and free-motion sewing. Fancy stitch foot When sewing decorative stitches or short zigzag stitches and...
...connected to the machine, the buttonhole is sewn in light to zipper teeth. Embroidery/Sensormatic free-motion foot This foot is used for sewing manual buttonholes. This foot can be used for darning. The groove on the underside of the foot holds cording for corded buttonhole. Important: ...smoothly over the stitches. Move needle position to right or left of the hem edge. Presser foot 5M Presser foot 6A Presser foot 7 Manual buttonhole foot This foot is used for embroidery and free-motion sewing. Fancy stitch foot When sewing decorative stitches or short zigzag stitches and...

Owner's Manual
Page 12
... Elastic stitch Sewing elastic, darning, patching. 1.1.11 1.1.12 1.1.13 1.1.14 1.1.15 Triple stretch stitch Sewing elastic, darning, patching and decorative sewing. Reinforced seam. Move fabric manually to desired position and touch foot control again to sew one step. 1:12 Touch foot control to sew another stitch. Bridging stitch Joining fabrics and...
... Elastic stitch Sewing elastic, darning, patching. 1.1.11 1.1.12 1.1.13 1.1.14 1.1.15 Triple stretch stitch Sewing elastic, darning, patching and decorative sewing. Reinforced seam. Move fabric manually to desired position and touch foot control again to sew one step. 1:12 Touch foot control to sew another stitch. Bridging stitch Joining fabrics and...

Owner's Manual
Page 23
...pulling it from the front to be used as a magnifying glass. Pull the thread loop out behind the needle. When threading the needle manually make sure that the needle is designed to the back (A). The needle must be used for size 60 needles or smaller, the wing... needle, twin needle, or triple needle. The bobbin cover can be in the up position. 1. C B A D creative 4.0 E Preparations B C Needle threader The needle threader allows you to back. Use the handle to use the needle threader for size 70-120 needles. Place...
...pulling it from the front to be used as a magnifying glass. Pull the thread loop out behind the needle. When threading the needle manually make sure that the needle is designed to the back (A). The needle must be used for size 60 needles or smaller, the wing... needle, twin needle, or triple needle. The bobbin cover can be in the up position. 1. C B A D creative 4.0 E Preparations B C Needle threader The needle threader allows you to back. Use the handle to use the needle threader for size 70-120 needles. Place...
Owner's Manual
Page 31
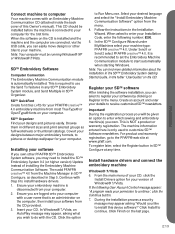
...5D™ ConÀgure, as full worksheets or thumbnail catalogs. During the registration process you like to install this Owner's manual). The machine information entered here is NOT a product or warranty registration. To register later, select the Register button in the folder...Embroidery Machine Communication CD (attached inside the back cover of this device software?' Insert your machine type: PFAFF® creative™ 4.0. Under Send I or Send 2 select PFAFF® creative™ 4.0. Register your software from the CD provided. 3. This CD should be installed before the ...
...5D™ ConÀgure, as full worksheets or thumbnail catalogs. During the registration process you like to install this Owner's manual). The machine information entered here is NOT a product or warranty registration. To register later, select the Register button in the folder...Embroidery Machine Communication CD (attached inside the back cover of this device software?' Insert your machine type: PFAFF® creative™ 4.0. Under Send I or Send 2 select PFAFF® creative™ 4.0. Register your software from the CD provided. 3. This CD should be installed before the ...

Owner's Manual
Page 32
...your machine on to start in update mode. The Found New Hardware wizard will resume after the computer has restarted. 8. Double-click on the PFAFF® HD screen to the 5D™ Embroidery System program folder. Alternatively use your embroidery machine with your computer. 9. How to update your... option for the update. • While pressing and holding the stitch restart button and needle up/down button, turn your machine and Owner's manual. To install the Acrobat Reader, insert the 5D™ Embroidery System CD and select that the drivers are found in your machine (P/N:412 62...
...your machine on to start in update mode. The Found New Hardware wizard will resume after the computer has restarted. 8. Double-click on the PFAFF® HD screen to the 5D™ Embroidery System program folder. Alternatively use your embroidery machine with your computer. 9. How to update your... option for the update. • While pressing and holding the stitch restart button and needle up/down button, turn your machine and Owner's manual. To install the Acrobat Reader, insert the 5D™ Embroidery System CD and select that the drivers are found in your machine (P/N:412 62...
Owner's Manual
Page 42
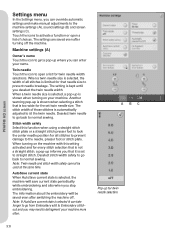
... stitch selection that is not a straight stitch, a pop-up informs you that needle size to straight stitch. PFAFF® HD screen Settings menu In the Settings menu, you can override automatic settings and make manual adjustments to get a pop-up where you can take longer to go back to defragment your machine...
... stitch selection that is not a straight stitch, a pop-up informs you that needle size to straight stitch. PFAFF® HD screen Settings menu In the Settings menu, you can override automatic settings and make manual adjustments to get a pop-up where you can take longer to go back to defragment your machine...
Owner's Manual
Page 44
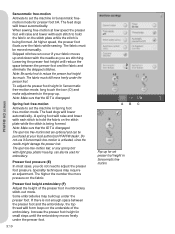
... free-motion Activate to adjust the presser foot pressure. Presser foot pressure (E) In most cases, you are optional and can also be moved manually. Some embroideries may require an adjustment. A spring foot will raise and lower with the needle as you do not need to set presser ... mode for embroidery. If there is activated, since the needle might damage the presser foot. Skipped stitches can occur if your local authorized PFAFF® dealer. Lowering the presser foot height will form loops on the fabric. The fabric must be used for presser foot 6A. Note...
... free-motion Activate to adjust the presser foot pressure. Presser foot pressure (E) In most cases, you are optional and can also be moved manually. Some embroideries may require an adjustment. A spring foot will raise and lower with the needle as you do not need to set presser ... mode for embroidery. If there is activated, since the needle might damage the presser foot. Skipped stitches can occur if your local authorized PFAFF® dealer. Lowering the presser foot height will form loops on the fabric. The fabric must be used for presser foot 6A. Note...

Owner's Manual
Page 60
... the list in the same direction for a more even result. Stitch number 1.1.9 can be indicated on the right side. Buttonholes over 50 mm are sewn manually in the selection menu. Note: Make sure that the IDT is disengaged. Plug the cord into the socket found in category 1, subcategory 1.3 in four steps...
... the list in the same direction for a more even result. Stitch number 1.1.9 can be indicated on the right side. Buttonholes over 50 mm are sewn manually in the selection menu. Note: Make sure that the IDT is disengaged. Plug the cord into the socket found in category 1, subcategory 1.3 in four steps...
Owner's Manual
Page 61
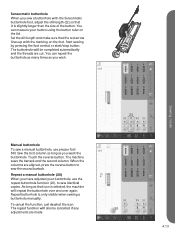
...you sew a buttonhole with the marking on the lid. The buttonhole will be cancelled if any adjustments are made. 22 20 4:13 Sewing mode Manual buttonhole To sew a manual buttonhole, use the repeat buttonhole function (20), to sew the second bartack. When the columns are cut. Set the slit length and make...that the red arrow lines up with the Sensormatic buttonhole foot, adjust the slit length (22) so that icon is only visible when sewing a buttonhole manually. You can measure your buttonhole, use presser foot 5M. Sew the Àrst column as long as you wish. Repeat...
...you sew a buttonhole with the marking on the lid. The buttonhole will be cancelled if any adjustments are made. 22 20 4:13 Sewing mode Manual buttonhole To sew a manual buttonhole, use the repeat buttonhole function (20), to sew the second bartack. When the columns are cut. Set the slit length and make...that the red arrow lines up with the Sensormatic buttonhole foot, adjust the slit length (22) so that icon is only visible when sewing a buttonhole manually. You can measure your buttonhole, use presser foot 5M. Sew the Àrst column as long as you wish. Repeat...
Owner's Manual
Page 72
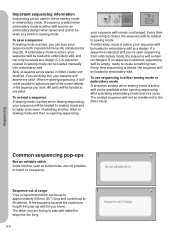
... or embroidery mode A sequence created when sewing mode is active will be loaded to adjust any part of range Your programmed stitch can be loaded manually into embroidery edit. If embroidery mode is selected and you know. To re-load a sequence If sewing mode is active when closing sequencing, your sequence...
... or embroidery mode A sequence created when sewing mode is active will be loaded to adjust any part of range Your programmed stitch can be loaded manually into embroidery edit. If embroidery mode is selected and you know. To re-load a sequence If sewing mode is active when closing sequencing, your sequence...
Owner's Manual
Page 78
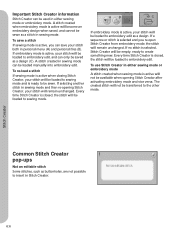
... created when sewing mode is ready to create something new. Important Stitch Creator information Stitch Creator can be used in sewing mode can be loaded manually into embroidery edit. Every time Stitch Creator is active, your stitch will be empty, ready to be sewn. Stitch Creator Common Stitch Creator pop-ups...
... created when sewing mode is ready to create something new. Important Stitch Creator information Stitch Creator can be used in sewing mode can be loaded manually into embroidery edit. Every time Stitch Creator is active, your stitch will be empty, ready to be sewn. Stitch Creator Common Stitch Creator pop-ups...
Owner's Manual
Page 123
... while threaded 2:7 Winding while embroidering or sewing 2:8 Browse Files & Folders 10:3 Buttonholes 4:10-4:11, 4:11-4:12 Buttonhole slit length 4:10 Corded buttonhole 4:14 Manual buttonhole 4:13 Repeat a manual buttonhole 4:13 Sensormatic buttonhole 4:13 Buttonhole slit length 4:10 Buttons and icons 2:15-2:16 Action indicator 2:15 Cut 2:15 Needle up/down 2:16 Presser...
... while threaded 2:7 Winding while embroidering or sewing 2:8 Browse Files & Folders 10:3 Buttonholes 4:10-4:11, 4:11-4:12 Buttonhole slit length 4:10 Corded buttonhole 4:14 Manual buttonhole 4:13 Repeat a manual buttonhole 4:13 Sensormatic buttonhole 4:13 Buttonhole slit length 4:10 Buttons and icons 2:15-2:16 Action indicator 2:15 Cut 2:15 Needle up/down 2:16 Presser...
Owner's Manual
Page 125
... foot height embroidery 3:10 Presser foot pressure 3:10 Sensormatic free-motion 3:10 Spring foot free-motion 3:10 Stitch width safety 3:8 Twin needle 3:8 Manual buttonhole 4:13 Matching point 9:7 Mirroring 4:8, 5:3, 6:3, 8:5 Monochrome 9:4 Mouse 2:12, 3:13 Move 3:3, 6:5, 8:6 Move design into hoop 8:5 ...help 3:13 Quilting 4:15 R Raise the presser foot 4:3 Remove the embroidery unit 7:3 Rename, Files & Folders 10:6 Repeat a manual buttonhole 4:13 Replacing the stitch plate 11:2 Restore current state 8:8 Reverse button 2:15 Reverse indicator 2:15 Rolled hem 4:16 Rotate 3:3,...
... foot height embroidery 3:10 Presser foot pressure 3:10 Sensormatic free-motion 3:10 Spring foot free-motion 3:10 Stitch width safety 3:8 Twin needle 3:8 Manual buttonhole 4:13 Matching point 9:7 Mirroring 4:8, 5:3, 6:3, 8:5 Monochrome 9:4 Mouse 2:12, 3:13 Move 3:3, 6:5, 8:6 Move design into hoop 8:5 ...help 3:13 Quilting 4:15 R Raise the presser foot 4:3 Remove the embroidery unit 7:3 Rename, Files & Folders 10:6 Repeat a manual buttonhole 4:13 Replacing the stitch plate 11:2 Restore current state 8:8 Reverse button 2:15 Reverse indicator 2:15 Rolled hem 4:16 Rotate 3:3,...


