Owner's Manual
Page 3
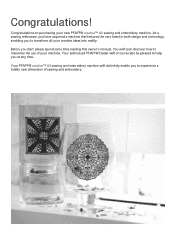
Congratulations on purchasing your creative ideas into reality. As a sewing enthusiast, you have acquired a machine that features the very latest in both design and technology, enabling you to maximize the use of sewing and embroidery. You will soon discover how to transform all your new PFAFF® creative™ 4.0 sewing and embroidery machine. Congratulations! Your PFAFF® creative™ 4.0 sewing and embroidery machine will of course...
Congratulations on purchasing your creative ideas into reality. As a sewing enthusiast, you have acquired a machine that features the very latest in both design and technology, enabling you to maximize the use of sewing and embroidery. You will soon discover how to transform all your new PFAFF® creative™ 4.0 sewing and embroidery machine. Congratulations! Your PFAFF® creative™ 4.0 sewing and embroidery machine will of course...
Owner's Manual
Page 4
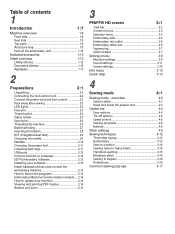
... Embroidery Machine Communication module.... 2:14 How to update your machine 2:14 Viewing and printing PDF Guides 2:14 Buttons and icons 2:13 3 PFAFF® HD screen 3:1 Task bar 3:2 Common icons 3:3 Selection menu 3:4 Embroidery edit 3:5 Embroidery text editor 3:6 Embroidery stitch-out 3:6 Sequencing 3:7 Stitch Creator 3:7 Settings menu 3:8 Machine settings 3:8 Sound settings 3:11 Screen settings 3:12 Info menu 3:13 Quick help 3:13 4 Sewing...
... Embroidery Machine Communication module.... 2:14 How to update your machine 2:14 Viewing and printing PDF Guides 2:14 Buttons and icons 2:13 3 PFAFF® HD screen 3:1 Task bar 3:2 Common icons 3:3 Selection menu 3:4 Embroidery edit 3:5 Embroidery text editor 3:6 Embroidery stitch-out 3:6 Sequencing 3:7 Stitch Creator 3:7 Settings menu 3:8 Machine settings 3:8 Sound settings 3:11 Screen settings 3:12 Info menu 3:13 Quick help 3:13 4 Sewing...

Owner's Manual
Page 5
... information 6:6 Common Stitch Creator pop-ups 6:6 7 Embroidery preparations 7:1 Embroidery unit overview 7:2 Built-in designs 7:2 Embroidery hoop overview 7:2 creative™ 4.0 Embroidery collection 7:3 Connect the embroidery unit 7:3 Remove the embroidery unit 7:3 To hoop the fabric 7:4 Slide on the hoop 7:4 Getting started embroidering 7:5 8 Embroidery mode - overview 5:2 Create a sequence 5:3 Option bar 5:4 Save options 5:4 Sequence commands 5:4 Horizontal preview 5:5 Sewing a sequence 5:5 Important sequencing information 5:6 Common...
... information 6:6 Common Stitch Creator pop-ups 6:6 7 Embroidery preparations 7:1 Embroidery unit overview 7:2 Built-in designs 7:2 Embroidery hoop overview 7:2 creative™ 4.0 Embroidery collection 7:3 Connect the embroidery unit 7:3 Remove the embroidery unit 7:3 To hoop the fabric 7:4 Slide on the hoop 7:4 Getting started embroidering 7:5 8 Embroidery mode - overview 5:2 Create a sequence 5:3 Option bar 5:4 Save options 5:4 Sequence commands 5:4 Horizontal preview 5:5 Sewing a sequence 5:5 Important sequencing information 5:6 Common...

Owner's Manual
Page 11
... the foot is designed to both sides of the foot holds cording for blindhem stitches. This foot can be used for embroidery and free-motion sewing. Fancy stitch foot When sewing decorative stitches or short zigzag stitches and other utility stitches with IDT This foot can also be snapped on the foot is... foot with IDT (attached on the foot guides the fabric. Zipper foot with less than 1.0mm. Important: Make sure that has been entered into the machine. Use the markings on the back of the zipper teeth. The Ànger on the foot to the button size that the IDT is sewn...
... the foot is designed to both sides of the foot holds cording for blindhem stitches. This foot can be used for embroidery and free-motion sewing. Fancy stitch foot When sewing decorative stitches or short zigzag stitches and other utility stitches with IDT This foot can also be snapped on the foot is... foot with IDT (attached on the foot guides the fabric. Zipper foot with less than 1.0mm. Important: Make sure that has been entered into the machine. Use the markings on the back of the zipper teeth. The Ànger on the foot to the button size that the IDT is sewn...

Owner's Manual
Page 27
... foot. Insert the new needle, using the multi-purpose tool. Preparations IDT (Integrated dual feed) For sewing any fabric precisely PFAFF® creative™ 4.0 sewing and embroidery machine provides the ideal solution: the integrated dual feed, IDT system. Use the hole in the multi-purpose ...tool to release the IDT slowly upward. As on industrial machines, the IDT feeds the fabric from you until ...
... foot. Insert the new needle, using the multi-purpose tool. Preparations IDT (Integrated dual feed) For sewing any fabric precisely PFAFF® creative™ 4.0 sewing and embroidery machine provides the ideal solution: the integrated dual feed, IDT system. Use the hole in the multi-purpose ...tool to release the IDT slowly upward. As on industrial machines, the IDT feeds the fabric from you until ...
Owner's Manual
Page 28
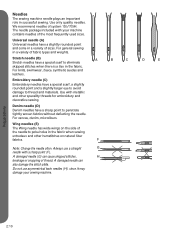
... G needle with metallic and other hemstitches on the side of the most frequently used sizes. Needles The sewing machine needle plays an important role in the fabric when sewing entredeux and other specailty threads for embroidery and decorative sewing Denim needle (D) Denim needles have a sharp point to penetrate tightly woven fabrics without deÁecting...
... G needle with metallic and other hemstitches on the side of the most frequently used sizes. Needles The sewing machine needle plays an important role in the fabric when sewing entredeux and other specailty threads for embroidery and decorative sewing Denim needle (D) Denim needles have a sharp point to penetrate tightly woven fabrics without deÁecting...
Owner's Manual
Page 30
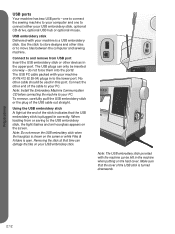
... - No other devices in the upper port. Note: Do not remove the USB embroidery stick when the hourglass is shown on the screen. one to connect the sewing machine to the USB embroidery stick, the light Áashes and an hourglass appears on the screen or while ...Files & Folders is turned downwards. Note: Install the Embroidery Machine Communication CD before connecting the machine to move Àles between the computer and sewing machine. USB embroidery stick Delivered with your USB embroidery stick. Removing the stick at the end of the USB stick is open...
... - No other devices in the upper port. Note: Do not remove the USB embroidery stick when the hourglass is shown on the screen. one to connect the sewing machine to the USB embroidery stick, the light Áashes and an hourglass appears on the screen or while ...Files & Folders is turned downwards. Note: Install the Embroidery Machine Communication CD before connecting the machine to move Àles between the computer and sewing machine. USB embroidery stick Delivered with your USB embroidery stick. Removing the stick at the end of the USB stick is open...
Owner's Manual
Page 31
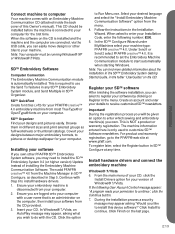
...?' Select your details to pictures or desktop wallpaper for your PFAFF® creative™ 4.0 embroidery machine from the Machine Manager in 5D™ ConÀgure, as full worksheets...sewing and embroidery machine(s) you may need to install hardware drivers. 1. Ensure you are connected, via the USB cable, you wish to do with Step 6 to install the 5D™ Embroidery System 9.2 (or higher version) Update instead of installing the Embroidery Machine Communication Software. Click Finish on your computer. 5D™ Organizer Find your machine type: PFAFF® creative...
...?' Select your details to pictures or desktop wallpaper for your PFAFF® creative™ 4.0 embroidery machine from the Machine Manager in 5D™ ConÀgure, as full worksheets...sewing and embroidery machine(s) you may need to install hardware drivers. 1. Ensure you are connected, via the USB cable, you wish to do with Step 6 to install the 5D™ Embroidery System 9.2 (or higher version) Update instead of installing the Embroidery Machine Communication Software. Click Finish on your computer. 5D™ Organizer Find your machine type: PFAFF® creative...

Owner's Manual
Page 33
...lowered automatically when you press the button again to sew. The thread snips function can be programmed, see page 3:9). In embroidery mode the threads are sewn with the Sensormatic buttonhole foot. If you press the reverse button while sewing, the machine sews in reverse. Start/stop . The tie-off ... at the color change. The icon stays lit until you start position of the stitch. The feed dogs will be lit and the machine sews in the Settings menu (see chapter 4. Reverse indicator (B) The reverse indicator will be cancelled in reverse until the action is also used...
...lowered automatically when you press the button again to sew. The thread snips function can be programmed, see page 3:9). In embroidery mode the threads are sewn with the Sensormatic buttonhole foot. If you press the reverse button while sewing, the machine sews in reverse. Start/stop . The tie-off ... at the color change. The icon stays lit until you start position of the stitch. The feed dogs will be lit and the machine sews in the Settings menu (see chapter 4. Reverse indicator (B) The reverse indicator will be cancelled in reverse until the action is also used...

Owner's Manual
Page 34
If pressing the stitch restart button while sewing, the stitch will be Ànished and the machine will stop in the middle of a stitch, press restart to start sewing at the same time. You can also use stitch restart to go back to reset any special settings you have made. ... /down (J) Press this button to raise or lower the needle. Preparations 2:16 D E F G H I J C B A Stitch restart (I) When having to the beginning of an embroidery. When needle down is activated, the icon is lit, the needle will then stop position is changed at the beginning of the stitch again without...
If pressing the stitch restart button while sewing, the stitch will be Ànished and the machine will stop in the middle of a stitch, press restart to start sewing at the same time. You can also use stitch restart to go back to reset any special settings you have made. ... /down (J) Press this button to raise or lower the needle. Preparations 2:16 D E F G H I J C B A Stitch restart (I) When having to the beginning of an embroidery. When needle down is activated, the icon is lit, the needle will then stop position is changed at the beginning of the stitch again without...

Owner's Manual
Page 36
... option bar has different options depending on , a welcome screen is connected, the embroidery mode appears. Task bar Main functions in embroidery mode In embroidery mode 8. PFAFF® HD screen PFAFF® HD screen Your machine features a PFAFF® HD screen. If the embroidery unit is shown Àrst, B then the sewing mode. This technology provides great resolution and color.
... option bar has different options depending on , a welcome screen is connected, the embroidery mode appears. Task bar Main functions in embroidery mode In embroidery mode 8. PFAFF® HD screen PFAFF® HD screen Your machine features a PFAFF® HD screen. If the embroidery unit is shown Àrst, B then the sewing mode. This technology provides great resolution and color.
Owner's Manual
Page 42
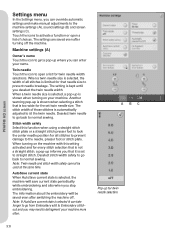
...pop-up for every stitch selection that needle size to normal sewing. Deselect twin needle to go back to straight stitch. AutoSave current state When AutoSave current state is kept until you deselect the twin needle width. PFAFF® HD screen Settings menu In the Settings menu, you ... a list for the set to normal sewing. The setting is selected, the machine will be used at the same time. Machine settings (A) Owner's name Touch the icon to get a pop-up where you can take longer to go from Embroidery edit to Embroidery stitchout and you may need to the needle...
...pop-up for every stitch selection that needle size to normal sewing. Deselect twin needle to go back to straight stitch. AutoSave current state When AutoSave current state is kept until you deselect the twin needle width. PFAFF® HD screen Settings menu In the Settings menu, you ... a list for the set to normal sewing. The setting is selected, the machine will be used at the same time. Machine settings (A) Owner's name Touch the icon to get a pop-up where you can take longer to go from Embroidery edit to Embroidery stitchout and you may need to the needle...

Owner's Manual
Page 43
... for Cut jump stitches. Defragment machine memory To optimize the sewing and embroidery performance you time trimming after you can easily remove the thread end when cut automatically and the presser foot raises at color changes or when an embroidery is completed. PFAFF® HD screen Cut jump stitches Your machine features the automatic function Cut...
... for Cut jump stitches. Defragment machine memory To optimize the sewing and embroidery performance you time trimming after you can easily remove the thread end when cut automatically and the presser foot raises at color changes or when an embroidery is completed. PFAFF® HD screen Cut jump stitches Your machine features the automatic function Cut...
Owner's Manual
Page 44
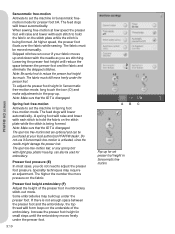
PFAFF® HD screen Sensormatic free-motion Activate to set the machine in Spring foot free-motion mode. To adjust the presser foot height in Sensormatic free-motion mode, long touch the icon (D) and make adjustments in the pop-up for set the machine in Sensormatic freemotion mode for embroidery...to set presser foot height in Sensormatic freemotion Skipped stitches can be moved manually. Presser foot height embroidery (F) Adjust the height of the embroidery. When sewing free-motion at your fabric moves up and down with each stitch to reduce the presser foot ...
PFAFF® HD screen Sensormatic free-motion Activate to set the machine in Spring foot free-motion mode. To adjust the presser foot height in Sensormatic free-motion mode, long touch the icon (D) and make adjustments in the pop-up for set the machine in Sensormatic freemotion mode for embroidery...to set presser foot height in Sensormatic freemotion Skipped stitches can be moved manually. Presser foot height embroidery (F) Adjust the height of the embroidery. When sewing free-motion at your fabric moves up and down with each stitch to reduce the presser foot ...

Owner's Manual
Page 68
Combine various 9mm stitches and stitch fonts from the machine or from an external device. Stitch selection area 3. ... function by pressing the foot control, or by pressing the start/stop c) cut 16. Note: If sewing mode is active and your created combination, touch the symbol on the task bar. overview 1. Stitch density...15a 15b 15c 15 16 9 10 11 12 13 17 13 Sequencing Sequencing can also close sequencing and sew your programmed stitch is in embroidery mode. Sequencing - Scroll bar (scroll through stitch categories) 4. Duplicate 7. Stitch width 11. Width/position...
Combine various 9mm stitches and stitch fonts from the machine or from an external device. Stitch selection area 3. ... function by pressing the foot control, or by pressing the start/stop c) cut 16. Note: If sewing mode is active and your created combination, touch the symbol on the task bar. overview 1. Stitch density...15a 15b 15c 15 16 9 10 11 12 13 17 13 Sequencing Sequencing can also close sequencing and sew your programmed stitch is in embroidery mode. Sequencing - Scroll bar (scroll through stitch categories) 4. Duplicate 7. Stitch width 11. Width/position...
Owner's Manual
Page 70
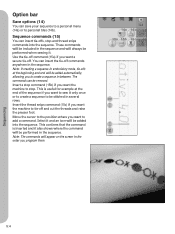
... several rows. Note: If creating a sequence in the order you want the machine to tie-off . Insert the thread snips command (15c) if you want to sew it also shows where the command will appear on the screen in embroidery mode, tie-offs at the end of the sequence if you want to... where you want a secure tie-off and cut the threads and raise the presser foot. Select it . Insert a stop command (15b) if you want the machine to stop and thread snips commands into the sequence. Option bar Save options (14) You can insert tie-offs, stop . Use the tie-off command...
... several rows. Note: If creating a sequence in the order you want the machine to tie-off . Insert the thread snips command (15c) if you want to sew it also shows where the command will appear on the screen in embroidery mode, tie-offs at the end of the sequence if you want to... where you want a secure tie-off and cut the threads and raise the presser foot. Select it . Insert a stop command (15b) if you want the machine to stop and thread snips commands into the sequence. Option bar Save options (14) You can insert tie-offs, stop . Use the tie-off command...

Owner's Manual
Page 110
... end After changing the thread, the machine will sew a few stitches and then stop so you want to your design. 9:10 If you touch OK, the designs will ask you if you can cut . The next recommended color is Ànished - clear screen When the embroidery is cut the thread end. Touch cancel... to get back to clear the screen. stitch-out Change thread color When it is time to change the needle thread, the machine stops and the upper thread is Ànished, the machine will be deleted. Embroidery is shown in the pop-up. Change the spool and re-thread the...
... end After changing the thread, the machine will sew a few stitches and then stop so you want to your design. 9:10 If you touch OK, the designs will ask you if you can cut . The next recommended color is Ànished - clear screen When the embroidery is cut the thread end. Touch cancel... to get back to clear the screen. stitch-out Change thread color When it is time to change the needle thread, the machine stops and the upper thread is Ànished, the machine will be deleted. Embroidery is shown in the pop-up. Change the spool and re-thread the...
Owner's Manual
Page 112
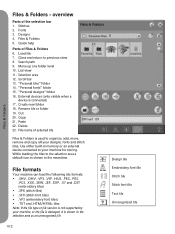
...help Parts of the selection bar 1. Search path 9. Scroll bar 13. File formats Your machine can load the following Àle formats: • .SHV, .DHV, .VP3, .VIP, .HUS, .PEC, .PES, .PCS, .XXX, .SEW, .JEF, .EXP, .10* and .DST (embroidery Àles) • .SPX (stitch Àles) • .SFX (stitch font... Àles) • .VF3 (embroidery font Àles) • .TXT and .HTM/HTML-Àles Note: If the Àle...
...help Parts of the selection bar 1. Search path 9. Scroll bar 13. File formats Your machine can load the following Àle formats: • .SHV, .DHV, .VP3, .VIP, .HUS, .PEC, .PES, .PCS, .XXX, .SEW, .JEF, .EXP, .10* and .DST (embroidery Àles) • .SPX (stitch Àles) • .SFX (stitch font... Àles) • .VF3 (embroidery font Àles) • .TXT and .HTM/HTML-Àles Note: If the Àle...
Owner's Manual
Page 120
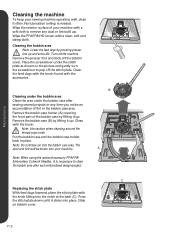
... . Clean the feed dogs with the brush found with the brush. Note: Do not blow air into your sewing machine operating well, clean it up and extra lift. Note: When using the optional accessory PFAFF® Embroidery Cutwork Needles, it is needed. B A C Replacing the stitch plate With feed dogs lowered, place the stitch plate...
... . Clean the feed dogs with the brush found with the brush. Note: Do not blow air into your sewing machine operating well, clean it up and extra lift. Note: When using the optional accessory PFAFF® Embroidery Cutwork Needles, it is needed. B A C Replacing the stitch plate With feed dogs lowered, place the stitch plate...

Owner's Manual
Page 122
... plate and clean the feed dogs with your dealer. Is the inner embroidery hoop completely inserted in such a way that the embroidery unit is threaded. Hoop the fabric in the outer embroidery hoop? Have your sewing machine serviced regularly by use only the original PFAFF® bobbins approved for your dealer. Is the stitch plate hole...
... plate and clean the feed dogs with your dealer. Is the inner embroidery hoop completely inserted in such a way that the embroidery unit is threaded. Hoop the fabric in the outer embroidery hoop? Have your sewing machine serviced regularly by use only the original PFAFF® bobbins approved for your dealer. Is the stitch plate hole...


