
Owner's Manual
Page 2
.../EN 60335-2-28 and UL1594 IMPORTANT SAFETY INSTRUCTIONS When using an electrical appliance, basic safety precautions should never be used by the manufacturer as threading needle, changing needle, threading bobbin, or changing presser foot, etc. • Always unplug the sewing machine from the electric outlet immediately after using this sewing machine if...
.../EN 60335-2-28 and UL1594 IMPORTANT SAFETY INSTRUCTIONS When using an electrical appliance, basic safety precautions should never be used by the manufacturer as threading needle, changing needle, threading bobbin, or changing presser foot, etc. • Always unplug the sewing machine from the electric outlet immediately after using this sewing machine if...

Owner's Manual
Page 4
...blind stitch - No 31 3:22 Bridging stitch - No 11 3:23 Crosshem stitch - Table of Content 1 INTRODUCTION Stitch Chart Decorative stitches creative 2170 Machine Parts of the embroidery unit Parts of the embroidery hoop Standard accessories 1:7-1:18 1:8-1:10 1:11-1:13 1:14 1:15 1:15 1:16...foot 2:5 The IDT (Integrated Dual Feed) 2:6 Changing the needle 2:7 The feed dogs 2:7 Winding the bobbin from the spool pin 2:8 Threading 2:8 Winding from the second spool pin 2:9 Winding from the third spool pin 2:9 Bobbin winding while embroidering 2:10 Winding a bobbin through...
...blind stitch - No 31 3:22 Bridging stitch - No 11 3:23 Crosshem stitch - Table of Content 1 INTRODUCTION Stitch Chart Decorative stitches creative 2170 Machine Parts of the embroidery unit Parts of the embroidery hoop Standard accessories 1:7-1:18 1:8-1:10 1:11-1:13 1:14 1:15 1:15 1:16...foot 2:5 The IDT (Integrated Dual Feed) 2:6 Changing the needle 2:7 The feed dogs 2:7 Winding the bobbin from the spool pin 2:8 Threading 2:8 Winding from the second spool pin 2:9 Winding from the third spool pin 2:9 Bobbin winding while embroidering 2:10 Winding a bobbin through...

Owner's Manual
Page 6
...38-5:40 File formats 5:40 Using the hoop adapter 5:40 Automatic hoop positioning 5:40 Prepare a creative memory card for saving 5:41 Transferring designs from the PC to your Pfaff creative 2170 5:41 How to do if...? Multi-color embroidery 5:19 One color embroidery 5:20 Move the... design within the hoop 5:20 Embroider 5:21 Enlarged representation 5:22 Positioning of designs in the right place 5:42-5:43 Stabilizers 5:44-5:45 Needles 5:45 Threads 5:46...
...38-5:40 File formats 5:40 Using the hoop adapter 5:40 Automatic hoop positioning 5:40 Prepare a creative memory card for saving 5:41 Transferring designs from the PC to your Pfaff creative 2170 5:41 How to do if...? Multi-color embroidery 5:19 One color embroidery 5:20 Move the... design within the hoop 5:20 Embroider 5:21 Enlarged representation 5:22 Positioning of designs in the right place 5:42-5:43 Stabilizers 5:44-5:45 Needles 5:45 Threads 5:46...

Owner's Manual
Page 8
... hem finishing on stretch fabric, for decorative elastic application and sewing with a hand look stitch. 17 Quilt stitch For topstitching quilt projects with elastic thread in zippers. 2 Stretch triple straight stitch For reinforced seams such as leathers and terry cloth. 13 Cross hem stitch Provides a highly elastic, decorative seam for...
... hem finishing on stretch fabric, for decorative elastic application and sewing with a hand look stitch. 17 Quilt stitch For topstitching quilt projects with elastic thread in zippers. 2 Stretch triple straight stitch For reinforced seams such as leathers and terry cloth. 13 Cross hem stitch Provides a highly elastic, decorative seam for...

Owner's Manual
Page 14
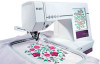
...overview Parts of the creative 2170 1 Top cover with stitch chart 2 Multi-color touch screen 3 Base plate 4 Slide for lowering the feed dogs 5 Connection for knee lift 6 Feed dogs 7 Free arm 8 Presser foot holder with presser foot 9 Needle threader 10 Needle holder with set screw 11 Thread cutter 12 Reverse sewing ...lead cord 29 Connection socket foot control 30 Main switch 31 Accessory tray 32 Needle plate 33 Thread guides, right and left 34 Sewing bulb (max. 5 W) 35 Threading slot 36 Carrying handle 37 Thread snips button 38 Pattern Start button 39 Sew slow button 40 Needle up/down button 41 ...
...overview Parts of the creative 2170 1 Top cover with stitch chart 2 Multi-color touch screen 3 Base plate 4 Slide for lowering the feed dogs 5 Connection for knee lift 6 Feed dogs 7 Free arm 8 Presser foot holder with presser foot 9 Needle threader 10 Needle holder with set screw 11 Thread cutter 12 Reverse sewing ...lead cord 29 Connection socket foot control 30 Main switch 31 Accessory tray 32 Needle plate 33 Thread guides, right and left 34 Sewing bulb (max. 5 W) 35 Threading slot 36 Carrying handle 37 Thread snips button 38 Pattern Start button 39 Sew slow button 40 Needle up/down button 41 ...
Owner's Manual
Page 18
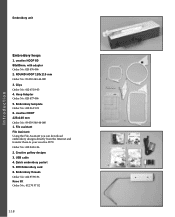
...designs directly from the Internet and transfer them to your creative 2170. USB cable 4. Embroidery unit Introduction Embroidery hoops 1. Embroidery template Order No: 412 86 21 01 6. Order No: 412 84 16-96 2. Clips Order No: 412 65 18-03 4. creative HOOP 225x140 mm Order No: 93-039-340-44...HOOP 120x115 mm Order No: 93-039-343-44-000 3. Creative gallery designs 3. Quick embroidery packet 5. 300 Embroidery card 6. creative HOOP 80 80x80mm, with adapter Order No: 820 476-096 2. Hoop Adapter Order No: 820 477-096 5. Embroidery threads Order No: 412 85 90-96 Knee lift Order No.: ...
...designs directly from the Internet and transfer them to your creative 2170. USB cable 4. Embroidery unit Introduction Embroidery hoops 1. Embroidery template Order No: 412 86 21 01 6. Order No: 412 84 16-96 2. Clips Order No: 412 65 18-03 4. creative HOOP 225x140 mm Order No: 93-039-340-44...HOOP 120x115 mm Order No: 93-039-343-44-000 3. Creative gallery designs 3. Quick embroidery packet 5. 300 Embroidery card 6. creative HOOP 80 80x80mm, with adapter Order No: 820 476-096 2. Hoop Adapter Order No: 820 477-096 5. Embroidery threads Order No: 412 85 90-96 Knee lift Order No.: ...

Owner's Manual
Page 21
Contrast of the screen The contrast of the screen is adjustable. The setting can be re-adjusted with the screen control dial (A). "0" = OFF "I ) the sewing lightbulb lights up and the multi-color touch screen lights up over the thread cutter. The sewing machine is now ready to the front up . A 2:3 Preparations Main switch When the main switch is switched on (switch function I " = ON Thread cutter Pull the thread from the back to function.
Contrast of the screen The contrast of the screen is adjustable. The setting can be re-adjusted with the screen control dial (A). "0" = OFF "I ) the sewing lightbulb lights up and the multi-color touch screen lights up over the thread cutter. The sewing machine is now ready to the front up . A 2:3 Preparations Main switch When the main switch is switched on (switch function I " = ON Thread cutter Pull the thread from the back to function.

Owner's Manual
Page 26
...spool cap for larger spools of the thread around the bobbin several times in diameter than the spool. Start bobbin winding by placing the small pin on the main switch. Wind the start of thread, and the smallest cap with the Pfaff logo up. Cut the thread and remove the bobbin from the winder.... Place the sewing thread on page 2:11. Switch on the bobbin winder into guide (A) from front to the ...
...spool cap for larger spools of the thread around the bobbin several times in diameter than the spool. Start bobbin winding by placing the small pin on the main switch. Wind the start of thread, and the smallest cap with the Pfaff logo up. Cut the thread and remove the bobbin from the winder.... Place the sewing thread on page 2:11. Switch on the bobbin winder into guide (A) from front to the ...

Owner's Manual
Page 27
...and lock. Start bobbin winding by pushing the bobbin lever to back and pull it counter clockwise above the bobbin winder thread guide (B). As soon as the bobbin is full, the winding action will be stopped automatically. Place a spool of the... thread around the bobbin several times in the hole provided. Preparations 1. 2. 1. Winding from front to the right. Threading Place the thread into thread guide (A) from the third spool pin Insert the third spool pin in a clockwise direction....
...and lock. Start bobbin winding by pushing the bobbin lever to back and pull it counter clockwise above the bobbin winder thread guide (B). As soon as the bobbin is full, the winding action will be stopped automatically. Place a spool of the... thread around the bobbin several times in the hole provided. Preparations 1. 2. 1. Winding from front to the right. Threading Place the thread into thread guide (A) from the third spool pin Insert the third spool pin in a clockwise direction....

Owner's Manual
Page 28
... winding while embroidering The creative 2170 has a thread guide for threading instructions). Pull the bobbin thread (blue) counter clockwise above the bobbin winder thread guide. Raise the presser foot. Note: The take -up lever must be stopped automatically. Wind the start of the thread around the bobbin several... times in a clockwise direction. Start bobbin winding by pushing the bobbin lever to cut the thread after bobbin winding. 2:10 As soon as the bobbin is fully threaded (see page 2:14 for bobbin winding while embroidering. A Winding a bobbin through the needle...
... winding while embroidering The creative 2170 has a thread guide for threading instructions). Pull the bobbin thread (blue) counter clockwise above the bobbin winder thread guide. Raise the presser foot. Note: The take -up lever must be stopped automatically. Wind the start of the thread around the bobbin several... times in a clockwise direction. Start bobbin winding by pushing the bobbin lever to cut the thread after bobbin winding. 2:10 As soon as the bobbin is fully threaded (see page 2:14 for bobbin winding while embroidering. A Winding a bobbin through the needle...

Owner's Manual
Page 30
... side swinging it rests in the bobbin case. A warning message will also be given on your display. Check: Hold the bobbin case with the Pfaff logo facing towards the bobbin case) in the opening (see arrow). The bobbin case must face upwards. Lift the latch of the bobbin case and...only activated when the bobbin door is nearing its end the red light next to the reverse button flashes automatically. Check: Pull the bobbin thread sharply. Release the latch and take the empty bobbin out of the machine. Inserting the bobbin Insert the full bobbin (with the bobbin facing ...
... side swinging it rests in the bobbin case. A warning message will also be given on your display. Check: Hold the bobbin case with the Pfaff logo facing towards the bobbin case) in the opening (see arrow). The bobbin case must face upwards. Lift the latch of the bobbin case and...only activated when the bobbin door is nearing its end the red light next to the reverse button flashes automatically. Check: Pull the bobbin thread sharply. Release the latch and take the empty bobbin out of the machine. Inserting the bobbin Insert the full bobbin (with the bobbin facing ...

Owner's Manual
Page 31
... of the fabric, you need to adjust the thread tension. Press the thread tension icon (A), + and - to get it This machine will be needed. the threads evenly meet between the two fabric layers. The needle thread tension must be increased. The following is valid ...for different types of the fabric: The needle thread tension is correctly adjusted, i.e. A Thread tension For the best stitch appearance and durability make sure the needle thread tension is too tight. Preparations Correct top tension - Your adjustments will automatically ...
... of the fabric, you need to adjust the thread tension. Press the thread tension icon (A), + and - to get it This machine will be needed. the threads evenly meet between the two fabric layers. The needle thread tension must be increased. The following is valid ...for different types of the fabric: The needle thread tension is correctly adjusted, i.e. A Thread tension For the best stitch appearance and durability make sure the needle thread tension is too tight. Preparations Correct top tension - Your adjustments will automatically ...

Owner's Manual
Page 32
... and fit a spool cap of the thread end through the left to thread the needle automatically. 1. Pull the thread around the stop (C) in the right-hand threading slot and upwards to make threading of the needle easier and quicker the Pfaff needle threader is built-in the right-hand threading slot. Press the threader down with the...
... and fit a spool cap of the thread end through the left to thread the needle automatically. 1. Pull the thread around the stop (C) in the right-hand threading slot and upwards to make threading of the needle easier and quicker the Pfaff needle threader is built-in the right-hand threading slot. Press the threader down with the...

Owner's Manual
Page 33
... right thread into the left thread guide and thread the left threading slot, make sure that both threads are placed underneath the bobbin winder thread guide. Place the fabric under the presser foot and start to the left thread into the right thread guide and thread the right needle. Threading the twin...with an appropriate spool cap on it. Insert the bobbin case and place the thread to sew. During threading in the usual manner, making sure the threads do not become twisted together. Bobbin thread Raise the presser foot. A Swing the second spool holder up by itself. ...
... right thread into the left thread guide and thread the left threading slot, make sure that both threads are placed underneath the bobbin winder thread guide. Place the fabric under the presser foot and start to the left thread into the right thread guide and thread the right needle. Threading the twin...with an appropriate spool cap on it. Insert the bobbin case and place the thread to sew. During threading in the usual manner, making sure the threads do not become twisted together. Bobbin thread Raise the presser foot. A Swing the second spool holder up by itself. ...

Owner's Manual
Page 35
...among other things, find instructions on how to thread the needle, wind a bobbin, change the presser foot, change to use the machine. It provides you with information about the machine. When closing the creative Assistant press the (C) icon. The toolbar will change ... on how to help function is a creative Assistant function (A) that gives you are sewing; General notes on how the Pfaff creative 2170 works In your Pfaff creative 2170 there is launched. Sewing and Embroidery. Machine Assistant When you are in the creative Assistant you will change the light bulb,...
...among other things, find instructions on how to thread the needle, wind a bobbin, change the presser foot, change to use the machine. It provides you with information about the machine. When closing the creative Assistant press the (C) icon. The toolbar will change ... on how to help function is a creative Assistant function (A) that gives you are sewing; General notes on how the Pfaff creative 2170 works In your Pfaff creative 2170 there is launched. Sewing and Embroidery. Machine Assistant When you are in the creative Assistant you will change the light bulb,...

Owner's Manual
Page 44
... you want the presser foot to sew, the machine sews in the sewing mode. 1. When the tie-off at the end is activated. 4. Thread Snips Button B. Sew Slow Button When pressing this button. 3:2 A BCD D. You can choose how high you when turning a corner, quilting etc...tie-off . E F G. E. Pattern start This button has two functions. F. If you press this button the machine automatically cuts the bobbin and needle thread. Reverse Sewing Button A. Pattern start C. If you keep the button pressed. 2. Sewing Function Buttons A. If you press it easy for as long as...
... you want the presser foot to sew, the machine sews in the sewing mode. 1. When the tie-off at the end is activated. 4. Thread Snips Button B. Sew Slow Button When pressing this button. 3:2 A BCD D. You can choose how high you when turning a corner, quilting etc...tie-off . E F G. E. Pattern start This button has two functions. F. If you press this button the machine automatically cuts the bobbin and needle thread. Reverse Sewing Button A. Pattern start C. If you keep the button pressed. 2. Sewing Function Buttons A. If you press it easy for as long as...

Owner's Manual
Page 47
... have chosen (in this case 90° or 60°). If you select one of the these functions it possible for the Tie-off end, Thread Snips and Presser foot lifter. If you select another stitch. Sewing mode functions A B A. Tie-off program G. Tapering I . Balance I J H. When touching the icon a new window appears...
... have chosen (in this case 90° or 60°). If you select one of the these functions it possible for the Tie-off end, Thread Snips and Presser foot lifter. If you select another stitch. Sewing mode functions A B A. Tie-off program G. Tapering I . Balance I J H. When touching the icon a new window appears...
Owner's Manual
Page 51
... 11. Demo: with the embroidery unit attached. The opening screen appears instantly and you to turn different messages on how to stop when the bobbin thread is running out. 10. Note: this function button when you want to create a Personal menu for all the stitches you of your machine. Version:...here. 14. The code must have at least four digits, and no more on or off, for your machine is a great feature to lock your Pfaff creative 2170. For example you might want to install an upgrade for instance if you don't want to remind you need for a project. To program a demo,...
... 11. Demo: with the embroidery unit attached. The opening screen appears instantly and you to turn different messages on how to stop when the bobbin thread is running out. 10. Note: this function button when you want to create a Personal menu for all the stitches you of your machine. Version:...here. 14. The code must have at least four digits, and no more on or off, for your machine is a great feature to lock your Pfaff creative 2170. For example you might want to install an upgrade for instance if you don't want to remind you need for a project. To program a demo,...

Owner's Manual
Page 53
... the width of a stitch. You can modify the settings that are displayed, such as you change . to increase or reduce the thread tension. 3:11 Sewing You will then scroll your Pfaff creative 2170 and stitch cards or in this icon changes to the way they were. You can select a stitch by number on your...
... the width of a stitch. You can modify the settings that are displayed, such as you change . to increase or reduce the thread tension. 3:11 Sewing You will then scroll your Pfaff creative 2170 and stitch cards or in this icon changes to the way they were. You can select a stitch by number on your...

Owner's Manual
Page 54
...this the Tie-off end, Thread Snips and Presser foot lifter. Tie-off beginning, Tie-off program. icons to make the pattern longer without changing the density. It will stay that way even if you want , touch OK. Save parameter You can program your creative 2170 there are two different ways ... menu and choose Reset parameter. We call this icon the tie-off is the Immediate tie-off at the beginning, at the end, cut the threads and raise the presser foot. B C A Tie-off program icon (C) a new window appears. If you go into another menu or turn off program icon ...
...this the Tie-off end, Thread Snips and Presser foot lifter. Tie-off beginning, Tie-off program. icons to make the pattern longer without changing the density. It will stay that way even if you want , touch OK. Save parameter You can program your creative 2170 there are two different ways ... menu and choose Reset parameter. We call this icon the tie-off is the Immediate tie-off at the beginning, at the end, cut the threads and raise the presser foot. B C A Tie-off program icon (C) a new window appears. If you go into another menu or turn off program icon ...


