
Owner's Manual
Page 3
Congratulations! Your Pfaff creative 2124 is to use will free your creative engergies turning your ideas become reality! But we do not want to your imagination and make your ideas into reality will soon discover how easy it is the perfect embroidery and sewing machine combination. You will be a joy. Before you any longer. Congratulations on purchasing your Pfaff creative 2124. Give a free rein to keep you start, please spend some time reading these operating instructions. Its ease of use your new Pfaff creative 2124!
Congratulations! Your Pfaff creative 2124 is to use will free your creative engergies turning your ideas become reality! But we do not want to your imagination and make your ideas into reality will soon discover how easy it is the perfect embroidery and sewing machine combination. You will be a joy. Before you any longer. Congratulations on purchasing your Pfaff creative 2124. Give a free rein to keep you start, please spend some time reading these operating instructions. Its ease of use your new Pfaff creative 2124!
Owner's Manual
Page 4
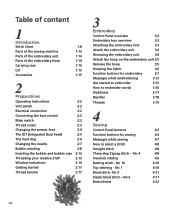
...4:10 Blind stitch- Table of content 1 Introduction Stitch Chart 1:8 Parts of the sewing machine 1:13 Parts of the embroidery unit 1:14 Parts of the embroidery hoop 1:14 Carrying case 1:15 Lid 1:15 Accessories 1:15 2 Preparations Operating Instructions ... your creative 2124 2:13 Window indications 2:16 Getting started 2:17 Thread tension 2:17 3 Embroidery Control Panel overview 3:2 Embroidery box overview 3:3 Attaching the embroidery foot 3:3 Attach the embroidery unit 3:4 Removing the embroidery unit 3:4 Attach the hoop on the embroidery unit ...
...4:10 Blind stitch- Table of content 1 Introduction Stitch Chart 1:8 Parts of the sewing machine 1:13 Parts of the embroidery unit 1:14 Parts of the embroidery hoop 1:14 Carrying case 1:15 Lid 1:15 Accessories 1:15 2 Preparations Operating Instructions ... your creative 2124 2:13 Window indications 2:16 Getting started 2:17 Thread tension 2:17 3 Embroidery Control Panel overview 3:2 Embroidery box overview 3:3 Attaching the embroidery foot 3:3 Attach the embroidery unit 3:4 Removing the embroidery unit 3:4 Attach the hoop on the embroidery unit ...
Owner's Manual
Page 13
...needle threader 22. Reverse sewing or Embroidery start/stop button 23. Lid ... feed 21. Free arm 26. Thread take-up lever 30. Hole for the embroidery unit 1:13 Carrying handle 10. Connection socket, "lead cord" 14. Presser foot...controls, -/+ button 3. Bobbin door 25. Sewing light bulb (Max. 5 W.) 27. Creative smart card slot 36. Connection socket for second spool holder 33. Connection socket, "foot control...foot 20. Thread tension, -/+ button 4. Sew slow button 8. Embroidery function buttons 13. Main switch 16. Removable accessory tray 19. Thread cutter 28. ...
...needle threader 22. Reverse sewing or Embroidery start/stop button 23. Lid ... feed 21. Free arm 26. Thread take-up lever 30. Hole for the embroidery unit 1:13 Carrying handle 10. Connection socket, "lead cord" 14. Presser foot...controls, -/+ button 3. Bobbin door 25. Sewing light bulb (Max. 5 W.) 27. Creative smart card slot 36. Connection socket for second spool holder 33. Connection socket, "foot control...foot 20. Thread tension, -/+ button 4. Sew slow button 8. Embroidery function buttons 13. Main switch 16. Removable accessory tray 19. Thread cutter 28. ...
Owner's Manual
Page 14
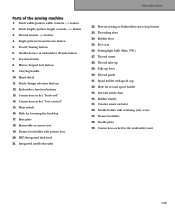
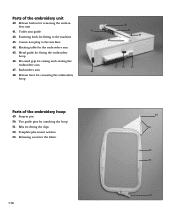
... latch for fitting to the machine 44. Ribs for the fabric 49 50 51 52 53 1:14 Recessed grip for the embroidery arm 45. Template placement notches 53. Parts of the embroidery hoop 49. Under arm guide 42. Snap-in pin 50. Embroidery arm 48. Rotating table for raising and... rotating the embroidery arm 47. Release lever for attaching the hoop 51. Connection plug to the machine 43. Two guide pins for removing the embroidery hoop 48 45 47 46 44 41 42 43 40...
... latch for fitting to the machine 44. Ribs for the fabric 49 50 51 52 53 1:14 Recessed grip for the embroidery arm 45. Template placement notches 53. Parts of the embroidery hoop 49. Under arm guide 42. Snap-in pin 50. Embroidery arm 48. Rotating table for raising and... rotating the embroidery arm 47. Release lever for attaching the hoop 51. Connection plug to the machine 43. Two guide pins for removing the embroidery hoop 48 45 47 46 44 41 42 43 40...
Owner's Manual
Page 15
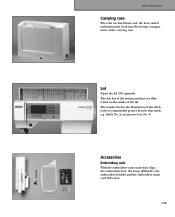
...machine are illustrated on the inside of the stitch, is the recommended presser foot for that stitch, e.g. The number below the illustration of the lid. Stitch No. 2, use presser foot No. 0. Accessories Embroidery unit With the embroidery unit comes four clips, the embroidery foot, the hoop (225x140), the embroidery... booklet and the embroidery smart card 300 s foot. 1:15 Lid Open the lid (33) upwards...
...machine are illustrated on the inside of the stitch, is the recommended presser foot for that stitch, e.g. The number below the illustration of the lid. Stitch No. 2, use presser foot No. 0. Accessories Embroidery unit With the embroidery unit comes four clips, the embroidery foot, the hoop (225x140), the embroidery... booklet and the embroidery smart card 300 s foot. 1:15 Lid Open the lid (33) upwards...
Owner's Manual
Page 38
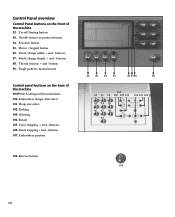
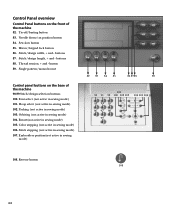
.... Color stepping, + and - buttons 107. buttons 87. Orbiting 104. Single pattern/monochrome Control panel buttons on the front of the machine 90-99 Stitch/design selection buttons 100. Parking 103. Embroidery position 82 83 84 85 86 87 88 89 101 90 91 92 100 102 103 104 105 106 107 93... 88. Hoop size select 102. Rotate 105. Tie-off/basting button 83. buttons 106. Control Panel overview Control Panel buttons on the base of the machine 82. Needle down/cut position button 84. Sew slow button 85. Embroidery design/font select 101. Stitch stepping,+ and -
.... Color stepping, + and - buttons 107. buttons 87. Orbiting 104. Single pattern/monochrome Control panel buttons on the front of the machine 90-99 Stitch/design selection buttons 100. Parking 103. Embroidery position 82 83 84 85 86 87 88 89 101 90 91 92 100 102 103 104 105 106 107 93... 88. Hoop size select 102. Rotate 105. Tie-off/basting button 83. buttons 106. Control Panel overview Control Panel buttons on the base of the machine 82. Needle down/cut position button 84. Sew slow button 85. Embroidery design/font select 101. Stitch stepping,+ and -
Owner's Manual
Page 40
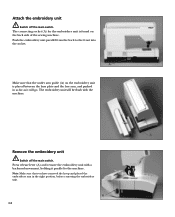
...a backward movement, holding it parallel to the front into the socket. A Remove the embroidery unit Switch off the main switch. Press release lever (A) and remove the embroidery unit with the machine. The embroidery unit will go. Note: Make sure that the under arm guide (A) on the back ...side of the sewing machine. The connecting socket (A) for the embroidery unit is found on the embroidery unit is placed between the base ...
...a backward movement, holding it parallel to the front into the socket. A Remove the embroidery unit Switch off the main switch. Press release lever (A) and remove the embroidery unit with the machine. The embroidery unit will go. Note: Make sure that the under arm guide (A) on the back ...side of the sewing machine. The connecting socket (A) for the embroidery unit is found on the embroidery unit is placed between the base ...
Owner's Manual
Page 41
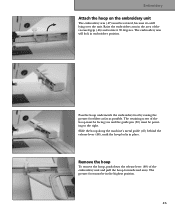
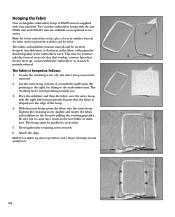
... in place. Slide the hoop along the machine's metal guide (45) behind the release lever (48), until the hoop locks in the area of the recessed grip (46) and rotate it is still lying over the unit. Pass the hoop underneath the embroidery foot by raising the presser foot lifter as far... as possible. The retaining screw of the embroidery unit and pull the hoop forwards and away. The presser foot must be in embroidery position. Remove the hoop To remove the hoop, push down the release lever (48) of the hoop must be facing you...
... in place. Slide the hoop along the machine's metal guide (45) behind the release lever (48), until the hoop locks in the area of the recessed grip (46) and rotate it is still lying over the unit. Pass the hoop underneath the embroidery foot by raising the presser foot lifter as far... as possible. The retaining screw of the embroidery unit and pull the hoop forwards and away. The presser foot must be in embroidery position. Remove the hoop To remove the hoop, push down the release lever (48) of the hoop must be facing you...
Owner's Manual
Page 42
...;nished quality of stabilizer beneath the fabric and hoop both the stabilizer and the fabric. Two circular embroidery hoops with the right side facing upwards. Note: If you with your machine. Hooping the fabric One rectangular embroidery hoop (140x225 mm) is hooped as an optional accessories. Tighten the retaining screw slightly and tauten...
...;nished quality of stabilizer beneath the fabric and hoop both the stabilizer and the fabric. Two circular embroidery hoops with the right side facing upwards. Note: If you with your machine. Hooping the fabric One rectangular embroidery hoop (140x225 mm) is hooped as an optional accessories. Tighten the retaining screw slightly and tauten...
Owner's Manual
Page 43
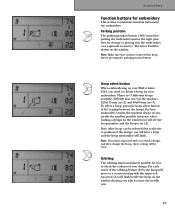
... for your Pfaff creative 2124, you have mirrored and/or rotated a design, and then change the hoop, these settings will be shown on the window. There are 3 different hoops available: 225x140 mm (no 1 in the right position for storage or placing it possible for the embroidery. For each...you have removed the hoop before pressing the parking position button. Orbiting The orbiting function makes it in . 3:7 For best embroidery results, the machine always recommends the smallest possible hoop size when loading a design. Parking position The parking position button (102) is in the...
... for your Pfaff creative 2124, you have mirrored and/or rotated a design, and then change the hoop, these settings will be shown on the window. There are 3 different hoops available: 225x140 mm (no 1 in the right position for storage or placing it possible for the embroidery. For each...you have removed the hoop before pressing the parking position button. Orbiting The orbiting function makes it in . 3:7 For best embroidery results, the machine always recommends the smallest possible hoop size when loading a design. Parking position The parking position button (102) is in the...
Owner's Manual
Page 44
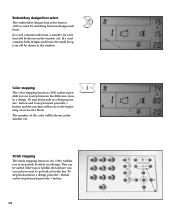
... select The embroidery design/font select button (100) is used for switching between the different colors in the window (A). This can be shown in a design. Stitch stepping The ... top or bobbin thread have run out and you to step forward press the + button. button and to step forward press the + button and the machine will move to the beginning of the color will be shown on the window (A). A 3:8
... select The embroidery design/font select button (100) is used for switching between the different colors in the window (A). This can be shown in a design. Stitch stepping The ... top or bobbin thread have run out and you to step forward press the + button. button and to step forward press the + button and the machine will move to the beginning of the color will be shown on the window (A). A 3:8
Owner's Manual
Page 45
The machine will automatically be limited by the hoop size. If you have reached the limit of your design. You can not be hooped tightly. The basting function can be shown on the window. Embroidery Rotating button This function makes it possible to baste the fabric and stabilizer together. 3:9 Note: If the design...
The machine will automatically be limited by the hoop size. If you have reached the limit of your design. You can not be hooped tightly. The basting function can be shown on the window. Embroidery Rotating button This function makes it possible to baste the fabric and stabilizer together. 3:9 Note: If the design...
Owner's Manual
Page 49
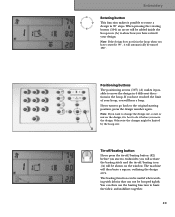
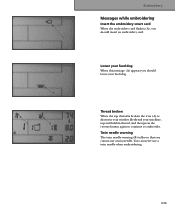
Lower your feed dog When this message (A) appears you should insert an embroidery card. You can never use a twin needle. Twin needle warning The twin needle warning (B) tells you that you cannot use a twin needle when embroidering. 3:13 Rethread your window. Thread broken When the top thread is broken the icon (A) is shown in your machine, top and bobbin thread, and then press the reverse button again to continue to embroider. Embroidery Messages while embroidering Insert the embroidery smart card When the embroidery card flashes (A), you should lower your feed dog.
Lower your feed dog When this message (A) appears you should insert an embroidery card. You can never use a twin needle. Twin needle warning The twin needle warning (B) tells you that you cannot use a twin needle when embroidering. 3:13 Rethread your window. Thread broken When the top thread is broken the icon (A) is shown in your machine, top and bobbin thread, and then press the reverse button again to continue to embroider. Embroidery Messages while embroidering Insert the embroidery smart card When the embroidery card flashes (A), you should lower your feed dog.

Owner's Manual
Page 50
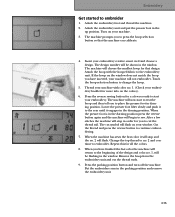
...number, to cut the thread tail. When you have cut symbol (A), telling you to indicate a stop When embroidering an appliqué embroidery or a cutwork embroidery, you will then disappear. Darning position The message (A) prompts you to the back until it to put the presser foot in darning ... foot When the symbol (A) appears with the cut the thread, press the reverse button again, and the machine will disappear when you have sewn a few stitches your Pfaff creative 2124 stops and flashes with the arrow flashing, you have started to embroider. Press the reverse ...
...number, to cut the thread tail. When you have cut symbol (A), telling you to indicate a stop When embroidering an appliqué embroidery or a cutwork embroidery, you will then disappear. Darning position The message (A) prompts you to the back until it to put the presser foot in darning ... foot When the symbol (A) appears with the cut the thread, press the reverse button again, and the machine will disappear when you have sewn a few stitches your Pfaff creative 2124 stops and flashes with the arrow flashing, you have started to embroider. Press the reverse ...
Owner's Manual
Page 51
...embroidery creative smart card and choose a design. The machine will flash on the colors). 6. Repeat this for more info on your window. Remove the hoop from the embroidery unit and cut symbol will choose the smallest hoop for that the machine can calibrate. 4. Thread your embroidery...64257;rst color it engages in the window. When you have finished the last color the machine will flash. Attach the embroidery foot and thread the machine. 2. Insert your machine. 3. Press the reverse sewing button for you to no . 1, will not embroider. Attach the ...
...embroidery creative smart card and choose a design. The machine will flash on the colors). 6. Repeat this for more info on your window. Remove the hoop from the embroidery unit and cut symbol will choose the smallest hoop for that the machine can calibrate. 4. Thread your embroidery...64257;rst color it engages in the window. When you have finished the last color the machine will flash. Attach the embroidery foot and thread the machine. 2. Insert your machine. 3. Press the reverse sewing button for you to no . 1, will not embroider. Attach the ...
Owner's Manual
Page 52
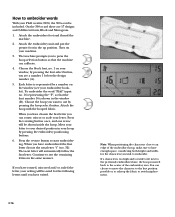
...designs and 2 different fonts, Block and Monogram. 1. Continue to sew the remaining letters in the up position. Attach the embroidery foot and thread the machine. 2. The next letter will automatically follow the first letter. Attach the hoop with the hooped fabric. How to ...Press the reverse button to an edge of the embroidery area. If you have enough space, considering both height and width, for the following letters until you want to have rotated, mirrored and/or scaled the letter, your Pfaff creative 2124, the 300 s-card is represented by pressing ...
...designs and 2 different fonts, Block and Monogram. 1. Continue to sew the remaining letters in the up position. Attach the embroidery foot and thread the machine. 2. The next letter will automatically follow the first letter. Attach the hoop with the hooped fabric. How to ...Press the reverse button to an edge of the embroidery area. If you have enough space, considering both height and width, for the following letters until you want to have rotated, mirrored and/or scaled the letter, your Pfaff creative 2124, the 300 s-card is represented by pressing ...
Owner's Manual
Page 56
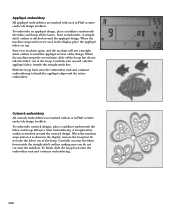
... Slide the hoop back onto the embroidery unit and continue embroidering to embroider. Carefully cut away the fabric from inside the straight stitch outline making sure you see an A in Pfaff creative cards/cds design booklets. A Start your machine again, and the machine will sew a straight stitch outline ...64257;nish the appliqué edges and the entire embroidery. When the machine stops the second time, slide off the hoop but do not take the fabric out of the design. When the machine stops and an A is shown in Pfaff creative cards/cds design booklets. To finish, ...
... Slide the hoop back onto the embroidery unit and continue embroidering to embroider. Carefully cut away the fabric from inside the straight stitch outline making sure you see an A in Pfaff creative cards/cds design booklets. A Start your machine again, and the machine will sew a straight stitch outline ...64257;nish the appliqué edges and the entire embroidery. When the machine stops the second time, slide off the hoop but do not take the fabric out of the design. When the machine stops and an A is shown in Pfaff creative cards/cds design booklets. To finish, ...
Owner's Manual
Page 58
... 108 4:2 Mirror/keypad lock button 86. Stitch/design length, + and - buttons 88. Single pattern/monochrome Control panel buttons on the front of the machine 90-99 Stitch/design selection buttons 100. Font select (not active in sewing mode) 104. Orbiting (not active in sewing mode) 101. Stitch/design width...slow button 85. Hoop select (not active in sewing mode) 107. Stitch stepping (not active in sewing mode) 102. Tie-off/basting button 83. Embroidery position(not active in sewing mode) 106. Color stepping (not active in sewing mode) 82 83 84 85 86 87 88 89 101 90 91...
... 108 4:2 Mirror/keypad lock button 86. Stitch/design length, + and - buttons 88. Single pattern/monochrome Control panel buttons on the front of the machine 90-99 Stitch/design selection buttons 100. Font select (not active in sewing mode) 104. Orbiting (not active in sewing mode) 101. Stitch/design width...slow button 85. Hoop select (not active in sewing mode) 107. Stitch stepping (not active in sewing mode) 102. Tie-off/basting button 83. Embroidery position(not active in sewing mode) 106. Color stepping (not active in sewing mode) 82 83 84 85 86 87 88 89 101 90 91...

Owner's Manual
Page 82
...needle up/down" functions. • Attach fancy stitch foot no . 36 and 37 this traditional sewing technique can also vary the shade of your machine with the sewing speed creates the stitch length. You can use a wooden ring hoop wrapped with bias binding for easier viewing when stitching. 5:10... lend a distinctive character to appear on , you control the stitch length. Important: Never engage the IDT when free motion sewing. With your Pfaff creative 2124 and the two cross stitches, no . 2. From now on the reverse side of your fabric tight as a drum into a round embroidery hoop.
...needle up/down" functions. • Attach fancy stitch foot no . 36 and 37 this traditional sewing technique can also vary the shade of your machine with the sewing speed creates the stitch length. You can use a wooden ring hoop wrapped with bias binding for easier viewing when stitching. 5:10... lend a distinctive character to appear on , you control the stitch length. Important: Never engage the IDT when free motion sewing. With your Pfaff creative 2124 and the two cross stitches, no . 2. From now on the reverse side of your fabric tight as a drum into a round embroidery hoop.
Owner's Manual
Page 92
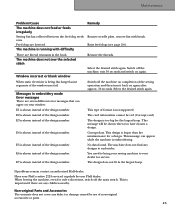
...for service. The design does not fit in embroidery mode Error messages There are lowered. This is larger than the maximum size for only a short time, switch off the machine, wait 10 seconds and switch on your Pfaff creative 2124 serviced regularly by use of the design number. Remove... the threads. Switch off the machine on again after approx. 10 seconds. Select the desired stitch again. ...
...for service. The design does not fit in embroidery mode Error messages There are lowered. This is larger than the maximum size for only a short time, switch off the machine, wait 10 seconds and switch on your Pfaff creative 2124 serviced regularly by use of the design number. Remove... the threads. Switch off the machine on again after approx. 10 seconds. Select the desired stitch again. ...


