
Owner's Manual
Page 3
Congratulations! Before you any longer. Give a free rein to your imagination and make your new Pfaff creative 2124! You will soon discover how easy it is the perfect embroidery and sewing machine combination. Congratulations on purchasing your ideas become reality! Your Pfaff creative 2124 is to keep you start, please spend some time reading these operating instructions. Its ease of use your ideas into reality will free your creative engergies turning your Pfaff creative 2124. But we do not want to use will be a joy.
Congratulations! Before you any longer. Give a free rein to your imagination and make your new Pfaff creative 2124! You will soon discover how easy it is the perfect embroidery and sewing machine combination. Congratulations on purchasing your ideas become reality! Your Pfaff creative 2124 is to keep you start, please spend some time reading these operating instructions. Its ease of use your ideas into reality will free your creative engergies turning your Pfaff creative 2124. But we do not want to use will be a joy.
Owner's Manual
Page 4
...4:11 Buttonholes 4:12 1:4 Table of content 1 Introduction Stitch Chart 1:8 Parts of the sewing machine 1:13 Parts of the embroidery unit 1:14 Parts of the embroidery hoop 1:14 Carrying case 1:15 Lid 1:15 Accessories 1:15 2 Preparations Operating Instructions 2:2 ... creative 2124 2:13 Window indications 2:16 Getting started 2:17 Thread tension 2:17 3 Embroidery Control Panel overview 3:2 Embroidery box overview 3:3 Attaching the embroidery foot 3:3 Attach the embroidery unit 3:4 Removing the embroidery unit 3:4 Attach the hoop on the embroidery unit...
...4:11 Buttonholes 4:12 1:4 Table of content 1 Introduction Stitch Chart 1:8 Parts of the sewing machine 1:13 Parts of the embroidery unit 1:14 Parts of the embroidery hoop 1:14 Carrying case 1:15 Lid 1:15 Accessories 1:15 2 Preparations Operating Instructions 2:2 ... creative 2124 2:13 Window indications 2:16 Getting started 2:17 Thread tension 2:17 3 Embroidery Control Panel overview 3:2 Embroidery box overview 3:3 Attaching the embroidery foot 3:3 Attach the embroidery unit 3:4 Removing the embroidery unit 3:4 Attach the hoop on the embroidery unit...
Owner's Manual
Page 13
... retaining (set) screw 37. IDT/Integrated dual feed 21. Free arm 26. Needle plate 39. Connection socket for the embroidery unit 1:13 Single pattern/monochrome button 5. Creative smart card slot 36. Stitch width/pattern width controls, -/+ button 2. Tie-off/basting button 6. PInretrpoadruacttioionns Parts of the sewing machine 1. Thread tension, -/+ button 4. Mirror/keypad lock button 9.
... retaining (set) screw 37. IDT/Integrated dual feed 21. Free arm 26. Needle plate 39. Connection socket for the embroidery unit 1:13 Single pattern/monochrome button 5. Creative smart card slot 36. Stitch width/pattern width controls, -/+ button 2. Tie-off/basting button 6. PInretrpoadruacttioionns Parts of the sewing machine 1. Thread tension, -/+ button 4. Mirror/keypad lock button 9.
Owner's Manual
Page 15
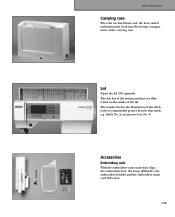
... the lid. Stitch No. 2, use presser foot No. 0. Accessories Embroidery unit With the embroidery unit comes four clips, the embroidery foot, the hoop (225x140), the embroidery booklet and the embroidery smart card 300 s foot. 1:15 Lid Open the lid (33) upwards. The stitches of the sewing machine are illustrated on the inside of the stitch, is the...
... the lid. Stitch No. 2, use presser foot No. 0. Accessories Embroidery unit With the embroidery unit comes four clips, the embroidery foot, the hoop (225x140), the embroidery booklet and the embroidery smart card 300 s foot. 1:15 Lid Open the lid (33) upwards. The stitches of the sewing machine are illustrated on the inside of the stitch, is the...
Owner's Manual
Page 38
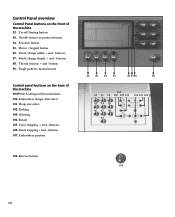
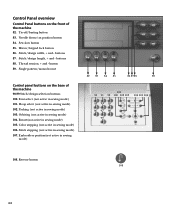
...stepping, + and - Reverse button 108 3:2 Sew slow button 85. Stitch/design width, + and - buttons 87. Single pattern/monochrome Control panel buttons on the front of the machine 90-99 Stitch/design selection buttons 100. buttons 107. Orbiting 104. Hoop size select 102. Embroidery position 82 83 84 85 86 87 88... button 83. Thread tension, + and - Rotate 105. Stitch/design length, + and - buttons 88. Parking 103. Stitch stepping,+ and - buttons 106. button 89. Embroidery design/font select 101. Control Panel overview Control Panel buttons on the base of the...
...stepping, + and - Reverse button 108 3:2 Sew slow button 85. Stitch/design width, + and - buttons 87. Single pattern/monochrome Control panel buttons on the front of the machine 90-99 Stitch/design selection buttons 100. buttons 107. Orbiting 104. Hoop size select 102. Embroidery position 82 83 84 85 86 87 88... button 83. Thread tension, + and - Rotate 105. Stitch/design length, + and - buttons 88. Parking 103. Stitch stepping,+ and - buttons 106. button 89. Embroidery design/font select 101. Control Panel overview Control Panel buttons on the base of the...
Owner's Manual
Page 40
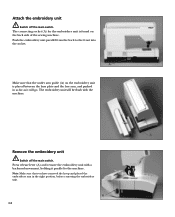
.... Press release lever (A) and remove the embroidery unit with the machine. A Remove the embroidery unit Switch off the main switch. Push the embroidery unit parallel from the back to the machine. Note: Make sure that the under arm guide (A) on the embroidery unit is found on the back side of the sewing machine. A Make sure that you have...
.... Press release lever (A) and remove the embroidery unit with the machine. A Remove the embroidery unit Switch off the main switch. Push the embroidery unit parallel from the back to the machine. Note: Make sure that the under arm guide (A) on the embroidery unit is found on the back side of the sewing machine. A Make sure that you have...
Owner's Manual
Page 51
...not embroider. When you have inserted, your embroidery creative smart card and choose a design. Press the parking position button and turn off the machine. Insert your machine will flash on your window. The machine will now start your embroidery booklet for more info on the window ... Cut the thread and press the reverse button to sew. If the hoop on the colors). 6. Press the reverse sewing button for that the machine can calibrate. 4. The machine prompts you have finished the last color the machine will stop in the window. Repeat this for you...
...not embroider. When you have inserted, your embroidery creative smart card and choose a design. Press the parking position button and turn off the machine. Insert your machine will flash on your window. The machine will now start your embroidery booklet for more info on the window ... Cut the thread and press the reverse button to sew. If the hoop on the colors). 6. Press the reverse sewing button for that the machine can calibrate. 4. The machine prompts you have finished the last color the machine will stop in the window. Repeat this for you...
Owner's Manual
Page 52
... hoop. You can choose to move the character to the best position possible or to rehoop the fabric to sew the remaining letters in the up position. Attach the embroidery unit and put the presser foot in the same manner. Each letter is moved back to the center of ...your window, by pressing the embroidery positioning buttons. 6. On the 300 s-card there are 17 designs and 2 different fonts, Block and Monogram. 1. The next letter will be saved for the characters you want to use by a number on your letter. The machine prompts you see your Pfaff creative 2124, the 300 s-card is ...
... hoop. You can choose to move the character to the best position possible or to rehoop the fabric to sew the remaining letters in the up position. Attach the embroidery unit and put the presser foot in the same manner. Each letter is moved back to the center of ...your window, by pressing the embroidery positioning buttons. 6. On the 300 s-card there are 17 designs and 2 different fonts, Block and Monogram. 1. The next letter will be saved for the characters you want to use by a number on your letter. The machine prompts you see your Pfaff creative 2124, the 300 s-card is ...
Owner's Manual
Page 56
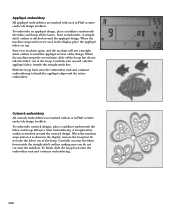
... shown in Pfaff creative cards/cds design booklets. When the machine stops the second time, slide off the hoop but do not cut away the stabilizer. Appliqué embroidery All appliqué embroideries are marked with an A in the display, place the appliqué fabric on top. A Start your machine again, and the machine will sew a straight stitch...
... shown in Pfaff creative cards/cds design booklets. When the machine stops the second time, slide off the hoop but do not cut away the stabilizer. Appliqué embroidery All appliqué embroideries are marked with an A in the display, place the appliqué fabric on top. A Start your machine again, and the machine will sew a straight stitch...
Owner's Manual
Page 58
... 107 93 94 95 96 97 98 99 108. Control Panel overview Control Panel buttons on the base of the machine 82. Embroidery position(not active in sewing mode) 107. Mirror/keypad lock button 86. Single pattern/monochrome Control panel buttons on the front of the... machine 90-99 Stitch/design selection buttons 100. Hoop select (not active in sewing mode) 104. Orbiting (not active in sewing mode) 102. Reverse button 108 4:2...
... 107 93 94 95 96 97 98 99 108. Control Panel overview Control Panel buttons on the base of the machine 82. Embroidery position(not active in sewing mode) 107. Mirror/keypad lock button 86. Single pattern/monochrome Control panel buttons on the front of the... machine 90-99 Stitch/design selection buttons 100. Hoop select (not active in sewing mode) 104. Orbiting (not active in sewing mode) 102. Reverse button 108 4:2...

Owner's Manual
Page 82
...using the various types of your Pfaff creative 2124. Free Motion Sewing With Free Motion Sewing you can use the same thread for bobbin thread, or an embroidery weight bobbin thread. You can create the most fantastic work. The movement of your Pfaff creative 2124 and the two cross stitches,... no . 2. You can also vary the shade of the hoop along with the sewing speed creates the stitch length. Hoop your machine with...
...using the various types of your Pfaff creative 2124. Free Motion Sewing With Free Motion Sewing you can use the same thread for bobbin thread, or an embroidery weight bobbin thread. You can create the most fantastic work. The movement of your Pfaff creative 2124 and the two cross stitches,... no . 2. You can also vary the shade of the hoop along with the sewing speed creates the stitch length. Hoop your machine with...
Owner's Manual
Page 92
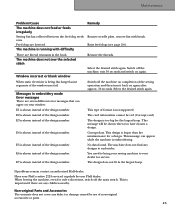
...again. No data found. The design does not fit in embroidery mode Error messages There are lowered. When leaving the machine, even for a design. This type of the design number. You need to bring your sewing machine to embroider. E3 is too big for service. Switch off the ... remain contact an authorized Pfaff dealer. Have your Pfaff creative 2124 serviced regularly by use of the design number. E6 is shown instead of the window may fail. Messages in the largest hoop. E4 is being discharged some segments of the design number. The machine does not find...
...again. No data found. The design does not fit in embroidery mode Error messages There are lowered. When leaving the machine, even for a design. This type of the design number. You need to bring your sewing machine to embroider. E3 is too big for service. Switch off the ... remain contact an authorized Pfaff dealer. Have your Pfaff creative 2124 serviced regularly by use of the design number. E6 is shown instead of the window may fail. Messages in the largest hoop. E4 is being discharged some segments of the design number. The machine does not find...
Owner's Manual
Page 95
... stitches R Raise the feed dog Raise the presserfoot Remove the embroidery unit Remove the hoop Reverse sewing button Rolled hem Rotating button S Select a design Select a stitch Sewing machine Sewing on buttons Shell edging Stabilizers Adhesive Cut-A-Away Heat-Away Iron-... T Tear-Away stabilizer Tie-off/basting button Treads Rayon Metallic Bobbin threads Thread broken Thread cutter Threading Thread tension Three-step zig-zag stitch Test sew Top stitching Trouble-shooting Twin needle pintucks threading warning 1:8, 4:8 3:11, 4:4 1:8-1:11 3:11, 4:6 5:5 4:5 4:5 3:8 5:11 3:17 3:11, 4:3 3:19 3:19 ...
... stitches R Raise the feed dog Raise the presserfoot Remove the embroidery unit Remove the hoop Reverse sewing button Rolled hem Rotating button S Select a design Select a stitch Sewing machine Sewing on buttons Shell edging Stabilizers Adhesive Cut-A-Away Heat-Away Iron-... T Tear-Away stabilizer Tie-off/basting button Treads Rayon Metallic Bobbin threads Thread broken Thread cutter Threading Thread tension Three-step zig-zag stitch Test sew Top stitching Trouble-shooting Twin needle pintucks threading warning 1:8, 4:8 3:11, 4:4 1:8-1:11 3:11, 4:6 5:5 4:5 4:5 3:8 5:11 3:17 3:11, 4:3 3:19 3:19 ...
Owner's Manual
Page 96
... be safely recycled in doubt please contact your retailer for guidance. presser foot height Needle system Package contents Sewing machine Carrying case Foot control Lead cord Accessories Instruction manual Embroidery unit Embroidery hoop Embroidery clips Quick start embroidery kit 408 x 290 x 187 8,3 kg 120V / 220...240 V 75 W 12 V /max. 5 W Max 950 rpm Min 80 rpm 0...6 mm...
... be safely recycled in doubt please contact your retailer for guidance. presser foot height Needle system Package contents Sewing machine Carrying case Foot control Lead cord Accessories Instruction manual Embroidery unit Embroidery hoop Embroidery clips Quick start embroidery kit 408 x 290 x 187 8,3 kg 120V / 220...240 V 75 W 12 V /max. 5 W Max 950 rpm Min 80 rpm 0...6 mm...


