
Owner's Manual
Page 2
...not unplug by the manufacturer as threading needle, changing needle, threading bobbin, or changing presser foot, etc. • Always unplug sewing machine from all instructions before relamping. Replace bulb with the words 'DOUBLE INSULATION' or 'DOUBLE INSULATED'. Special care is not working ... in . No ground means is being administrated. • To disconnect, turn all controls to the product. Always unplug this sewing machine from the electric outlet immediately after using and before cleaning. • Always unplug before using an electrical appliance, basic safety precautions...
...not unplug by the manufacturer as threading needle, changing needle, threading bobbin, or changing presser foot, etc. • Always unplug sewing machine from all instructions before relamping. Replace bulb with the words 'DOUBLE INSULATION' or 'DOUBLE INSULATED'. Special care is not working ... in . No ground means is being administrated. • To disconnect, turn all controls to the product. Always unplug this sewing machine from the electric outlet immediately after using and before cleaning. • Always unplug before using an electrical appliance, basic safety precautions...

Owner's Manual
Page 3
... features the very latest in both design and technology, enabling you start, please spend some time reading this owner's manual. Our authorized PFAFF® dealers will soon discover how to transform all your new PFAFF® creative™ 2.0 sewing and embroidery machine. You will of sewing and embroidery. Before you to maximize the use of your...
... features the very latest in both design and technology, enabling you start, please spend some time reading this owner's manual. Our authorized PFAFF® dealers will soon discover how to transform all your new PFAFF® creative™ 2.0 sewing and embroidery machine. You will of sewing and embroidery. Before you to maximize the use of your...

Owner's Manual
Page 4
... stitch-out 6:2 Load a design 6:2 Load a font 6:2 Stitches left in color block 6:3 Current color 6:3 Orbit to the power supply 2:1 Pack away after sewing 2.2 Free arm 2:2 Thread cutter 2:2 Spool pins 2:2 Threading the machine 2:3 Bobbin winding 2:5 Inserting the bobbin 2:6 IDT (Integrated dual feed 2:6 Needles 2:7 Changing the needle 2:7 Lowering feed dogs 2:8 Changing the presser foot 2.8 USB...
... stitch-out 6:2 Load a design 6:2 Load a font 6:2 Stitches left in color block 6:3 Current color 6:3 Orbit to the power supply 2:1 Pack away after sewing 2.2 Free arm 2:2 Thread cutter 2:2 Spool pins 2:2 Threading the machine 2:3 Bobbin winding 2:5 Inserting the bobbin 2:6 IDT (Integrated dual feed 2:6 Needles 2:7 Changing the needle 2:7 Lowering feed dogs 2:8 Changing the presser foot 2.8 USB...
Owner's Manual
Page 8
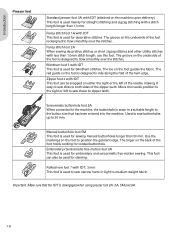
... is disengaged when using presser foot 2A, 5A, 5M and 6A. 1:8 Sensormatic buttonhole foot 5A When connected to the machine, the buttonhole is sewn in light to medium weight fabric. Used to sew buttonholes up to zipper teeth. The Ànger on the back of the foot holds cording for blindhem stitches... foot 4 with IDT This foot can also be snapped on either the right or the left to sew closer to 50 mm. Introduction Presser feet Standard presser foot 0A with IDT (attached on the machine upon delivery) This foot is designed to ride along the fold of the hem edge. The groove...
... is disengaged when using presser foot 2A, 5A, 5M and 6A. 1:8 Sensormatic buttonhole foot 5A When connected to the machine, the buttonhole is sewn in light to medium weight fabric. Used to sew buttonholes up to zipper teeth. The Ànger on the back of the foot holds cording for blindhem stitches... foot 4 with IDT This foot can also be snapped on either the right or the left to sew closer to 50 mm. Introduction Presser feet Standard presser foot 0A with IDT (attached on the machine upon delivery) This foot is designed to ride along the fold of the hem edge. The groove...
Owner's Manual
Page 13
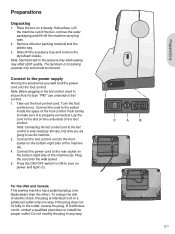
...power supply Among the accessories you are going to use the machine. 2. Note: Connecting the foot control cord to the socket inside . Plug the cord into the wall socket. 5. Do not modify the plug in the accessory tray while sewing may affect stitch quality. Remove all outer packing material and ... to ensure that it is intended to the front socket on power and light (C). For the USA and Canada This sewing machine has a polarized plug (one way. Lift the machine out of the box, remove the outer packaging and lift off the accessory tray and remove the styrofoam inside the space...
...power supply Among the accessories you are going to use the machine. 2. Note: Connecting the foot control cord to the socket inside . Plug the cord into the wall socket. 5. Do not modify the plug in the accessory tray while sewing may affect stitch quality. Remove all outer packing material and ... to ensure that it is intended to the front socket on power and light (C). For the USA and Canada This sewing machine has a polarized plug (one way. Lift the machine out of the box, remove the outer packaging and lift off the accessory tray and remove the styrofoam inside the space...
Owner's Manual
Page 14
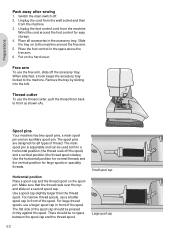
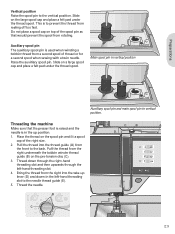
...position (the thread reels off the spool) and a vertical position (the thread spool rotates). When attached, a hook keeps the accessory tray locked to the machine around the foot control for large spools or specialty threads. A Thread cutter To use a smaller spool cap in the space above the free arm. 6. Use.... The Áat side of the spool. There should be no space between the spool cap and the thread spool. Preparations Pack away after sewing 1. Unplug the cord from the wall socket and then from back to the left. Put on a second spool cap. For narrow thread spools,...
...position (the thread reels off the spool) and a vertical position (the thread spool rotates). When attached, a hook keeps the accessory tray locked to the machine around the foot control for large spools or specialty threads. A Thread cutter To use a smaller spool cap in the space above the free arm. 6. Use.... The Áat side of the spool. There should be no space between the spool cap and the thread spool. Preparations Pack away after sewing 1. Unplug the cord from the wall socket and then from back to the left. Put on a second spool cap. For narrow thread spools,...
Owner's Manual
Page 15
... then upwards through the left -hand threading slot to prevent the thread from a second spool of thread or for a second spool when sewing with a twin needle. PFA Threading the machine Make sure that would prevent the spool from the front to the vertical position. Place the thread on a large spool cap and...
... then upwards through the left -hand threading slot to prevent the thread from a second spool of thread or for a second spool when sewing with a twin needle. PFA Threading the machine Make sure that would prevent the spool from the front to the vertical position. Place the thread on a large spool cap and...
Owner's Manual
Page 19
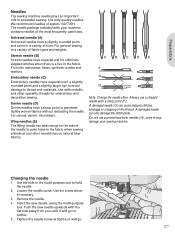
... have a special scarf to poke holes in the fabric. For knits, swimwear, Áeece, synthetic suedes and leathers. Use with your sewing machine. For canvas, denim, microÀbers. Changing the needle 1. Tighten the needle screw as tight as it will go no further. ... larger eye to avoid damage to thread and materials. Preparations Needles The sewing machine needle plays an important role in a variety of system 130/705H. Use only quality needles. For general sewing in successful sewing. Embroidery needle (C) Embroidery needles have a sharp point to hold the needle...
... have a special scarf to poke holes in the fabric. For knits, swimwear, Áeece, synthetic suedes and leathers. Use with your sewing machine. For canvas, denim, microÀbers. Changing the needle 1. Tighten the needle screw as tight as it will go no further. ... larger eye to avoid damage to thread and materials. Preparations Needles The sewing machine needle plays an important role in a variety of system 130/705H. Use only quality needles. For general sewing in successful sewing. Embroidery needle (C) Embroidery needles have a sharp point to hold the needle...
Owner's Manual
Page 20
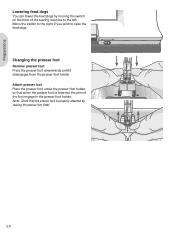
... foot holder. Attach presser foot Place the presser foot under the presser foot holder, so that the presser foot is lowered, the pins of the sewing machine to raise the feed dogs.
... foot holder. Attach presser foot Place the presser foot under the presser foot holder, so that the presser foot is lowered, the pins of the sewing machine to raise the feed dogs.
Owner's Manual
Page 23
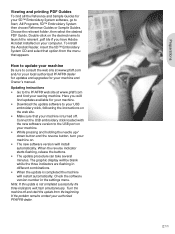
... Guides for your 5D™ Embroidery System software, go to consult the web site at www.pfaff.com and Ànd your sewing machine. How to update your authorized PFAFF® dealer. 2:11 If the problem remains contact your machine Be sure to Start, All Programs, 5D™ Embroidery System then choose Reference Guides or...
... Guides for your 5D™ Embroidery System software, go to consult the web site at www.pfaff.com and Ànd your sewing machine. How to update your authorized PFAFF® dealer. 2:11 If the problem remains contact your machine Be sure to Start, All Programs, 5D™ Embroidery System then choose Reference Guides or...
Owner's Manual
Page 24
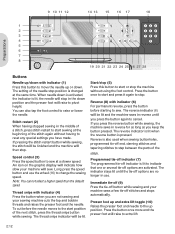
... reverse until the tie-off options are activated. An icon on the graphic display will indicate how slow your sewing machine cuts the top and bobbin threads and raises the presser foot and the needle. Programmed tie-off indicator (7) The programmed tie-off indicator is lit, ...the needle will stop in the down position and the presser foot will be lit and the machine sews in the middle of the stitch again without using the foot control. The indicator stays lit until you are no longer in reverse for as...
... reverse until the tie-off options are activated. An icon on the graphic display will indicate how slow your sewing machine cuts the top and bobbin threads and raises the presser foot and the needle. Programmed tie-off indicator (7) The programmed tie-off indicator is lit, ...the needle will stop in the down position and the presser foot will be lit and the machine sews in the middle of the stitch again without using the foot control. The indicator stays lit until you are no longer in reverse for as...
Owner's Manual
Page 26
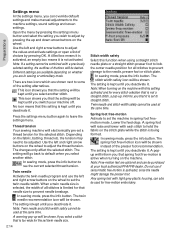
...is active when turning on the stitch plate while the stitch is set to set a thread tension for free-motion embroidery. Thread tension Your sewing machine will inform you that the setting will be kept until you select another stitch. Use the left and right arrow buttons on the wheel to... damage the presser foot. When a twin needle size is selected, the width of choices by pressing the up informs you switch your local authorized PFAFF® dealer. No icon means that the setting will be kept until you that it . Note: Twin needle and stitch width safety cannot be...
...is active when turning on the stitch plate while the stitch is set to set a thread tension for free-motion embroidery. Thread tension Your sewing machine will inform you that the setting will be kept until you select another stitch. Use the left and right arrow buttons on the wheel to... damage the presser foot. When a twin needle size is selected, the width of choices by pressing the up informs you switch your local authorized PFAFF® dealer. No icon means that the setting will be kept until you that it . Note: Twin needle and stitch width safety cannot be...
Owner's Manual
Page 27
...the left and right arrow buttons. Select cut . Jump stitch trim commands can be cancelled when you turn on the machine, a pop-up informs you that you can occur if your sewing machine. 2:15 Preparations Use the OK button to balance the stitch between -7 and 7. Stop for your fabric moves up under... between the presser foot and the embroidery, the top thread will stay lowered even if the machine stops with the needle in down with your machine. Pivot height Adjust the height of 0.5. When you sew again, the balance will trim the top jump stitch thread and pull the thread end to...
...the left and right arrow buttons. Select cut . Jump stitch trim commands can be cancelled when you turn on the machine, a pop-up informs you that you can occur if your sewing machine. 2:15 Preparations Use the OK button to balance the stitch between -7 and 7. Stop for your fabric moves up under... between the presser foot and the embroidery, the top thread will stay lowered even if the machine stops with the needle in down with your machine. Pivot height Adjust the height of 0.5. When you sew again, the balance will trim the top jump stitch thread and pull the thread end to...

Owner's Manual
Page 30
... you have selected a buttonhole, the graphic display will by default show the density setting instead of the entire stitch. Sewing Stitch adjustments Your machine will set stitch width and the stitch length are highlighted when the setting is too loose. Your changed . The set... trying to change the setting manually. Stitch width (1) Increase or decrease the stitch width using + and -. Your sewing machine electronically sets a thread tension for general sewing, the threads evenly meet between the two fabric layers. See page 2:14 for each adjustment. If the bobbin thread...
... you have selected a buttonhole, the graphic display will by default show the density setting instead of the entire stitch. Sewing Stitch adjustments Your machine will set stitch width and the stitch length are highlighted when the setting is too loose. Your changed . The set... trying to change the setting manually. Stitch width (1) Increase or decrease the stitch width using + and -. Your sewing machine electronically sets a thread tension for general sewing, the threads evenly meet between the two fabric layers. See page 2:14 for each adjustment. If the bobbin thread...

Owner's Manual
Page 36
... the hole and over it becomes larger can also use a sew-on the wheel. 5. Sewing hems in your garment. 2. Note: Use the multi-purpose tool to create a thread shank for you and then tie-off and stop. Your sewing machine will be set the length of the needle and the width is... appropriate for the actual button. Sewing Sew on a button, remove the presser foot and select the button sewing stitch. 2. Lower the feed dogs. 3. The machine will fasten the button on the fabric in...
... the hole and over it becomes larger can also use a sew-on the wheel. 5. Sewing hems in your garment. 2. Note: Use the multi-purpose tool to create a thread shank for you and then tie-off and stop. Your sewing machine will be set the length of the needle and the width is... appropriate for the actual button. Sewing Sew on a button, remove the presser foot and select the button sewing stitch. 2. Lower the feed dogs. 3. The machine will fasten the button on the fabric in...

Owner's Manual
Page 41
... 7. Press the number of the next stitch and it will be placed at the cursor position. Save your own stitches and sequences on your machine and reload and sew them any time you wish to use. overview 1. Stitch Àeld 3. Note: The current position in the stitch Àeld. 3. ...commands into sequences. Press the sequencing button to 3 commands in the same sequence. The stitch will be included when you save your sewing machine can add up to enter sequencing. 2. You can be performed when sewing it possible to 40 stitches, letters and commands in a row. 4:1 Sequencing -
... 7. Press the number of the next stitch and it will be placed at the cursor position. Save your own stitches and sequences on your machine and reload and sew them any time you wish to use. overview 1. Stitch Àeld 3. Note: The current position in the stitch Àeld. 3. ...commands into sequences. Press the sequencing button to 3 commands in the same sequence. The stitch will be included when you save your sewing machine can add up to enter sequencing. 2. You can be performed when sewing it possible to 40 stitches, letters and commands in a row. 4:1 Sequencing -

Owner's Manual
Page 56
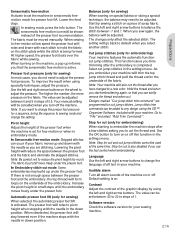
...press OK so that forces the embroidery unit to continue embroidering. 6:8 Embroidering This can load or save a design. Use your sewing machine cannot access the information on the USB stick, the USB stick could be damaged or you might be using a USB stick ...cannot be read This pop-up will appear when there is very important to slide off the hoop and clear the machine area for calibrating the embroidery arm. Press OK to move freely, remove the hoop and then press OK. Note:... pop-ups Embroidery unit calibration When the embroidery unit is noncompatible with the sewing machine.
...press OK so that forces the embroidery unit to continue embroidering. 6:8 Embroidering This can load or save a design. Use your sewing machine cannot access the information on the USB stick, the USB stick could be damaged or you might be using a USB stick ...cannot be read This pop-up will appear when there is very important to slide off the hoop and clear the machine area for calibrating the embroidery arm. Press OK to move freely, remove the hoop and then press OK. Note:... pop-ups Embroidery unit calibration When the embroidery unit is noncompatible with the sewing machine.
Owner's Manual
Page 57
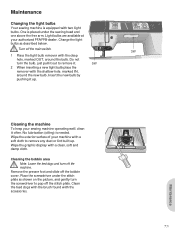
... to remove any dust or lint built up . 123 456 789 0 creative 3W Cleaning the machine To keep your authorized PFAFF® dealer. Place the screwdriver under the sewing head and one above the free arm. Maintenance Changing the light bulbs Your sewing machine is needed. No lubrication (oiling) is equipped with the shallow hole, marked...
... to remove any dust or lint built up . 123 456 789 0 creative 3W Cleaning the machine To keep your authorized PFAFF® dealer. Place the screwdriver under the sewing head and one above the free arm. Maintenance Changing the light bulbs Your sewing machine is needed. No lubrication (oiling) is equipped with the shallow hole, marked...
Owner's Manual
Page 60
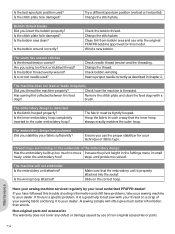
... the inner hoop always exactly matches the outer hoop. Slide on a scrap of your sewing machine to test sew with a brush. Try a different spool pin position (vertical or horizontal). Are you thread the machine properly? Is a correct needle used ? Insert a proper needle correctly as described in ... plate hole damaged? Check the bobbin thread. Check bobbin winding. The embroidery design has puckered Did you use only the original PFAFF® bobbins approved for your dealer. steps until problem is threaded. Is the bobbin wound correctly? Bobbin thread breaks Did you...
... the inner hoop always exactly matches the outer hoop. Slide on a scrap of your sewing machine to test sew with a brush. Try a different spool pin position (vertical or horizontal). Are you thread the machine properly? Is a correct needle used ? Insert a proper needle correctly as described in ... plate hole damaged? Check the bobbin thread. Check bobbin winding. The embroidery design has puckered Did you use only the original PFAFF® bobbins approved for your dealer. steps until problem is threaded. Is the bobbin wound correctly? Bobbin thread breaks Did you...
Owner's Manual
Page 67
... positioned underneath the Sewing Machine. Intellectual Property Patents protecting this product must be to the beneÀt of accessories without prior notice, or make modiÀcations to the performance or design. We reserve the right to change the machine equipment and the assortment of the user and the product. PFAFF, CREATIVE, IDT (image) and...
... positioned underneath the Sewing Machine. Intellectual Property Patents protecting this product must be to the beneÀt of accessories without prior notice, or make modiÀcations to the performance or design. We reserve the right to change the machine equipment and the assortment of the user and the product. PFAFF, CREATIVE, IDT (image) and...


