
Owner's Manual
Page 3
...Ànitely enable you to experience a totally new dimension of course also be pleased to transform all your new PFAFF® creative™ 2.0 sewing and embroidery machine. Our authorized PFAFF® dealers will of sewing and embroidery. As a sewing enthusiast, you have acquired a machine that features the very latest in both design and technology, enabling you to advise...
...Ànitely enable you to experience a totally new dimension of course also be pleased to transform all your new PFAFF® creative™ 2.0 sewing and embroidery machine. Our authorized PFAFF® dealers will of sewing and embroidery. As a sewing enthusiast, you have acquired a machine that features the very latest in both design and technology, enabling you to advise...

Owner's Manual
Page 4
...-ups 3:11 4 Sequencing 4:1 Sequencing - overview 4:1 Create a sequence 4.1 Using the alphabet 4:2 Manage your sequences 4:2 Sewing a sequence 4:3 5 Embroidery preparations 5:1 Embroidery unit overview 5:1 Embroidery hoop overview 5:1 Connect the embroidery unit 5:2 Remove the embroidery unit 5:2 To hoop the fabric 5:3 6 Embroidering 6:1 Embroidery stitch-out view 6:1 Embroidery edit view 6:1 Design information 6:1 Embroidery stitch-out 6:2 Load a design 6:2 Load a font 6:2 Stitches left in color block 6:3 Current color...
...-ups 3:11 4 Sequencing 4:1 Sequencing - overview 4:1 Create a sequence 4.1 Using the alphabet 4:2 Manage your sequences 4:2 Sewing a sequence 4:3 5 Embroidery preparations 5:1 Embroidery unit overview 5:1 Embroidery hoop overview 5:1 Connect the embroidery unit 5:2 Remove the embroidery unit 5:2 To hoop the fabric 5:3 6 Embroidering 6:1 Embroidery stitch-out view 6:1 Embroidery edit view 6:1 Design information 6:1 Embroidery stitch-out 6:2 Load a design 6:2 Load a font 6:2 Stitches left in color block 6:3 Current color...
Owner's Manual
Page 8
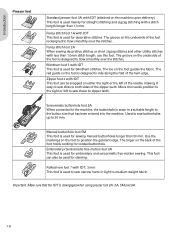
... buttonhole. The Ànger on the underside of the foot holds cording for straight stitching and zigzag stitching with less than 1.0 mm. Embroidery/Sensormatic free-motion foot 6A This foot is designed to position the garment edge. The groove on the back of the foot is used... for embroidery and sensormatic free-motion sewing. Fancy stitch foot 2A When sewing decorative stitches or short zigzag stitches and other utility stitches with a stitch length longer than 1.0mm stitch length,...
... buttonhole. The Ànger on the underside of the foot holds cording for straight stitching and zigzag stitching with less than 1.0 mm. Embroidery/Sensormatic free-motion foot 6A This foot is designed to position the garment edge. The groove on the back of the foot is used... for embroidery and sensormatic free-motion sewing. Fancy stitch foot 2A When sewing decorative stitches or short zigzag stitches and other utility stitches with a stitch length longer than 1.0mm stitch length,...
Owner's Manual
Page 18
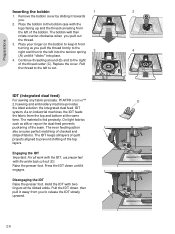
... right and then to cut -out (D). Replace the cover. Hold the IDT with the center back cut . 1 3 B A C IDT (integrated dual feed) For sewing any fabric precisely, PFAFF® creative™ 2.0 sewing and embroidery machine provides the ideal solution: the integrated dual feed, IDT system. Engaging the IDT Important: For all layers of quilt projects aligned...
... right and then to cut -out (D). Replace the cover. Hold the IDT with the center back cut . 1 3 B A C IDT (integrated dual feed) For sewing any fabric precisely, PFAFF® creative™ 2.0 sewing and embroidery machine provides the ideal solution: the integrated dual feed, IDT system. Engaging the IDT Important: For all layers of quilt projects aligned...
Owner's Manual
Page 19
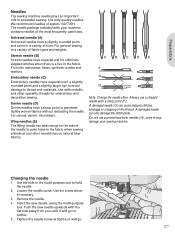
Universal needle (A) Universal needles have a slightly rounded point and come in a variety of the needle to poke holes in the fabric when sewing entredeux and other specailty threads for embroidery and decorative sewing Denim needle (D) Denim needles have a sharp point to eliminate skipped stitches when there is a Áex in the multi-purpose tool...
Universal needle (A) Universal needles have a slightly rounded point and come in a variety of the needle to poke holes in the fabric when sewing entredeux and other specailty threads for embroidery and decorative sewing Denim needle (D) Denim needles have a sharp point to eliminate skipped stitches when there is a Áex in the multi-purpose tool...
Owner's Manual
Page 22
... newsletters. Double-click on the desktop 1. Alternatively use the Start Menu to do with a user name that is not required for the PFAFF® creative™ 2.0 embroidery machine. Insert your computer. Your installation CD includes an option to Run Menu.exe. Register your software from the CD provided (attached inside...designs and pictures easily. Double-click on 5D™ Organizer, 5D™ QuickFont or 5D™ ConÀgure to enter which sewing and embroidery machine(s) you wish to open modules under MyMachines select your desired language, and select the 'Install...
... newsletters. Double-click on the desktop 1. Alternatively use the Start Menu to do with a user name that is not required for the PFAFF® creative™ 2.0 embroidery machine. Insert your computer. Your installation CD includes an option to Run Menu.exe. Register your software from the CD provided (attached inside...designs and pictures easily. Double-click on 5D™ Organizer, 5D™ QuickFont or 5D™ ConÀgure to enter which sewing and embroidery machine(s) you wish to open modules under MyMachines select your desired language, and select the 'Install...
Owner's Manual
Page 23
... your machine Be sure to consult the web site at www.pfaff.com and Ànd your authorized PFAFF® dealer. 2:11 Turn the machine off . To install the Acrobat Reader, insert the 5D™ Embroidery System CD and select that appears. Choose the relevant folder, then... select the desired PDF Guide. If the problem remains contact your sewing machine. The graphic...
... your machine Be sure to consult the web site at www.pfaff.com and Ànd your authorized PFAFF® dealer. 2:11 Turn the machine off . To install the Acrobat Reader, insert the 5D™ Embroidery System CD and select that appears. Choose the relevant folder, then... select the desired PDF Guide. If the problem remains contact your sewing machine. The graphic...

Owner's Manual
Page 25
...decrease the stitch width using the + and - buttons. Use the + and - In sequencing the F1 button is lowered automatically when you start sewing. Function 2 (20) The F2 button is used to switch between options in the settings menu. By pressing the alternatives button, the stitch ...the stitch length using the + and - Direct selection (18) By pressing one of, or a combination of a buttonhole and moving between embroidery edit and embroidery stitchout. In sequencing it is used to check the position of the length setting. Mirror side to side (24) For mirroring stitches and...
...decrease the stitch width using the + and - buttons. Use the + and - In sequencing the F1 button is lowered automatically when you start sewing. Function 2 (20) The F2 button is used to switch between options in the settings menu. By pressing the alternatives button, the stitch ...the stitch length using the + and - Direct selection (18) By pressing one of, or a combination of a buttonhole and moving between embroidery edit and embroidery stitchout. In sequencing it is used to check the position of the length setting. Mirror side to side (24) For mirroring stitches and...
Owner's Manual
Page 26
... is too wide for the set a thread tension for that box will be shown. A spring foot will go back to set the machine in sewing or embroidery mode. Lower the feed dogs. This icon shows you that is kept until you deactivate it. A warning pop-up informs you select a stitch ... setting is kept until you select another stitch. This icon shows you that the setting will inform you switch your local authorized PFAFF® dealer. Preparations Settings menu In the settings menu, you deactivate it. No icon means that spring foot free-motion is active when ...
... is too wide for the set a thread tension for that box will be shown. A spring foot will go back to set the machine in sewing or embroidery mode. Lower the feed dogs. This icon shows you that is kept until you deactivate it. A warning pop-up informs you select a stitch ... setting is kept until you select another stitch. This icon shows you that the setting will inform you switch your local authorized PFAFF® dealer. Preparations Settings menu In the settings menu, you deactivate it. No icon means that spring foot free-motion is active when ...
Owner's Manual
Page 27
..., press the info button. When sewing in free-motion at the same time. The value can be adjusted between 0 and 9 in the settings menu. Your manual setting will be set between the presser foot and the embroidery, the top thread will form loops on the stitch plate while the ...-out mode: Some embroideries may need to adjust the presser foot pressure. Increase the pivot height in steps of the presser foot recommendation. Automatic presser foot lift (only for your fabric moves up and down with each stitch to the underside of the graphic display by sewing a stitch on or ...
..., press the info button. When sewing in free-motion at the same time. The value can be adjusted between 0 and 9 in the settings menu. Your manual setting will be set between the presser foot and the embroidery, the top thread will form loops on the stitch plate while the ...-out mode: Some embroideries may need to adjust the presser foot pressure. Increase the pivot height in steps of the presser foot recommendation. Automatic presser foot lift (only for your fabric moves up and down with each stitch to the underside of the graphic display by sewing a stitch on or ...
Owner's Manual
Page 46
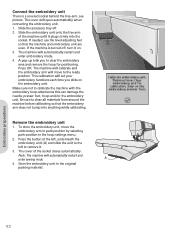
... original packing material. The cover will automatically restart and enter embroidery mode. 4. Be sure to the ready position. The machine will calibrate and the embroidery arm will automatically restart and enter sewing mode. Store the embroidery unit in the hoop settings menu. 2. Slide the embroidery unit onto the free arm of the socket closes automatically...
... original packing material. The cover will automatically restart and enter embroidery mode. 4. Be sure to the ready position. The machine will calibrate and the embroidery arm will automatically restart and enter sewing mode. Store the embroidery unit in the hoop settings menu. 2. Slide the embroidery unit onto the free arm of the socket closes automatically...

Owner's Manual
Page 51
...to the next color block, use the + and - Press the + and - To go back to enter the text editor again. When you want to sew your embroidery text by pressing OK. 3. Use the + and - Step backwards a few stitches if the needle thread breaks or runs out. ConÀrm your ... will be shown automatically when you have the appearance of the loaded font. 5. A popup will therefor appear asking if you wish to returm to embroidery mode and all corners of the button will be embroidered. The text editor works just like sequencing, see page 4:2. 1. Press F1 to view all...
...to the next color block, use the + and - Press the + and - To go back to enter the text editor again. When you want to sew your embroidery text by pressing OK. 3. Use the + and - Step backwards a few stitches if the needle thread breaks or runs out. ConÀrm your ... will be shown automatically when you have the appearance of the loaded font. 5. A popup will therefor appear asking if you wish to returm to embroidery mode and all corners of the button will be embroidered. The text editor works just like sequencing, see page 4:2. 1. Press F1 to view all...

Owner's Manual
Page 52
... when embroidering an appliqué. Use the wheel to the current stitch and start embroidering again where the embroidery was interrupted, open and exit the hoop 1 options menu. A Àlled box means that the... the list. Cut position Cut position will move backwards, allowing you have Ànished your authorized PFAFF® dealer. Open the hoop options menu. Depending on the size of the box next to ... can also press the start/stop button once to return to the current stitch and start sewing and the hoop you to check where the center position of this. Use the wheel to...
... when embroidering an appliqué. Use the wheel to the current stitch and start embroidering again where the embroidery was interrupted, open and exit the hoop 1 options menu. A Àlled box means that the... the list. Cut position Cut position will move backwards, allowing you have Ànished your authorized PFAFF® dealer. Open the hoop options menu. Depending on the size of the box next to ... can also press the start/stop button once to return to the current stitch and start sewing and the hoop you to check where the center position of this. Use the wheel to...
Owner's Manual
Page 53
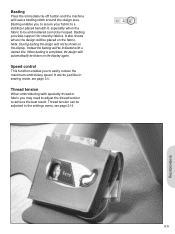
... will be indicated with specialty thread or fabric you to be embroidered cannot be hooped. Instead the basting will not be adjusted in sewing mode, see page 2:14. 6:5 Embroidering Speed control This function enables you may need to adjust the thread tension to achieve the best...3:4. Basting enables you to secure your fabric to a stabilizer placed beneath it, especially when the fabric to easily reduce the maximum embroidery speed. Basting Press the immediate tie-off button and the machine will sew a basting stitch around the design area. Basting provides support for stretchy fabrics.
... will be indicated with specialty thread or fabric you to be embroidered cannot be hooped. Instead the basting will not be adjusted in sewing mode, see page 2:14. 6:5 Embroidering Speed control This function enables you may need to adjust the thread tension to achieve the best...3:4. Basting enables you to secure your fabric to a stabilizer placed beneath it, especially when the fabric to easily reduce the maximum embroidery speed. Basting Press the immediate tie-off button and the machine will sew a basting stitch around the design area. Basting provides support for stretchy fabrics.

Owner's Manual
Page 56
... USB stick When in embroidery mode and pressing the load button without having a USB stick connected, this pop-up will appear when there is a programmed stop . Design includes elements that cannot be opened Some designs may be damaged while calibrating. Use your sewing machine cannot access the ... opened . Stop command in the design. Connect a USB stick and press OK so that is noncompatible with the sewing machine. Common embroidery pop-ups Embroidery unit calibration When the embroidery unit is attached, a popup asks you can be caused by wrong Àle formats on the USB stick.
... USB stick When in embroidery mode and pressing the load button without having a USB stick connected, this pop-up will appear when there is a programmed stop . Design includes elements that cannot be opened Some designs may be damaged while calibrating. Use your sewing machine cannot access the ... opened . Stop command in the design. Connect a USB stick and press OK so that is noncompatible with the sewing machine. Common embroidery pop-ups Embroidery unit calibration When the embroidery unit is attached, a popup asks you can be caused by wrong Àle formats on the USB stick.
Owner's Manual
Page 58
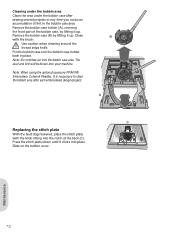
...and lint will be blown into the bobbin case area. Use caution when cleaning around the thread snips knife. Note: When using the optional accessory PFAFF® Embroidery Cutwork Needles, it up . Press the stitch plate down until it up . Remove the bobbin case (B) by lifting it is neccessary to ...clean the bobbin area after sewing several projects or any time you notice an accumulation of the bobbin case, by lifting it clicks into the notch at...
...and lint will be blown into the bobbin case area. Use caution when cleaning around the thread snips knife. Note: When using the optional accessory PFAFF® Embroidery Cutwork Needles, it up . Press the stitch plate down until it up . Remove the bobbin case (B) by lifting it is neccessary to ...clean the bobbin area after sewing several projects or any time you notice an accumulation of the bobbin case, by lifting it clicks into the notch at...
Owner's Manual
Page 59
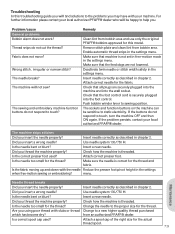
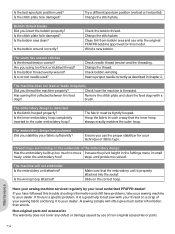
... Needle thread breaks Did you insert the needle properly? Is the needle bent or blunt? For further information please contact your local authorized PFAFF® dealer who will be sensitive to a new higher quality thread purchased which has become dry? The needle breaks? Remove stitch plate...you using poor thread with slubs or thread Change to static electricity. Are you thread the machine properly? from bobbin area. The sewing and embroidery machine function buttons do not respond to touch, turn the machine OFF and then ON again. Deactivate twin needle or stitch width safety...
... Needle thread breaks Did you insert the needle properly? Is the needle bent or blunt? For further information please contact your local authorized PFAFF® dealer who will be sensitive to a new higher quality thread purchased which has become dry? The needle breaks? Remove stitch plate...you using poor thread with slubs or thread Change to static electricity. Are you thread the machine properly? from bobbin area. The sewing and embroidery machine function buttons do not respond to touch, turn the machine OFF and then ON again. Deactivate twin needle or stitch width safety...
Owner's Manual
Page 60
... Settings menu in such a way that the embroidery unit is a great help to your technique or fabric type. The embroidery design is threaded. The machine will often give much to your local authorized PFAFF® dealer! steps until problem is solved. A sewing sample will not embroider Is the embroidery unit attached? Change the stitch plate.
... Settings menu in such a way that the embroidery unit is a great help to your technique or fabric type. The embroidery design is threaded. The machine will often give much to your local authorized PFAFF® dealer! steps until problem is solved. A sewing sample will not embroider Is the embroidery unit attached? Change the stitch plate.
Owner's Manual
Page 61
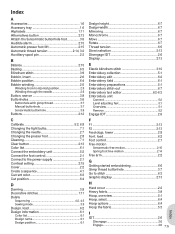
...7:1 Clear button 2:13 Color list 6:1 Connect the embroidery unit 5:2 Connect the foot control 2:1 Connect to the...Sewing mode 3:5 Design, load 6:2 Design information 6:1 Color list 6:1 Design name 6:1 Design position 6:1 Design height 6:7 Design width 6:7 Mirroring 6:7 Monochrome 6:7 Move 6:7 Rotate 6:7 Thread tension 6:5 Direct selection 2:13 Disengage IDT 2:6 Display 2:13 E Elastic blindhem stitch 3:10 Embroidery collection 5:1 Embroidery edit 6:2 Embroidery Àeld 6:1 Embroidery preparations 5:1 Embroidery stitch-out 6:7 Embroidery text editor 6:2-6:3 Embroidery...
...7:1 Clear button 2:13 Color list 6:1 Connect the embroidery unit 5:2 Connect the foot control 2:1 Connect to the...Sewing mode 3:5 Design, load 6:2 Design information 6:1 Color list 6:1 Design name 6:1 Design position 6:1 Design height 6:7 Design width 6:7 Mirroring 6:7 Monochrome 6:7 Move 6:7 Rotate 6:7 Thread tension 6:5 Direct selection 2:13 Disengage IDT 2:6 Display 2:13 E Elastic blindhem stitch 3:10 Embroidery collection 5:1 Embroidery edit 6:2 Embroidery Àeld 6:1 Embroidery preparations 5:1 Embroidery stitch-out 6:7 Embroidery text editor 6:2-6:3 Embroidery...
Owner's Manual
Page 62
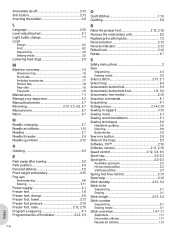
... 2:13, 3:3, 4:2, 6:7 Monochrome 6:7 Move 6:7 N Needle, changing 2:7 Needle art stitches 1:10 Needles 2:7 Needle threader 2:4 Needle up/down 2:12 O Orbiting 6:3 P Pack away after sewing 2:2 Park position 6:4 Personal stitches 3:5 Pivot height embroidery 2:15 Pop-ups Embroidering 6:8 Sewing 3:11 Power supply 2:1 Presser feet 1:8 Presser foot, change 2:8 Presser foot, lower 2:13 Presser foot pressure 2:15 Presser foot, raise 2:12...
... 2:13, 3:3, 4:2, 6:7 Monochrome 6:7 Move 6:7 N Needle, changing 2:7 Needle art stitches 1:10 Needles 2:7 Needle threader 2:4 Needle up/down 2:12 O Orbiting 6:3 P Pack away after sewing 2:2 Park position 6:4 Personal stitches 3:5 Pivot height embroidery 2:15 Pop-ups Embroidering 6:8 Sewing 3:11 Power supply 2:1 Presser feet 1:8 Presser foot, change 2:8 Presser foot, lower 2:13 Presser foot pressure 2:15 Presser foot, raise 2:12...


