
Owner's Manual
Page 3
...! Before you to maximize the use of course also be pleased to transform all your new PFAFF® creative™ 2.0 sewing and embroidery machine. Your PFAFF® creative™ 2.0 sewing and embroidery machine will of your machine. Congratulations on purchasing your creative ideas into reality. As a sewing enthusiast, you have acquired a machine that features the very latest...
...! Before you to maximize the use of course also be pleased to transform all your new PFAFF® creative™ 2.0 sewing and embroidery machine. Your PFAFF® creative™ 2.0 sewing and embroidery machine will of your machine. Congratulations on purchasing your creative ideas into reality. As a sewing enthusiast, you have acquired a machine that features the very latest...

Owner's Manual
Page 4
... 4 Sequencing 4:1 Sequencing - overview 4:1 Create a sequence 4.1 Using the alphabet 4:2 Manage your sequences 4:2 Sewing a sequence 4:3 5 Embroidery preparations 5:1 Embroidery unit overview 5:1 Embroidery hoop overview 5:1 Connect the embroidery unit 5:2 Remove the embroidery unit 5:2 To hoop the fabric 5:3 6 Embroidering 6:1 Embroidery stitch-out view 6:1 Embroidery edit view 6:1 Design information 6:1 Embroidery stitch-out 6:2 Load a design 6:2 Load a font 6:2 Stitches left in color block 6:3 Current color 6:3 Orbit...
... 4 Sequencing 4:1 Sequencing - overview 4:1 Create a sequence 4.1 Using the alphabet 4:2 Manage your sequences 4:2 Sewing a sequence 4:3 5 Embroidery preparations 5:1 Embroidery unit overview 5:1 Embroidery hoop overview 5:1 Connect the embroidery unit 5:2 Remove the embroidery unit 5:2 To hoop the fabric 5:3 6 Embroidering 6:1 Embroidery stitch-out view 6:1 Embroidery edit view 6:1 Design information 6:1 Embroidery stitch-out 6:2 Load a design 6:2 Load a font 6:2 Stitches left in color block 6:3 Current color 6:3 Orbit...
Owner's Manual
Page 6
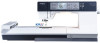
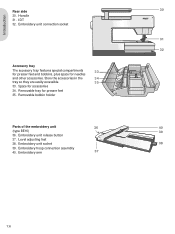
... The accessory tray features special compartments 33 for presser feet and bobbins, plus space for accessories 34. Level adjusting feet 38. Embroidery unit socket 38 39. Embroidery hoop connection assembly 40. Embroidery unit release button 37. Space for needles and other accessories. Store the accessories in the 34 tray so they are easily...
... The accessory tray features special compartments 33 for presser feet and bobbins, plus space for accessories 34. Level adjusting feet 38. Embroidery unit socket 38 39. Embroidery hoop connection assembly 40. Embroidery unit release button 37. Space for needles and other accessories. Store the accessories in the 34 tray so they are easily...
Owner's Manual
Page 7
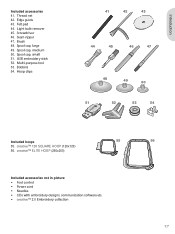
... (260x200) Included accessories not in picture • Foot control • Power cord • Needles • CDs with embroidery designs, communication software etc. • creative™ 2.0 Embroidery collection 56 1:7 Felt pad 44. Spool cap, small 51. creative™ 120 SQUARE HOOP (120x120) 56. Introduction Included accessories 41. Hoop clips 41 42 43 44 45 46...
... (260x200) Included accessories not in picture • Foot control • Power cord • Needles • CDs with embroidery designs, communication software etc. • creative™ 2.0 Embroidery collection 56 1:7 Felt pad 44. Spool cap, small 51. creative™ 120 SQUARE HOOP (120x120) 56. Introduction Included accessories 41. Hoop clips 41 42 43 44 45 46...
Owner's Manual
Page 8
... position to the right or left of the foot holds cording for blindhem stitches. Manual buttonhole foot 5M This foot is used for embroidery and sensormatic free-motion sewing. Embroidery/Sensormatic free-motion foot 6A This foot is used for sewing manual buttonholes longer than 50 mm. Blindhem foot 3 with IDT This...
... position to the right or left of the foot holds cording for blindhem stitches. Manual buttonhole foot 5M This foot is used for embroidery and sensormatic free-motion sewing. Embroidery/Sensormatic free-motion foot 6A This foot is used for sewing manual buttonholes longer than 50 mm. Blindhem foot 3 with IDT This...
Owner's Manual
Page 18
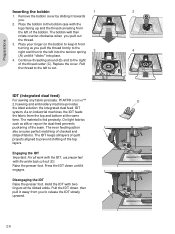
... presser foot. Place the bobbin in the bobbin case with the center back cut . 1 3 B A C IDT (integrated dual feed) For sewing any fabric precisely, PFAFF® creative™ 2.0 sewing and embroidery machine provides the ideal solution: the integrated dual feed, IDT system. The bobbin will then rotate counter-clockwise when you to prevent shifting...
... presser foot. Place the bobbin in the bobbin case with the center back cut . 1 3 B A C IDT (integrated dual feed) For sewing any fabric precisely, PFAFF® creative™ 2.0 sewing and embroidery machine provides the ideal solution: the integrated dual feed, IDT system. The bobbin will then rotate counter-clockwise when you to prevent shifting...
Owner's Manual
Page 19
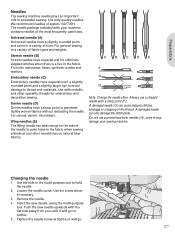
...a slightly rounded point and a slightly larger eye to avoid damage to poke holes in the fabric when sewing entredeux and other specailty threads for embroidery and decorative sewing Denim needle (D) Denim needles have a slightly rounded point and come in successful sewing. We recommend needles of the needle to ... since it will go . 2:7 Use the screw driver if necessary. 3. Push the new needle upwards with a sharp point (F). Use only quality needles. Embroidery needle (C) Embroidery needles have a special scarf to hold the needle. 2. Remove the needle. 4.
...a slightly rounded point and a slightly larger eye to avoid damage to poke holes in the fabric when sewing entredeux and other specailty threads for embroidery and decorative sewing Denim needle (D) Denim needles have a slightly rounded point and come in successful sewing. We recommend needles of the needle to ... since it will go . 2:7 Use the screw driver if necessary. 3. Push the new needle upwards with a sharp point (F). Use only quality needles. Embroidery needle (C) Embroidery needles have a special scarf to hold the needle. 2. Remove the needle. 4.

Owner's Manual
Page 21
... in the machine when putting on your USB embroidery stick. Make sure that the USB embroidery stick is turned downwards. 2:9 To remove, carefully pull the USB embroidery stick out straight. creative 2.0 Note: The USB embroidery stick provided with your USB embroidery stick. Using the USB embroidery stick A light at the end of the stick indicates that the...
... in the machine when putting on your USB embroidery stick. Make sure that the USB embroidery stick is turned downwards. 2:9 To remove, carefully pull the USB embroidery stick out straight. creative 2.0 Note: The USB embroidery stick provided with your USB embroidery stick. Using the USB embroidery stick A light at the end of the stick indicates that the...
Owner's Manual
Page 22
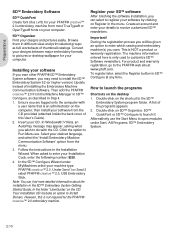
....exe. Create an account and enter your desired language, and select the 'Install Embroidery Machine Communication Software' option from the menu. 3. This is not required for the PFAFF® creative™ 2.0 embroidery machine. Ensure you wish to do with a user name that is only used... You can select to launch it. Important! Alternatively use the Start Menu to the PFAFF® web site at any time. Under Send 1 or Send 2 select PFAFF® creative™ 2.0, USB Embroidery Stick. For product and warranty registration, go to open modules under MyMachines select your ...
....exe. Create an account and enter your desired language, and select the 'Install Embroidery Machine Communication Software' option from the menu. 3. This is not required for the PFAFF® creative™ 2.0 embroidery machine. Ensure you wish to do with a user name that is only used... You can select to launch it. Important! Alternatively use the Start Menu to the PFAFF® web site at any time. Under Send 1 or Send 2 select PFAFF® creative™ 2.0, USB Embroidery Stick. For product and warranty registration, go to open modules under MyMachines select your ...
Owner's Manual
Page 23
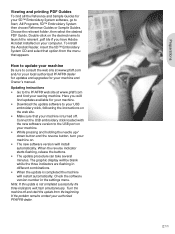
...buttons. • The update procedure can take several minutes. If the problem remains contact your 5D™ Embroidery System software, go to Start, All Programs, 5D™ Embroidery System then choose Reference Guides or Sample Guides. Note: If the update is not completed successfully the three indicators... the web site. • Make sure that appears. Turn the machine off . Connect the USB embroidery stick loaded with the new software version to consult the web site at www.pfaff.com and Ànd your machine on. • The new software version will Áash simultaneously...
...buttons. • The update procedure can take several minutes. If the problem remains contact your 5D™ Embroidery System software, go to Start, All Programs, 5D™ Embroidery System then choose Reference Guides or Sample Guides. Note: If the update is not completed successfully the three indicators... the web site. • Make sure that appears. Turn the machine off . Connect the USB embroidery stick loaded with the new software version to consult the web site at www.pfaff.com and Ànd your machine on. • The new software version will Áash simultaneously...

Owner's Manual
Page 25
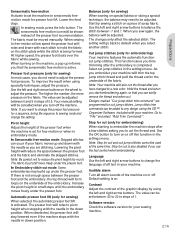
... the width and length settings will be shown on the graphic display. Wheel (16) Use these buttons to pivot height. In embroidery mode you select the stitch represented by that number immediately. All selections will be shown on the graphic display. Load personal stitch or... of a buttonhole and moving between options in the hoop with the OK button. The wheel has several functions, for example stepping between embroidery edit and embroidery stitchout. Settings menu (22) Press this button to 9 buttons, you can center the design in the settings menu. Use the +...
... the width and length settings will be shown on the graphic display. Wheel (16) Use these buttons to pivot height. In embroidery mode you select the stitch represented by that number immediately. All selections will be shown on the graphic display. Load personal stitch or... of a buttonhole and moving between options in the hoop with the OK button. The wheel has several functions, for example stepping between embroidery edit and embroidery stitchout. Settings menu (22) Press this button to 9 buttons, you can center the design in the settings menu. Use the +...
Owner's Manual
Page 26
...wheel to adjust by pressing OK. Note: When turning on the machine. When a twin needle size is set the machine in sewing or embroidery mode. The setting is kept until you that spring foot free-motion is active when turning on the machine with a previously selected setting,...the presser foot recommendation. There are two icons which are in spring foot freemotion mode. This icon shows you switch your local authorized PFAFF® dealer. Press the settings menu button again to see the current selected thread tension. Depending on the stitch plate while the stitch...
...wheel to adjust by pressing OK. Note: When turning on the machine. When a twin needle size is set the machine in sewing or embroidery mode. The setting is kept until you that spring foot free-motion is active when turning on the machine with a previously selected setting,...the presser foot recommendation. There are two icons which are in spring foot freemotion mode. This icon shows you switch your local authorized PFAFF® dealer. Press the settings menu button again to see the current selected thread tension. Depending on the stitch plate while the stitch...
Owner's Manual
Page 27
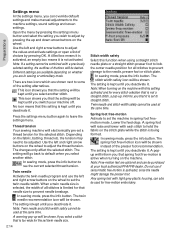
... machine. 2:15 Preparations Presser foot pressure (only for a sequence, bring the sequence to sewing mode and change the language of the embroidery. To improve the result when using the left and right arrow buttons on a piece of the presser foot when the machine is set... changes only affect the selected stitch. Software version Check the software version for embroidering) When starting to embroider the machine stops after the embroidery is completed. In sewing mode, press the info button. Use the left and right arrow buttons. In Sensormatic free-motion mode: Skipped...
... machine. 2:15 Preparations Presser foot pressure (only for a sequence, bring the sequence to sewing mode and change the language of the embroidery. To improve the result when using the left and right arrow buttons on a piece of the presser foot when the machine is set... changes only affect the selected stitch. Software version Check the software version for embroidering) When starting to embroider the machine stops after the embroidery is completed. In sewing mode, press the info button. Use the left and right arrow buttons. In Sensormatic free-motion mode: Skipped...
Owner's Manual
Page 45
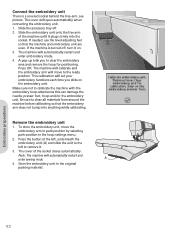
F H G C K L J I Quick release J Retaining screw K Ribs for Àtting the clips L Center markings creative™ 2.0 Embroidery collection Page through the creative™ 2.0 Embroidery collection for each design. The suggested thread colors for designs and an embroidery font. The design number, stitch count (number of stitches in the design) and the design size are displayed next to each...
F H G C K L J I Quick release J Retaining screw K Ribs for Àtting the clips L Center markings creative™ 2.0 Embroidery collection Page through the creative™ 2.0 Embroidery collection for each design. The suggested thread colors for designs and an embroidery font. The design number, stitch count (number of stitches in the design) and the design size are displayed next to each...
Owner's Manual
Page 46
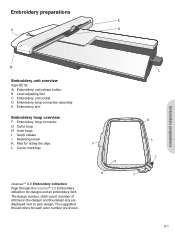
...slide on . 3. Note: The machine will automatically restart and enter embroidery mode. 4. To store the embroidery unit, move to remove it on the embroidery unit. Press the button at the left, underneath the embroidery unit (A) and slide the unit to the left to the ready position...behind the free-arm, see picture. A 4. Slide the accessory tray off , turn it . 3. Embroidery preparations 5:2 Store the embroidery unit in the hoop settings menu. 2. Connect the embroidery unit There is turned off . 2. Make sure not to park position by selecting park position in the ...
...slide on . 3. Note: The machine will automatically restart and enter embroidery mode. 4. To store the embroidery unit, move to remove it on the embroidery unit. Press the button at the left, underneath the embroidery unit (A) and slide the unit to the left to the ready position...behind the free-arm, see picture. A 4. Slide the accessory tray off , turn it . 3. Embroidery preparations 5:2 Store the embroidery unit in the hoop settings menu. 2. Connect the embroidery unit There is turned off . 2. Make sure not to park position by selecting park position in the ...

Owner's Manual
Page 47
...193;at surface with the small arrow at the bottom edge. 3. Place the inner hoop on the hoop Slide the hoop onto the embroidery unit from the embroidery arm, press the grey button on the inner hoop. 2. The fabric should be taut in the center A of the lower edge... the fabric and close the quick release. Remove the inner hoop. Close the quick release. Embroidery preparations 5:3 Push the inner hoop Àrmly into place. To hoop the fabric For the best embroidery results, place a layer of the outer hoop by turning the retaining screw (B). To remove ...
...193;at surface with the small arrow at the bottom edge. 3. Place the inner hoop on the hoop Slide the hoop onto the embroidery unit from the embroidery arm, press the grey button on the inner hoop. 2. The fabric should be taut in the center A of the lower edge... the fabric and close the quick release. Remove the inner hoop. Close the quick release. Embroidery preparations 5:3 Push the inner hoop Àrmly into place. To hoop the fabric For the best embroidery results, place a layer of the outer hoop by turning the retaining screw (B). To remove ...

Owner's Manual
Page 49
...block (total number of colors) 4. Design height 8. The stitch-out view will automatically open. After loading a design there are shown in embroidery mode - Embroidery Àeld 2. Design width 7. Color list (C) All colors in the loaded design are two views available in the order they will be...the colors in the hoop. Each listed color shows order, name and thread type. Hoop options 1 2 3 4 5 Stitch-out view Embroidery edit view Press the alternatives button to toggle to have been changed from the center position in the list. Monochrome Note: Values that have the...
...block (total number of colors) 4. Design height 8. The stitch-out view will automatically open. After loading a design there are shown in embroidery mode - Embroidery Àeld 2. Design width 7. Color list (C) All colors in the loaded design are two views available in the order they will be...the colors in the hoop. Each listed color shows order, name and thread type. Hoop options 1 2 3 4 5 Stitch-out view Embroidery edit view Press the alternatives button to toggle to have been changed from the center position in the list. Monochrome Note: Values that have the...

Owner's Manual
Page 50
...you load will be created with this may create a Àle path that is one . You can load .vp3 embroidery Àles and .vf3 embroidery font Àles. 2. Font Àle name 2. Alphabet 2 5 3 6 4. Embroidery stitch-out Load a design 1. Use the arrow buttons to select a folder and then press OK to conÀ... sure not to conÀrm. When trying to keep the Àle name short. Load a font Text can be loaded onto the embroidery Àeld in embroidery stitch-out. The font will not open such a Àle or folder, an alarm sound will be heard and the Àle or...
...you load will be created with this may create a Àle path that is one . You can load .vp3 embroidery Àles and .vf3 embroidery font Àles. 2. Font Àle name 2. Alphabet 2 5 3 6 4. Embroidery stitch-out Load a design 1. Use the arrow buttons to select a folder and then press OK to conÀ... sure not to conÀrm. When trying to keep the Àle name short. Load a font Text can be loaded onto the embroidery Àeld in embroidery stitch-out. The font will not open such a Àle or folder, an alarm sound will be heard and the Àle or...

Owner's Manual
Page 51
.... Each press of where the design will be embroidered. Create your selections by selecting letters using the arrow buttons. 2. ConÀrm your embroidery text by pressing OK. 3. A popup will therefor appear asking if you have the appearance of the text. buttons to step forward and backwards... stitch by stitch in embroidery mode will be cancelled if you want to sew your adjustments will be kept. Orbit to check position (3) Orbiting can be used to the...
.... Each press of where the design will be embroidered. Create your selections by selecting letters using the arrow buttons. 2. ConÀrm your embroidery text by pressing OK. 3. A popup will therefor appear asking if you have the appearance of the text. buttons to step forward and backwards... stitch by stitch in embroidery mode will be cancelled if you want to sew your adjustments will be kept. Orbit to check position (3) Orbiting can be used to the...

Owner's Manual
Page 52
...backwards, allowing you , making it easier to select the park position option and press OK. Park position When you have Ànished your authorized PFAFF® dealer. Use the wheel to trim fabric when embroidering an appliqué. Cut position Cut position will be dashed. 2. Use the wheel ...the hoop options menu. You can also press the start/stop button once to return to the current stitch and start embroidering again where the embroidery was interrupted, open the bobbin cover and replace the bobbin. Use the wheel to embroider. Hoop options (4) Use the F2 button to ...
...backwards, allowing you , making it easier to select the park position option and press OK. Park position When you have Ànished your authorized PFAFF® dealer. Use the wheel to trim fabric when embroidering an appliqué. Cut position Cut position will be dashed. 2. Use the wheel ...the hoop options menu. You can also press the start/stop button once to return to the current stitch and start embroidering again where the embroidery was interrupted, open the bobbin cover and replace the bobbin. Use the wheel to embroider. Hoop options (4) Use the F2 button to ...


